1.安装node、vue这些最基础最简单的安装的就一一省略过。
1.4 安装 Mock
2.新建一个vue工程,打开cmd cd到工程目录下,或者在文件夹选中项目工程同时按住Ctrl+shift键,右击选中的项目找到【在此处打开powershell窗口】,点击打开
效果如下:
执行命令: vue init webpack
? Generate project in current directory? Yes 选择Yes
? Project name (project2) 你的项目名称
? Project description (A Vue.js project) 项目的描述
? Author (xxx<xxx@xx-xxxxx>) 作者
? Vue build (Use arrow keys)
> Runtime + Compiler: recommended for most users
Runtime-only: about 6KB lighter min+gzip, but templates (or any Vue-specific HTML) are ONLY allowed in .vue files - r
ender functions are required elsewhere
直接回车,
? Install vue-router? (Y/n) 是否要安装路由,看个人情况安装,一般选择安装
? Use ESLint to lint your code? (Y/n) 是否用ESLint 检测代码,学习使用可以选择N,因为安装之后对语法要求非常严格,可能发生不必要的警告或错误,真正项目开发时一定要开启来。
? Set up unit tests (Y/n) 是否要安装测试过程,因情况而定。
? Setup e2e tests with Nightwatch? (Y/n) 因情况而定。
接下来就是一直回车 ----》等待安装完成
2.1 安装 axios axios具体怎么用,语法是什么请参考官方文档:https://www.npmjs.com/package/axios 英文看不懂???没关系!参考:https://www.kancloud.cn/yunye/axios/234845
执行命令:npm install --save axios 等待安装完毕
vue main.js配置
导入axios ===>
import Axios from 'axios'
挂载到原型身上:
Vue.prototype.$axios=Axios;//异步组件挂载到原型
配置完成之后axios就已经安装完成了。
如何使用????
 this.$axios.get("请求url地址").then((response)=>{
      console.log(response);//请求成功的数据
    }).catch((error)=> {
        console.log(error);//请求失败的错误信息
    });
使用如此简单还在等什么
2.2 安装 Element-Ui 插件  Element-UI是做什么的呢???它是一款前端UI框架,如何使用???请参考官方文档:http://element-cn.eleme.io/#/zh-CN
执行命令:npm i element-ui -S 等待安装完毕
vue main.js配置
导入element-ui===>
import Element from 'element-ui'
import 'element-ui/lib/theme-chalk/index.css';
Vue.use(Element);

配置完成,就可以使用了,使用方法参考文档

2.3 安装qs  qs 是个工具插件,axios post请求时要用到
 执行命令:npm install qs  等待安装完毕
vue main.js配置
导入qs===>
import QS from 'qs'

以上三个插件安装完毕,接下来就是终极配置了。
vue  main.js配置
// 超时时间
Axios.defaults.timeout = 5000;
// http请求拦截器
Axios.interceptors.request.use(config => {
  if(config.method=='post'){
    config.data=QS.stringify(config.data);//防止post请求参数无法传到后台  在这里就用到了qs
  }
  let loading = Element.Loading.service({//使用element-ui的加载条组件
    fullscreen: true,
    text: '拼命加载中...',
  });
  return config
}, error => {
  let loading = Element.Loading.service({});
  loading.close();    //关闭加载前,记得重新定义实例
  return Promise.reject(error)
});
// http响应拦截器
Axios.interceptors.response.use(data => {
  let loading = Element.Loading.service({});
  loading.close();
  return data
}, error => {
  let loading = Element.Loading.service({
    fullscreen: true,
    text: '拼命加载中...',
  });
  loading.close();
  return Promise.reject(error)
});
2.4 安装 mock 插件,mock 插件是做什么的???  请看官方文档:http://mockjs.com/
命令安装: npm install mockjs  等待安装完毕

如何使用??
在vue 工程下新建一个mock.js的文件,文件名名称为什么要用mock?文件名如何命名无所谓自己喜欢就好。
mock.js里面怎么写?请参考如下代码:
//引入mockjs
const Mock = require('mockjs')
//使用mockjs模拟数据
Mock.mock('/api/data',{
  'foods|10-50': [{
    'name': "@ctitle(2,10)",
    "img": "@image('600x600',#b7ef7c)",
    "brief": "@csentence(1,50)",
    "price|0-20.0-2": 1,
    "num": 0,
    "minusFlag": true,
    "time": "@time",
    "peisongfei|0-100.0-2": 1,
    "limit|0-50": 1
  }]
});
Mock.setup({
  timeout: 2000//请求两秒后才加载数据
});
语法请参考官方文档
在vue main.js 配置如下:
require('./mock')//此部分引入的是我们所编写的mockjs文档    此处一定要加载进来,重要、重要、重要

接下来就可以在其他.vue页面肆无忌惮的使用了。
如何使用?? look
export default {
name: 'HelloWorld',
data () {
return {
msg: 'Welcome to Your Vue.js App'
}
},
created(){
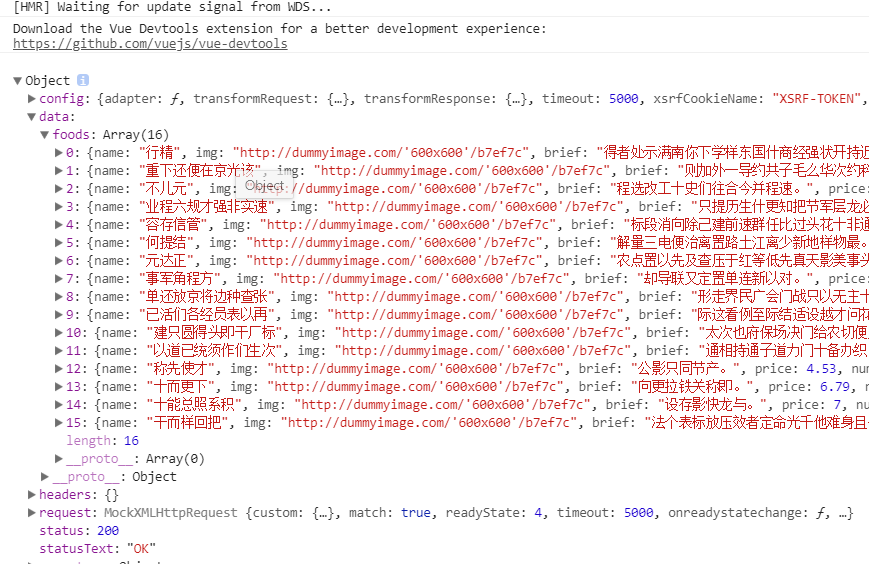
this.$axios.get("/api/data").then((response)=>{
console.log(response);
}).catch((error)=> {
console.log(error);
});
}
}
效果: