nginx可以使用各平台的默认包来安装,本文是介绍使用源码编译安装,包括具体的编译参数信息。
正式开始前,编译环境gcc g++ 开发库之类的需要提前装好,这里默认你已经装好。
ububtu平台编译环境可以使用以下指令
apt-get install build-essential
apt-get install libtool
centos平台编译环境使用如下指令
安装make:
yum -y install gcc automake autoconf libtool make
安装g++:
yum install gcc gcc-c++
下面正式开始
---------------------------------------------------------------------------
一般我们都需要先装pcre, zlib,前者为了重写rewrite,后者为了gzip压缩。
1.选定源码目录
可以是任何目录,本文选定的是/usr/local/src
cd /usr/local/src
2.安装PCRE库
首先去官网下载pcre的安装包
如果通过FTP的方式,下载地址为:ftp://ftp.csx.cam.ac.uk/pub/software/programming/pcre/
如果通过http的方式,下载地址为:http://sourceforge.net/projects/pcre/files/pcre/
目前最新的版本为8.32,linux对应的安装包名称为:pcre-8.32.tar.gz。
ftp://ftp.csx.cam.ac.uk/pub/software/programming/pcre/ 下载最新的 PCRE 源码包,使用下面命令下载编译和安装 PCRE 包:
1 cd /usr/local/src
2 wget ftp://ftp.csx.cam.ac.uk/pub/software/programming/pcre/pcre-8.37.tar.gz
3 tar -zxvf pcre-8.37.tar.gz
4 cd pcre-8.34
5 ./configure
6 make
7 make install
3.安装zlib库
官网:http://zlib.net/
下载地址:http://prdownloads.sourceforge.net/libpng/zlib-1.2.8.tar.gz?download
http://zlib.net/zlib-1.2.8.tar.gz 下载最新的 zlib 源码包,使用下面命令下载编译和安装 zlib包:
1 cd /usr/local/src
2
3 wget http://zlib.net/zlib-1.2.8.tar.gz
4 tar -zxvf zlib-1.2.8.tar.gz
5 cd zlib-1.2.8
6 ./configure
7 make
8 make install
4.安装ssl(某些vps默认没装ssl)
1 cd /usr/local/src
2 wget https://www.openssl.org/source/openssl-1.0.1t.tar.gz
3 tar -zxvf openssl-1.0.1t.tar.gz
5.安装nginx
下载地址:https://nginx.org/download/
Nginx 一般有两个版本,分别是稳定版和开发版,您可以根据您的目的来选择这两个版本的其中一个,下面是把 Nginx 安装到 /usr/local/nginx 目录下的详细步骤:
cd /usr/local/src
wget http://nginx.org/download/nginx-1.4.2.tar.gz
tar -zxvf nginx-1.4.2.tar.gz
cd nginx-1.4.2

./configure --prefix=/usr/local/nginx
--sbin-path=/usr/local/nginx/nginx
--conf-path=/usr/local/nginx/nginx.conf
--pid-path=/usr/local/nginx/nginx.pid
--with-http_ssl_module
--with-pcre=/usr/local/src/pcre-8.37
--with-zlib=/usr/local/src/zlib-1.2.8
--with-openssl=/usr/local/src/openssl-1.0.1t

make
make install
--with-pcre=/usr/src/pcre-8.34 指的是pcre-8.34 的源码路径。
--with-zlib=/usr/src/zlib-1.2.7 指的是zlib-1.2.7 的源码路径。
安装成功后 /usr/local/nginx 目录下如下
1 fastcgi.conf            koi-win             nginx.conf.default
2 fastcgi.conf.default    logs                scgi_params
3 fastcgi_params          mime.types          scgi_params.default
4 fastcgi_params.default  mime.types.default  uwsgi_params
5 html                    nginx               uwsgi_params.default
6 koi-utf                 nginx.conf          win-utf
6.启动
确保系统的 80 端口没被其他程序占用,运行/usr/local/nginx/nginx 命令来启动 Nginx,
netstat -ano|grep 80
如果查不到结果后执行,有结果则忽略此步骤(ubuntu下必须用sudo启动,不然只能在前台运行)
sudo /usr/local/nginx/nginx
打开浏览器访问此机器的 IP,如果浏览器出现 Welcome to nginx! 则表示 Nginx 已经安装并运行成功。

-----------------------------------------------------
到这里nginx就安装完成了,如果只是处理静态html就不用继续安装了
如果你需要处理php脚本的话,还需要安装php-fpm。
下面安装排错
附:可能遇到的错误和一些帮助信息
1.1编译pcre错误
1 libtool: compile: unrecognized option `-DHAVE_CONFIG_H'
2 libtool: compile: Try `libtool --help' for more information.
3 make[1]: *** [pcrecpp.lo] Error 1
4 make[1]: Leaving directory `/usr/local/src/pcre-8.34'
5 make: *** [all] Error 2
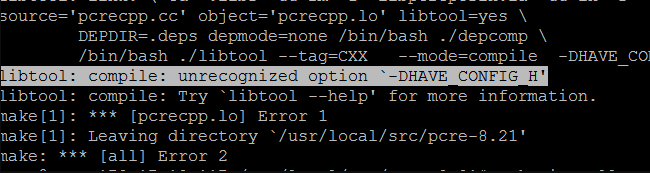
解决办法:安装g++,别忘了重新configure
1 apt-get install g++
2 apt-get install build-essential
3 make clean
4 ./configure
5 make
1.2 make出错
1 make: *** No rule to make target `build', needed by `default'.  Stop.
2 ./configure: error: SSL modules require the OpenSSL library.
3 You can either do not enable the modules, or install the OpenSSL library
4 into the system, or build the OpenSSL library statically from the source
5 with nginx by using --with-openssl=<path> option.
按照第4步的安装方法或
ubuntu下
apt-get install openssl
apt-get install libssl-dev
centos下
yum -y install openssl openssl-devel
2.nginx编译选项
make是用来编译的,它从Makefile中读取指令,然后编译。
make install是用来安装的,它也从Makefile中读取指令,安装到指定的位置。
configure命令是用来检测你的安装平台的目标特征的。它定义了系统的各个方面,包括nginx的被允许使用的连接处理的方法,比如它会检测你是不是有CC或GCC,并不是需要CC或GCC,它是个shell脚本,执行结束时,它会创建一个Makefile文件。nginx的configure命令支持以下参数:
--prefix=定义一个目录,存放服务器上的文件 ,也就是nginx的安装目录。默认使用path/usr/local/nginx。--sbin-path=设置nginx的可执行文件的路径,默认为pathprefix/sbin/nginx--conf-path=设置在nginx.conf配置文件的路径。nginx允许使用不同的配置文件启动,通过命令行中的-c选项。默认为pathprefix/conf/nginx.conf--pid-path=path 设置nginx.pid文件,将存储的主进程的进程号。安装完成后,可以随时改变的文件名 , 在nginx.conf配置文件中使用 PID指令。默认情况下,文件名 为prefix/logs/nginx.pid--error-log-path=设置主错误,警告,和诊断文件的名称。安装完成后,可以随时改变的文件名 ,在nginx.conf配置文件中 使用 的error_log指令。默认情况下,文件名 为pathprefix/logs/error.log--http-log-path=设置主请求的HTTP服务器的日志文件的名称。安装完成后,可以随时改变的文件名 ,在nginx.conf配置文件中 使用 的access_log指令。默认情况下,文件名 为pathprefix/logs/access.log--user=设置nginx工作进程的用户。安装完成后,可以随时更改的名称在nginx.conf配置文件中 使用的 user指令。默认的用户名是nobody。name--group=设置nginx工作进程的用户组。安装完成后,可以随时更改的名称在nginx.conf配置文件中 使用的 user指令。默认的为非特权用户。name--with-select_module--without-select_module 启用或禁用构建一个模块来允许服务器使用select()方法。该模块将自动建立,如果平台不支持的kqueue,epoll,rtsig或/dev/poll。--with-poll_module--without-poll_module启用或禁用构建一个模块来允许服务器使用poll()方法。该模块将自动建立,如果平台不支持的kqueue,epoll,rtsig或/dev/poll。--without-http_gzip_module— 不编译压缩的HTTP服务器的响应模块。编译并运行此模块需要zlib库。--without-http_rewrite_module不编译重写模块。编译并运行此模块需要PCRE库支持。--without-http_proxy_module— 不编译http_proxy模块。--with-http_ssl_module— 使用https协议模块。默认情况下,该模块没有被构建。建立并运行此模块的OpenSSL库是必需的。--with-pcre=— 设置PCRE库的源码路径。PCRE库的源码(版本4.4 - 8.30)需要从PCRE网站下载并解压。其余的工作是Nginx的./ configure和make来完成。正则表达式使用在location指令和 ngx_http_rewrite_module 模块中。path--with-pcre-jit—编译PCRE包含“just-in-time compilation”(1.1.12中, pcre_jit指令)。--with-zlib=—设置的zlib库的源码路径。要下载从 zlib(版本1.1.3 - 1.2.5)的并解压。其余的工作是Nginx的./ configure和make完成。ngx_http_gzip_module模块需要使用zlib 。path--with-cc-opt=— 设置额外的参数将被添加到CFLAGS变量。例如,当你在FreeBSD上使用PCRE库时需要使用:parameters--with-cc-opt="-I /usr/local/include。.如需要需要增加select()支持的文件数量:--with-cc-opt="-D FD_SETSIZE=2048".--with-ld-opt=—设置附加的参数,将用于在链接期间。例如,当在FreeBSD下使用该系统的PCRE库,应指定:parameters--with-ld-opt="-L /usr/local/lib".
典型实例(下面为了展示需要写在多行,执行时内容需要在同一行)
1 ./configure
2     --sbin-path=/usr/local/nginx/nginx
3     --conf-path=/usr/local/nginx/nginx.conf
4     --pid-path=/usr/local/nginx/nginx.pid
5     --with-http_ssl_module
6     --with-pcre=../pcre-4.4
7     --with-zlib=../zlib-1.1.3
转载:http://www.nginx.cn/install
最后补充:
启动nginx
关闭防火墙
setenforce 0
systemctl stop firewalld
systemctl disable firewalld

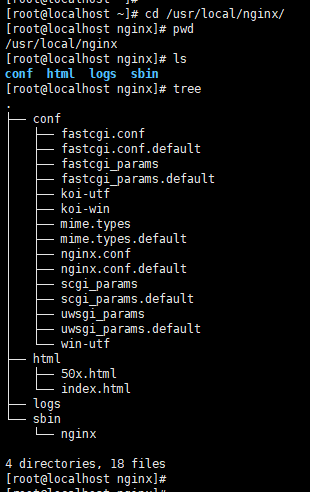
进入到安装目录/usr/local/nginx,查看目录结构
cd /usr/local/nginx
pwd
ls
启动Nginx
/usr/local/nginx/sbin/nginx
查看Nginx进程是否启动
ps aux | grep nginx

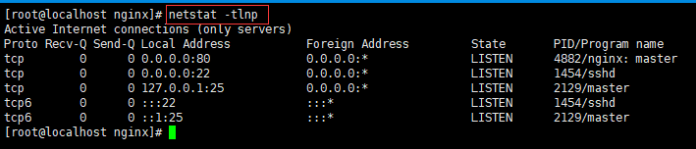
查看Nginx占用的端口号
netstat -tlnp
使用本地主机访问虚拟机上的Nginx服务器
停止nginx
停止Nginx的三种方式
# 1. 立即停止Nginx服务
/usr/local/nginx/sbin/nginx -s stop

# 2.完成当前任务后停止
/usr/local/nginx/sbin/nginx -s quit

# 3.杀死Nginx进程
killall nginx
把nginx命令添加到环境变量
使用软连接将nginx链接到/usr/local/sbin
ln -s /usr/local/nginx/sbin/nginx /usr/local/sbin
ll /usr/local/sbin/ | grep "nginx"

显示当前环境变量PATH
echo $PATH
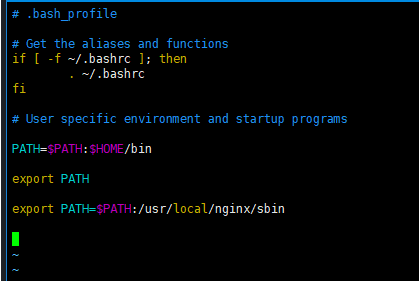
编辑.bash_profile文件
vim ~/.bash_profile
在.bash_profile文件末尾加入以下内容
export PATH=$PATH:/usr/local/nginx/sbin
引用.bash_profile文件
source ~/.bash_profile
使用nginx命令
# 启动nginx
nginx
# 停止nginx
nginx -s quit
把nginx命令添加到系统服务
创建并编辑文件/root/service-nginx.sh
#!/bin/sh
#
# filename: service-nginx.sh
#
# nginx - this script starts and stops the nginx daemon
#
# chkconfig:   - 85 15
# description:  NGINX is an HTTP(S) server, HTTP(S) reverse
#               proxy and IMAP/POP3 proxy server
# processname: nginx
# config:      /etc/nginx/nginx.conf
# config:      /etc/sysconfig/nginx
# pidfile:     /var/run/nginx.pid

# Source function library.
. /etc/rc.d/init.d/functions

# Source networking configuration.
. /etc/sysconfig/network

# Check that networking is up.
[ "$NETWORKING" = "no" ] && exit 0

#nginx="/usr/sbin/nginx"
nginx="/usr/local/sbin/nginx"
prog=$(basename $nginx)

#NGINX_CONF_FILE="/etc/nginx/nginx.conf"
NGINX_CONF_FILE="/usr/local/nginx/conf/nginx.conf"

[ -f /etc/sysconfig/nginx ] && . /etc/sysconfig/nginx

lockfile=/var/lock/subsys/nginx

make_dirs() {
   # make required directories
   user=`$nginx -V 2>&1 | grep "configure arguments:.*--user=" | sed 's/[^*]*--user=([^ ]*).*/1/g' -`
   if [ -n "$user" ]; then
      if [ -z "`grep $user /etc/passwd`" ]; then
         useradd -M -s /bin/nologin $user
      fi
      options=`$nginx -V 2>&1 | grep 'configure arguments:'`
      for opt in $options; do
          if [ `echo $opt | grep '.*-temp-path'` ]; then
              value=`echo $opt | cut -d "=" -f 2`
              if [ ! -d "$value" ]; then
                  # echo "creating" $value
                  mkdir -p $value && chown -R $user $value
              fi
          fi
       done
    fi
}

start() {
    [ -x $nginx ] || exit 5
    [ -f $NGINX_CONF_FILE ] || exit 6
    make_dirs
    echo -n $"Starting $prog: "
    daemon $nginx -c $NGINX_CONF_FILE
    retval=$?
    echo
    [ $retval -eq 0 ] && touch $lockfile
    return $retval
}

stop() {
    echo -n $"Stopping $prog: "
    killproc $prog -QUIT
    retval=$?
    echo
    [ $retval -eq 0 ] && rm -f $lockfile
    return $retval
}

restart() {
    configtest || return $?
    stop
    sleep 1
    start
}

reload() {
    configtest || return $?
    echo -n $"Reloading $prog: "
    killproc $nginx -HUP
    RETVAL=$?
    echo
}

force_reload() {
    restart
}

configtest() {
  $nginx -t -c $NGINX_CONF_FILE
}

rh_status() {
    status $prog
}

rh_status_q() {
    rh_status >/dev/null 2>&1
}

case "$1" in
    start)
        rh_status_q && exit 0
        $1
        ;;
    stop)
        rh_status_q || exit 0
        $1
        ;;
    restart|configtest)
        $1
        ;;
    reload)
        rh_status_q || exit 7
        $1
        ;;
    force-reload)
        force_reload
        ;;
    status)
        rh_status
        ;;
    condrestart|try-restart)
        rh_status_q || exit 0
            ;;
    *)
        echo $"Usage: $0 {start|stop|status|restart|condrestart|try-restart|reload|force-reload|configtest}"
        exit 2
esac
# END
用/root/service-nginx.sh替换/etc/init.d/nginx
mv /root/service-nginx.sh /etc/init.d/nginx
赋予可执行限权
chmod 755 /etc/init.d/nginx
执行
systemctl start nginx
源码方式安装nginx,自动化安装脚本
#!/bin/bash

# installation configuration
NGINX_VERSION=1.12.2
NGINX_SRC_PATH=/root
NGINX_BIN_PATH=/usr/local/nginx

# disable firewall
systemctl stop firewalld
setenforce 0

# installation dependence
yum install -y pcre-devel zlib-devel openssl-devel wget gcc

# download nginx source package
cd ${NGINX_SRC_PATH}
wget http://nginx.org/download/nginx-${NGINX_VERSION}.tar.gz

# unzip source package
tar -xzvf nginx-${NGINX_VERSION}.tar.gz
cd ./nginx-${NGINX_VERSION}

# install nginx
./configure --prefix=${NGINX_BIN_PATH} --with-http_ssl_module
make & make install

# start nginx service
cd ${NGINX_BIN_PATH}/sbin
./nginx

# END