Upsample(上采样,插值)
Upsample
torch.nn.Upsample(size=None, scale_factor=None, mode='nearest', align_corners=None)
Upsamples a given multi-channel 1D (temporal), 2D (spatial) or 3D (volumetric) data.
对给定的多通道1D(时间)、2D(空间)或3D(容量)数据进行上采样。
The input data is assumed to be of the form minibatch x channels x [optional depth] x [optional height] x width. Hence, for spatial inputs, we expect a 4D Tensor and for volumetric inputs, we expect a 5D Tensor.
输入格式:
一维数据 [N, C, W]
二维数据 [N, C, H, W]
三维数据 [N, C, D, H, W]
The algorithms available for upsampling are nearest neighbor and linear, bilinear, bicubic and trilinear for 3D, 4D and 5D input Tensor, respectively.
Upsample可用的算法是最近邻和线性,双线性,双三次和三线性插值算法。
One can either give a scale_factor or the target output size to calculate the output size. (You cannot give both, as it is ambiguous)
可以给出scale_factor或目标输出大小来计算输出大小(不能同时给出两者)。
参数说明:
size: (int or Tuple[int] or Tuple[int, int] or Tuple[int, int, int], optional) – output spatial sizes
scale_factor :(float or Tuple[float] or Tuple[float, float] or Tuple[float, float, float],optional) – multiplier for spatial size. Has to match input size if it is a tuple.
输出尺寸可以指定size,也可以通过缩放的倍数指定。
mode: (str, optional) – the upsampling algorithm: one of 'nearest', 'linear', 'bilinear', 'bicubic' and 'trilinear'. Default: 'nearest'
align_corners (bool, optional) – if True, the corner pixels of the input and output tensors are aligned, and thus preserving the values at those pixels. This only has effect when mode is 'linear', 'bilinear', or 'trilinear'. Default: False
输入输出形状:

注意:
在align_corners = True的情况下,线性插值模式(线性,双线性,双三次和三线性)不会按比例对齐输出像素和输入像素,因此输出值可能取决于输入大小。 这是这些模式(0.3.1版之前)的默认行为。 从那时起,默认行为是align_corners = False。 有关如何影响输出的具体示例,请参见下文。
关于align_corners的解释参考知乎这篇文章。
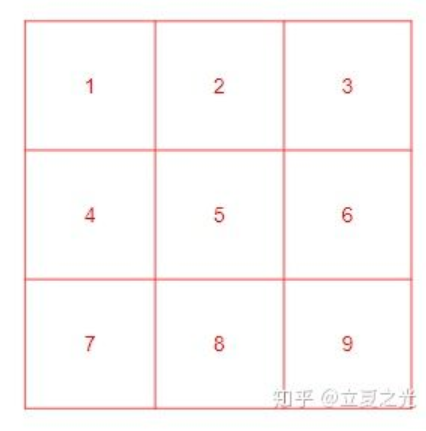
输入为:
对它上采样两倍后,得到下图:
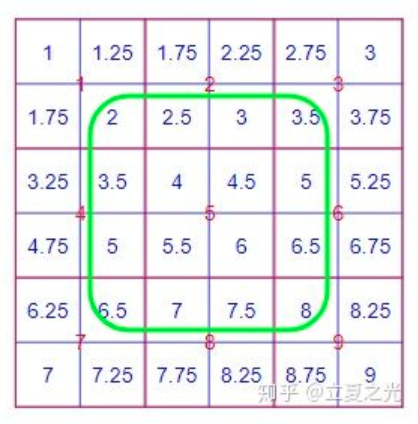
首先介绍 align_corners=False,它是 pytorch 中 interpolate 的默认选项。这种设定下,我们认定像素值位于像素块的中心。首先观察绿色框内的像素,我们会发现它们严格遵守了 bilinear 的定义。而对于角上的四个点,其像素值保持了原图的值。边上的点则根据角点的值,进行了 bilinear 插值。所以,我们从全局来看,内部和边缘处采用了比较不同的规则。
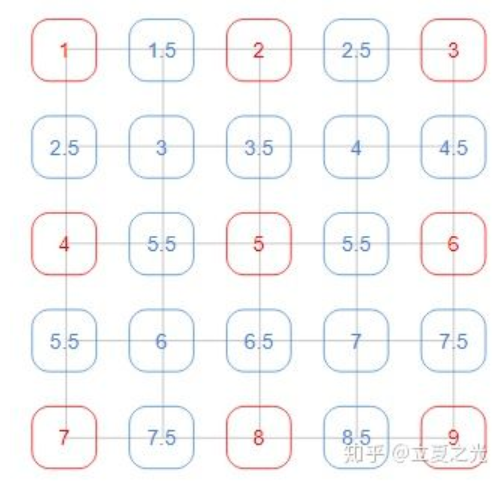
在 align_corners=True世界观里,像素值位于网格上,如上图所示:
这里仔细的读者会发现,3*3 的图像上采两倍后,变成了 5*5。更广泛地来讲,对于输入尺寸是 (2x+1) * (2x+1) 的图片,其经过 align_corners=True 的上采样后,尺寸变为 (4x+1) * (4x+1)。所以虽然内容上整齐了,外在的数目上,却没了那种 2 的整数次幂的美感。(注:这里指定了输出为5x5)
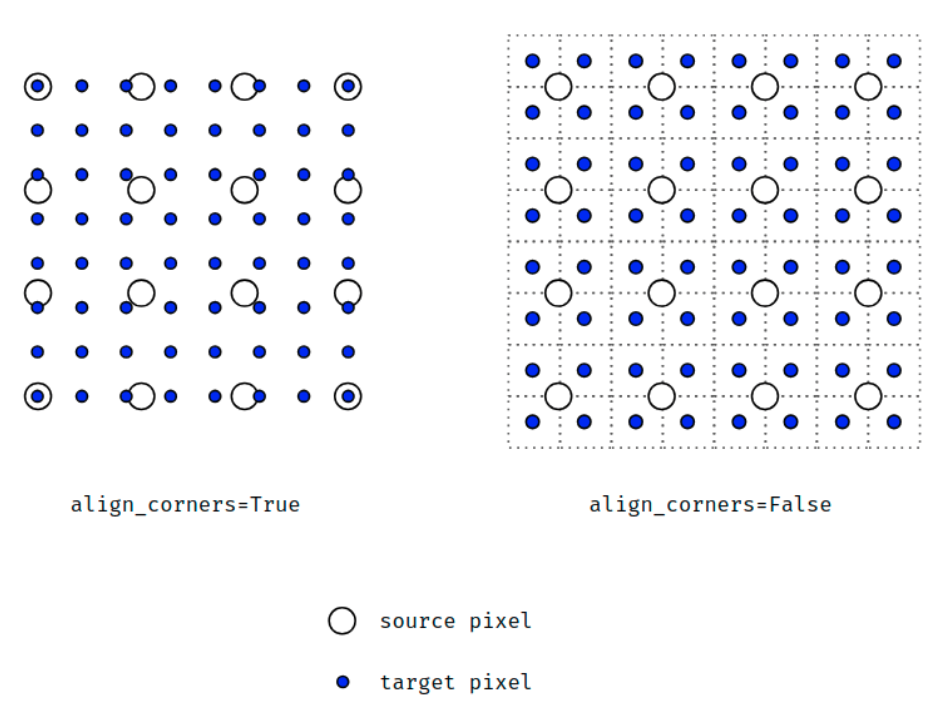
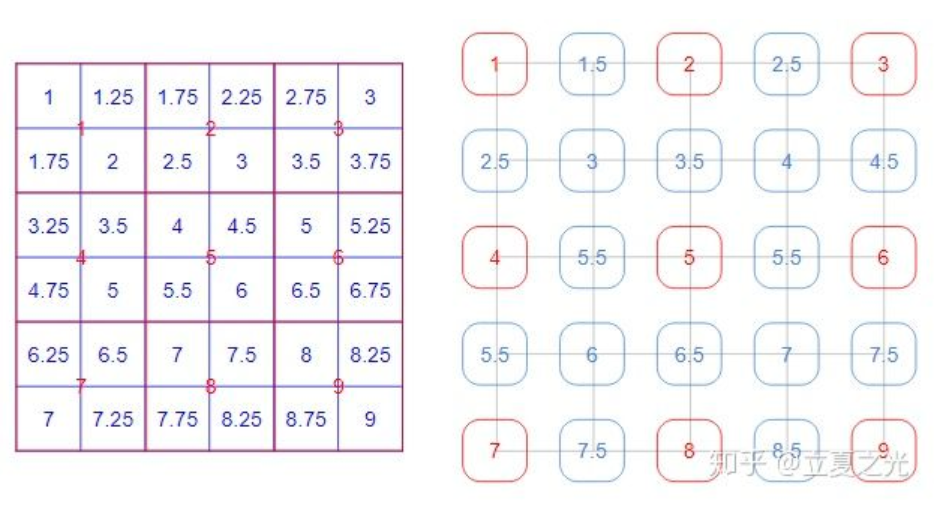
- 当**align_corners = True**时,像素被视为网格的格子上的点,拐角处的像素对齐.可知是点之间是等间距的
- 当**align_corners = False**时, 像素被视为网格的交叉线上的点, 拐角处的点依然是原图像的拐角像素,但是插值的点间却按照上图的取法取,导致点与点之间是不等距的
如果要下采样/常规调整大小,则应使用interpolate()。
UpsamplingNearest2d
torch.nn.UpsamplingNearest2d(size=None, scale_factor=None)
UpsamplingBilinear2d
torch.nn.UpsamplingBilinear2d(size=None, scale_factor=None)
ConvTranspose(转置卷积)
torch.nn.ConvTranspose1d
torch.nn.ConvTranspose1d(in_channels, out_channels, kernel_size, stride=1, padding=0, output_padding=0, groups=1, bias=True, dilation=1, padding_mode='zeros')
对由多个输入平面组成的输入图像应用1D转置卷积算子。
这个模块可以看作是相对于其输入的Conv1d的梯度。它也被称为分数步卷积或反卷积、去卷积(尽管它不是一个实际的数学上的反卷积操作)。
Parameters:
in_channels (int) – Number of channels in the input image
out_channels (int) – Number of channels produced by the convolution
kernel_size (int or tuple) – Size of the convolving kernel
stride (int or tuple, optional) – Stride of the convolution. Default: 1 控制交叉相关的步幅。
padding (int or tuple, optional) – dilation * (kernel_size - 1) - padding zero-padding will be added to both sides of the input. Default: 0 控制两侧的隐式零填充量dilation * (kernel_size - 1) - padding。 有关详细信息,请参见下面的注释。
output_padding (int or tuple, optional) – Additional size added to one side of the output shape. Default: 0 控制添加到输出形状一侧的附加大小。详情请参阅下面的说明。
groups (int, optional) – Number of blocked connections from input channels to output channels. Default: 1 控制输入和输出之间的连接。 in_channels和out_channels必须都可以被groups整除。
bias (bool, optional) – If True, adds a learnable bias to the output. Default: True
dilation (int or tuple, optional) – Spacing between kernel elements. Default: 1 controls the spacing between the kernel points; also known as the à trous algorithm. It is harder to describe, but this link has a nice visualization of what dilation does. 控制卷积核核点之间的间隔,也被称为à trous算法。这很难描述,但是这个链接很好地展示了膨胀的作用。
注意:
Depending of the size of your kernel, several (of the last) columns of the input might be lost, because it is a valid cross-correlation, and not a full cross-correlation. It is up to the user to add proper padding.
根据卷积核的大小,输入的(最后一列)几列可能会丢失,因为它是有效的互相关,而不是完整的互相关。 用户可以自行添加适当的填充。
The padding argument effectively adds dilation * (kernel_size - 1) - padding amount of zero padding to both sides of the input. This is set so that when a Conv1d and a ConvTranspose1d are initialized with same parameters, they are inverses of each other in regard to the input and output shapes. However, when stride > 1, Conv1d maps multiple input shapes to the same output shape. output_padding is provided to resolve this ambiguity by effectively increasing the calculated output shape on one side. Note that output_padding is only used to find output shape, but does not actually add zero-padding to output.
padding参数有效地将diation *(kernel_size-1)-padding个零填充的填充量添加到输入的两侧。 进行设置是为了使Conv1d和ConvTranspose1d用相同的参数初始化时,它们在输入和输出形状方面彼此相反。 但是,当stride> 1时,Conv1d会将多个输入形状映射到相同的输出形状。 提供output_padding可以通过有效地增加一侧的计算输出形状来解决这种歧义。 请注意,output_padding仅用于查找输出形状,但实际上并未向输出添加零填充。
In some circumstances when using the CUDA backend with CuDNN, this operator may select a nondeterministic algorithm to increase performance. If this is undesirable, you can try to make the operation deterministic (potentially at a performance cost) by setting torch.backends.cudnn.deterministic = True. Please see the notes on Reproducibility for background.
在某些情况下,将CUDA后端与CuDNN一起使用时,该运算符可能会选择不确定的算法来提高性能。 如果不希望这样做,则可以通过将torch.backends.cudnn.deterministic = True设置为确定性操作(可能以性能为代价)。 请参阅有关可重现性的说明作为背景。
输入输出形状:
Input: (N, Cin, Lin)
Output: (N,Cout,Lout) where
Lout=(Lin−1)×stride−2×padding+dilation×(kernel_size−1)+output_padding+1
Variables
ConvTranspose1d.weight (Tensor)
ConvTranspose1d.bias (Tensor)
torch.nn.ConvTranspose2d
torch.nn.ConvTranspose2d(in_channels, out_channels, kernel_size, stride=1, padding=0, output_padding=0, groups=1, bias=True, dilation=1, padding_mode='zeros')
The parameters kernel_size, stride, padding, output_padding can either be:
-
a single
int– in which case the same value is used for the height and width dimensions 高宽两个方向参数相同 -
a
tupleof two ints – in which case, the first int is used for the height dimension, and the second int for the width dimension分别为高宽两个方向指定参数
Shape:
- Input: (N,Cin,Hin,Win)
- Output: (N,Cout,Hout,Wout) where
Hout=(Hin−1)×stride[0]−2×padding[0]+dilation[0]×(kernel_size[0]−1)+output_padding[0]+1
Hout=(Hin−1)×stride[0]−2×padding[0]+dilation[0]×(kernel_size[0]−1)+output_padding[0]+1
torch.nn.ConvTranspose3d
torch.nn.ConvTranspose3d(in_channels, out_channels, kernel_size, stride=1, padding=0, output_padding=0, groups=1, bias=True, dilation=1, padding_mode='zeros')
ConvTranspose2d原理,深度网络如何进行上采样?
unpooling(上池化)
另一种上采样的方法是,参考代码:segnet_pytorch:
        # Stage 5
        x51 = F.relu(self.bn51(self.conv51(x4p)))
        x52 = F.relu(self.bn52(self.conv52(x51)))
        x53 = F.relu(self.bn53(self.conv53(x52)))
        #这个id5记录的是池化操作时最大值的index,其要设置参数return_indices为True
        x5p, id5 = F.max_pool2d(x53,kernel_size=2, stride=2,return_indices=True)


        # Stage 5d
        #这个是进行最大值上采样的函数,其是根据id5来把值放到什么位置,其它位置没有值的地方
        #补0
        x5d = F.max_unpool2d(x5p, id5, kernel_size=2, stride=2)
        x53d = F.relu(self.bn53d(self.conv53d(x5d)))
        x52d = F.relu(self.bn52d(self.conv52d(x53d)))
        x51d = F.relu(self.bn51d(self.conv51d(x52d)))
测试:
#测试上采样
m=nn.MaxPool2d((3,3),stride=(1,1),return_indices=True)
upm=nn.MaxUnpool2d((3,3),stride=(1,1))
data4=torch.randn(1,1,3,3)
output5,indices=m(data4)
output6=upm(output5,indices)

print('
data4:',data4,
      '
maxPool2d',output5,
      '
indices:',indices,
      '
output6:',output6)
其输出为:
data4: tensor([[[[ 2.3151, -1.0391,  0.1074],
          [ 1.9360,  0.2524,  2.3735],
          [-0.1151,  0.4684, -1.8800]]]])
maxPool2d tensor([[[[2.3735]]]])
indices: tensor([[[[5]]]])
output6: tensor([[[[0.0000, 0.0000, 0.0000],
          [0.0000, 0.0000, 2.3735],
          [0.0000, 0.0000, 0.0000]]]])
通过转置卷积或upsample+卷积的方式上采样:
def upconv2x2(in_channels, out_channels, mode='transpose'):
    if mode == 'transpose':
        # 这个上采用需要设置其输入通道,输出通道.其中kernel_size、stride
        # 大小要跟对应下采样设置的值一样大小。这样才可恢复到相同的wh。这里时反卷积
        # 操作。
        return nn.ConvTranspose2d(
            in_channels,
            out_channels,
            kernel_size=2,
            stride=2)
    else:
        # out_channels is always going to be the same
        # as in_channels
        # 这里不会改变通道数,其中scale_factor是上采用的放大因子,其是相对于当前的
        # 输入大小的倍数
        return nn.Sequential(
            nn.Upsample(mode='bilinear', scale_factor=2, align_corners=True))
        # 这里的代码是在这里设置多一个卷积,这样子就起到了可以修改其输出通道的功能
        # 了。
        # 相当于功能跟ConvTranspose2d()差不多,只是上采样的方法不同
        conv1x1((in_channels, out_channels))


def conv1x1(in_channels, out_channels, groups=1):
    return nn.Sequential(nn.Conv2d(
        in_channels,
        out_channels,
        kernel_size=1,
        groups=groups,
        stride=1),
    nn.BatchNorm2d(out_channels))
PixelShuffle
在PyTorch中,上采样的层被封装在torch.nn中的Vision Layers里面,一共有4种:
- ① PixelShuffle
- ② Upsample
- ③ UpsamplingNearest2d
- ④ UpsamplingBilinear2d
该类定义如下:
class torch.nn.PixleShuffle(upscale_factor)
这里的upscale_factor就是放大的倍数,数据类型为int。
以四维输入(N,C,H,W)为例,Pixelshuffle会将为(∗,r2C,H,W)的Tensor给reshape成(∗,C,rH,rW)的Tensor。形式化地说,它的输入输出的shape如下:
输入:(N,C x upscale_factor2,H,W)
输出:(N,C ,Hx upscale_factor,Wx upscale_factor)
相当于将特征图转化为图片像素。
>>> ps = nn.PixelShuffle(3)
>>> input = torch.tensor(1, 9, 4, 4)
>>> output = ps(input)
>>> print(output.size())
torch.Size([1, 1, 12, 12])