大纲摘要:
1、Springmvc介绍
2、入门程序
3、Springmvc架构讲解
a) 框架结构
b) 组件说明
4、Springmvc整合mybatis
5、参数绑定
乱码问题解决
a) Springmvc默认支持的类型
b) 简单数据类型
c) Pojo类型
d) Pojo包装类型
e) 自定义参数绑定
Springmvc和struts2的区别
一、springMVC介绍
springMVC是一个表现层框架
作用:从请求中获取传入的参数
将处理后的结果数据返回给页面显示
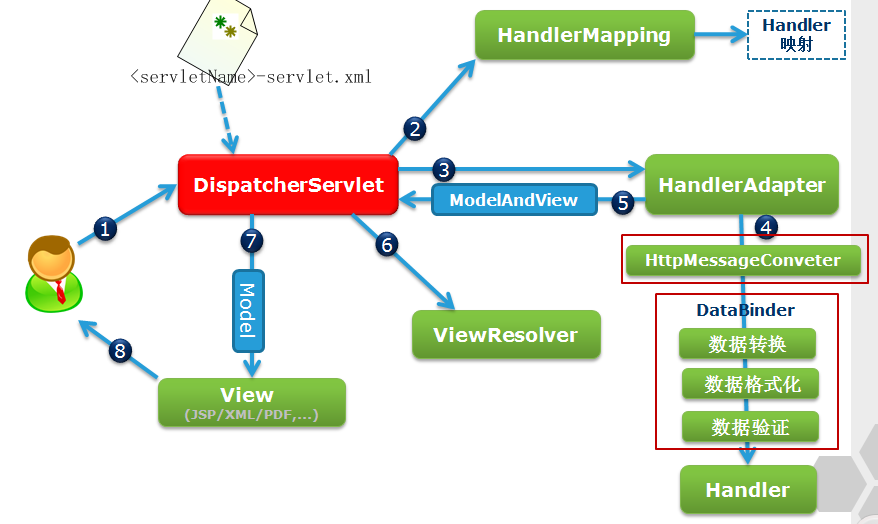
SpringMVC运行流程:
//把数据和标签拼装进行显示的过程叫做渲染
大致流程:(引用自http://blog.csdn.net/u014010769/article/details/47354529)
第一步:发起请求到前端控制器(DispatcherServlet)
第二步:前端控制器请求HandlerMapping查找 Handler
可以根据xml配置、注解进行查找
第三步:处理器映射器HandlerMapping向前端控制器返回Handler
第四步:前端控制器调用处理器适配器去执行Handler
第五步:处理器适配器去执行Handler
第六步:Handler执行完成给适配器返回ModelAndView
第七步:处理器适配器向前端控制器返回ModelAndView
ModelAndView是springmvc框架的一个底层对象,包括Model和view
第八步:前端控制器请求视图解析器去进行视图解析
根据逻辑视图名解析成真正的视图(jsp)
第九步:视图解析器向前端控制器返回View
第十步:前端控制器进行视图渲染
视图渲染将模型数据(在ModelAndView对象中)填充到request域
第十一步:前端控制器向用户响应结果
二、入门程序
版本:Springmvc:4.1.3
需求:
使用springmvc实现商品列表的展示。(此处演示只使用静态数据)
导包:(独立运行springMVC的jar包)

此时来试试直接配置前端控制器并启动服务器(装了springIDE插件后将变得非常简单,一步到位配置)
  <servlet>
      <servlet-name>springMVC</servlet-name>
      <!-- 在webmvc.jar里面servlet的包里面找 ,复制全路径名去掉class即可-->
      <servlet-class>org.springframework.web.servlet.DispatcherServlet</servlet-class>
      <!-- tomcat启动时即加载,12345代表顺序 -->
      <load-on-startup>1</load-on-startup>
      <!-- 如果没有指定核心配置文件,默认会去找servlet-name+ -servlet.xml
          此处即使springMVC-servlet.xml
          一般而言,会在项目目录下新建配置文件夹 source folder config
       -->
  </servlet>
  <servlet-mapping>
      <servlet-name>springMVC</servlet-name>
      <url-pattern>*.action</url-pattern>
  </servlet-mapping>
//此时会报配置文件/WEB-INF/xxx.xml未找到的异常
创建 source folder ,并在里面创建springMVC.xml
<?xml version="1.0" encoding="UTF-8"?>
<beans xmlns="http://www.springframework.org/schema/beans"
    xmlns:xsi="http://www.w3.org/2001/XMLSchema-instance"
    xmlns:p="http://www.springframework.org/schema/p"
    xmlns:context="http://www.springframework.org/schema/context"
    xmlns:dubbo="http://code.alibabatech.com/schema/dubbo"
    xmlns:mvc="http://www.springframework.org/schema/mvc"
    xsi:schemaLocation="http://www.springframework.org/schema/beans http://www.springframework.org/schema/beans/spring-beans-4.0.xsd
        http://www.springframework.org/schema/mvc http://www.springframework.org/schema/mvc/spring-mvc-4.0.xsd
        http://code.alibabatech.com/schema/dubbo http://code.alibabatech.com/schema/dubbo/dubbo.xsd
        http://www.springframework.org/schema/context http://www.springframework.org/schema/context/spring-context-4.0.xsd">
</beans>
//这里暂时只引入约束,具体内容待补充
在web.xml中前端控制器的servlet下指定核心配置文件的路径等信息
当然,也可以使用默认的配置文件的位置,name就是<servlet-name>-servlet.xml
 <!-- 初始化参数 ,指定核心配置文件路径
             spring-servlet.xml因为被配置在servlet的初始化过程中,
             所以如果不初始化servlet,
             那么spring-servlet.xml是不会被发现的
         -->
         <init-param>
             <param-name>contextConfigLocation</param-name>
             <param-value>classpath:springMVC.xml</param-value>
         </init-param>
此时完整的web.xml如下:


<?xml version="1.0" encoding="UTF-8"?>
<web-app xmlns:xsi="http://www.w3.org/2001/XMLSchema-instance" xmlns="http://java.sun.com/xml/ns/javaee" xsi:schemaLocation="http://java.sun.com/xml/ns/javaee http://java.sun.com/xml/ns/javaee/web-app_2_5.xsd" id="WebApp_ID" version="2.5">
  <display-name>springMVC01</display-name>
  <welcome-file-list>
    <welcome-file>index.html</welcome-file>
    <welcome-file>index.htm</welcome-file>
    <welcome-file>index.jsp</welcome-file>
    <welcome-file>default.html</welcome-file>
    <welcome-file>default.htm</welcome-file>
    <welcome-file>default.jsp</welcome-file>
  </welcome-file-list>
  <!-- springMVC前端控制器 -->
  <servlet>
      <servlet-name>springMVC</servlet-name>
      <!-- 在webmvc.jar里面servlet的包里面找 ,复制全路径名去掉class即可-->
      <servlet-class>org.springframework.web.servlet.DispatcherServlet</servlet-class>
        <!-- 初始化参数 ,指定核心配置文件路径
             spring-servlet.xml因为被配置在servlet的初始化过程中,
             所以如果不初始化servlet,
             那么spring-servlet.xml是不会被发现的
         -->
         <init-param>
             <param-name>contextConfigLocation</param-name>
             <param-value>classpath:springMVC.xml</param-value>
         </init-param>
      <!-- tomcat启动时即加载,12345代表顺序 -->
      <load-on-startup>1</load-on-startup>
      <!-- 如果没有指定核心配置文件,默认会去找servlet-name+ -servlet.xml
          此处即使springMVC-servlet.xml
          一般而言,会在项目目录下新建配置文件夹 source folder config
       -->

  </servlet>
  <servlet-mapping>
      <servlet-name>springMVC</servlet-name>
      <url-pattern>*.action</url-pattern>
  </servlet-mapping>

</web-app>
【更新】,springMVC的前端控制器拦截URL的/ /* 等区别小结:
  1、拦截*.do、*.htm, 例如:/user/add.do
    这是最传统的方式,最简单也最实用。不会导致静态文件(jpg,js,css)被拦截。
  2、拦截/,例如:/user/add
    可以实现现在很流行的REST风格。很多互联网类型的应用很喜欢这种风格的URL。
    弊端:会导致静态文件(jpg,js,css)被拦截后不能正常显示。想实现REST风格,事情就是麻烦一些。后面有解决办法还算简单。
  3、拦截/*,这是一个错误的方式,请求可以走到Action中,但转到jsp时再次被拦截,不能访问到jsp。
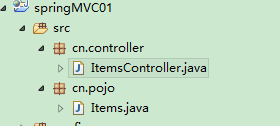
创建包的目录结构
把要返回的页面准备好(/WEB-INF/jsp/itemList.jsp)
<%@ page language="java" contentType="text/html; charset=UTF-8"
    pageEncoding="UTF-8"%>
<%@ taglib uri="http://java.sun.com/jsp/jstl/core" prefix="c" %>
<%@ taglib uri="http://java.sun.com/jsp/jstl/fmt"  prefix="fmt"%>
<!DOCTYPE html PUBLIC "-//W3C//DTD HTML 4.01 Transitional//EN" "http://www.w3.org/TR/html4/loose.dtd">
<html>
<head>
<meta http-equiv="Content-Type" content="text/html; charset=UTF-8">
<title>查询商品列表</title>
</head>
<body>
<form action="${pageContext.request.contextPath }/item/queryitem.action" method="post">
查询条件:
<table width="100%" border=1>
<tr>
<td><input type="submit" value="查询"/></td>
</tr>
</table>
商品列表:
<table width="100%" border=1>
<tr>
    <td>商品名称</td>
    <td>商品价格</td>
    <td>生产日期</td>
    <td>商品描述</td>
    <td>操作</td>
</tr>
<c:forEach items="${itemList }" var="item">
<tr>
    <td>${item.name }</td>
    <td>${item.price }</td>
    <td><fmt:formatDate value="${item.createtime}" pattern="yyyy-MM-dd HH:mm:ss"/></td>
    <td>${item.detail }</td>

    <td><a href="${pageContext.request.contextPath }/itemEdit.action?id=${item.id}">修改</a></td>

</tr>
</c:forEach>

</table>
</form>
</body>

</html>
springMVC.xml中配置包扫描
关于为何由springMVC扫描controller,可以参见父子容器的随笔:http://www.cnblogs.com/hafiz/p/5875740.html
<!-- 配置包扫描,包下的controller注解会被扫描 -->
    <context:component-scan base-package="cn.controller"></context:component-scan>
编写controller
package cn.controller;

import java.util.ArrayList;
import java.util.List;

import org.springframework.stereotype.Controller;
import org.springframework.web.bind.annotation.RequestMapping;
import org.springframework.web.servlet.ModelAndView;

import cn.pojo.Items;

@Controller
public class ItemsController {

    //指定url到请求方法的映射
    @RequestMapping("/list")
    public ModelAndView listItems() throws Exception{

        //静态数据模拟dao返回的数据
        List<Items>itemList = new ArrayList<>();

        //商品列表
        Items items_1 = new Items();
        items_1.setName("联想笔记本_3");
        items_1.setPrice(6000f);
        items_1.setDetail("ThinkPad T430 联想笔记本电脑!");

        Items items_2 = new Items();
        items_2.setName("苹果手机");
        items_2.setPrice(5000f);
        items_2.setDetail("iphone6苹果手机!");

        itemList.add(items_1);
        itemList.add(items_2);
        //创建modelandView对象
        //model模型对象存放了返回页面的数据,view视图指定了返回的页面的路径
        ModelAndView modelAndView = new ModelAndView();
        //添加model,类似request.setAttribute()
        modelAndView.addObject("itemList",itemList);
        //添加视图
        modelAndView.setViewName("/WEB-INF/jsp/itemList.jsp");
        //modelAndView.setViewName("itemsList");
        return modelAndView;
    }
}
//注意类注解和方法注解的添加——类注解,标注此类为一个controller,方法注解,标注的请求url
简单测试:

//当然,.action的后缀可以在web.xml前端控制器配置出手动进行配置
这里贴出入门程序的代码:
web.xml
<?xml version="1.0" encoding="UTF-8"?>
<web-app xmlns:xsi="http://www.w3.org/2001/XMLSchema-instance" xmlns="http://java.sun.com/xml/ns/javaee" xsi:schemaLocation="http://java.sun.com/xml/ns/javaee http://java.sun.com/xml/ns/javaee/web-app_2_5.xsd" id="WebApp_ID" version="2.5">
  <display-name>springMVC01</display-name>
  <welcome-file-list>
    <welcome-file>index.html</welcome-file>
    <welcome-file>index.htm</welcome-file>
    <welcome-file>index.jsp</welcome-file>
    <welcome-file>default.html</welcome-file>
    <welcome-file>default.htm</welcome-file>
    <welcome-file>default.jsp</welcome-file>
  </welcome-file-list>
  <!-- springMVC前端控制器 -->
  <servlet>
      <servlet-name>springMVC</servlet-name>
      <!-- 在webmvc.jar里面servlet的包里面找 ,复制全路径名去掉class即可-->
      <servlet-class>org.springframework.web.servlet.DispatcherServlet</servlet-class>
        <!-- 初始化参数 ,指定核心配置文件路径
             spring-servlet.xml因为被配置在servlet的初始化过程中,
             所以如果不初始化servlet,
             那么spring-servlet.xml是不会被发现的
         -->
         <init-param>
             <param-name>contextConfigLocation</param-name>
             <param-value>classpath:springMVC.xml</param-value>
         </init-param>
      <!-- tomcat启动时即加载,12345代表顺序 -->
      <load-on-startup>1</load-on-startup>
      <!-- 如果没有指定核心配置文件,默认会去找servlet-name+ -servlet.xml
          此处即使springMVC-servlet.xml
          一般而言,会在项目目录下新建配置文件夹 source folder config
       -->

  </servlet>
  <servlet-mapping>
      <servlet-name>springMVC</servlet-name>
      <url-pattern>*.action</url-pattern>
  </servlet-mapping>

</web-app>
springMVC.xml
<?xml version="1.0" encoding="UTF-8"?>
<beans xmlns="http://www.springframework.org/schema/beans"
    xmlns:xsi="http://www.w3.org/2001/XMLSchema-instance"
    xmlns:p="http://www.springframework.org/schema/p"
    xmlns:context="http://www.springframework.org/schema/context"
    xmlns:dubbo="http://code.alibabatech.com/schema/dubbo"
    xmlns:mvc="http://www.springframework.org/schema/mvc"
    xsi:schemaLocation="http://www.springframework.org/schema/beans http://www.springframework.org/schema/beans/spring-beans-4.0.xsd
        http://www.springframework.org/schema/mvc http://www.springframework.org/schema/mvc/spring-mvc-4.0.xsd
        http://code.alibabatech.com/schema/dubbo http://code.alibabatech.com/schema/dubbo/dubbo.xsd
        http://www.springframework.org/schema/context http://www.springframework.org/schema/context/spring-context-4.0.xsd">
    <!-- 配置包扫描,包下的controller注解会被扫描 -->
    <context:component-scan base-package="cn.controller"></context:component-scan>
</beans>
Items.java
package cn.pojo;

import java.util.Date;

public class Items {

    private Integer id;
    private String name;
    private Float price;
    private String pic;
    private Date createtime;
    private String detail;

    public Integer getId() {
        return id;
    }

    public void setId(Integer id) {
        this.id = id;
    }

    public String getName() {
        return name;
    }

    public void setName(String name) {
        this.name = name == null ? null : name.trim();
    }

    public Float getPrice() {
        return price;
    }

    public void setPrice(Float price) {
        this.price = price;
    }

    public String getPic() {
        return pic;
    }

    public void setPic(String pic) {
        this.pic = pic == null ? null : pic.trim();
    }

    public Date getCreatetime() {
        return createtime;
    }

    public void setCreatetime(Date createtime) {
        this.createtime = createtime;
    }

    public String getDetail() {
        return detail;
    }

    public void setDetail(String detail) {
        this.detail = detail == null ? null : detail.trim();
    }
}
controller与jsp页面见上
使用maven构建请参见网友博客:http://www.cnblogs.com/qixing/p/qixing.html
三、springMVC架构
1.架构图:
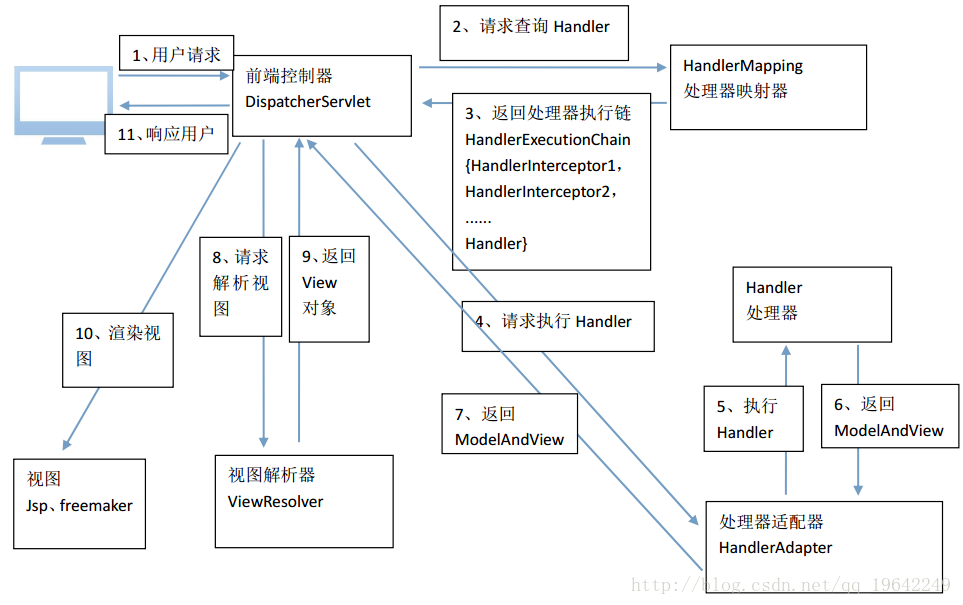
2.大致流程(加上上文已有两个版本):
1、 用户发送请求至前端控制器DispatcherServlet。
2、 DispatcherServlet收到请求调用HandlerMapping处理器映射器。
3、 处理器映射器根据请求url找到具体的处理器,生成处理器对象及处理器拦截器(如果有则生成)一并返回给DispatcherServlet。
4、 DispatcherServlet通过HandlerAdapter处理器适配器调用处理器
5、 执行处理器(Controller,也叫后端控制器)。
6、 Controller执行完成返回ModelAndView
7、 HandlerAdapter将controller执行结果ModelAndView返回给DispatcherServlet
8、 DispatcherServlet**将ModelAndView传给ViewReslover视图解析器**
9、 ViewReslover解析后返回具体View
10、 DispatcherServlet对View进行渲染视图(即将模型数据填充至视图中)。
11、 DispatcherServlet响应用户
3.组件说明:
以下组件通常使用框架提供实现:
DispatcherServlet:前端控制器
用户请求到达前端控制器,它就相当于mvc模式中的c,dispatcherServlet是整个流程控制的中心(医院的分诊台),由它调用其它组件处理用户的请求,dispatcherServlet的存在降低了组件之间的耦合性。
HandlerMapping:处理器映射器
HandlerMapping负责根据用户请求找到Handler即处理器,springmvc提供了不同的映射器实现不同的映射方式,例如:配置文件方式,实现接口方式,注解方式等。
Handler:处理器(controller的表现形式,最终调用的controller是handler形式的)
Handler 是继DispatcherServlet前端控制器的后端控制器,在DispatcherServlet的控制下Handler对具体的用户请求进行处理。
由于Handler涉及到具体的用户业务请求,所以一般情况需要程序员根据业务需求开发Handler。
HandlAdapter:处理器适配器
通过HandlerAdapter对处理器进行执行,这是适配器模式的应用,通过扩展适配器可以对更多类型的处理器进行执行。
View Resolver:视图解析器
View Resolver负责将处理结果生成View视图,View Resolver首先根据逻辑视图名解析成物理视图名即具体的页面地址,再生成View视图对象,最后对View进行渲染将处理结果通过页面展示给用户。
*自定义视图解析器这里暂时不展开
View:视图
springmvc框架提供了很多的View视图类型的支持,包括:jstlView、freemarkerView、pdfView等。我们最常用的视图就是jsp。
一般情况下需要通过页面标签或页面模版技术将模型数据通过页面展示给用户,需要由程序员根据业务需求开发具体的页面。

无论何种返回值,springMVC最终都会转化为一个ModelAndView对象,然后调用视图解析器进行解析
ModelAndView可以通过有不同的形式:Model Map形式,sprngMVC都会通过转换为统一的ModelAndView
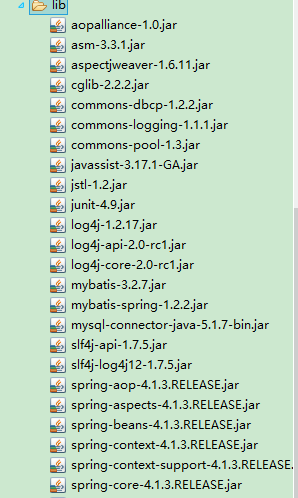
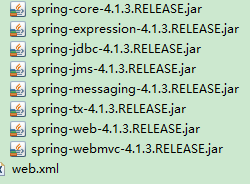
4.框架默认加载组件
//在lib包下寻找
5.配置注解的处理器映射器和适配器
(组件包扫描见上文包扫描)
注解式处理器映射器,对类中标记@ResquestMapping的方法进行映射,根据ResquestMapping定义的url匹配ResquestMapping标记的方法,
匹配成功返回HandlerMethod对象给前端控制器,HandlerMethod对象中封装url对应的方法Method。
从spring3.1版本开始,废除了DefaultAnnotationHandlerMapping的使用,推荐使用RequestMappingHandlerMapping完成注解式处理器映射。
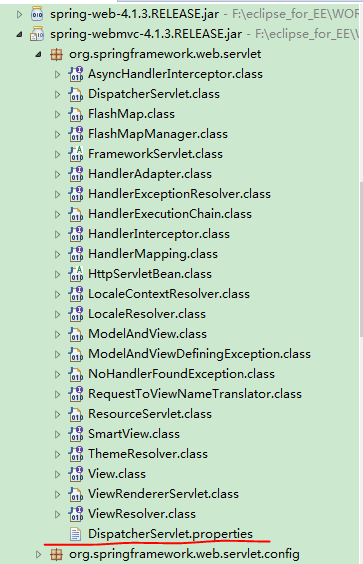
大部分的类的全路径等信息都可以在第4点中框架默认加载的配置文件中找到
<!--如果没有显式的配置处理器映射器和处理器适配器,
    springMVC会在其默认的配置文件DispatcherServlet.properties中(在lib包的servlet下可以找到)逐一查找合适的方式
    (是否为注解形式?等) -->
    <!-- 1.0注解形式的处理器映射器 -->
    <!-- <bean class="org.springframework.web.servlet.mvc.annotation.DefaultAnnotationHandlerMapping"></bean> -->
    <!-- 注解形式的处理器适配器 -->
    <!-- <bean class="org.springframework.web.servlet.mvc.annotation.AnnotationMethodHandlerAdapter"></bean> -->
    <!--2.0 配置最新版的注解的处理器映射器和适配器,原因是上面的点开源码可以看到已经在3.x的版本已经废除 -->
    <!-- <bean class="org.springframework.web.servlet.mvc.method.annotation.RequestMappingHandlerMapping"></bean> -->
    <!-- <bean class="org.springframework.web.servlet.mvc.method.annotation.RequestMappingHandlerAdapter"></bean> -->
    <!-- 3.0使用注解驱动,可以自动配置最新版的处理器映射器和处理器适配器 ,和注解扫描木有关系-->
    <mvc:annotation-driven></mvc:annotation-driven>
如上,配置处理器适配器和处理器映射器迭代了三个版本的方法:
1.0 直接从默认配置文件中查找(采用看源码方式发现已经废除)
2.0 从下图包中查找:

2.0虽然没有废弃,但带来的问题是每次更新都需要我们手动修改配置文件的相关的配置,也不可取!
3.0 使用的是注解驱动的一个注解,可以实现自动帮我们配置注解的最新版的处理器映射器和处理器适配器【常用】
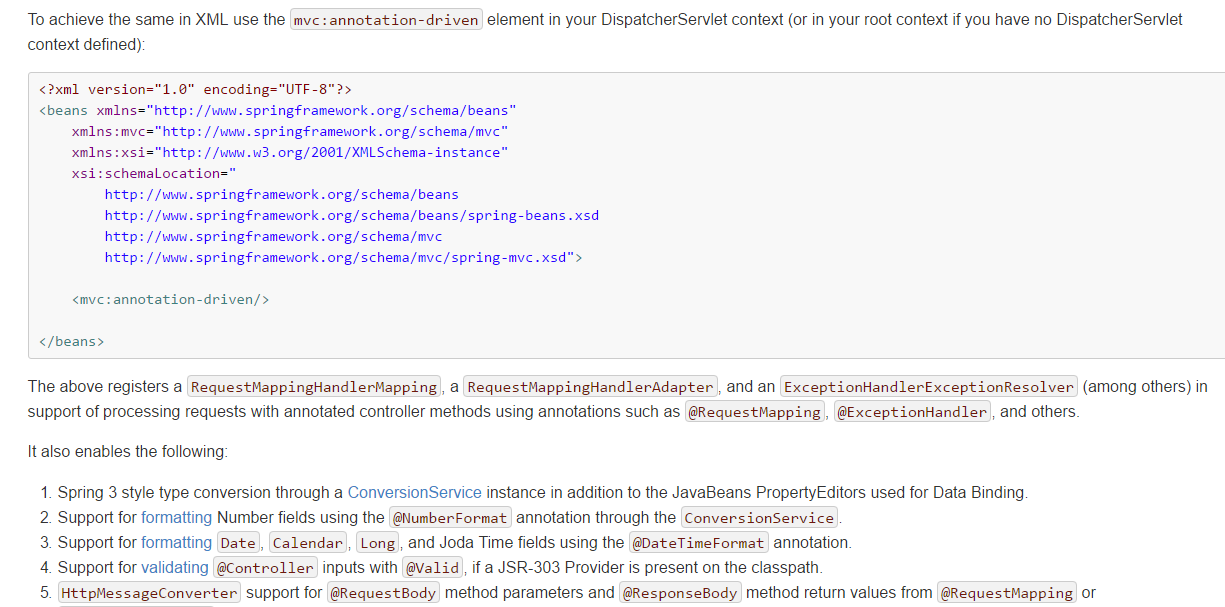
这里可以小结一下<mvc;annotation-driven>:
我们可以在docs中查看官方的文档:(C:Usersjiangbei01Desktop江北java实用工具文件夹jar包spring-framework-4.3.8.RELEASEdocsspring-framework-referencehtmlsingle)
//其它具体内容也可以参见文档
【更新】:<mvc:annotation-driven /> 是一种简写形式,完全可以手动配置替代这种简写形式,简写形式可以让初学都快速应用默认配置方案。<mvc:annotation-driven /> 会自动注册DefaultAnnotationHandlerMapping与AnnotationMethodHandlerAdapter 两个bean,是spring MVC为@Controllers分发请求所必须的。
并提供了:数据绑定支持,@NumberFormatannotation支持,@DateTimeFormat支持,@Valid支持,读写XML的支持(JAXB),读写JSON的支持(Jackson)
如果出现下面的错误,可能是没有配置<mvc:annotation-driven />的原因。
报错WARNING: No mapping found for HTTP request with URI [/mvc/user/findUser/lisi/770] in DispatcherServlet with name 'springMVC
6.视图解析器
<!-- 配置视图解析器,没配时使用的是默认视图解析器 -->
    <bean class="org.springframework.web.servlet.view.InternalResourceViewResolver">
        <!-- 前后缀,页面路径为前缀+真正页面名+后缀 ,更加方便-->
        <property name="prefix" value="/WEB-INF/jsp/"></property>
        <property name="suffix" value=".jsp"></property>
    </bean>
//其中class的全路径名从默认加载配置文件中找
InternalResourceViewResolver:支持JSP视图解析(其它视图解析器见上文查找默认组件中看)
viewClass:JstlView表示JSP模板页面需要使用JSTL标签库,所以classpath中必须包含jstl的相关jar 包。此属性可以不设置,默认为JstlView。
prefix 和suffix:查找视图页面的前缀和后缀(可以从class的类源码中查找),最终视图的址为:
前缀+逻辑视图名+后缀,逻辑视图名需要在controller中返回ModelAndView指定,比如逻辑视图名为hello,
则最终返回的jsp视图地址 “WEB-INF/jsp/hello.jsp”
*若使用JSTL的fmt标签(<fmt message>...),则需要配置国际化资源文件:

至此,我们就配完了三大组件——处理器映射器、处理器适配器、视图解析器
配置文件springMVC.xml:
<?xml version="1.0" encoding="UTF-8"?>
<beans xmlns="http://www.springframework.org/schema/beans"
    xmlns:xsi="http://www.w3.org/2001/XMLSchema-instance" xmlns:context="http://www.springframework.org/schema/context"
    xmlns:mvc="http://www.springframework.org/schema/mvc"
    xsi:schemaLocation="http://www.springframework.org/schema/mvc http://www.springframework.org/schema/mvc/spring-mvc-4.3.xsd
        http://www.springframework.org/schema/beans http://www.springframework.org/schema/beans/spring-beans.xsd
        http://www.springframework.org/schema/context http://www.springframework.org/schema/context/spring-context-4.3.xsd">

    <!-- 配置包扫描,扫描controller,service将交给spring来管理 -->
    <context:component-scan base-package="cn.test"></context:component-scan>
    <!-- 注解驱动,配置映射器和适配器 ,可以将请求参数绑定到控制参数 -->
    <mvc:annotation-driven></mvc:annotation-driven>
    <!-- 配置静态资源访问 ,一共三种方案 -->
    <!-- <mvc:resources mapping="/resources/**" location="/resources/" /> -->
    <mvc:default-servlet-handler />
    <!-- 视图页面配置,此解析器需要放到最后,因为他必定会返回一个对象 -->
    <bean
        class="org.springframework.web.servlet.view.InternalResourceViewResolver">
        <property name="prefix" value="/WEB-INF/jsp/" />
        <property name="suffix" value=".jsp" />
    </bean>
</beans>
四、与Mybatis的整合
整合概述:
ssm整合:
    1)Dao层
        pojo和映射文件以及接口使用逆向工程生成
        SqlMapConfig.xml   mybatis核心配置文件
        ApplicationContext-dao.xml 整合后spring在dao层的配置
            数据源
            会话工厂
            扫描Mapper
    2)service层
        事务            ApplicationContext-trans.xml
        @Service注解扫描    ApplicationContext-service.xml
    3)controller层
        SpringMvc.xml
            注解扫描:扫描@Controller注解
            注解驱动:替我们显示的配置了最新版的处理器映射器和处理器适配器
            视图解析器:显示的配置是为了在controller中不用每个方法都写页面的全路径
    4)web.xml
        springMvc前端控制器配置
        spring监听
需求:
实现商品查询列表,从mysql数据库查询商品信息。
jar包准备:
包括:spring(包括springmvc)、mybatis、mybatis-spring整合包、数据库驱动、第三方连接池。
//当然,后期都是通过maven管理
整合思路:
Dao层:
1、SqlMapConfig.xml,空文件即可。需要文件头。
2、applicationContext-dao.xml。
a)数据库连接池
b)SqlSessionFactory对象,需要spring和mybatis整合包下的。
c)配置mapper文件扫描器。
Service层:
1、applicationContext-service.xml包扫描器,扫描@service注解的类。
2、applicationContext-trans.xml配置事务。
表现层:
Springmvc.xml
1、包扫描器,扫描@Controller注解的类。
2、配置注解驱动。
3、视图解析器
Web.xml
配置前端控制器。
a) 逆向工程生成:
修改配置文件 generator.xml
<?xml version="1.0" encoding="UTF-8"?>
<!DOCTYPE generatorConfiguration
  PUBLIC "-//mybatis.org//DTD MyBatis Generator Configuration 1.0//EN"
  "http://mybatis.org/dtd/mybatis-generator-config_1_0.dtd">

<generatorConfiguration>
    <context id="testTables" targetRuntime="MyBatis3">
        <commentGenerator>
            <!-- 是否去除自动生成的注释 true:是 : false:否 -->
            <property name="suppressAllComments" value="true" />
        </commentGenerator>
        <!--数据库连接的信息:驱动类、连接地址、用户名、密码 -->
        <jdbcConnection driverClass="com.mysql.jdbc.Driver"
            connectionURL="jdbc:mysql://localhost:3306/ssm01" userId="root"
            password="root">
        </jdbcConnection>
        <!-- <jdbcConnection driverClass="oracle.jdbc.OracleDriver"
            connectionURL="jdbc:oracle:thin:@127.0.0.1:1521:yycg"
            userId="yycg"
            password="yycg">
        </jdbcConnection> -->

        <!-- 默认false,把JDBC DECIMAL 和 NUMERIC 类型解析为 Integer,为 true时把JDBC DECIMAL 和
            NUMERIC 类型解析为java.math.BigDecimal -->
        <javaTypeResolver>
            <property name="forceBigDecimals" value="false" />
        </javaTypeResolver>

        <!-- targetProject:生成PO类的位置 -->
        <javaModelGenerator targetPackage="cn.pojo"
            targetProject=".src">
            <!-- enableSubPackages:是否让schema作为包的后缀 -->
            <property name="enableSubPackages" value="false" />
            <!-- 从数据库返回的值被清理前后的空格 -->
            <property name="trimStrings" value="true" />
        </javaModelGenerator>
        <!-- targetProject:mapper映射文件生成的位置 -->
        <sqlMapGenerator targetPackage="cn.dao"
            targetProject=".src">
            <!-- enableSubPackages:是否让schema作为包的后缀 -->
            <property name="enableSubPackages" value="false" />
        </sqlMapGenerator>
        <!-- targetPackage:mapper接口生成的位置 -->
        <javaClientGenerator type="XMLMAPPER"
            targetPackage="cn.dao"
            targetProject=".src">
            <!-- enableSubPackages:是否让schema作为包的后缀 -->
            <property name="enableSubPackages" value="false" />
        </javaClientGenerator>
        <!-- 指定数据库表 -->
<!--         <table tableName="items"></table> -->
        <table tableName="items"></table>
<!--         <table tableName="orderdetail"></table> -->
        <table tableName="user"></table>
        <!-- <table schema="" tableName="sys_user"></table>
        <table schema="" tableName="sys_role"></table>
        <table schema="" tableName="sys_permission"></table>
        <table schema="" tableName="sys_user_role"></table>
        <table schema="" tableName="sys_role_permission"></table> -->

        <!-- 有些表的字段需要指定java类型
         <table schema="" tableName="">
            <columnOverride column="" javaType="" />
        </table> -->
    </context>
</generatorConfiguration>
//主要修改配置文件的数据库名、pojo、dao等几个地方

b) dao层的配置
在classpath下创建mybatis核心配置文件SqlMapConfig.xml (只留根标签即可)
<?xml version="1.0" encoding="UTF-8" ?>
<!DOCTYPE configuration
PUBLIC "-//mybatis.org//DTD Config 3.0//EN"
"http://mybatis.org/dtd/mybatis-3-config.dtd">
<configuration>

</configuration>
配置applicationContext-dao.xml
<?xml version="1.0" encoding="UTF-8"?>
<beans xmlns="http://www.springframework.org/schema/beans"
    xmlns:context="http://www.springframework.org/schema/context"
    xmlns:p="http://www.springframework.org/schema/p"
    xmlns:aop="http://www.springframework.org/schema/aop"
    xmlns:tx="http://www.springframework.org/schema/tx"
    xmlns:xsi="http://www.w3.org/2001/XMLSchema-instance"
    xsi:schemaLocation="http://www.springframework.org/schema/beans http://www.springframework.org/schema/beans/spring-beans-4.0.xsd
    http://www.springframework.org/schema/context http://www.springframework.org/schema/context/spring-context-4.0.xsd
    http://www.springframework.org/schema/aop http://www.springframework.org/schema/aop/spring-aop-4.0.xsd http://www.springframework.org/schema/tx http://www.springframework.org/schema/tx/spring-tx-4.0.xsd
    http://www.springframework.org/schema/util http://www.springframework.org/schema/util/spring-util-4.0.xsd">

    <!-- 加载配置文件 -->
    <context:property-placeholder location="classpath:db.properties"/>
    <!-- 数据库连接池 -->
    <bean id="dataSource" class="org.apache.commons.dbcp.BasicDataSource"
        destroy-method="close">
        <property name="driverClassName" value="${jdbc.driver}"/>
        <property name="url" value="${jdbc.url}"/>
        <property name="username" value="${jdbc.username}"/>
        <property name="password" value="${jdbc.password}"/>
        <property name="maxActive" value="10"/>
        <property name="maxIdle" value="5"/>
    </bean>
    <!-- mapper配置 -->
    <!-- 让spring管理sqlsessionfactory 使用mybatis和spring整合包中的 -->
    <bean id="sqlSessionFactory" class="org.mybatis.spring.SqlSessionFactoryBean">
        <!-- 数据库连接池 -->
        <property name="dataSource" ref="dataSource"/>
        <!-- 加载mybatis的全局配置文件 -->
        <property name="configLocation" value="classpath:SqlMapConfig.xml"/>
    </bean>
    <!-- 配置Mapper扫描器  此处为扫描dao-->
    <bean class="org.mybatis.spring.mapper.MapperScannerConfigurer">
        <property name="basePackage" value="cn.dao"/>
    </bean>
</beans>
//修改适当的地方
其它两个配置文件 log4j.properties 和 db.properties (修改合适的地方)直接复制上一次spring-mybatis 整合即可
此时配置文件目录如下:

c) service层的配置
配置applicationContext-service.xml文件
<?xml version="1.0" encoding="UTF-8"?>
<beans xmlns="http://www.springframework.org/schema/beans"
    xmlns:context="http://www.springframework.org/schema/context"
    xmlns:p="http://www.springframework.org/schema/p"
    xmlns:aop="http://www.springframework.org/schema/aop"
    xmlns:tx="http://www.springframework.org/schema/tx"
    xmlns:xsi="http://www.w3.org/2001/XMLSchema-instance"
    xsi:schemaLocation="http://www.springframework.org/schema/beans http://www.springframework.org/schema/beans/spring-beans-4.0.xsd
    http://www.springframework.org/schema/context http://www.springframework.org/schema/context/spring-context-4.0.xsd
    http://www.springframework.org/schema/aop http://www.springframework.org/schema/aop/spring-aop-4.0.xsd http://www.springframework.org/schema/tx http://www.springframework.org/schema/tx/spring-tx-4.0.xsd
    http://www.springframework.org/schema/util http://www.springframework.org/schema/util/spring-util-4.0.xsd">
    <!-- @Service扫描 -->
    <context:component-scan base-package="cn.service"></context:component-scan>
</beans>
//只配置一个扫描service注解的包
d) 事务的配置
配置applicationContext-trans.xml
<?xml version="1.0" encoding="UTF-8"?>
<beans xmlns="http://www.springframework.org/schema/beans"
    xmlns:context="http://www.springframework.org/schema/context"
    xmlns:p="http://www.springframework.org/schema/p"
    xmlns:aop="http://www.springframework.org/schema/aop"
    xmlns:tx="http://www.springframework.org/schema/tx"
    xmlns:xsi="http://www.w3.org/2001/XMLSchema-instance"
    xsi:schemaLocation="http://www.springframework.org/schema/beans http://www.springframework.org/schema/beans/spring-beans-4.0.xsd
    http://www.springframework.org/schema/context http://www.springframework.org/schema/context/spring-context-4.0.xsd
    http://www.springframework.org/schema/aop http://www.springframework.org/schema/aop/spring-aop-4.0.xsd http://www.springframework.org/schema/tx http://www.springframework.org/schema/tx/spring-tx-4.0.xsd
    http://www.springframework.org/schema/util http://www.springframework.org/schema/util/spring-util-4.0.xsd">
    <!-- 事务管理器 -->
    <bean id="transactionManager"
        class="org.springframework.jdbc.datasource.DataSourceTransactionManager">
        <!-- 数据源 -->
        <property name="dataSource" ref="dataSource"/>
    </bean>
    <!-- 通知 -->
    <tx:advice id="txAdvice" transaction-manager="transactionManager">
        <tx:attributes>
            <!-- 传播行为 -->
            <tx:method name="save*" propagation="REQUIRED"/>
            <tx:method name="insert*" propagation="REQUIRED"/>
            <tx:method name="delete*" propagation="REQUIRED"/>
            <tx:method name="update*" propagation="REQUIRED"/>
            <tx:method name="find*" propagation="SUPPORTS" read-only="true"/>
            <tx:method name="get*" propagation="SUPPORTS" read-only="true"/>
        </tx:attributes>
    </tx:advice>
    <!-- 将sevice包配置事务 注意切面 -->
    <!-- 切面 -->
    <aop:config>
        <aop:advisor advice-ref="txAdvice"
            pointcut="execution(* cn.service.*.*(..))"/>
    </aop:config>
</beans>
//注意将service的包名进行事务的配置
e) 配置springMVC核心配置文件
配置springMVC.xml(主要是配置三大组件)
<?xml version="1.0" encoding="UTF-8"?>
<beans xmlns="http://www.springframework.org/schema/beans"
    xmlns:xsi="http://www.w3.org/2001/XMLSchema-instance"
    xmlns:p="http://www.springframework.org/schema/p"
    xmlns:context="http://www.springframework.org/schema/context"
    xmlns:dubbo="http://code.alibabatech.com/schema/dubbo"
    xmlns:mvc="http://www.springframework.org/schema/mvc"
    xsi:schemaLocation="http://www.springframework.org/schema/beans http://www.springframework.org/schema/beans/spring-beans-4.0.xsd
        http://www.springframework.org/schema/mvc http://www.springframework.org/schema/mvc/spring-mvc-4.0.xsd
        http://code.alibabatech.com/schema/dubbo http://code.alibabatech.com/schema/dubbo/dubbo.xsd
        http://www.springframework.org/schema/context http://www.springframework.org/schema/context/spring-context-4.0.xsd">
        <!-- 进行controller注解扫描的配置 -->
        <context:component-scan base-package="cn.controller"></context:component-scan>
        <!-- 配置注解驱动,作用不再赘述(三大件中的两件) -->
        <mvc:annotation-driven></mvc:annotation-driven>
        <!-- 配置视图解析器,没配时使用的是默认视图解析器 -->
    <bean class="org.springframework.web.servlet.view.InternalResourceViewResolver">
        <!-- 前后缀,页面路径为前缀+真正页面名+后缀 ,更加方便-->
        <property name="prefix" value="/WEB-INF/jsp/"></property>
        <property name="suffix" value=".jsp"></property>
    </bean>
</beans>
f) 配置 web.xml
主要是对前端控制器和spring监听的配置
<?xml version="1.0" encoding="UTF-8"?>
<web-app xmlns:xsi="http://www.w3.org/2001/XMLSchema-instance" xmlns="http://java.sun.com/xml/ns/javaee" xsi:schemaLocation="http://java.sun.com/xml/ns/javaee http://java.sun.com/xml/ns/javaee/web-app_2_5.xsd" id="WebApp_ID" version="2.5">
  <display-name>ssm-01</display-name>
  <welcome-file-list>
    <welcome-file>index.html</welcome-file>
    <welcome-file>index.htm</welcome-file>
    <welcome-file>index.jsp</welcome-file>
    <welcome-file>default.html</welcome-file>
    <welcome-file>default.htm</welcome-file>
    <welcome-file>default.jsp</welcome-file>
  </welcome-file-list>
  <!-- 前端控制器 -->
  <servlet>
      <servlet-name>springMVC</servlet-name>
      <servlet-class>org.springframework.web.servlet.DispatcherServlet</servlet-class>
      <!-- 配置核心配置文件路径 -->
      <init-param>
          <param-name>contextConfigLocation</param-name>
          <param-value>classpath:springMVC.xml</param-value>
      </init-param>
      <!-- 启动时加载 -->
      <load-on-startup>1</load-on-startup>
  </servlet>
  <servlet-mapping>
      <servlet-name>springMVC</servlet-name>
      <url-pattern>*.action</url-pattern>
  </servlet-mapping>
  <!-- 配置spring监听 -->
  <!-- 加载spring容器 -->
    <context-param>
        <param-name>contextConfigLocation</param-name>
        <param-value>classpath:applicationContext-*.xml</param-value>
    </context-param>
    <listener>
        <listener-class>org.springframework.web.context.ContextLoaderListener</listener-class>
    </listener>
</web-app>
配置了这么多,终于可以进行配置的测试了(虽然一般企业都有架构师来做这个事)
最好的检测的方法就是跑一下一个例子,这里就以上面的商品列表为例:
*先将页面导入到WEB-INF/jsp文件夹下
*这里采用纵向的形式(controller->service->dao的路线)
编写controller:
package cn.controller;

import java.util.List;

import javax.annotation.Resource;

import org.springframework.beans.factory.annotation.Autowired;
import org.springframework.stereotype.Controller;
import org.springframework.web.bind.annotation.RequestMapping;
import org.springframework.web.servlet.ModelAndView;

import cn.pojo.Items;
import cn.service.ItemsService;

@Controller
public class ItemsController {

    //注入service,使用的注解为resource;注意与autowired的区别
    /*@Resource("itemsService")*
     * 此方法适合多实现时指定实现类,指定名称为实现类上@service的指定类名
     * AutoWired为唯一实现类的自动装配*/
    @Autowired
    private ItemsService service;
    @RequestMapping("/list")
    public ModelAndView itemsList() throws Exception{
        List<Items> list = service.list();
        //需要modelAndView
        ModelAndView modelAndView = new ModelAndView();
        //加模型
        modelAndView.addObject("itemList", list);
        //加要去的视图路径
        modelAndView.setViewName("itemList");
        return modelAndView;
    }
}
编写service:
public interface ItemsService {

    List<Items> list() throws Exception;
}
编写serviceImpl实现类:
package cn.service;

import java.util.List;

import org.springframework.beans.factory.annotation.Autowired;
import org.springframework.stereotype.Service;

import cn.dao.ItemsMapper;
import cn.pojo.Items;
import cn.pojo.ItemsExample;

@Service
public class ItemsServiceImpl implements ItemsService {

    //注入dao
    @Autowired
    private ItemsMapper mapper;

    @Override
    public List<Items> list() throws Exception {
        //withBLOBs会查出文本类型(text大文件)
        //注意逆向工程自动生成查询工具的用法
        ItemsExample example = new ItemsExample();
        //此处不需要查询条件,不需要设置criteria对象
        List<Items> list = mapper.selectByExampleWithBLOBs(example);
        return list;
    }
}
//这里我们注意利用逆向工程的工具查询时的用法(这里采用逐渐讲解的方式,此处演示查询)
*演示的结果就如上图springMVC结果所示,访问的路径为:http://localhost:8080/ssm-01/list.action
五、参数绑定
1.默认参数绑定类型:Servlet原生API
作为一个表现层的框架,参数绑定是springMVC非常重要的一块。
参数绑定,通俗地理解就是怎样从请求中接收参数(当然,接收的类型等也在其中)
这里我们以需求驱动的形式来进行 学习:
需求:
打开商品编辑页面,展示商品信息。(也就是点击修改,可以到修改的页面)
编写controller:
//点击修改到详情页
    @RequestMapping("/itemEdit")
    public String itemEdit(HttpServletRequest request,HttpServletResponse response,
            HttpSession session,Model model) throws Exception{
        //原始的通过request拿参数
        String id = request.getParameter("id");
        Items items = service.findItemsById(Integer.parseInt(id));
        //model叫做模型,模型中放入返回给页面的数据
        //底层用的就是request域来传递数据,但是进行了拓展
        model.addAttribute("item", items);
        //如果springMVC方法返回一个简单的string字符串
        //springMVC就是认为这就是页面的名称
        return "editItem";
    }
//注意,若返回字符串,则为页面的 名称(这里感觉类似struts2)
编写service:
public interface ItemsService {

    List<Items> list() throws Exception;
    Items findItemsById(Integer id)throws Exception;
}
编写实现类:
@Override
    public Items findItemsById(Integer id) {
        //此处使用逆向工程的另外一个按主键查询的方法
        Items items = mapper.selectByPrimaryKey(id);
        return items;
    }
//注意,这里又用到了逆向工程生成另外一个查询方法(按主键id查询)
至此我们大概了解了参数绑定的含义以及比较熟悉的使用request接收请求参数,这里建议使用springMVC提供的model把模型放入
model作为request的增强(具体增强day02将会提到),各方面来说都比request好用
(示例中方法参数中可以选择需要用到的参数session等均按情况选择)
在正式测试之前,我们先解决一下将要出现的乱码的问题:
POST乱码的解决:
【更新】:spring4.0以后,需要设置另外两个参数:可以通过点开源码看到核心的方法
    protected void doFilterInternal(
            HttpServletRequest request, HttpServletResponse response, FilterChain filterChain)
            throws ServletException, IOException {

        String encoding = getEncoding();
        if (encoding != null) {
            if (isForceRequestEncoding() || request.getCharacterEncoding() == null) {
                request.setCharacterEncoding(encoding);
            }
            if (isForceResponseEncoding()) {
                response.setCharacterEncoding(encoding);
            }
        }
        filterChain.doFilter(request, response);
    }
需要的参数init-param一个是我们要设置的编码,另外两个分别是请求和响应编码,于是得到过滤器的配置如下:
<!-- springMVC的字符编码过滤器 -->
    <filter>
        <filter-name>characterEncodingFilter</filter-name>
        <filter-class>org.springframework.web.filter.CharacterEncodingFilter</filter-class>
        <init-param>
            <param-name>encoding</param-name>
            <param-value>utf-8</param-value>
        </init-param>
        <init-param>
            <param-name>forceRequestEncoding</param-name>
            <param-value>true</param-value>
        </init-param>
        <init-param>
            <param-name>forceResponseEncoding</param-name>
            <param-value>true</param-value>
        </init-param>
    </filter>
    <filter-mapping>
        <filter-name>characterEncodingFilter</filter-name>
        <url-pattern>/*</url-pattern>
    </filter-mapping>
GET乱码的解决:
修改tomcat配置文件添加编码与工程编码一致,如下:
<Connector URIEncoding="utf-8" connectionTimeout="20000" port="8080" protocol="HTTP/1.1" redirectPort="8443"/>
另外一种方法对参数进行重新编码:
   String userName new

  String(request.getParamter("userName").getBytes("ISO8859-1"),"utf-8")
ISO8859-1是tomcat默认编码,需要将tomcat编码后的内容按utf-8编码
以下就是常用的默认支持的默认参数类型(还有例如 Writer Reader 等就不逐一列出)
默认支持的参数类型
处理器形参中添加如下类型的参数处理适配器会默认识别并进行赋值。
.1HttpServletRequest
通过request对象获取请求信息
.2HttpServletResponse
通过response处理响应信息
.3HttpSession
通过session对象得到session中存放的对象
.4Model/ModelMap
ModelMap是Model接口的实现类,通过Model或ModelMap向页面传递数据
2.绑定简单数据类型
我们这里进行修改到修改详情页的例子:
编写controller
//修改页面数据的方法(记得配requestMapping)
    @RequestMapping("/updateitem")
    public String updateitem(Integer id,String name,Float price,String detail) throws Exception{
        /*接收参数原本为String字符串,
        springMVC会自动转换为我们写的Integer(根据id这个名称来转换传来的参),
        后面的类同*/
        //将参数封装进对象
        Items items = new Items();
        items.setId(id);
        items.setName(name);
        items.setPrice(price);
        items.setDetail(detail);
        //由于字段限制非空,必须加时间
        items.setCreatetime(new Date());
        service.updateitem(items);
        return "success";
    }
//此处需要注意的是简单参数类型获取到的都是string,而我们这里写的 Integer id,String name,Float price,String detail
//会由springMVC帮我们转换(而参数名需要我们与页面的传递参数名一致)
编写service
void updateitem(Items items) throws Exception;
编写service实现类
//修改
    @Override
    public void updateitem(Items items) throws Exception {
        //此处选择按主键更新(带大文本的detail),具体原因可以查看逆向工程生成的配置文件的SQL
        //需要更新detail这个大文本,必须带blobs
        mapper.updateByPrimaryKeyWithBLOBs(items);
        //没拿session,不用commit(),全归spring管理
    }
成功跳转到success.jsp页面即为成功!
3.绑定POJO类型
由上面方式2我们很容易看出无论从代码量可读性与优雅性来说都是不太可取的,
由于接收的参数的规律和POJO类对应,并且还支持级联属性(例如表单可以写address.province(User里的address是pojo类型)),我们把方式改为接收POJO类(当然底层是上面的方式)
@RequestMapping("/updateitem")
    public String updateitem(Items items) throws Exception{
        //由于字段限制非空,必须加时间
        items.setCreatetime(new Date());
        service.updateitem(items);
        return "success";
    }
//很容易看出 接收的规律:POJO类属性与参数同名
4.绑定POJO包装类型(VO类型)
VO对象主要是通过包装一些例如订单 用户等POJO类型来完成复杂查询的包装类型
这里我们先新建一个vo包定义一个VO,里面作测试暂时只封装一个Items:
package cn.vo;

import cn.pojo.Items;

public class QueryVo {

    //商品对象
    private Items items;
    public Items getItems() {
        return items;
    }
    public void setItems(Items items) {
        this.items = items;
    }
    //订单对象 用户对象...

}
再来看itemsList.jsp页面的变化
<form action="${pageContext.request.contextPath }/serach.action" method="post">
查询条件:
<table width="100%" border=1>
<tr>
<!-- 使用了包装类型vo后,将使用对象.xx的形式编写name属性值 -->
商品名称:<td><input type="text" name="items.name"/></td>
商品价格:<td><input type="text" name="items.price"/></td>
<td><input type="submit" value="查询"/></td>
//这里主要注意name属性的编写
controller的编写比较简单,仅作演示而用,采用打断点查看vo的数据
//查询的方法,主要用于演示绑定参数为vo等包装类型的,为简便起见采用断点查看
    @RequestMapping("/serach")
    public String serach(QueryVo vo) throws Exception{
        System.out.println(vo);
        return "";
    }
测试的话比较简单 访问 localhost:8080/ssm-01/list.action到列表页面去,点击列表页面查询到debug页面查看数据是否到了vo即可
5.自定义参数绑定:数据的格式化与数据类型转换
【更新】:单独对某个POJO属性进行格式化(而不是下文的全局配置):注意这里需要依赖注解驱动!
@DateTimeFormat(pattern = "yyyy-MM-dd")
private Date receiveAppTime;
//待验证
场景:在上述的传参中,由于接收类型都是String ,springMVC会自动转换好,但如果加入一个日期这样的类型,它将会报400的异常
这里就需要我们对传入的日期转字符串进行转换处理
分析:由于日期数据有很多种格式,所以springmvc没办法把字符串转换成日期类型。所以需要自定义参数绑定。前端控制器接收到请求后,
找到注解形式的处理器适配器,对RequestMapping标记的方法进行适配,并对方法中的形参进行参数绑定。在springmvc这可以在处理器适配器上
自定义Converter进行参数绑定。如果使用<mvc:annotation-driven/>可以在此标签上进行扩展。
springMVC的解决方案是通过转换器来完成;先自定义一个converter来完成转换:(实现Converter接口的形式)
package cn.controller.convert;

import java.text.ParseException;
import java.text.SimpleDateFormat;
import java.util.Date;

import org.springframework.core.convert.converter.Converter;

/**
 * S:source 源,这里是String
 * T:target 目标:这里是Date
 * 这里注意一下实现接口时导入的是spring核心包里的
 * @author jiangbei01
 *
 */
public class CustomerStringToDateConverter implements Converter<String, Date> {

    @Override
    public Date convert(String source) {
        try {
            Date date = new SimpleDateFormat("yyyy-MM-dd HH:mm:ss").parse(source);
            return date;
        } catch (ParseException e) {
            e.printStackTrace();
            return null;
        }

    }


}
//此类是在controller下的子包里的类
然后需要在springMVC核心配置中配置转换器:
<!-- 转换器配置 -->
    <bean id="conversionService"
        class="org.springframework.format.support.FormattingConversionServiceFactoryBean">
        <property name="converters">
            <set>
                <!-- 指定自定义转换器的全路径 -->
                <bean class="cn.controller.convert.CustomerStringToDateConverter"/>
            </set>
        </property>
    </bean>
还需要在<mvc:annotation-driven/>在此标签上进行扩展
<!-- 配置注解驱动,作用不再赘述(三大件中的两件) -->
        <mvc:annotation-driven conversion-service="conversionService"></mvc:annotation-driven>
为什么要做这个配置呢?原因是我们是写的类是转换的类,转换是由处理器适配器来调用管理,所以需要配置处理器适配器,
当然,我们这里不采用显式配置的方式,我们的映射器、适配器是在注解驱动中完成配置的,故在此做这个配置
editItem.jsp增加时间(把原来修改的controller里的设置日期去掉)
<%@ page language="java" contentType="text/html; charset=UTF-8"
    pageEncoding="UTF-8"%>
<%@ taglib uri="http://java.sun.com/jsp/jstl/core" prefix="c" %>
<%@ taglib uri="http://java.sun.com/jsp/jstl/fmt"  prefix="fmt"%>
<!DOCTYPE html PUBLIC "-//W3C//DTD HTML 4.01 Transitional//EN" "http://www.w3.org/TR/html4/loose.dtd">
<html>
<head>
<meta http-equiv="Content-Type" content="text/html; charset=UTF-8">
<title>修改商品信息</title>

</head>
<body>
    <!-- 上传图片是需要指定属性 enctype="multipart/form-data" -->
    <!-- <form id="itemForm" action="" method="post" enctype="multipart/form-data"> -->
    <form id="itemForm"    action="${pageContext.request.contextPath }/updateitem.action" method="post">
        <input type="hidden" name="id" value="${item.id }" /> 修改商品信息:
        <table width="100%" border=1>
            <tr>
                <td>商品名称</td>
                <td><input type="text" name="name" value="${item.name }" /></td>
            </tr>
            <tr>
                <td>商品价格</td>
                <td><input type="text" name="price" value="${item.price }" /></td>
            </tr>

            <tr>
                <td>商品生产日期</td>
                <td><input type="text" name="createtime"
                    value="<fmt:formatDate value="${item.createtime}" pattern="yyyy-MM-dd HH:mm:ss"/>" /></td>
            </tr>
            <%--
            <tr>
                <td>商品图片</td>
                <td>
                    <c:if test="${item.pic !=null}">
                        <img src="/pic/${item.pic}" width=100 height=100/>
                        <br/>
                    </c:if>
                    <input type="file"  name="pictureFile"/>
                </td>
            </tr>
             --%>
            <tr>
                <td>商品简介</td>
                <td><textarea rows="3" cols="30" name="detail">${item.detail }</textarea>
                </td>
            </tr>
            <tr>
                <td colspan="2" align="center"><input type="submit" value="提交" />
                </td>
            </tr>
        </table>

    </form>
</body>

</html>
当然,除了可以字符串转日期,还可以实现其它的自定义的类型转换,例如,String转POJO
与struts2对比这里暂不做展开
小结:
1. springMvc:是一个表现层框架,
    作用:就是从请求中接收传入的参数,
         将处理后的结果数据返回给页面展示
2. ssm整合:
    1)Dao层
        pojo和映射文件以及接口使用逆向工程生成
        SqlMapConfig.xml   mybatis核心配置文件
        ApplicationContext-dao.xml 整合后spring在dao层的配置
            数据源
            会话工厂
            扫描Mapper
    2)service层
        事务            ApplicationContext-trans.xml
        @Service注解扫描    ApplicationContext-service.xml
    3)controller层
        SpringMvc.xml
            注解扫描:扫描@Controller注解
            注解驱动:替我们显示的配置了最新版的处理器映射器和处理器适配器
            视图解析器:显示的配置是为了在controller中不用每个方法都写页面的全路径
    4)web.xml
        springMvc前端控制器配置
        spring监听

3.参数绑定(从请求中接收参数)重点
    1)默认类型:
        在controller方法中可以有也可以没有,看自己需求随意添加.
        httpservletRqeust,httpServletResponse,httpSession,Model(ModelMap其实就是Mode的一个子类
        ,一般用的不多)
    2)基本类型:string,double,float,integer,long.boolean
    3)pojo类型:页面上input框的name属性值必须要等于pojo的属性名称
    4)vo类型:页面上input框的name属性值必须要等于vo中的属性.属性.属性....
    5)自定义转换器converter:
        作用:由于springMvc无法将string自动转换成date所以需要自己手动编写类型转换器
        需要编写一个类实现Converter接口
        在springMvc.xml中配置自定义转换器
        在springMvc.xml中将自定义转换器配置到注解驱动上
springMVC的maven构建请参见另外一篇博文
【更新】web.xml上下文配置,这里我们来看我们web.xml:
<?xml version="1.0" encoding="UTF-8"?>
<web-app xmlns:xsi="http://www.w3.org/2001/XMLSchema-instance"
xmlns="http://java.sun.com/xml/ns/javaee"
xsi:schemaLocation="http://java.sun.com/xml/ns/javaee http://java.sun.com/xml/ns/javaee/web-app_2_5.xsd"
id="WebApp_ID" version="2.5">
    <display-name>springMVC-study</display-name>
  <servlet>
    <servlet-name>springDispatcherServlet</servlet-name>
    <servlet-class>org.springframework.web.servlet.DispatcherServlet</servlet-class>
    <init-param>
      <param-name>contextConfigLocation</param-name>
      <param-value>classpath:springContext.xml</param-value>
    </init-param>
    <load-on-startup>1</load-on-startup>
  </servlet>
  <servlet-mapping>
    <servlet-name>springDispatcherServlet</servlet-name>
    <url-pattern>/</url-pattern>
  </servlet-mapping>
  <!-- 配置spring应用的上下文 -->
  <!-- needed for ContextLoaderListener -->
    <context-param>
        <param-name>contextConfigLocation</param-name>
        <param-value>classpath:applicationContext.xml</param-value>
    </context-param>

    <!-- Bootstraps the root web application context before servlet initialization -->
    <listener>
        <listener-class>org.springframework.web.context.ContextLoaderListener</listener-class>
    </listener>
</web-app>
我们发现会有两个上下文,一个是dispatcherServlet里的springMVC的上下文,一个是listener里的spring的上下文;
两个上下文的范围是不同的,spring的上下文是全局所共享的,而springMVC的上下文是专为某个DispatcherServlet所共享的,事实上,一个应用程序可以存在多个DispatcherServlet用来分发不同的请求
【更新】:配置静态资源访问:
参见:http://blog.csdn.net/caokang1314/article/details/47750267
<!-- 静态资源访问 -->
<mvc:default-servlet-handler/>
//原理是匹配/**的资源,故一定会找到
【更新】:spring的配置文件中可以配置去除controller的扫描(交给springMVC来做)
【更新】:springMVC的表单标签:已更新为随笔:http://www.cnblogs.com/jiangbei/p/7168732.html