一、整合思路
1、SqlSessionFactory对象应该放到spring容器中作为单例存在。
2、传统dao的开发方式中,应该从spring容器中获得sqlsession对象。
3、Mapper代理形式中,应该从spring容器中直接获得mapper的代理对象。
4、数据库的连接(数据源)以及数据库连接池事务管理都交给spring容器来完成。
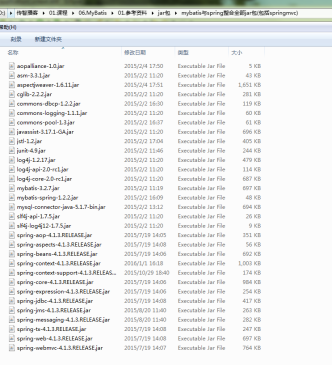
二、整合所需jar包
1、spring的jar包
2、Mybatis的jar包
3、Spring+mybatis的整合包。
4、Mysql的数据库驱动jar包。
5、数据库连接池的jar包。
//可能会有一些多余的jar包,此处暂作忽略(补充maven整合! )
三、整合步骤
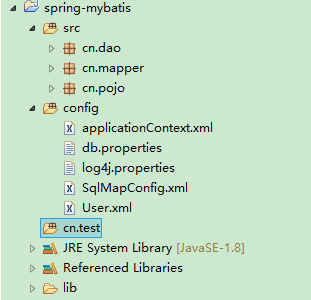
第一步:创建一个java工程。
目录结构如下:
//遵循maven项目结构
第二步:导入jar包。(上面提到的jar包)
(此处放入lib目录,不再赘述)
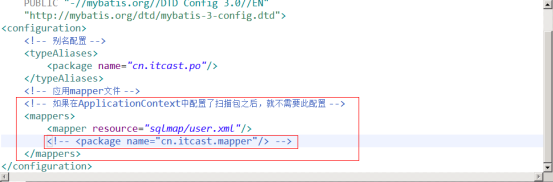
第三步:mybatis的配置文件sqlMapConfig.xml
<?xml version="1.0" encoding="UTF-8" ?>
<!DOCTYPE configuration
PUBLIC "-//mybatis.org//DTD Config 3.0//EN"
"http://mybatis.org/dtd/mybatis-3-config.dtd">
<configuration>
    <typeAliases>
        <!-- 定义单个pojo类别名
        type:类的全路劲名称
        alias:别名
         -->
<!--         <typeAlias type="cn.pojo.User" alias="user"/> -->

        <!-- 使用包扫描的方式批量定义别名
        定以后别名等于类名,不区分大小写,但是建议按照java命名规则来,首字母小写,以后每个单词的首字母大写
        -->
        <package name="cn.pojo"/>
    </typeAliases>
    <mappers>
        <mapper resource="User.xml"/>
        <!--
        使用class属性引入接口的全路径名称:
        使用规则:
            1. 接口的名称和映射文件名称除扩展名外要完全相同
            2. 接口和映射文件要放在同一个目录下
         -->
<!--         <mapper class="cn.mapper.UserMapper"/> -->

        <!-- 使用包扫描的方式批量引入Mapper接口
                使用规则:
                1. 接口的名称和映射文件名称除扩展名外要完全相同
                2. 接口和映射文件要放在同一个目录下
        -->
<!--         <package name="cn.mapper"/> -->
    </mappers>
</configuration>
//此处的映射文件只是为了演示一下原始DAO的开发方式
第四步:编写Spring的配置文件
1、数据库连接及连接池
2、事务管理(暂时可以不配置)
3、sqlsessionFactory对象,配置到spring容器中


<?xml version="1.0" encoding="UTF-8"?>
<beans xmlns="http://www.springframework.org/schema/beans"
    xmlns:context="http://www.springframework.org/schema/context" xmlns:p="http://www.springframework.org/schema/p"
    xmlns:aop="http://www.springframework.org/schema/aop" xmlns:tx="http://www.springframework.org/schema/tx"
    xmlns:xsi="http://www.w3.org/2001/XMLSchema-instance"
    xsi:schemaLocation="http://www.springframework.org/schema/beans http://www.springframework.org/schema/beans/spring-beans-4.0.xsd
    http://www.springframework.org/schema/context http://www.springframework.org/schema/context/spring-context-4.0.xsd
    http://www.springframework.org/schema/aop http://www.springframework.org/schema/aop/spring-aop-4.0.xsd http://www.springframework.org/schema/tx http://www.springframework.org/schema/tx/spring-tx-4.0.xsd
    http://www.springframework.org/schema/util http://www.springframework.org/schema/util/spring-util-4.0.xsd">

    <!-- 加载配置文件 -->
    <context:property-placeholder location="classpath:db.properties" />
    <!-- 数据库连接池 (此时使用的是dbcp,效率不高,仅作演示使用)-->
    <bean id="dataSource" class="org.apache.commons.dbcp.BasicDataSource"
        destroy-method="close">
        <property name="driverClassName" value="${jdbc.driver}" />
        <property name="url" value="${jdbc.url}" />
        <property name="username" value="${jdbc.username}" />
        <property name="password" value="${jdbc.password}" />
        <property name="maxActive" value="10" />
        <property name="maxIdle" value="5" />
    </bean>
    <!-- 整合后会话工厂归spring管理 ,class类名在整合jar包第一个包里找,去掉class即是了-->
    <bean id="sqlSessionFactory" class="org.mybatis.spring.SqlSessionFactoryBean">
        <!-- 需要哪些属性直接点开上面的class即可显示(即使未关联源码,下面会有显示) -->
        <!-- 指定mybatis核心配置文件 -->
        <property name="configLocation" value="classpath:SqlMapConfig.xml"></property>
        <!-- 指定会话工厂的数据源 -->
        <property name="dataSource" ref="dataSource"></property>
    </bean>
//这里配置sqlSessionFactory时可以回忆工厂是如何得到的,就可以很清楚地知道需要配置注入哪些信息
4、mapeer代理对象或者是dao实现类配置到spring容器中。
Dao的开发
1.传统dao(接口+实现类形式)
dao实现类
package cn.dao;

import java.util.List;

import org.apache.ibatis.session.SqlSession;
import org.mybatis.spring.support.SqlSessionDaoSupport;

import cn.pojo.User;

public class UserDaoImpl extends SqlSessionDaoSupport implements UserDao {

    @Override
    public User findUserById(Integer id) {
        //sqlSesion是线程不安全的,所以它的最佳使用范围在方法体内
        SqlSession openSession = this.getSqlSession();
        User user = openSession.selectOne("test.findUserById", id);
        //整合后会话归spring管理,所以不需要手动关闭.
        //openSession.close();
        return user;
    }

    @Override
    public List<User> findUserByUserName(String userName) {
        SqlSession openSession = this.getSqlSession();
        List<User> list = openSession.selectList("test.findUserByUserName", userName);
        return list;
    }


}
配置dao交给spring管理
<!-- 配置原生dao实现,id为接口,class为实现类的形式 -->
    <bean id="userDao" class="cn.dao.UserDaoImpl">
        <property name="sqlSessionFactory" ref="sqlSessionFactory"></property>
    </bean>
测试函数
package cn.test;

import org.junit.Before;
import org.junit.Test;
import org.springframework.context.ApplicationContext;
import org.springframework.context.support.ClassPathXmlApplicationContext;

import cn.dao.UserDao;
import cn.pojo.User;

public class UserDaoTest {

    private ApplicationContext applicationContext;

    //进行初始化
    @Before
    public void setUp() throws Exception{
        String configuration = "applicationContext.xml";
        applicationContext = new ClassPathXmlApplicationContext(configuration);
    }
    @Test
    public void testfindUserById() throws Exception{
        UserDao dao = (UserDao) applicationContext.getBean("userDao");
        User user = dao.findUserById(1);
        System.out.println(user);
    }
}
2.mapper代理形式开发dao
mapper文件编写

UserMapper.java
package cn.mapper;

import java.util.List;

import org.apache.ibatis.annotations.Param;

import cn.pojo.User;
import cn.pojo.UserExample;

public interface UserMapper {
    int countByExample(UserExample example);

    int deleteByExample(UserExample example);

    int deleteByPrimaryKey(Integer id);

    int insert(User record);

    int insertSelective(User record);

    List<User> selectByExample(UserExample example);

    User selectByPrimaryKey(Integer id);

    int updateByExampleSelective(@Param("record") User record, @Param("example") UserExample example);

    int updateByExample(@Param("record") User record, @Param("example") UserExample example);

    int updateByPrimaryKeySelective(User record);

    int updateByPrimaryKey(User record);
}
UserMapper.xml
<?xml version="1.0" encoding="UTF-8" ?>
<!DOCTYPE mapper PUBLIC "-//mybatis.org//DTD Mapper 3.0//EN" "http://mybatis.org/dtd/mybatis-3-mapper.dtd" >
<mapper namespace="cn.mapper.UserMapper" >
  <resultMap id="BaseResultMap" type="cn.pojo.User" >
    <id column="id" property="id" jdbcType="INTEGER" />
    <result column="username" property="username" jdbcType="VARCHAR" />
    <result column="birthday" property="birthday" jdbcType="DATE" />
    <result column="sex" property="sex" jdbcType="CHAR" />
    <result column="address" property="address" jdbcType="VARCHAR" />
  </resultMap>
  <sql id="Example_Where_Clause" >
    <where >
      <foreach collection="oredCriteria" item="criteria" separator="or" >
        <if test="criteria.valid" >
          <trim prefix="(" suffix=")" prefixOverrides="and" >
            <foreach collection="criteria.criteria" item="criterion" >
              <choose >
                <when test="criterion.noValue" >
                  and ${criterion.condition}
                </when>
                <when test="criterion.singleValue" >
                  and ${criterion.condition} #{criterion.value}
                </when>
                <when test="criterion.betweenValue" >
                  and ${criterion.condition} #{criterion.value} and #{criterion.secondValue}
                </when>
                <when test="criterion.listValue" >
                  and ${criterion.condition}
                  <foreach collection="criterion.value" item="listItem" open="(" close=")" separator="," >
                    #{listItem}
                  </foreach>
                </when>
              </choose>
            </foreach>
          </trim>
        </if>
      </foreach>
    </where>
  </sql>
  <sql id="Update_By_Example_Where_Clause" >
    <where >
      <foreach collection="example.oredCriteria" item="criteria" separator="or" >
        <if test="criteria.valid" >
          <trim prefix="(" suffix=")" prefixOverrides="and" >
            <foreach collection="criteria.criteria" item="criterion" >
              <choose >
                <when test="criterion.noValue" >
                  and ${criterion.condition}
                </when>
                <when test="criterion.singleValue" >
                  and ${criterion.condition} #{criterion.value}
                </when>
                <when test="criterion.betweenValue" >
                  and ${criterion.condition} #{criterion.value} and #{criterion.secondValue}
                </when>
                <when test="criterion.listValue" >
                  and ${criterion.condition}
                  <foreach collection="criterion.value" item="listItem" open="(" close=")" separator="," >
                    #{listItem}
                  </foreach>
                </when>
              </choose>
            </foreach>
          </trim>
        </if>
      </foreach>
    </where>
  </sql>
  <sql id="Base_Column_List" >
    id, username, birthday, sex, address
  </sql>
  <select id="selectByExample" resultMap="BaseResultMap" parameterType="cn.pojo.UserExample" >
    select
    <if test="distinct" >
      distinct
    </if>
    <include refid="Base_Column_List" />
    from user
    <if test="_parameter != null" >
      <include refid="Example_Where_Clause" />
    </if>
    <if test="orderByClause != null" >
      order by ${orderByClause}
    </if>
  </select>
  <select id="selectByPrimaryKey" resultMap="BaseResultMap" parameterType="java.lang.Integer" >
    select
    <include refid="Base_Column_List" />
    from user
    where id = #{id,jdbcType=INTEGER}
  </select>
  <delete id="deleteByPrimaryKey" parameterType="java.lang.Integer" >
    delete from user
    where id = #{id,jdbcType=INTEGER}
  </delete>
  <delete id="deleteByExample" parameterType="cn.pojo.UserExample" >
    delete from user
    <if test="_parameter != null" >
      <include refid="Example_Where_Clause" />
    </if>
  </delete>
  <insert id="insert" parameterType="cn.pojo.User" >
    insert into user (id, username, birthday,
      sex, address)
    values (#{id,jdbcType=INTEGER}, #{username,jdbcType=VARCHAR}, #{birthday,jdbcType=DATE},
      #{sex,jdbcType=CHAR}, #{address,jdbcType=VARCHAR})
  </insert>
  <insert id="insertSelective" parameterType="cn.pojo.User" >
    insert into user
    <trim prefix="(" suffix=")" suffixOverrides="," >
      <if test="id != null" >
        id,
      </if>
      <if test="username != null" >
        username,
      </if>
      <if test="birthday != null" >
        birthday,
      </if>
      <if test="sex != null" >
        sex,
      </if>
      <if test="address != null" >
        address,
      </if>
    </trim>
    <trim prefix="values (" suffix=")" suffixOverrides="," >
      <if test="id != null" >
        #{id,jdbcType=INTEGER},
      </if>
      <if test="username != null" >
        #{username,jdbcType=VARCHAR},
      </if>
      <if test="birthday != null" >
        #{birthday,jdbcType=DATE},
      </if>
      <if test="sex != null" >
        #{sex,jdbcType=CHAR},
      </if>
      <if test="address != null" >
        #{address,jdbcType=VARCHAR},
      </if>
    </trim>
  </insert>
  <select id="countByExample" parameterType="cn.pojo.UserExample" resultType="java.lang.Integer" >
    select count(*) from user
    <if test="_parameter != null" >
      <include refid="Example_Where_Clause" />
    </if>
  </select>
  <update id="updateByExampleSelective" parameterType="map" >
    update user
    <set >
      <if test="record.id != null" >
        id = #{record.id,jdbcType=INTEGER},
      </if>
      <if test="record.username != null" >
        username = #{record.username,jdbcType=VARCHAR},
      </if>
      <if test="record.birthday != null" >
        birthday = #{record.birthday,jdbcType=DATE},
      </if>
      <if test="record.sex != null" >
        sex = #{record.sex,jdbcType=CHAR},
      </if>
      <if test="record.address != null" >
        address = #{record.address,jdbcType=VARCHAR},
      </if>
    </set>
    <if test="_parameter != null" >
      <include refid="Update_By_Example_Where_Clause" />
    </if>
  </update>
  <update id="updateByExample" parameterType="map" >
    update user
    set id = #{record.id,jdbcType=INTEGER},
      username = #{record.username,jdbcType=VARCHAR},
      birthday = #{record.birthday,jdbcType=DATE},
      sex = #{record.sex,jdbcType=CHAR},
      address = #{record.address,jdbcType=VARCHAR}
    <if test="_parameter != null" >
      <include refid="Update_By_Example_Where_Clause" />
    </if>
  </update>
  <update id="updateByPrimaryKeySelective" parameterType="cn.pojo.User" >
    update user
    <set >
      <if test="username != null" >
        username = #{username,jdbcType=VARCHAR},
      </if>
      <if test="birthday != null" >
        birthday = #{birthday,jdbcType=DATE},
      </if>
      <if test="sex != null" >
        sex = #{sex,jdbcType=CHAR},
      </if>
      <if test="address != null" >
        address = #{address,jdbcType=VARCHAR},
      </if>
    </set>
    where id = #{id,jdbcType=INTEGER}
  </update>
  <update id="updateByPrimaryKey" parameterType="cn.pojo.User" >
    update user
    set username = #{username,jdbcType=VARCHAR},
      birthday = #{birthday,jdbcType=DATE},
      sex = #{sex,jdbcType=CHAR},
      address = #{address,jdbcType=VARCHAR}
    where id = #{id,jdbcType=INTEGER}
  </update>
</mapper>
mapper在spring中的配置(包含包扫描的方式【推荐】)
<!-- 此法略显麻烦,若有多个mapper,则配置mapper暴增 -->
    <!-- mapper动态代理实现,在整合包的mapper包下找,删除.class后缀即可 -->
    <!-- <bean id="userMapper" class="org.mybatis.spring.mapper.MapperFactoryBean"> -->
        <!-- 配置mapper接口的全路径名称 -->
        <!-- <property name="mapperInterface" value="cn.mapper.UserMapper"></property>
        <property name="sqlSessionFactory" ref="sqlSessionFactory"></property>
    </bean> -->
    <!-- 使用包扫描的方式,批量引入mapper 使用的是整合包的扫描器
        扫描后引用的时候可以使用类名的首字母小写
     -->
    <bean class="org.mybatis.spring.mapper.MapperScannerConfigurer">
        <!-- 指定要扫描的包的全路径,多个包用,分割 -->
        <property name="basePackage" value="cn.mapper"></property>
    </bean>
//加载mapper配置文件和代理类交给spring来管理
//默认是不需要配置sqlSessionFactory的,spring会自动寻找并注入
测试函数
package cn.test;

import org.junit.Before;
import org.junit.Test;
import org.springframework.context.ApplicationContext;
import org.springframework.context.support.ClassPathXmlApplicationContext;

import cn.mapper.UserMapper;

public class UserMapperTest {

private ApplicationContext applicationContext;

    @Before
    public void setUp() throws Exception{
        String configuration = "applicationContext.xml";
        applicationContext = new ClassPathXmlApplicationContext(configuration);
    }
    @Test
    public void testfindUserById() throws Exception{
        UserMapper mapper = (UserMapper) applicationContext.getBean("userMapper");
        System.out.println(mapper);
    }
}
此时应当去除mybatis的包配置,避免重复引入
四、mybatis的逆向工程
mybaits需要程序员自己编写sql语句,mybatis官方提供逆向工程,可以针对单表自动生成mybatis执行所需要的代码
(mapper.Java,mapper.xml、po..)PO类,mapper映射文件,mapper接口
企业实际开发中,常用的逆向工程方式:由数据库的表生成java代码。
生成的代码是 追加 而不是 覆盖!意味着例如我们的逆向工程main方法只能执行一次, 如果再次执行就会继续生成相应的Dao和JavaBean, 除非我们把之前生成的全都删除. 这样对于代码的扩展性就不是很好, 如果我们需要对表结构进行修改, 那么我们就必须对生成的Dao和JavaBean进行一个个修改.
此时项目的失败可以查看磁盘上项目的文件大小发生变化,此时运行就会报错!
逆向工程下载地址:
https://github.com/mybatis/generator/releases/tag/mybatis-generator-1.3.2
XXXMapper.xml文件已经存在时,如果进行重新生成则mapper.xml文件内容不被覆盖而是进行内容追加,结果导致mybatis解析失败。
解决方法:删除原来已经生成的mapper xml文件再进行生成。
Mybatis自动生成的po及mapper.java文件不是内容而是直接覆盖没有此问题。
//保险起见可以直接删除原来整个cn.xxx的包,重新生成
使用官方网站的mapper自动生成工具 mybatis-generator-core-1.3.2 来生成po类和mapper映射文件。
作用:mybatis官方提供逆向工程,可以使用它通过数据库中的表来自动生成Mapper接口和映射文件(单表增删改查)和Po类.
新建工程
导入的包如下:
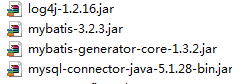
在工程目录下创建 generator.xml (内容暂不管,由mybatis官方提供的)
<?xml version="1.0" encoding="UTF-8"?>
<!DOCTYPE generatorConfiguration
  PUBLIC "-//mybatis.org//DTD MyBatis Generator Configuration 1.0//EN"
  "http://mybatis.org/dtd/mybatis-generator-config_1_0.dtd">

<generatorConfiguration>
    <context id="testTables" targetRuntime="MyBatis3">
        <commentGenerator>
            <!-- 是否去除自动生成的注释 true:是 : false:否 -->
            <property name="suppressAllComments" value="true" />
        </commentGenerator>
        <!--数据库连接的信息:驱动类、连接地址、用户名、密码 -->
        <jdbcConnection driverClass="com.mysql.jdbc.Driver"
            connectionURL="jdbc:mysql://localhost:3306/mybatis" userId="root"
            password="root">
        </jdbcConnection>
        <!-- <jdbcConnection driverClass="oracle.jdbc.OracleDriver"
            connectionURL="jdbc:oracle:thin:@127.0.0.1:1521:yycg"
            userId="yycg"
            password="yycg">
        </jdbcConnection> -->

        <!-- 默认false,把JDBC DECIMAL 和 NUMERIC 类型解析为 Integer,为 true时把JDBC DECIMAL 和
            NUMERIC 类型解析为java.math.BigDecimal -->
        <javaTypeResolver>
            <property name="forceBigDecimals" value="false" />
        </javaTypeResolver>

        <!-- targetProject:生成PO类的位置 -->
        <javaModelGenerator targetPackage="cn.pojo"
            targetProject=".src">
            <!-- enableSubPackages:是否让schema作为包的后缀 -->
            <property name="enableSubPackages" value="false" />
            <!-- 从数据库返回的值被清理前后的空格 -->
            <property name="trimStrings" value="true" />
        </javaModelGenerator>
        <!-- targetProject:mapper映射文件生成的位置 -->
        <sqlMapGenerator targetPackage="cn.mapper"
            targetProject=".src">
            <!-- enableSubPackages:是否让schema作为包的后缀 -->
            <property name="enableSubPackages" value="false" />
        </sqlMapGenerator>
        <!-- targetPackage:mapper接口生成的位置 -->
        <javaClientGenerator type="XMLMAPPER"
            targetPackage="cn.mapper"
            targetProject=".src">
            <!-- enableSubPackages:是否让schema作为包的后缀 -->
            <property name="enableSubPackages" value="false" />
        </javaClientGenerator>
        <!-- 指定数据库表 -->
<!--         <table tableName="items"></table> -->
        <table tableName="orders"></table>
<!--         <table tableName="orderdetail"></table> -->
        <table tableName="user"></table>
        <!-- <table schema="" tableName="sys_user"></table>
        <table schema="" tableName="sys_role"></table>
        <table schema="" tableName="sys_permission"></table>
        <table schema="" tableName="sys_user_role"></table>
        <table schema="" tableName="sys_role_permission"></table> -->

        <!-- 有些表的字段需要指定java类型
         <table schema="" tableName="">
            <columnOverride column="" javaType="" />
        </table> -->
    </context>
</generatorConfiguration>
//此配置文件中需要配置的内容:
1、 添加要生成的数据库表
2、 po文件所在包路径
3、 mapper文件所在包路径
创建java类 StartServer生 成Mapper文件 (内容咱不管,由官方提供)
package generator;

import java.io.File;
import java.util.ArrayList;
import java.util.List;

import org.mybatis.generator.api.MyBatisGenerator;
import org.mybatis.generator.config.Configuration;
import org.mybatis.generator.config.xml.ConfigurationParser;
import org.mybatis.generator.internal.DefaultShellCallback;

public class StartServer {

    public void generator() throws Exception{
        List<String> warnings = new ArrayList<String>();
        boolean overwrite = true;
        File configFile = new File("generator.xml");
        ConfigurationParser cp = new ConfigurationParser(warnings);
        Configuration config = cp.parseConfiguration(configFile);
        DefaultShellCallback callback = new DefaultShellCallback(overwrite);
        MyBatisGenerator myBatisGenerator = new MyBatisGenerator(config,
                callback, warnings);
        myBatisGenerator.generate(null);
    }
    public static void main(String[] args) throws Exception {
        try {
            StartServer startServer = new StartServer();
            startServer.generator();
        } catch (Exception e) {
            e.printStackTrace();
        }
}
}
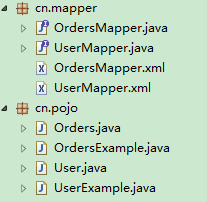
拷贝生成的mapper文件到工程中指定的目录中(也就是图中展开的目录)
mapper生成的常用的增删改查方法:
//删除符合条件的记录
int deleteByExample(UserExample example);
//根据主键删除
int deleteByPrimaryKey(String id);
//插入对象所有字段
int insert(User record);
//插入对象不为空的字段
int insertSelective(User record);
//自定义查询条件查询结果集
List<User> selectByExample(UserExample example);
//根据主键查询
UserselectByPrimaryKey(String id);
//根据主键将对象中不为空的值更新至数据库
int updateByPrimaryKeySelective(User record);
//根据主键将对象中所有字段的值更新至数据库
int updateByPrimaryKey(User record);
两个简单的测试例子:
package cn.test;

import java.util.List;

import org.junit.Before;
import org.junit.Test;
import org.springframework.context.ApplicationContext;
import org.springframework.context.support.ClassPathXmlApplicationContext;

import cn.mapper.UserMapper;
import cn.pojo.User;
import cn.pojo.UserExample;
import cn.pojo.UserExample.Criteria;

public class UserMapperTest {

private ApplicationContext applicationContext;

    @Before
    public void setUp() throws Exception{
        String configuration = "applicationContext.xml";
        applicationContext = new ClassPathXmlApplicationContext(configuration);
    }
    //根据ID来查询
    @Test
    public void testFindUserById() throws Exception{
        UserMapper mapper
            = (UserMapper) applicationContext.getBean("userMapper");
        User user = mapper.selectByPrimaryKey(1);
        System.out.println(user);
    }
    //根据姓名和性别查询
    @Test
    public void testFindUserAndSex() throws Exception{
        UserMapper mapper
        = (UserMapper) applicationContext.getBean("userMapper");
        //复杂条件通过逆向工程生成的UserExample来实现
        UserExample example = new UserExample();
        //通过内部类criteria进行查询(有点类似hibernate)
        Criteria criteria = example.createCriteria();
        //创建条件
        criteria.andUsernameLike("%王%");//手动加%
        criteria.andSexEqualTo("1");
        List<User> list = mapper.selectByExample(example);
        System.out.println(list);
    }
}
其它的自动生成的文件的细节在后续springMVC等中逐渐补充(常用单表查询已生成;如需要多表查询,可以自己在配置文件中加<select>...)
//一般而言,单表的查询可以使用逆向工程的生成代码,如果想使用自己的,可以自己再命名一套 UserMapperExt.java等的文件互相补充!
小结:
1. 输入映射(就是映射文件中可以传入哪些参数类型)
    1)基本类型
    2)pojo类型
    3)Vo类型
2. 输出映射(返回的结果集可以有哪些类型)
    1)基本类型
    2)pojo类型
    3)List类型
3. 动态sql:动态的拼接sql语句,因为sql中where条件有可能多也有可能少
    1)where:可以自动添加where关键字,还可以去掉第一个条件的and关键字
    2)if:判断传入的参数是否为空
    3)foreach:循环遍历传入的集合参数
    4)sql:封装查询条件,以达到重用的目的

4. 对单个对象的映射关系:
    1)自动关联(偷懒的办法):可以自定义一个大而全的pojo类,然后自动映射其实是根据数据库总的字段名称和
        pojo中的属性名称对应.
    2)手动关联: 需要指定数据库中表的字段名称和java的pojo类中的属性名称的对应关系.
        使用association标签
5. 对集合对象的映射关系
    只能使用手动映射:指定表中字段名称和pojo中属性名称的对应关系
        使用collection标签
6. spring和mybatis整合
    整合后会话工厂都归spring管理
    1)原生Dao实现:
        需要在spring配置文件中指定dao实现类
        dao实现类需要继承SqlSessionDaoSupport超类
        在dao实现类中不要手动关闭会话,不要自己提交事务.
    2)Mapper接口代理实现:
        在spring配置文件中可以使用包扫描的方式,一次性的将所有mapper加载

7. 逆向工程:自动生成Pojo类,还可以自动生成Mapper接口和映射文件
    注意:生成的方式是追加而不是覆盖,所以不可以重复生成,重复生成的文件有问题.
        如果想重复生成将原来生成的文件删除
所有mybatis两个day代码请参见:
链接:http://pan.baidu.com/s/1eSxMeR4 密码:htv1