使用 Flume 采集服务器本地日志,需要按照日志类型的不同,将不同种类的日志发往不同的分析系统。
在实际的开发中,一台服务器产生的日志类型可能有很多种,不同类型的日志可能需要发送到不同的分析系统。
此时会用到 Flume 拓扑结构中的 Multiplexing 结构,Multiplexing的原理是,根据 event 中 Header 的某个 key 的值,将不同的 event 发送到不同的 Channel中,所以我们需要自定义一个 Interceptor,为不同类型的 event 的 Header 中的 key 赋予 不同的值。
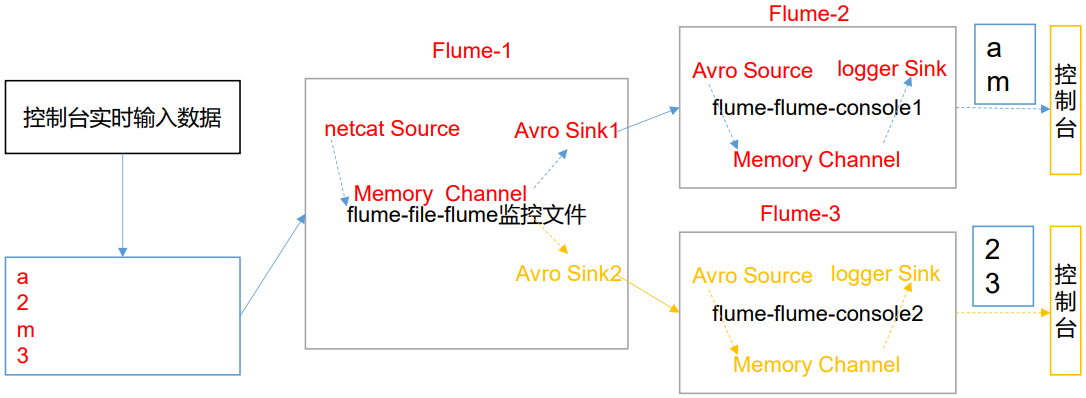
这里以端口数据模拟日志,以数字(单个)和字母(单个)模拟不同类型的日志,需要自定义 interceptor 区分数字和字母,将其分别发往不同的分析系统(Channel)。
一、创建自定义拦截器
https://flume.apache.org/FlumeUserGuide.html#flume-interceptors
1.引入 pom 依赖
<?xml version="1.0" encoding="UTF-8"?>
<project xmlns="http://maven.apache.org/POM/4.0.0"
         xmlns:xsi="http://www.w3.org/2001/XMLSchema-instance"
         xsi:schemaLocation="http://maven.apache.org/POM/4.0.0 http://maven.apache.org/xsd/maven-4.0.0.xsd">
    <modelVersion>4.0.0</modelVersion>

    <groupId>com</groupId>
    <artifactId>flume</artifactId>
    <version>1.0-SNAPSHOT</version>

    <dependencies>
        <dependency>
            <groupId>org.apache.flume</groupId>
            <artifactId>flume-ng-core</artifactId>
            <version>1.9.0</version>
        </dependency>
    </dependencies>

    <build>
        <plugins>
            <plugin>
                <groupId>org.apache.maven.plugins</groupId>
                <artifactId>maven-compiler-plugin</artifactId>
                <configuration>
                    <source>1.8</source>
                    <target>1.8</target>
                    <encoding>UTF-8</encoding>
                </configuration>
            </plugin>
        </plugins>
    </build>
</project>
2.编写拦截器类
package interceptor;

import org.apache.flume.Context;
import org.apache.flume.Event;
import org.apache.flume.interceptor.Interceptor;

import java.util.List;

public class CustomInterceptor implements Interceptor {
    @Override
    public void initialize() {

    }

    // 单个事件拦截
    @Override
    public Event intercept(Event event) {
        byte[] body = event.getBody();
        if (body[0] < 'z' && body[0] > 'a') {
            // 自定义头信息
            event.getHeaders().put("type", "letter");
        } else if (body[0] > '0' && body[0] < '9') {
            // 自定义头信息
            event.getHeaders().put("type", "number");
        }
        return event;
    }

    // 批量事件拦截
    @Override
    public List<Event> intercept(List<Event> list) {
        for (Event event : list) {
            intercept(event);
        }
        return list;
    }

    @Override
    public void close() {

    }

    public static class Builder implements Interceptor.Builder {
        @Override
        public Interceptor build() {
            return new CustomInterceptor();
        }

        @Override
        public void configure(Context context) {
        }
    }
}
二、打包测试
1.打包上传
将项目打包。

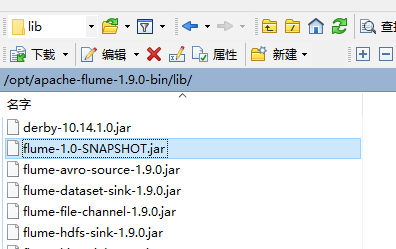
上传到 flume 的 lib 目录下。
2.编写 flume 配置文件
1.flume1
配置 1 个 netcat source,1 个 sink group(2 个 avro sink),并配置相应的 ChannelSelector 和 interceptor。


# Name the components on this agent
a1.sources = r1
a1.sinks = k1 k2
a1.channels = c1 c2

# Describe/configure the source
a1.sources.r1.type = netcat
a1.sources.r1.bind = 127.0.0.1
a1.sources.r1.port = 4444

# 拦截器
a1.sources.r1.interceptors = i1
a1.sources.r1.interceptors.i1.type = interceptor.CustomInterceptor$Builder

# 选择器
a1.sources.r1.selector.type = multiplexing
a1.sources.r1.selector.header = type
# 与自定义拦截器中设置的头信息对应
a1.sources.r1.selector.mapping.letter = c1
a1.sources.r1.selector.mapping.number = c2

# Describe the sink
a1.sinks.k1.type = avro
a1.sinks.k1.hostname = 127.0.0.1
a1.sinks.k1.port = 4141

a1.sinks.k2.type=avro
a1.sinks.k2.hostname = 127.0.0.1
a1.sinks.k2.port = 4242

# Use a channel which buffers events in memory
a1.channels.c1.type = memory
a1.channels.c1.capacity = 1000
a1.channels.c1.transactionCapacity = 100

a1.channels.c2.type = memory
a1.channels.c2.capacity = 1000
a1.channels.c2.transactionCapacity = 100

# Bind the source and sink to the channel
a1.sources.r1.channels = c1 c2
a1.sinks.k1.channel = c1
a1.sinks.k2.channel = c2
2.flume2
配置一个 avro source 和一个 logger sink。
a2.sources = r1
a2.sinks = k1
a2.channels = c1

a2.sources.r1.type = avro
a2.sources.r1.bind = 127.0.0.1
a2.sources.r1.port = 4141

a2.sinks.k1.type = logger

a2.channels.c1.type = memory
a2.channels.c1.capacity = 1000
a2.channels.c1.transactionCapacity = 100

a2.sinks.k1.channel = c1
a2.sources.r1.channels = c1
3.flume3
配置一个 avro source 和一个 logger sink。
a3.sources = r1
a3.sinks = k1
a3.channels = c1

a3.sources.r1.type = avro
a3.sources.r1.bind = 127.0.0.1
a3.sources.r1.port = 4242

a3.sinks.k1.type = logger

a3.channels.c1.type = memory
a3.channels.c1.capacity = 1000
a3.channels.c1.transactionCapacity = 100

a3.sinks.k1.channel = c1
a3.sources.r1.channels = c1
3.测试
flume2 和 flume3 需要先启动,flume1 需要连接 flume2 和 flume3,若先启动 flume1 会报连接不上(也可以无视错误日志,先启动)
cd /opt/apache-flume-1.9.0-bin

bin/flume-ng agent --conf conf/ --name a3 --conf-file /tmp/flume-job/interceptor/flume3 -Dflume.root.logger=INFO,console
bin/flume-ng agent --conf conf/ --name a2 --conf-file /tmp/flume-job/interceptor/flume2 -Dflume.root.logger=INFO,console
bin/flume-ng agent --conf conf/ --name a1 --conf-file /tmp/flume-job/interceptor/flume1 -Dflume.root.logger=INFO,console
向监控端口发送数据。
nc 127.0.0.1 4444

qwer
1234
可以看到不同的内容被发送到不同的 flume 了,拦截器代码中只定义数字和小写字母,发送其它的内容不会被 flume1 转发。
