一、环境准备
| 主机名 |
IP |
相关服务 |
| staging |
192.168.1.18 |
mysql,confluence |
二、配置Java环境
1.上传jdk包
[root@staging ~]# rz
[root@staging ~]# ll
总用量 206900
-rw-------. 1 root root      6921 2018-06-05 22:17 anaconda-ks.cfg
-rw-r--r--  1 root root 185540433 2021-05-19 17:21 jdk-8u131-linux-x64.tar.gz
-rw-------. 1 root root      6577 2018-06-05 22:17 original-ks.cfg
2.编写安装jdk脚本
[root@staging ~]# vim Ins_Jdk.sh
##########################################################################
# Author:          jin.hui
# QQ:              974089352
# File Name:       Ins_Jdk.sh
# Copyright (C):   2021 All rights reserved
# Created Time:    2021年05月19日 星期三 17时30分31秒
#########################################################################
#!/usr/bin/bash

jdk=jdk-8u131-linux-x64.tar.gz
jdk_dir=/opt/java

#1.新建jdk存放目录
mkdir $jdk_dir

#2.解压jdk压缩包
tar xf $jdk -C $jdk_dir

#3.配置环境变量
cat >> /etc/profile.d/java.sh <<EOF
export PATH=/opt/java/jdk1.8.0_131/bin:$PATH
EOF

#4.刷新环境变量
source /etc/profile

#5.验证服务
jdk_version=`java -version`

#6.jdk安装完成提示语
cat << EOF
+-------------------------------------------------+
| $jdk_version 安 装 已 完 成           |
| 请 使 用 相 关 服 务 !                          |
+-------------------------------------------------+
EOF

sleep 5

mv Ins_Jdk.sh /tmp
3.验证java环境
[root@staging ~]# java -version
java version "1.8.0_131"
Java(TM) SE Runtime Environment (build 1.8.0_131-b11)
Java HotSpot(TM) 64-Bit Server VM (build 25.131-b11, mixed mode)
三、安装mysql环境
注意:这边可以采用centos7下的MariaDB,可以根据自己的需要修改;或者自行安装mysql。
1.方式一:安装MariaDB
1)安装MariaDB
[root@staging ~]# yum -y install mariadb mariadb-server
2)启动MariaDB服务并设置开机启动
[root@staging ~]# systemctl  --now enable  mariadb.service
Created symlink from /etc/systemd/system/multi-user.target.wants/mariadb.service to /usr/lib/systemd/system/mariadb.service.
3)验证服务
[root@staging ~]# systemctl  status  mariadb.service
● mariadb.service - MariaDB database server
   Loaded: loaded (/usr/lib/systemd/system/mariadb.service; enabled; vendor preset: disabled)
   Active: active (running) since 二 2021-05-25 12:30:06 CST; 1min 1s ago
  Process: 32502 ExecStartPost=/usr/libexec/mariadb-wait-ready $MAINPID (code=exited, status=0/SUCCESS)
  Process: 32418 ExecStartPre=/usr/libexec/mariadb-prepare-db-dir %n (code=exited, status=0/SUCCESS)
 Main PID: 32501 (mysqld_safe)
    Tasks: 20
   Memory: 103.2M
   CGroup: /system.slice/mariadb.service
           ├─32501 /bin/sh /usr/bin/mysqld_safe --basedir=/usr
           └─32617 /usr/libexec/mysqld --basedir=/usr --datadir=/var/lib/mysql --plugin-dir=/usr/lib64/mysql/plugin --log-error=/var/lib/mysql/staging.err --pid-file=jin...

5月 25 12:30:04 staging mariadb-prepare-db-dir[32418]: MySQL manual for more instructions.
5月 25 12:30:04 staging mariadb-prepare-db-dir[32418]: Please report any problems at http://mariadb.org/jira
5月 25 12:30:04 staging mariadb-prepare-db-dir[32418]: The latest information about MariaDB is available at http://mariadb.org/.
5月 25 12:30:04 staging mariadb-prepare-db-dir[32418]: You can find additional information about the MySQL part at:
5月 25 12:30:04 staging mariadb-prepare-db-dir[32418]: http://dev.mysql.com
5月 25 12:30:04 staging mariadb-prepare-db-dir[32418]: Consider joining MariaDB's strong and vibrant community:
5月 25 12:30:04 staging mariadb-prepare-db-dir[32418]: https://mariadb.org/get-involved/
5月 25 12:30:05 staging mysqld_safe[32501]: 210525 12:30:05 mysqld_safe Logging to '/var/lib/mysql/staging.err'.
5月 25 12:30:05 staging mysqld_safe[32501]: 210525 12:30:05 mysqld_safe Starting mysqld daemon with databases from /var/lib/mysql
5月 25 12:30:06 staging systemd[1]: Started MariaDB database server.

[root@staging ~]# netstat  -lntp |grep 3306
tcp        0      0 0.0.0.0:3306            0.0.0.0:*               LISTEN      32617/mysqld
[root@staging ~]# ps -ef |grep mariadb
root       396  7307  0 12:31 pts/0    00:00:00 grep --color=auto mariadb
4)配置MariaDB
[root@staging ~]# mysql_secure_installation
首先是设置密码,会提示先输入密码

Enter current password for root (enter for none):<–初次运行直接回车

设置密码
Set root password? [Y/n] <– 是否设置root用户密码,输入y并回车或直接回车
New password: <– 设置root用户的密码
Re-enter new password: <– 再输入一次你设置的密码

其他配置
Remove anonymous users? [Y/n] <– 是否删除匿名用户,回车
Disallow root login remotely? [Y/n] <–是否禁止root远程登录,回车,
Remove test database and access to it? [Y/n] <– 是否删除test数据库,回车
Reload privilege tables now? [Y/n] <– 是否重新加载权限表,回车
5)登录MariaDB
[root@staging ~]# mysql -p123456
Welcome to the MariaDB monitor.  Commands end with ; or g.
Your MariaDB connection id is 3
Server version: 5.5.56-MariaDB MariaDB Server

Copyright (c) 2000, 2017, Oracle, MariaDB Corporation Ab and others.

Type 'help;' or 'h' for help. Type 'c' to clear the current input statement.

MariaDB [(none)]> show databases;
+--------------------+
| Database           |
+--------------------+
| information_schema |
| mysql              |
| performance_schema |
+--------------------+
4 rows in set (0.01 sec)

MariaDB [(none)]>
6)配置MariaDB的字符集
#1.首先是配置文件/etc/my.cnf,在[mysqld]标签下添加
init_connect='SET collation_connection = utf8_unicode_ci'
init_connect='SET NAMES utf8'
character-set-server=utf8
collation-server=utf8_unicode_ci
skip-character-set-client-handshake

#2.配置文件/etc/my.cnf.d/client.cnf,在[client]中添加
default-character-set=utf8

#3.配置文件/etc/my.cnf.d/mysql-clients.cnf,在[mysql]中添加
default-character-set=utf8

#4.重启MariaDB
[root@staging my.cnf.d]$ systemctl restart mariadb

#5.查看字符集
[root@staging my.cnf.d]$ mysql -p123456
Welcome to the MariaDB monitor.  Commands end with ; or g.
Your MariaDB connection id is 4
Server version: 5.5.56-MariaDB MariaDB Server

Copyright (c) 2000, 2017, Oracle, MariaDB Corporation Ab and others.

Type 'help;' or 'h' for help. Type 'c' to clear the current input statement.

MariaDB [(none)]> show variables like "%character%";show variables like "%collation%";
+--------------------------+----------------------------+
| Variable_name            | Value                      |
+--------------------------+----------------------------+
| character_set_client     | utf8                       |
| character_set_connection | utf8                       |
| character_set_database   | utf8                       |
| character_set_filesystem | binary                     |
| character_set_results    | utf8                       |
| character_set_server     | utf8                       |
| character_set_system     | utf8                       |
| character_sets_dir       | /usr/share/mysql/charsets/ |
+--------------------------+----------------------------+
8 rows in set (0.00 sec)

+----------------------+-----------------+
| Variable_name        | Value           |
+----------------------+-----------------+
| collation_connection | utf8_unicode_ci |
| collation_database   | utf8_unicode_ci |
| collation_server     | utf8_unicode_ci |
+----------------------+-----------------+
3 rows in set (0.00 sec)

MariaDB [(none)]>
7)授权Confluence用户
#1.Confluence创建对应的数据库、用户名和密码
MariaDB [(none)]> create database confluence default character set utf8 collate utf8_bin;
Query OK, 1 row affected (0.00 sec)

MariaDB [(none)]> grant all on confluence.* to 'confluenceuser'@'%' identified by 'confluencepass';
Query OK, 0 rows affected (0.00 sec)

MariaDB [(none)]> flush privileges;
Query OK, 0 rows affected (0.00 sec)
2.方式二:源码安装MySQL5.6
1)上传或下载代码包
[root@staging ~]# rz mysql-5.6.46.tar.gz
或者
[root@staging ~]# wget https://downloads.mysql.com/archives/get/p/23/file/mysql-5.6.46.tar.gz
2)安装依赖
[root@staging ~]# yum install -y ncurses-devel libaio-devel gcc gcc-c++ glibc cmake autoconf openssl openssl-devel
3)解压
[root@staging ~]# tar xf mysql-5.6.46.tar.gz
4)生成cmake
[root@staging ~]# cd mysql-5.6.46/
[root@staging ~/mysql-5.6.46]$ cmake . -DCMAKE_INSTALL_PREFIX=/usr/local/mysql-5.6.46
-DMYSQL_DATADIR=/usr/local/mysql-5.6.46/data
-DMYSQL_UNIX_ADDR=/usr/local/mysql-5.6.46/tmp/mysql.sock
-DDEFAULT_CHARSET=utf8
-DDEFAULT_COLLATION=utf8_general_ci
-DWITH_EXTRA_CHARSETS=all
-DWITH_INNOBASE_STORAGE_ENGINE=1
-DWITH_FEDERATED_STORAGE_ENGINE=1
-DWITH_BLACKHOLE_STORAGE_ENGINE=1
-DWITHOUT_EXAMPLE_STORAGE_ENGINE=1
-DWITH_ZLIB=bundled
-DWITH_SSL=system
-DENABLED_LOCAL_INFILE=1
-DWITH_EMBEDDED_SERVER=1
-DENABLE_DOWNLOADS=1
-DWITH_DEBUG=0

#程序存放位置
cmake . -DCMAKE_INSTALL_PREFIX=/application/mysql-5.6.38
#数据存放位置
-DMYSQL_DATADIR=/application/mysql-5.6.38/data
#socket文件存放位置
-DMYSQL_UNIX_ADDR=/application/mysql-5.6.38/tmp/mysql.sock
#使用utf8字符集
-DDEFAULT_CHARSET=utf8
#校验规则
-DDEFAULT_COLLATION=utf8_general_ci
#使用其他额外的字符集
-DWITH_EXTRA_CHARSETS=all
#支持的存储引擎
-DWITH_INNOBASE_STORAGE_ENGINE=1
-DWITH_FEDERATED_STORAGE_ENGINE=1
-DWITH_BLACKHOLE_STORAGE_ENGINE=1
#禁用的存储引擎
-DWITHOUT_EXAMPLE_STORAGE_ENGINE=1
#启用zlib库支持(zib、gzib相关)
-DWITH_ZLIB=bundled
#启用SSL库支持(安全套接层)
-DWITH_SSL=bundled
#启用本地数据导入支持
-DENABLED_LOCAL_INFILE=1
#编译嵌入式服务器支持
-DWITH_EMBEDDED_SERVER=1
# mysql5.6支持了google的c++mock框架了,允许下载,否则会安装报错。
-DENABLE_DOWNLOADS=1
#禁用debug(默认为禁用)
-DWITH_DEBUG=0
#编译
5)编译 make
[root@staging ~/mysql-5.6.46]$ make
6)安装 make install
[root@staging ~/mysql-5.6.46]$ make install
7)做软连接
[root@staging ~/mysql-5.6.46]$ ln -s /usr/local/mysql-5.6.46 /usr/local/mysql
8)创建数据库用户
[root@staging ~/mysql-5.6.46]$ useradd mysql -s /sbin/nologin -M
9)拷贝配置文件和启动文件
#1.进入配置文件和脚本的目录
[root@staging ~/mysql-5.6.46]$ cd /usr/local/mysql/support-files/

#2.拷贝配置文件
[root@staging /usr/local/mysql/support-files]$ cp my-default.cnf /etc/my.cnf
10)配置system管理MySQL服务
#1.配置system管理MySQL
[root@staging ~]# vim /usr/lib/systemd/system/mysql.service
[Unit]
Description=MySQL Server
Documentation=man:mysqld(8)
Documentation=https://dev.mysql.com/doc/refman/en/using-systemd.html
After=network.target
After=syslog.target
[Install]
WantedBy=multi-user.target
[Service]
User=mysql
Group=mysql
ExecStart=/usr/local/mysql/bin/mysqld --defaults-file=/etc/my.cnf
LimitNOFILE = 5000

#2.重新加载启动文件列表
[root@staging ~]# systemctl daemon-reload
11)初始化数据库
#1.进入初始化目录
[root@staging ~]# cd /usr/local/mysql/scripts/

#2.执行初始化命令
[root@staging /usr/local/mysql/scripts]$ ./mysql_install_db --user=mysql --basedir=/usr/local/mysql --datadir=/usr/local/mysql/data
12)创建socket文件目录(二进制安装没有)
#先创建tmp目录
[root@staging /usr/local/mysql/scripts]$ mkdir /usr/local/mysql/tmp
13)授权数据库目录(二进制安装没有)
[root@staging /usr/local/mysql/scripts]$ chown -R mysql.mysql /usr/local/mysql
[root@staging /usr/local/mysql/scripts]$ chown -R mysql.mysql /usr/local/mysql-5.6.46
14)system管理启动MySQL
[root@staging ~]# systemctl start mysql
15)检查进程和端口
[root@staging ~]# ps -ef | grep [m]ysql
mysql     3519     1  5 15:09 ?        00:00:00 /usr/local/mysql/bin/mysqld --defaults-file=/etc/my.cnf

[root@staging ~]# netstat -lntp | grep 3306
tcp6       0      0 :::3306                 :::*                    LISTEN      3519/mysqld
16)配置环境变量直接使用mysql
[root@staging ~]# vim /etc/profile.d/mysql.sh
export PATH=/usr/local/mysql/bin:$PATH
[root@staging ~]# source /etc/profile
17)配置数据库用户root密码
[root@staging ~]# mysqladmin -uroot -p password
Enter password: #新数据库没密码直接回车
New password:   #输入新密码
Confirm new password: #再次输入新的密码
18)登录数据库
[root@staging ~]# mysql -u root -p
Enter password:
Welcome to the MySQL monitor.  Commands end with ; or g.
Your MySQL connection id is 4
Server version: 5.6.46 Source distribution

Copyright (c) 2000, 2019, Oracle and/or its affiliates. All rights reserved.

Oracle is a registered trademark of Oracle Corporation and/or its
affiliates. Other names may be trademarks of their respective
owners.

Type 'help;' or 'h' for help. Type 'c' to clear the current input statement.

mysql>
19)配置数据库
#1.在/etc/my.conf 添加:
[root@staging ~]# vim /etc/my.cnf
[mysqld]
character-set-server = utf8
collation-server = utf8_bin
default-storage-engine = INNODB
max_allowed_packet = 256M
innodb_log_file_size = 2GB
transaction-isolation = READ-COMMITTED
binlog_format = row

#2.重启mysql
[root@staging ~]# systemctl restart mysql.service
20)数据库授权
mysql> create database confluence default character set utf8 collate utf8_bin;
Query OK, 1 row affected (0.00 sec)

mysql> grant all on confluence.* to 'confluenceuser'@'%' identified by 'confluencepass';
Query OK, 0 rows affected (0.00 sec)

mysql> flush privileges;
Query OK, 0 rows affected (0.00 sec)

mysql> quit
Bye
四、安装Confluence
1.下载安装包
#1.下载confluence版本 多个选择 (6.7.1 ,6.9.1 ,6.12.1 ,6.13.0,7.4.0)
[root@staging ~]# wget https://product-downloads.atlassian.com/software/confluence/downloads/atlassian-confluence-7.4.0-x64.bin

版本选择:
https://downloads.atlassian.com/software/confluence/downloads/atlassian-confluence-6.7.1-x64.bin
https://www.atlassian.com/software/confluence/downloads/binary/atlassian-confluence-6.9.1-x64.bin
https://downloads.atlassian.com/software/confluence/downloads/atlassian-confluence-6.12.1-x64.bin
https://downloads.atlassian.com/software/confluence/downloads/atlassian-confluence-6.13.0-x64.bin
https://product-downloads.atlassian.com/software/confluence/downloads/atlassian-confluence-7.4.0-x64.bin

#2.查看安装包
[root@staging ~]# ll
total 2383124
-rw-r--r--  1 root root 692294826 Apr 19  2020 atlassian-confluence-7.4.0-x64.bin
2.安装confluence
#1.添加执行权限
[root@staging ~]# chmod  +x atlassian-confluence-7.4.0-x64.bin

#2.安装confluence
[root@staging ~]# mkdir /opt/confluence-7.4.0
[root@staging ~]# ./atlassian-confluence-7.4.0-x64.bin
Unpacking JRE ...
Starting Installer ...

This will install Confluence 7.4.0 on your computer.
OK [o, Enter], Cancel [c]	#点击回车或者输入o

Click Next to continue, or Cancel to exit Setup.

Choose the appropriate installation or upgrade option.
Please choose one of the following:
Express Install (uses default settings) [1], 	#默认安装
Custom Install (recommended for advanced users) [2, Enter],		#自定义安装
Upgrade an existing Confluence installation [3]	  #升级安装
2
The following default options cannot be used. You will be asked to provide alternatives for these options.
* Installation Directory (Existing installation directory)

Select the folder where you would like Confluence 7.4.0 to be installed,
then click Next.
Where should Confluence 6.12.1 be installed?
[/opt/atlassian/confluence]
/opt/confluence-7.4.0	#选择安装目录,默认在/opt/atlassian/confluence下

Default location for Confluence data
[/var/atlassian/application-data/confluence]
/data3/confluence-7.4.0 #选择数据存放目录,默认在/var/atlassian/application-data/confluence下

See where Confluence will be installed and the settings that will be used.
Installation Directory: /opt/confluence-7.4.0
Home Directory: /var/atlassian/application-data/confluence
HTTP Port: 8090
RMI Port: 8000
Install as service: Yes
Install [i, Enter], Exit [e]	#点击回车


Extracting files ...


Please wait a few moments while we configure Confluence.

Installation of Confluence 7.4.0 is complete
Start Confluence now?
Yes [y, Enter], No [n]	#点击回车


Please wait a few moments while Confluence starts up.
Launching Confluence ...

Installation of Confluence 7.4.0 is complete
Your installation of Confluence 7.4.0 is now ready and can be accessed via
your browser.
Confluence 7.4.0 can be accessed at http://localhost:8090
Finishing installation ...

#3.查看服务
[root@staging ~]# ps -ef |grep confluence
root      1804 23581  0 11:37 pts/1    00:00:00 grep --color=auto confluence
conflue+ 32673     1 24 11:35 ?        00:00:23 /opt/confluence-6.12.1/jre//bin/java -Djava.util.logging.config.file=/opt/confluence-7.4.0/conf/logging.properties -Djava.util.logging.manager=org.apache.juli.ClassLoaderLogManager -Djdk.tls.ephemeralDHKeySize=2048 -Djava.protocol.handler.pkgs=org.apache.catalina.webresources -Dorg.apache.catalina.security.SecurityListener.UMASK=0027 -XX:ReservedCodeCacheSize=256m -XX:+UseCodeCacheFlushing -Dconfluence.context.path= -Datlassian.plugins.startup.options= -Dorg.apache.tomcat.websocket.DEFAULT_BUFFER_SIZE=32768 -Dsynchrony.enable.xhr.fallback=true -Xms1024m -Xmx1024m -XX:+UseG1GC -Datlassian.plugins.enable.wait=300 -Djava.awt.headless=true -XX:G1ReservePercent=20 -Xloggc:/opt/confluence-7.4.0/logs/gc-2021-05-27_11-35-39.log -XX:+UseGCLogFileRotation -XX:NumberOfGCLogFiles=5 -XX:GCLogFileSize=2M -XX:-PrintGCDetails -XX:+PrintGCDateStamps -XX:-PrintTenuringDistribution -Dignore.endorsed.dirs= -classpath /opt/confluence-7.4.0/bin/bootstrap.jar:/opt/confluence-7.4.0/bin/tomcat-juli.jar -Dcatalina.base=/opt/confluence-7.4.0 -Dcatalina.home=/opt/confluence-7.4.0 -Djava.io.tmpdir=/opt/confluence-7.4.0/temp org.apache.catalina.startup.Bootstrap start
[root@staging ~]# netstat  -lntp |grep 8090
tcp6       0      0 :::8090                 :::*                    LISTEN      32673/java
3.访问服务器
#1.浏览器输入http://192.168.1.18:8090访问
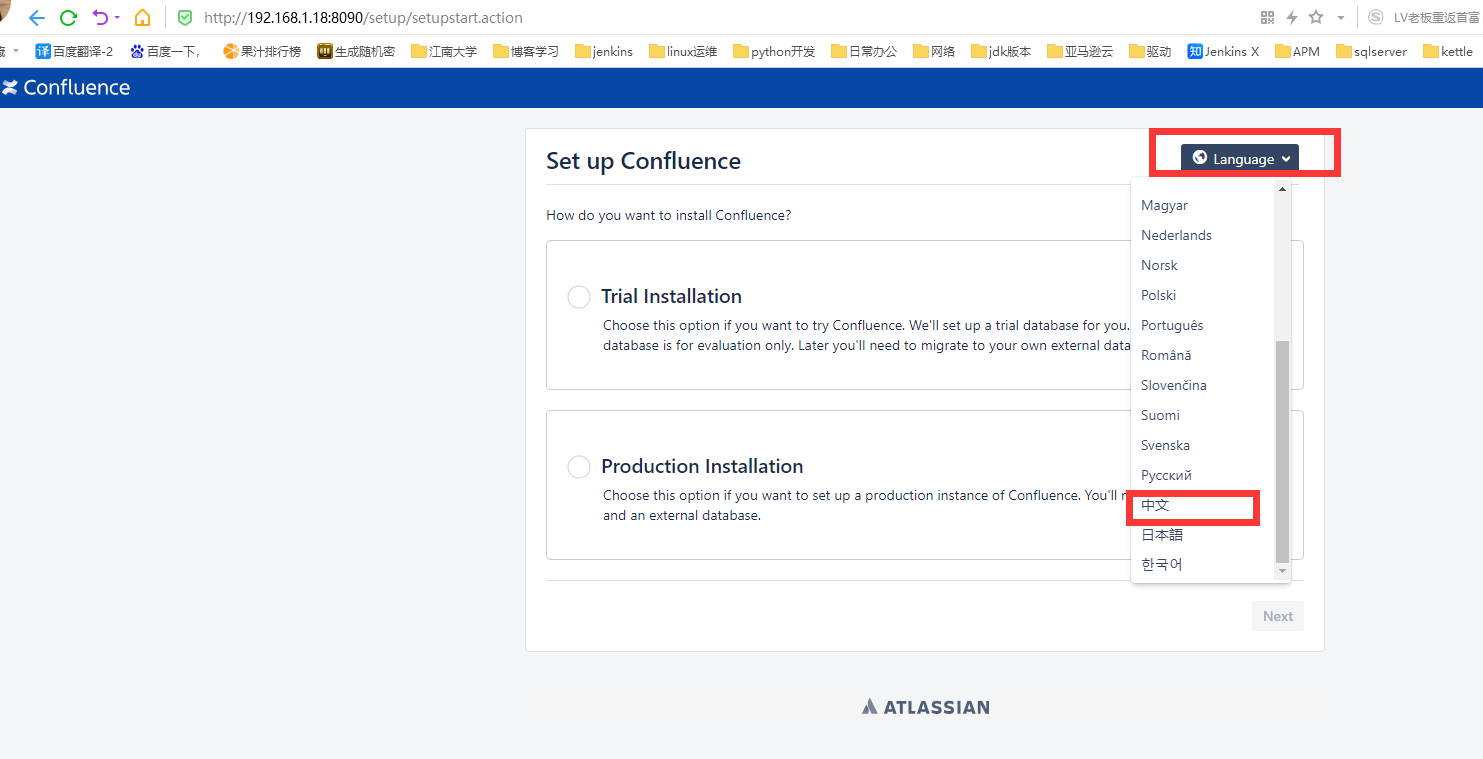
#2.选择语言中文,选择产品安装,点击下一步

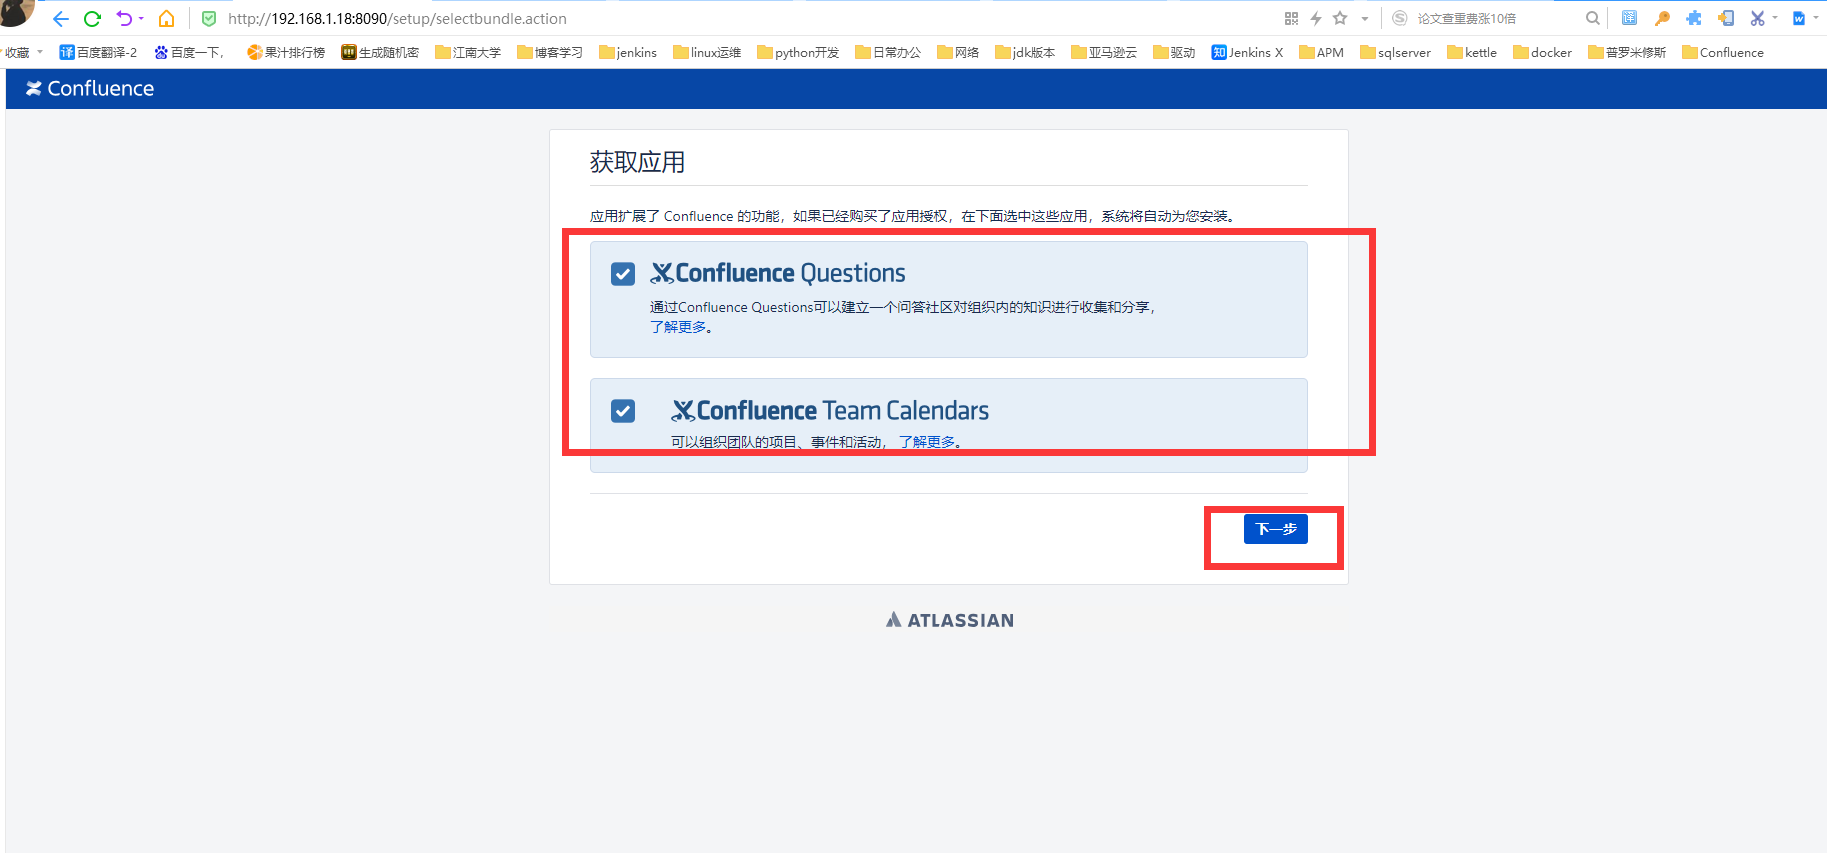
#3.选择插件安装,点击下一步
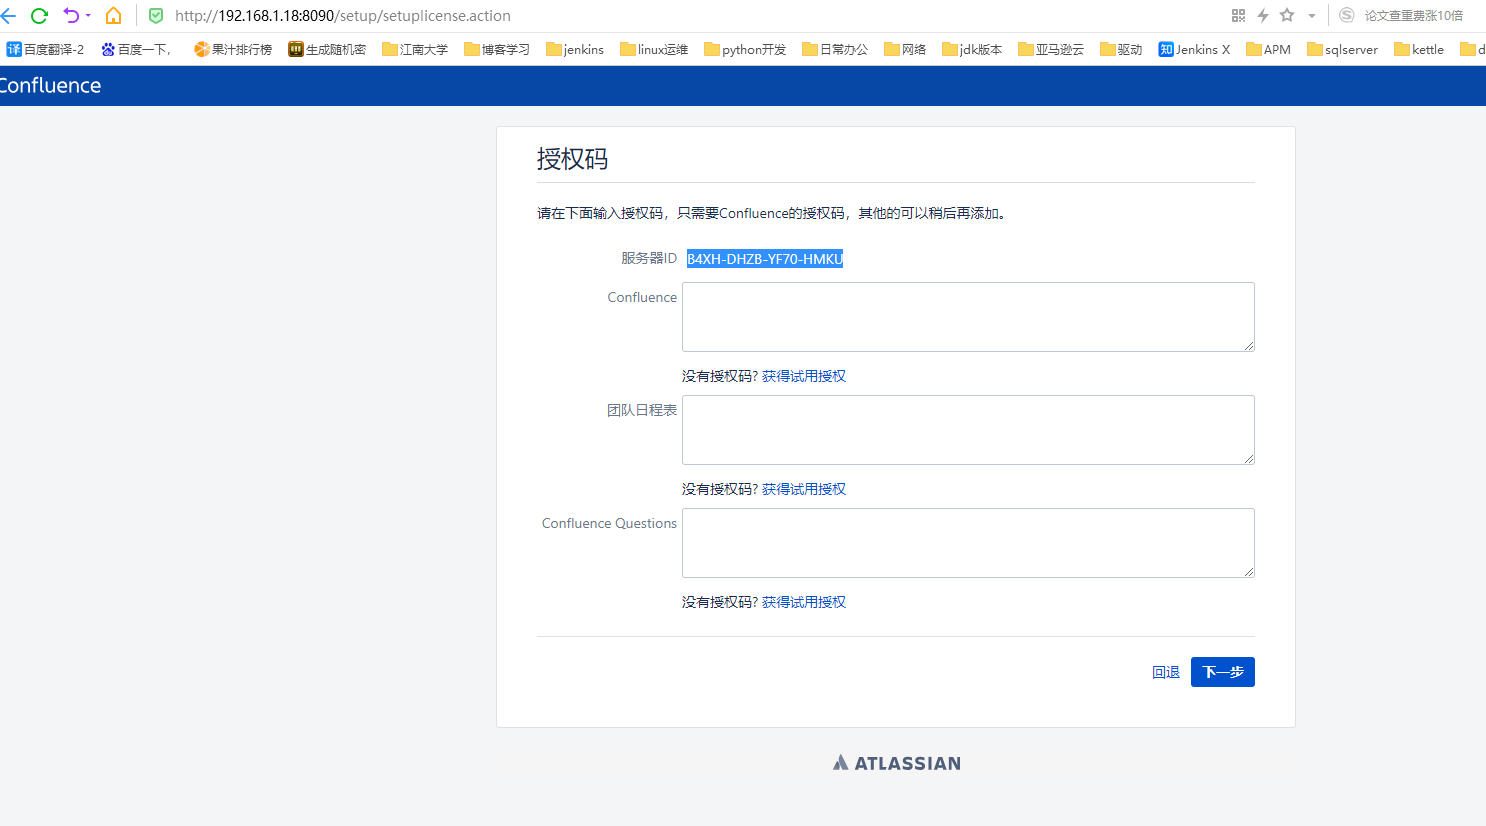
#4.复制当前服务器ID:B4XH-DHZB-YF70-HMKU
4.下载破解包
下载地址:https://files.cnblogs.com/files/sanduzxcvbnm/atlassian-agent-v1.2.3.zip
#1.下载破解包
[root@staging ~]# wget https://files.cnblogs.com/files/sanduzxcvbnm/atlassian-agent-v1.2.3.zip

#2.解压破解包
[root@staging ~]# unzip atlassian-agent-v1.2.3.zip

#3.将atlassian-agent.jar移动到当前目录下
[root@staging ~]# mv atlassian-agent-v1.2.3/atlassian-agent.jar ./
5.生成confluence许可命令
# 设置产品类型:-p conf, 详情可执行:java -jar atlassian-agent.jar
java -jar atlassian-agent.jar -d -m test@test.com -n BAT -p conf -o http://192.168.0.89 -s BTW4-2T4Y-9BTK-R0DP

复制服务器ID: BTW4-2T4Y-9BTK-R0DP
在本地存放atlassian-agent.jar的目录下执行命令,生成许可证:
需替换邮箱(test@test.com)、名称(BAT)、访问地址(http://192.168.0.89)、服务器ID(BTW4-2T4Y-9BTK-R0DP)为你的信息
6.生成许可证:
[root@staging docker]# java -jar atlassian-agent.jar -d -m hui.jin@dataxgroup.com -n BAT -p conf -o http://192.168.1.18 -s BM9B-RTHY-X0E8-ALTS
====================================================
======= Atlassian Crack Agent =======
======= https://zhile.io =======
======= QQ Group: 30347511 =======
====================================================
Your license code(Don't copy this line!!!):
AAABWw0ODAoPeJxtUF1rgzAUfc+vEPasNbJWLQTWqqNl2o5px7a31N7WDI0Sk1L36xc/YDAKeck59
55z7nnICmUktDMc18DuEntLPDeCNDMc28EoEEAlq3lIJZAeMe256bgoutJSDQw507IFFEKbC9YMy
IGXrGISTkbJcuAtGMfOKKRs2uVs9lOwEixWo724UM7aUaRnNYl9x8ILz8IW9lBe87NFc8muQKRQg
IKaS/2PEspKUihmfTP+dKKS3i6iVo2V19W4lEoqJIgp2gDFY5Ksa2BHKyDBPkmit2C7ipGW4xI45
TlEt4aJbjrW803b1Q9Nu9uQxNswjXZmjBeOg23X9uee7aMUxBWEptePHxsz3Hytzc9n1zY3ycthd
NeKNADeZxoumRTv270qkRe0hf+dT2W+g2j7yhyUquNf6YPuYLZT1RHE/nxo9SQxMdKRyZ3YU51DH
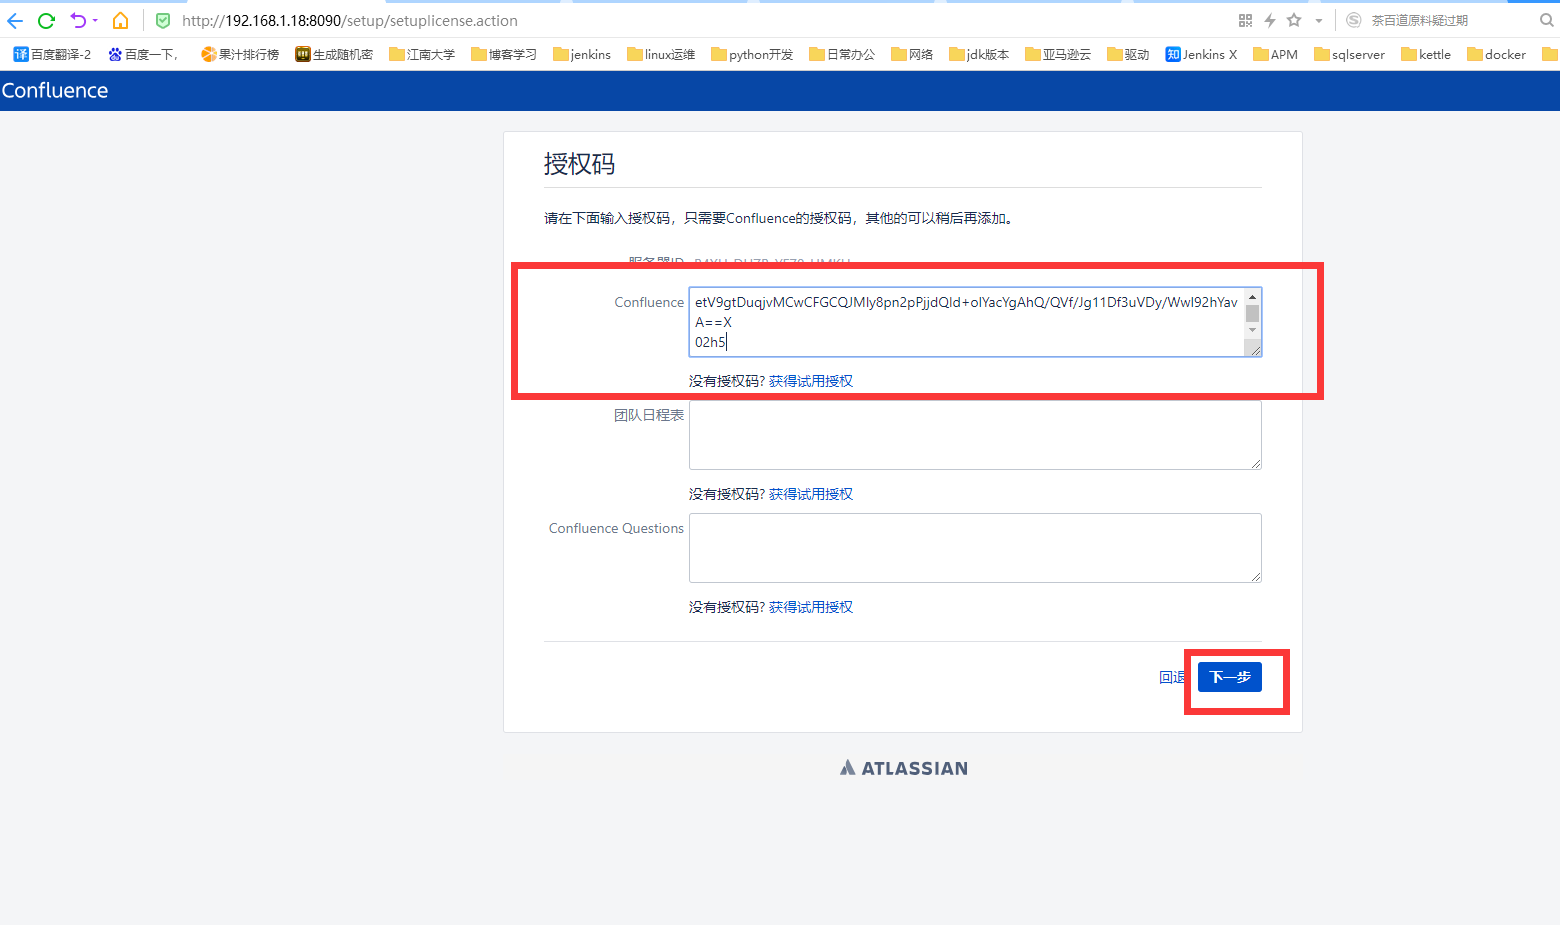
etV9gtDuqjvMCwCFGCQJMly8pn2pPjjdQId+olYacYgAhQ/QVf/Jg11Df3uVDy/WwI92hYavA==X
02h5
[root@staging docker]#
五、拷贝Confluence许可证
#1.复制生成的许可证,完成破解
六、连接外部数据库
#1.上传mysql驱动
[root@staging tmp]# rz
[root@staging tmp]# mv mysql-connector-java-5.1.44-bin.jar /opt/confluence-6.12.1/confluence/WEB-INF/lib/
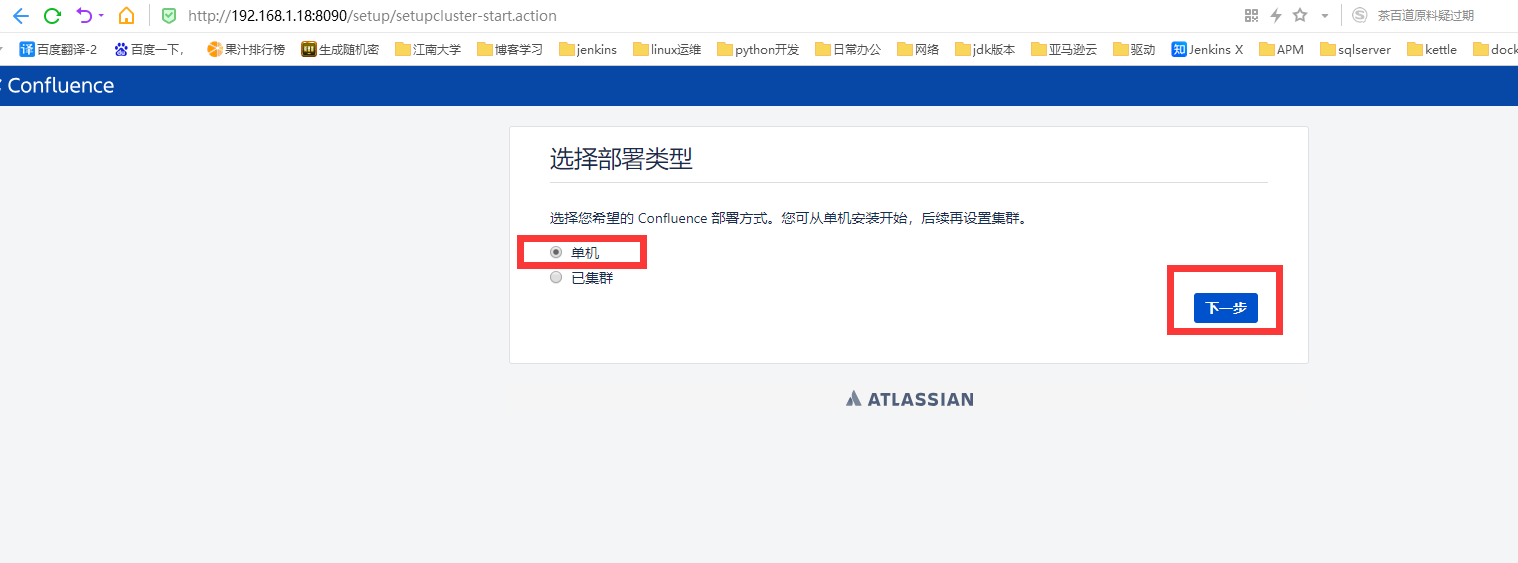
#2.选择部署类型为单机,点击下一步
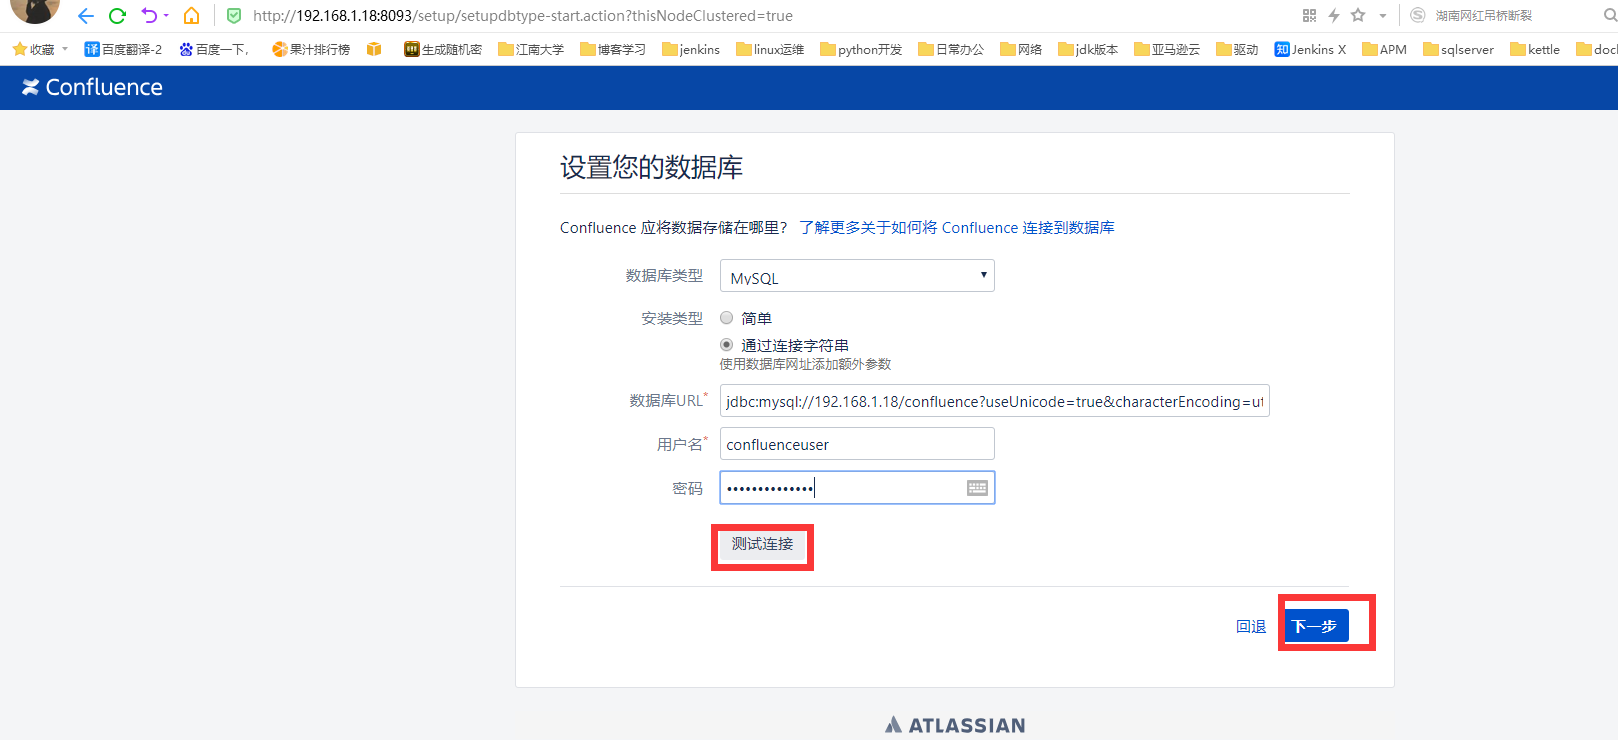
#3.这里选择数据库类型为MySQL,通过字符串连接:
jdbc:mysql://192.168.1.18/confluence?useUnicode=true&characterEncoding=utf8

注意一下:数据库url连接中用的是utf8,不能用utf8mb4.输入相应的用户名和密码,点击测试连接,成功点击下一步
七、配置Confluence
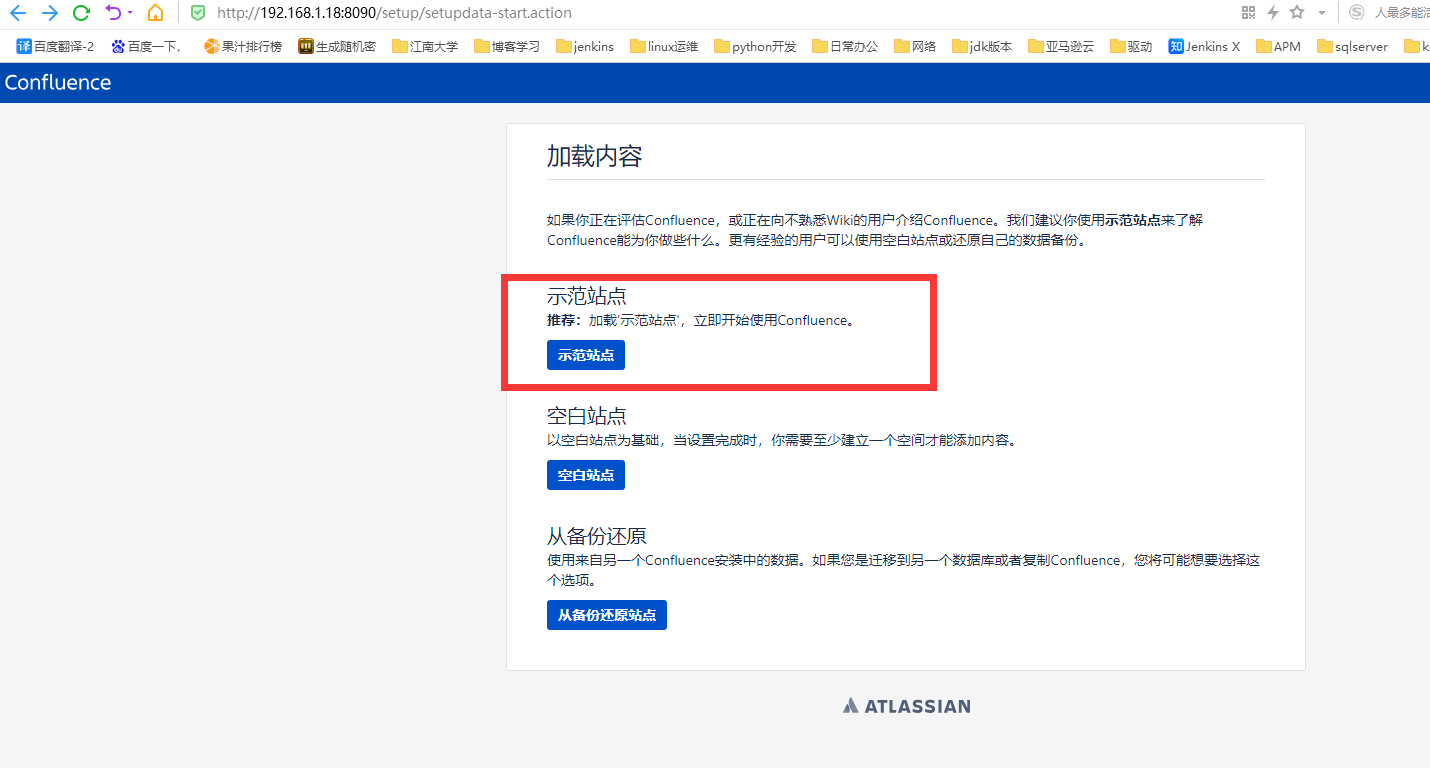
#1.选择示范站点
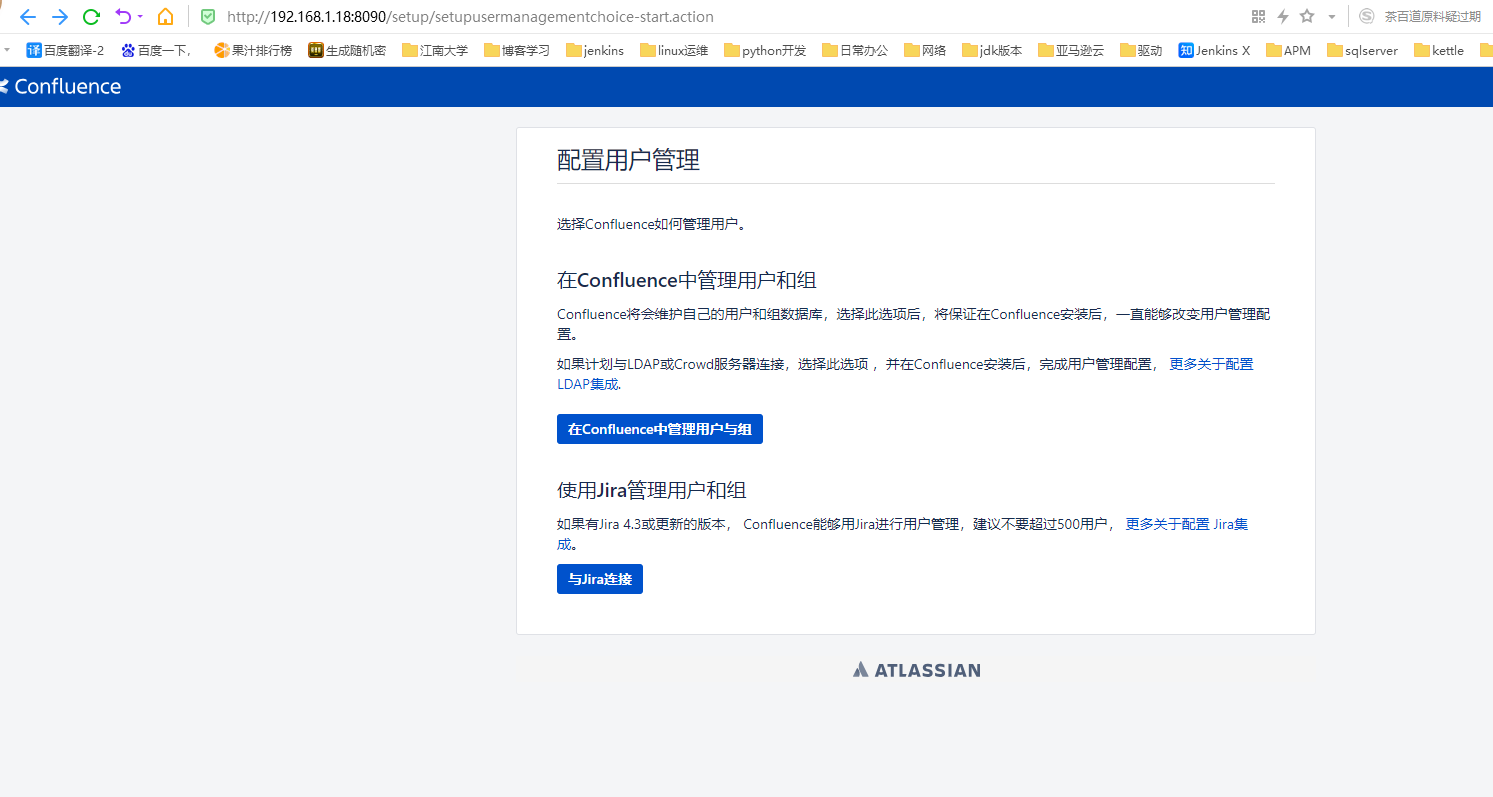
#2.进行配置用户管理
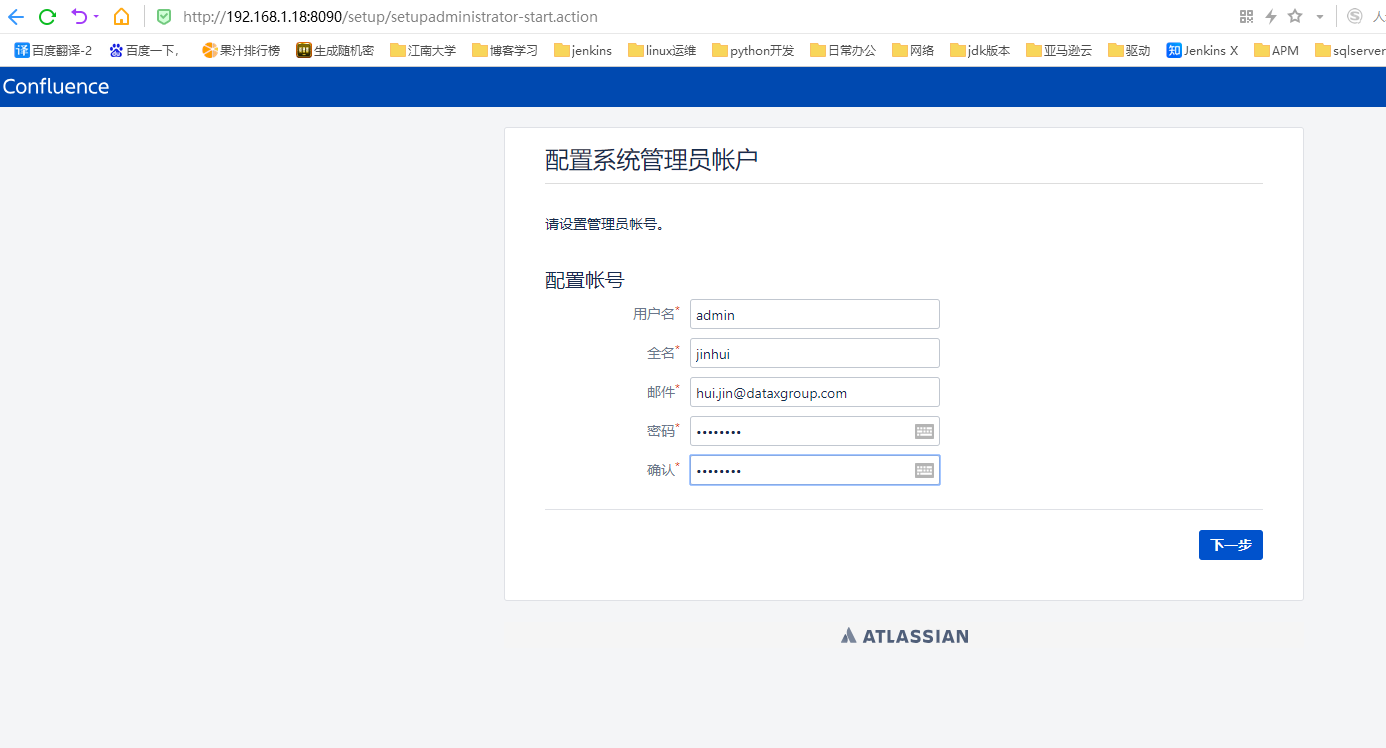
#3.配置系统管理员账户
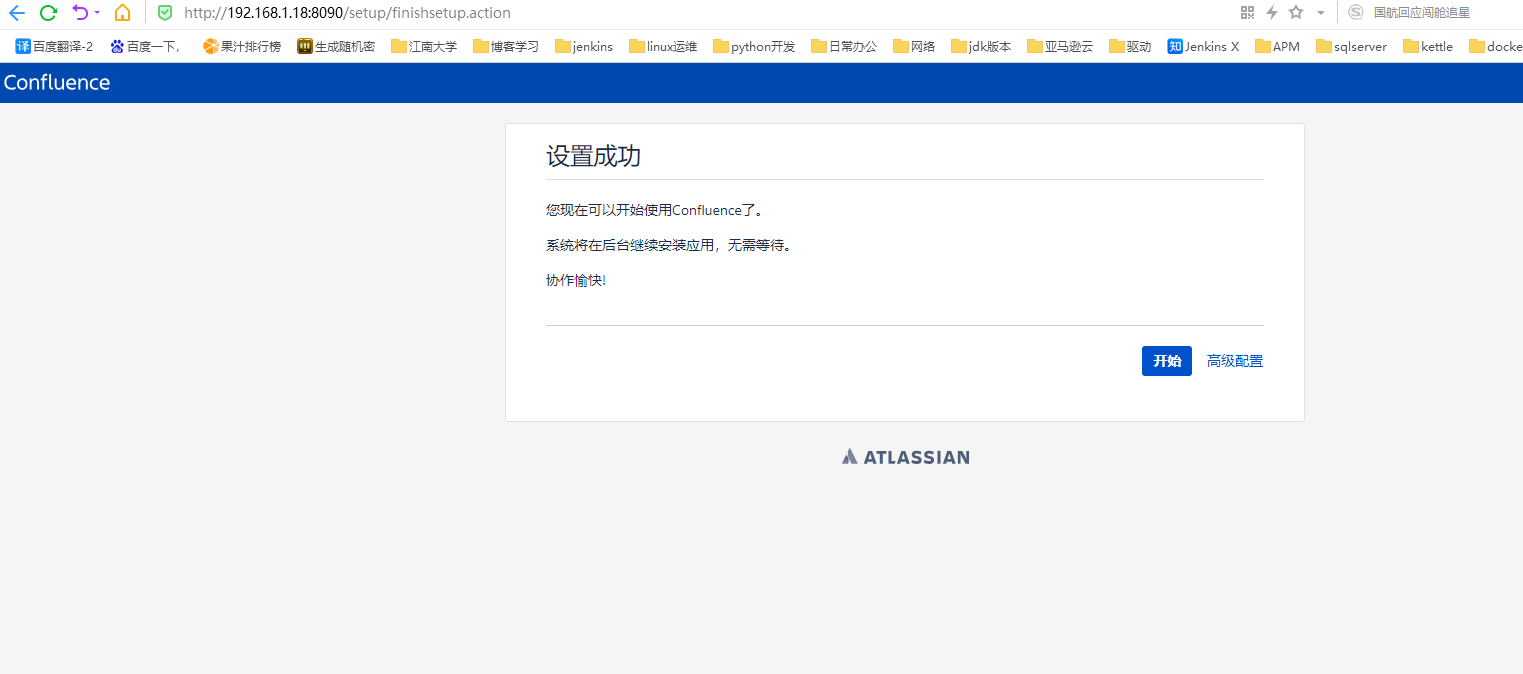
#4.confluence 配置完成开始使用
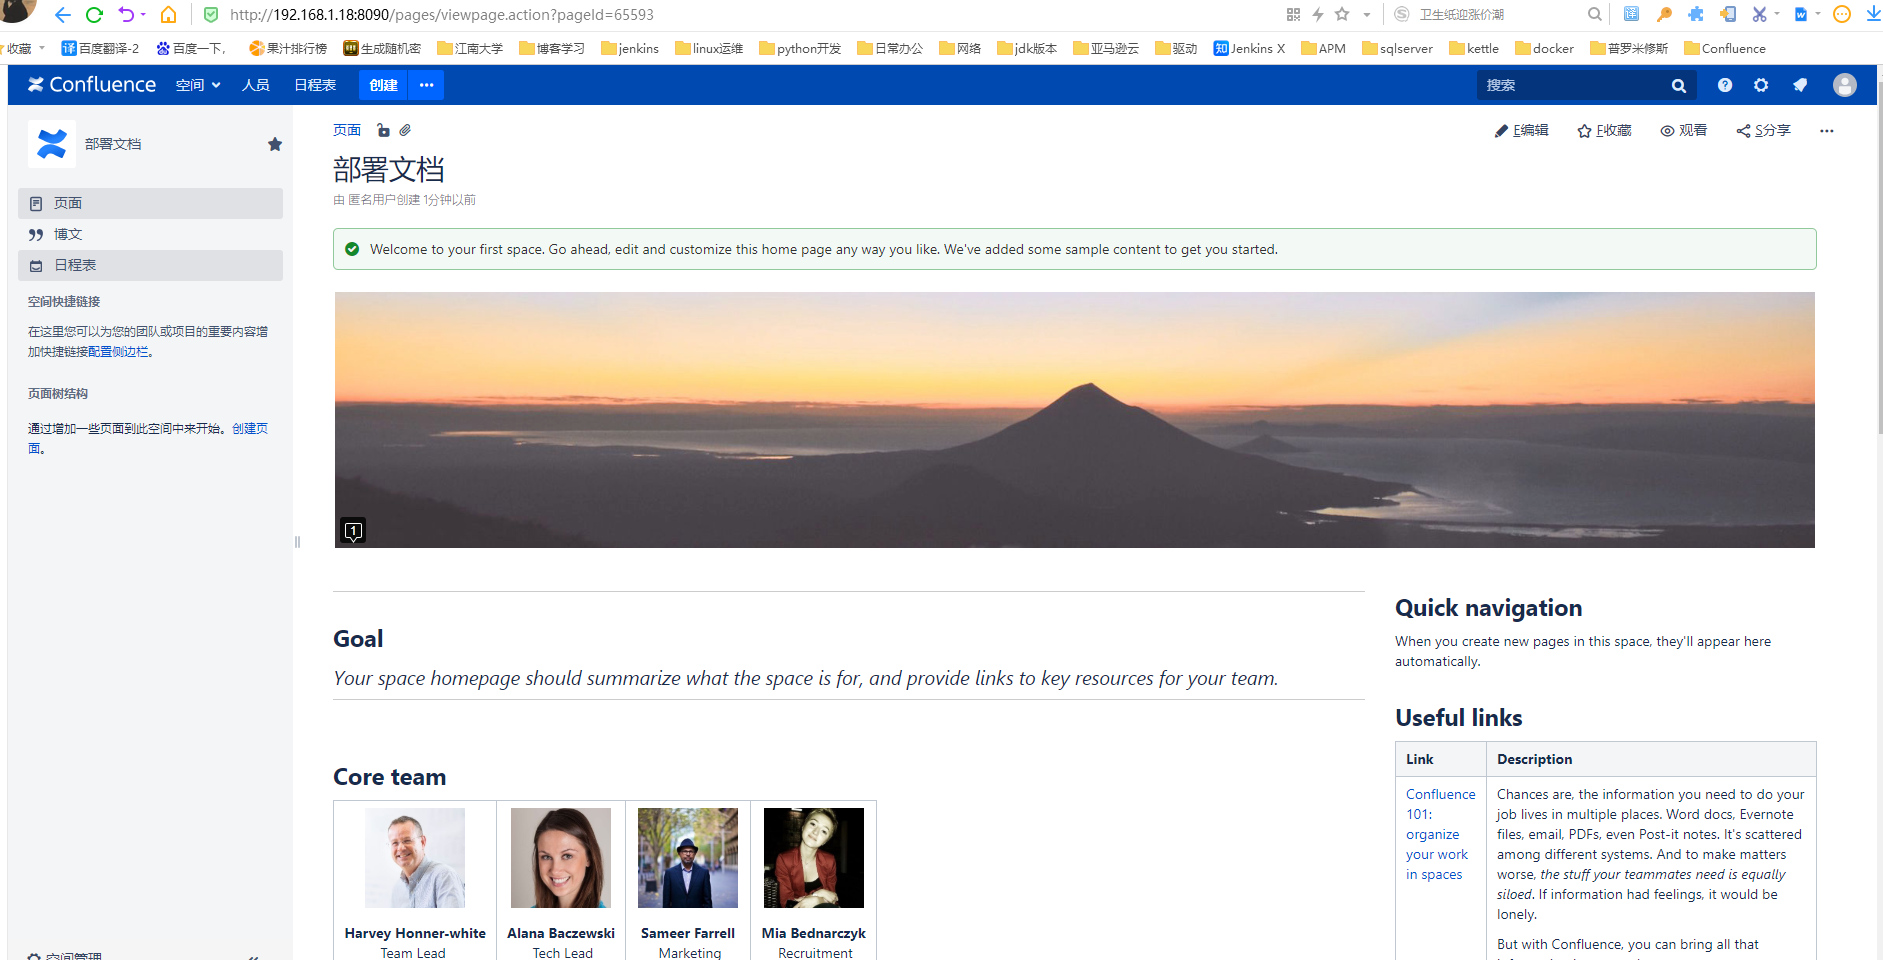
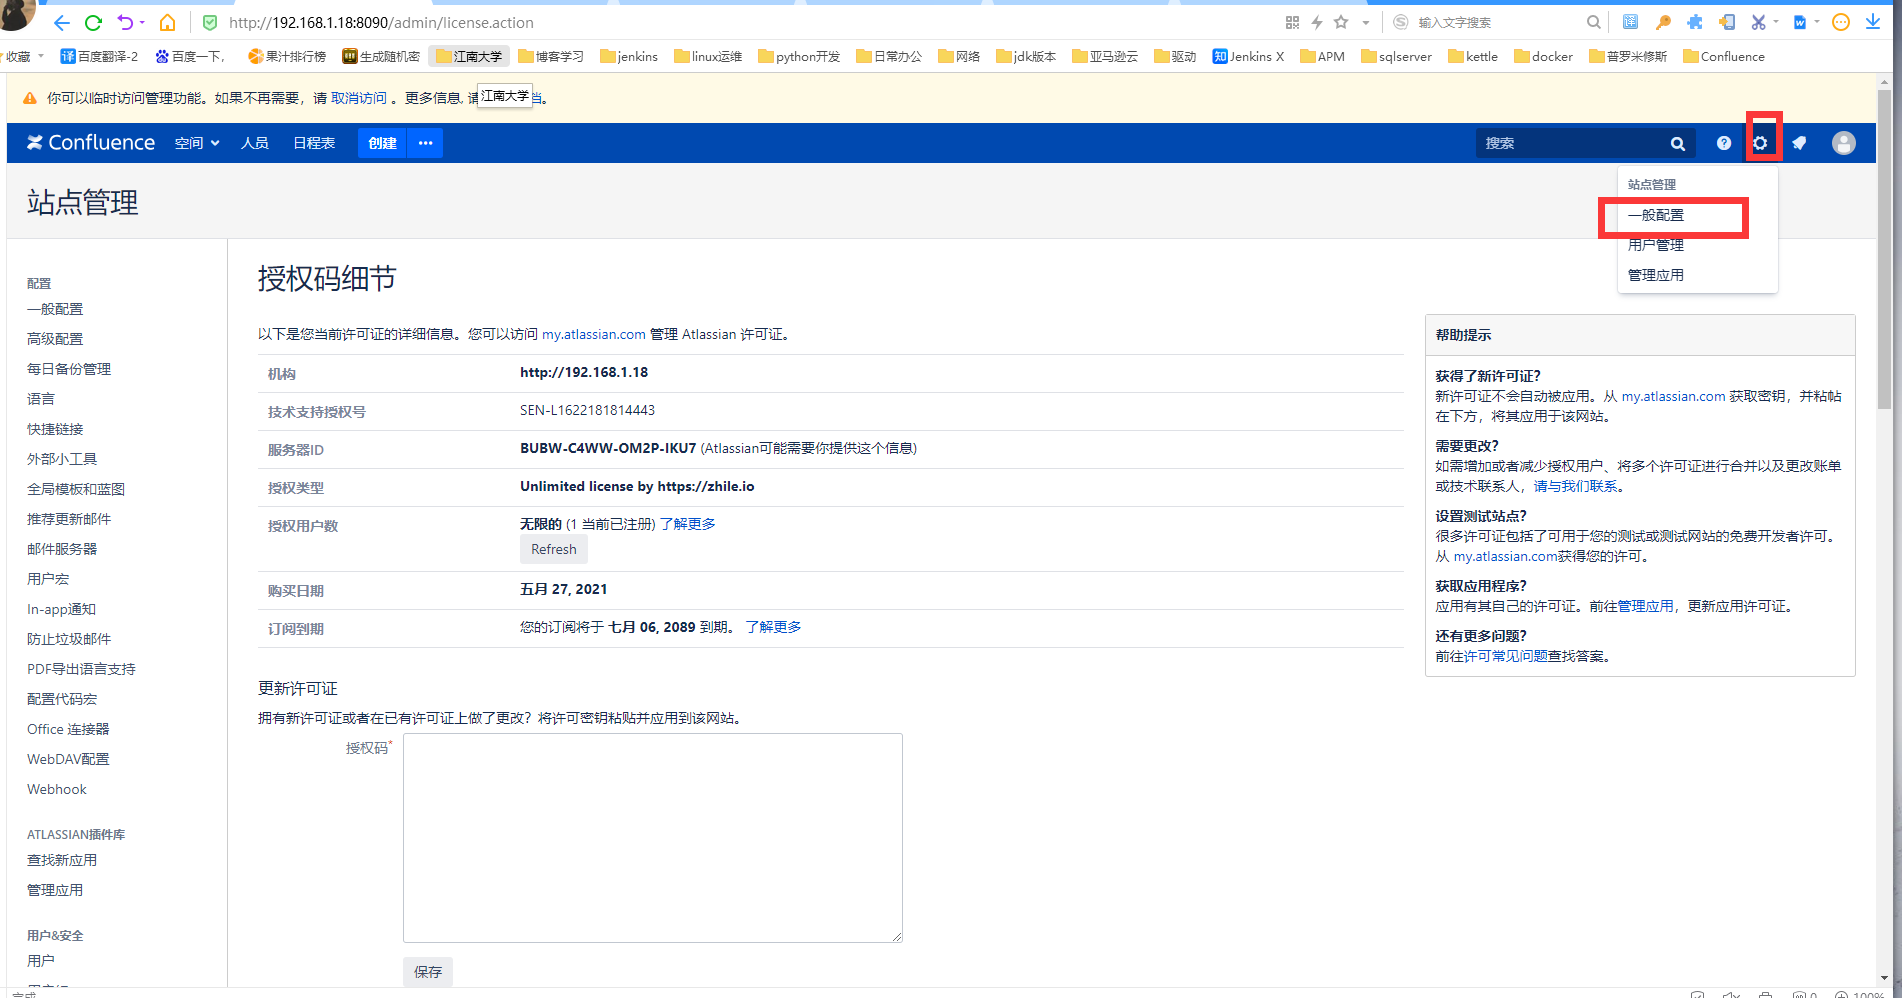
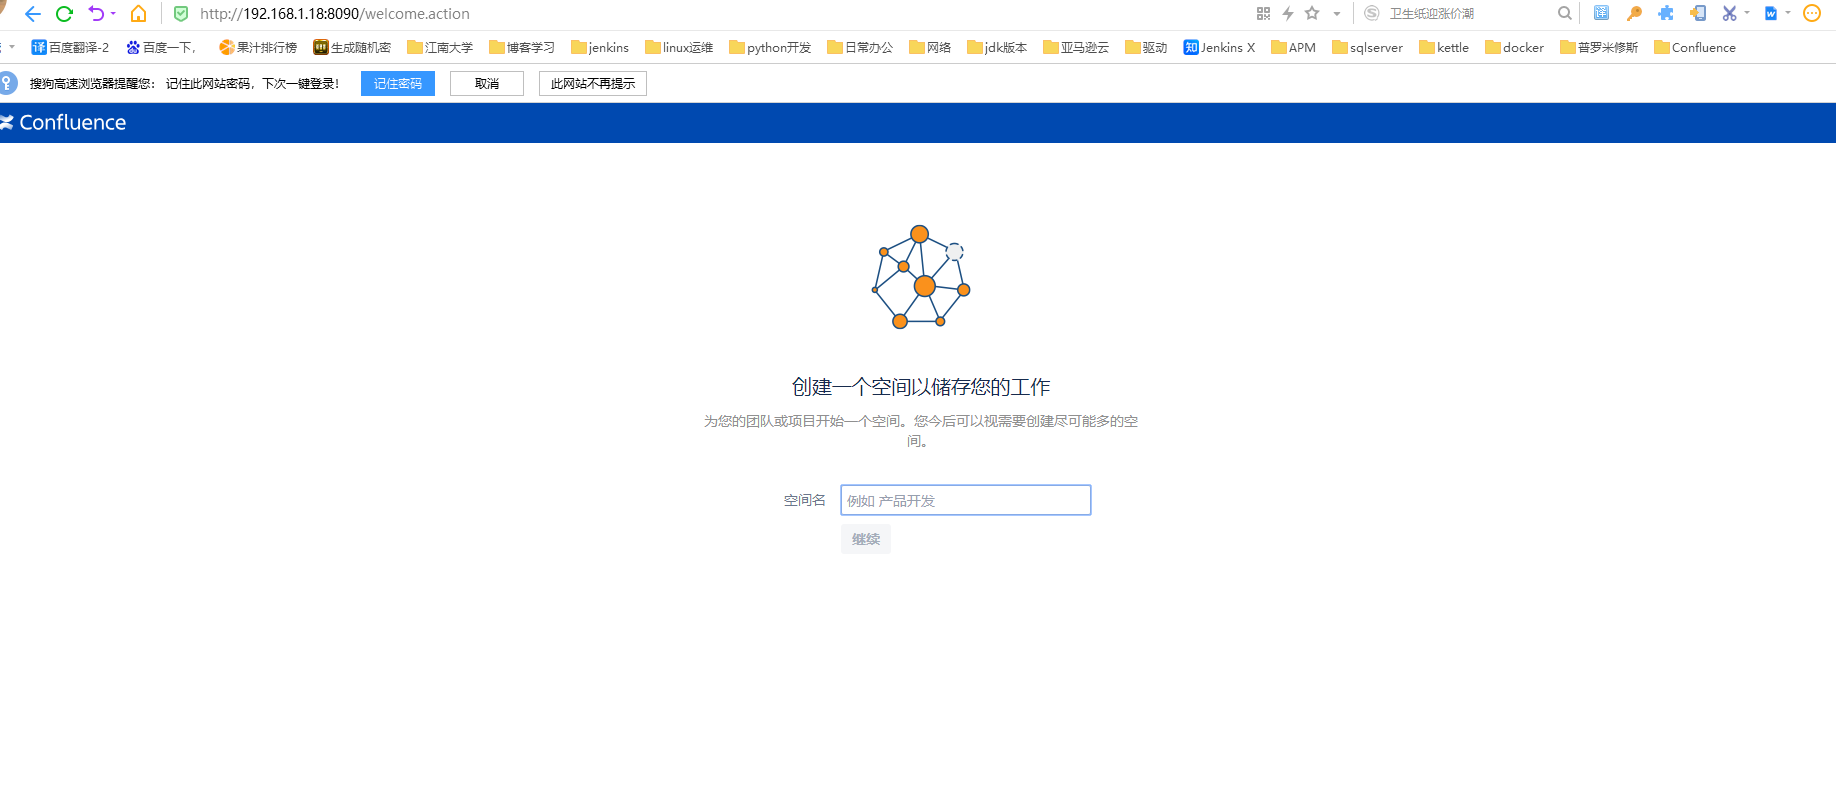
#5.创建一个工作空间
#6.测试写篇文档发布成功,点击右上角管理——>一般设置——>授权码细节,看到已经破解成功,至此Confluence部署全部完成。