祭出官方图:

Vue组件的生命周期主要为8个: beforeCreate、created、beforeMount、mounted、beforeUpdate、updated、beforeDestroy、destroyed。
其实官方图已经讲明白很多了。包括各个阶段之间做了些什么事情,但在掌握上终归还是有一些模糊的地方。
下面做了一些梳理。
个人理解是主要分为三个阶段:
- 创建阶段(注册实例与挂载): beforeCreate、created、beforeMount、mounted
- 运行阶段:beforeUpdate、updated
- 注销阶段:beforeDestroy、destroyed
以下代码vue分别注册了father和child组件,并在father中调用了child子组件来观察他们的生命周期已经先后关系:
<!-- HTML部分 -->
<!-- 父组件挂载 -->
<div id="app"></div>

<!-- child模板 -->
<div class="child" @click="updateTest()">
    i'm child <br />
    data: {{data}}
</div>

<!-- father模板 -->
<div class="father">
        <button @click="changeDate()">{{tData}}</button>
        <button @click="destroyEl()">destroy</button>
        <child v-if="showChild"></child>
        I'm father
</div>
/*JavaScript部分*/

/*child*/
var child = Vue.extend({
     template: '#child',
     data(){
       return {
         data: 0
       }
     },
     methods:{
        consoleinfo(){    console.log(this.data)},
        updateTest(){     this.data += 1}
     },
     beforeCreate(){    console.log('child-beforeCreate')},
     created(){        console.log('child-created')},
     beforeMount(){    console.log('child-beforeMount')},
     mounted(){        console.log('child-mounted')},
     beforeUpdate(){    console.log('child-beforeUpdate')},
     updated(){        console.log('child-updated')},
     beforeDestroy(){
         console.log('child-beforeDestroy:')
         this.consoleinfo()
     },
     destroyed(){
         console.log('child-destroyed:')
         this.consoleinfo()
     }
})
/*father*/
new Vue({
    el: '#app',
    template:'#father',
    components:{child},
    data(){
         return {
             tData: 0,
             tCom: 'computed',
             showChild: true
         }
    },
    computed:{
         tComputed(){ return this.tCom}
   },
   methods:{
         consoleinfo(){
             console.log('data: ' + this.tData)
             console.log('computed: ' + this.tComputed)
             console.log('el: ' + this.$el.outerHTML)
         },
         changeDate(){
             this.tData += 1
             this.tCom = 'changeComputed'
         },
         destroyEl(){
        //this.showChild = false
             this.$destroy()
         }
   },
   /**
   创建阶段
   */
   beforeCreate(){
         console.log('beforeCreate:')
         this.consoleinfo()
   },
   created(){
         console.log('created:')
         this.consoleinfo()
   },
   beforeMount(){
         console.log('beforeMount:')
         this.consoleinfo()
   },
   mounted(){
         console.log('mounted:')
         this.consoleinfo()
   },
   /**
   运行阶段
   */
   beforeUpdate(){
         console.log('beforeUpdate:')
         this.consoleinfo()
   },
   updated(){
         console.log('updated:')
         this.consoleinfo()
   },
   /**
   注销阶段
   */
   beforeDestroy(){
         console.log('beforeDestroy:')
         this.consoleinfo()
   },
   destroyed(){
         console.log('destroyed:')
         this.consoleinfo()
   }
})
接下来看下各个生命周期控制台的输出:
创建阶段
beforeCreate:

在beforeCreate阶段之前,vue做了init初始化的操作。操作包括:
—— 注册一些vue默认的属性方法事件(例如初始化vue的生命周期 —— 钩子beforeCreate()等)
因此,在beforeCreate钩子调用时,这些默认属性方法事件已经注册完成,但是vue实例中的data、computed、methods等都未定义:
—— 图中函数consoleinfo(),报错“not a function”’
Created:

beforeCreate与Created之间,实例将定义的data、methods等初始化并进行注入。
因此在Created阶段,控制台已经能够输出data、computed值,包括控制台输出的方法methods,这些值都已在当前father组件实例中定义生成了。
—— 此时只是在js操作了vue实例,dom中的元素还并未挂载,因此实例的$el并不能够调用outerHTML,因此报错。
——(虽然father组件调用了child组件,但是此时子组件child生命周期还未开始!这里要注意,只是father组件做初始化。子组件实例的生命周期什么时候开始,接下来的father生命周期里会涉及)
—— 由于data数据、methods方法等在created中已被定义,此时已经可以去做一些ajax请求后台数据。
beforeMount
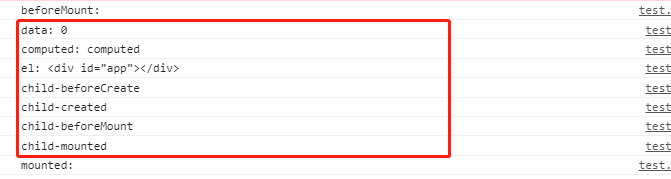
created与beforeMount之间,主要做了两步工作:
1、判断实例在dom中有没有挂载的元素(el:‘#app’),只有挂载了才能够继续。挂载好后,实例即与挂载dom元素进行了绑定(占坑),实例中也可以进行引用;
2、渲染dom模板。渲染dom模板只是在内存中,并非是在HTML中的DOM结构中渲染,所以前台在这个阶段时,组件对应的元素是没有显示的。(在调用 this.$el.outerHTML 后,控制台输出 <div id="app"></div>)
—— 可以看到fathe组件的beforeMount时,child子组件的vue创建生命周期已经完成到mounted阶段。说明father在执行dom模板渲染的时候,会监测模板中是否有自定义的vue子组件。如果有,就进入子组件的生命周期的创建阶段,等到所有子组件的完成创建并挂载(mounted)到父组件的模板当中后。才能表明父组件在内存中的模板渲染完成。
—— 子组件的mounted阶段虽然完成,但父组件仍在beforeMounte阶段时。前台也看不见子组件渲染的效果,子组件只是完成了挂载到父组件的模板中了(控制台可以看到dom树中的元素并未变化)。因此此刻在子组件的mounted阶段直接调用一些方法(dom操作方法)可能会造成异常错误。为保险起见可在子组件中通过 $nextTick() 回调,等下一次DOM更新后再进行dom的操作。
—— 以上内存中渲染DOM可以了解一下Virtual DOM技术。
mounted
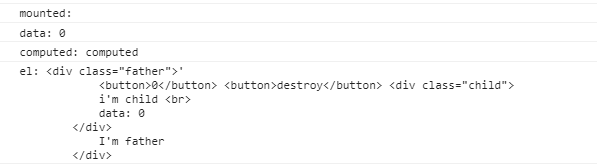
mounted阶段表示,当前实例在内存中渲染的组件模板,已成功挂在到父组件orDOM树中。
控制台可以看出DOM树中元素已经发生变化。
—— 这个阶段可以引用到元素,上面子组件提到过,一些情况下可以通过 $nextTick() 回调,避免一些意外错误。
运行阶段
beforeUpdate
通过点击左上角的button来改变father实例中的值
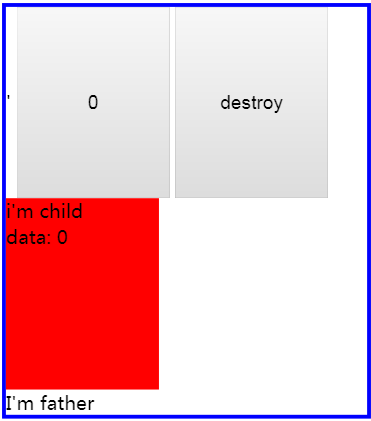
控制台
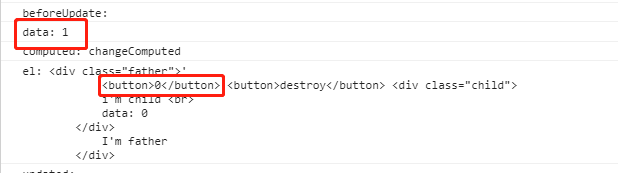
首先:只有实例中定义的变量绑定在了dom树中,例如 <div>{{data}}<div>,当data发生改变,才会进入beforeUpdate阶段。若dom树中未绑定某变量,该变量只在实例中发生变化,那么就不会进入beforeUpdate阶段!
我在代码中绑定了tData变量,从beforeUpdate阶段中可以看到,内部变量tData已经变化。页面中DOM的 tData绑定值还未变化。
子组件的数据更新,不会引起父组件的beforeUpdate和updated生命周期钩子。
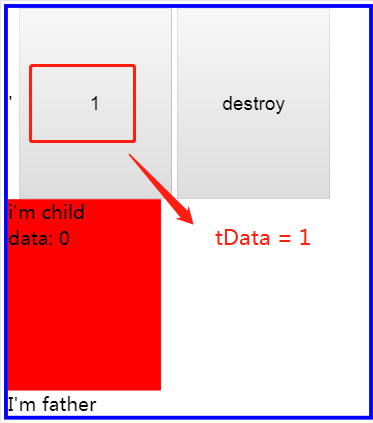
update
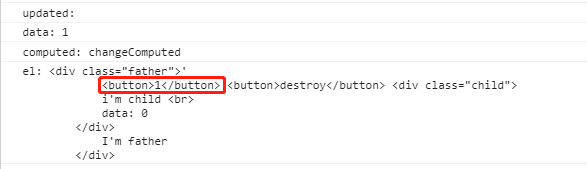
beforeUpdate和updated阶段直接,vue根据变量更新后的数据在虚拟DOM中进行渲染(图中re-render)。
而后进行页面相应组件的更新。
控制台组件中值为1
注销阶段
若一个组件被判断为销毁,则进入相应的销毁阶段。一般情况下销毁阶段的调用有:
- v-if = ‘false’
- v-for 列表发生了变化(列表中部分item不再使用)
- 实例调用 $destroy() 方法
beforeDestroy
进入该阶段,表明实例已经接收到了被销毁的指令。
在该阶段,实例的属性、方法、事件等仍然可以调用。
destroyed
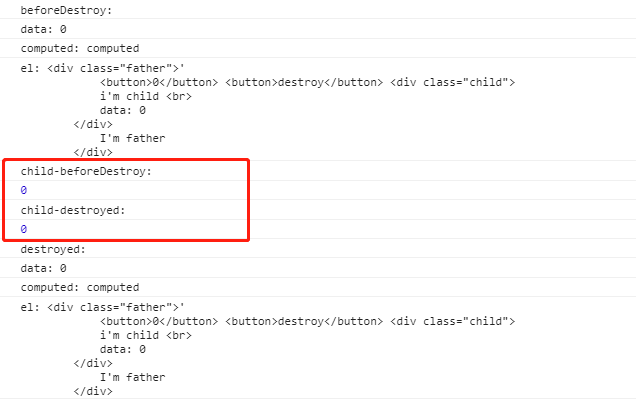

在beforeDestroy与destroyed之间,组件开始注销自己的属性、方法、事件以及自己的子组件。只有等到所有都已注销完成(子组件达到destroyed阶段),父组件才能够进入destroyed阶段。看控制台。
以上注销方法,是通过 $destroy() 来进行的,可以看到调用该方法后,页面上的元素并未随vue实例注销。但是通过点击button已经无法改变其button数组,说明实例已经不存在。
—— $destroy只是完全销毁一个实例。清理它与其它实例的连接,解绑它的全部指令及事件监听器。
—— 官方建议,$destroy 在多数情况下,还是用 v-if 和 v-for 来替代