一、Tomcat安装
1.下载jdk,Tomcat,解压到/usr/local/
2.配置jdk环境:
1 # vim /etc/profile
2       export JAVA_HOME=/usr/local/jdk1.8.0_171
3       export PATH=$JAVA_HOME/bin:$PATH
4       export CLASSPATH=.:$JAVA_HOME/lib/tools.jar:$JAVA_HOME/lib/dt.jar:$CLASSPATH

3.修改Tomcat首页:
# cd /usr/local/apache-tomcat-8.0.1/webapps/
# rm -rf !(ROOT)
# rm -rf ROOT/*
# echo "192.168.11.199" >ROOT/index.html
4.启动Tomcat
二、nginx安装
1.下载源码包,解压到/usr/local/
2.安装编译依赖:
1 # yum -y install zlib zlib-devel openssl openssl--devel pcre pcre-devel
3.编译:
1 # ./configure --prefix=/opt/nginx --sbin-path=/usr/bin/nginx --with-http_ssl_module
4.安装:
1 # make && make install
5.启动:
1 # nginx

三、负载均衡
1.ssl认证
私钥:
1 # openssl genrsa -des3 -out jason.key 1024
数字证书:
1 # openssl req -new -key jason.key -out jason.csr
去除访问密码:
1 # openssl rsa -in jason.key -out jason-np.key
公钥:
1 # openssl x509 -req -days 366 -in jason.csr -signkey jason-np.key -out jason.crt
2.修改nginx配置文件:
 1 # vim /opt/nginx/conf/nginx.conf
 2   #全局配置
 3   worker_processes 1;
 4   pid /var/run/nginx.pid;
 5   worker_rlimit_nofile 65535;
 6
 7   #events配置
 8   events {
 9   use epoll;
10   accept_mutex on;
11   multi_accept on;
12   worker_connections 1024;
13   }
14
15   #HTTP配置
16   http {
17   include mime.types;
18   default_type application/octet-stream;
19   sendfile on;
20   keepalive_timeout 65;
21   tcp_nopush on;
22   tcp_nodelay on;
23   client_header_buffer_size 32k;
24   large_client_header_buffers 4 64k;
25   client_max_body_size 8m;
26   proxy_cache_key '$host:$server_port$request_uri';
27   proxy_temp_file_write_size 64k;
28   proxy_ignore_headers X-Accel-Expires Expires Cache-Control Set-Cookie;
29   fastcgi_connect_timeout 300;
30   fastcgi_send_timeout 300;
31   fastcgi_read_timeout 300;
32   fastcgi_buffer_size 64k;
33   fastcgi_buffers 4 64k;
34   fastcgi_busy_buffers_size 128k;
35   fastcgi_temp_file_write_size 128k;
36   fastcgi_intercept_errors on;    #开启错误页面
37   log_format main '$remote_addr - $remote_user [$time_local] requesthost:"$http_host"; "$request" requesttime:"$request_time"; '
38   '$status $body_bytes_sent "$http_referer" - $request_body'
39   '"$http_user_agent" "$http_x_forwarded_for"';        #设置日志输出格式
40   error_log /var/log/nginx/error.log;
41   access_log /var/log/nginx/access.log main;            #成功日志格式调用log_format
42   gzip on;              #开启页面压缩,提高页面打开速度
43   gzip_min_length 1k;
44   gzip_buffers 16 64K;
45   gzip_http_version 1.1;
46   gzip_comp_level 6;
47   gzip_types text/plain application/x-javascript text/css application/xml application/javascript;
48   gzip_vary on;
49
50
51   upstream tomcat_server
52   {
53   server 192.168.11.199:8080 weight=1;
54   server 192.168.11.196:8080 weight=2;
55   }
56
57   server
58   {
59   listen 443;
60   server_name 192.168.11.199;
61   ssl on;
62   ssl_certificate /opt/nginx/ssl/nginx.crt;              #公钥
63   ssl_certificate_key /opt/nginx/ssl/nginx.key;        #私钥
64   ssl_session_timeout 5m;
65
66   location /
67   { proxy_pass http://tomcat_server; }              #负载
68   }
69
70   server
71   {
72   listen 70;
73   root html;
74   index index.html index.htm;
75
76   }
77
78   server
79   {
80   listen 71;
81   root html;
82   index index.html;
83   error_page 404 = /404.html;
84   error_page 500 502 503 504 = /50x.html;
85   }
86   }
3.编写日志分割脚本
 1 #!/bin/bash
 2 #此脚本用于自动分割Nginx的日志,包括access.log和error.log
 3 #每天00:00执行此脚本 将前一天的access.log重命名为access-xxxx-xx-xx.log格式,并重新打开日志文件
 4 #Nginx日志文件所在目录
 5 LOG_PATH=/var/log/nginx/
 6 #获取昨天的日期
 7 YESTERDAY=$(date -d "yesterday" +%Y-%m-%d)
 8 #获取pid文件路径
 9 PID=/var/run/nginx.pid
10 #分割日志
11 mv ${LOG_PATH}access.log ${LOG_PATH}access-${YESTERDAY}.log
12 mv ${LOG_PATH}error.log ${LOG_PATH}error-${YESTERDAY}.log
13 #向Nginx主进程发送USR1信号,重新打开日志文件
14 kill -USR1 `cat ${PID}`
15 chmod +x /opt/nginx/conf/log_cut.sh
4.相关测试
1.gzip压缩测试:
1 # curl -I -H "Accept-Encoding: gzip, deflate" "192.168.11.199"
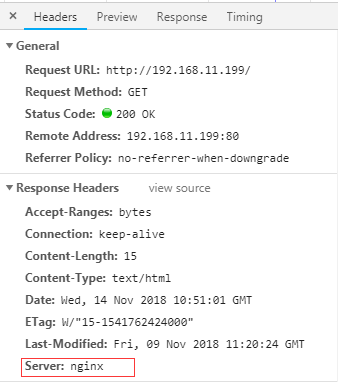
2.nginx版本号:F12查看页面
3.日志分割:
1 # ll /var/log/nginx

4.日志输出格式:
1 # tail -f /var/log/nginx/access-2018-11-13.log

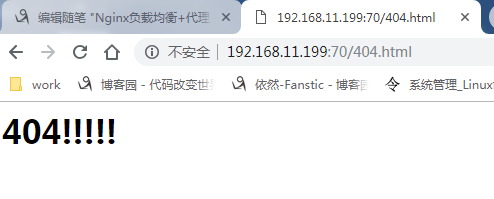
5.错误页面:
1 http://192.168.11.199:71/djkf
5.压力测试(ApacheBench):
 1 # yum -y install httpd-tools
 2   关闭ssl认证测试:
 3   # ab -c 500 -n 20000 http://192.168.11.199:80/index.html #一次5000并发,请求总数为200000
 4   Concurrency Level: 500            #一次请求量
 5   Time taken for tests: 10.484 seconds            #耗时
 6   Complete requests: 20000    #完成请求
 7   Failed requests: 6666            #请求失败
 8
 9
10
11   开启ssl认证测试:
12   # ab -c 500 -n 20000 https://192.168.11.199:443/index.html
13   Concurrency Level: 500
14   Time taken for tests: 27.011 seconds
15   Complete requests: 20000
16   Failed requests: 6667
6.nginx调优:
1   worker_rlimit_nofile 65535;         #文件打开数量
2   worker_connections 65535;          #单个进程最大连接数
3   sendfile on;                  #开启高效文件传输模式
4   tcp_nopush on;                 #防止网路阻塞
5   fastcgi_connect_timeout 600;        #指定连接到后端FastCGI的超时时间。
6   fastcgi_send_timeout 600;          #向FastCGI传送请求的超时时间。
7   fastcgi_read_timeout 600;          #指定接收FastCGI应答的超时时间。
7..系统层面
文件资源限制的配置:
1 # vim /etc/security/limits.conf
2     * soft nofile 65535
3     * hard nofile 65535
4     * soft noproc 65535
5     * hard noproc 65535

#logout重新登录查看
1 # ulimit -n

2.内核参数:
 1 # vim /etc/sysctl.conf
 2   net.ipv4.ip_forward = 0            #出现禁用 IPv4 包转送
 3   net.ipv4.conf.default.rp_filter = 1        #源路由核查功能
 4   net.ipv4.conf.default.accept_source_route = 0      #禁用所有IP源路由
 5   kernel.sysrq = 0                #禁用SysRq(组合键)功能
 6   kernel.core_uses_pid = 1            #控制core文件的文件名中是否添加pid作为扩展
 7   net.ipv4.tcp_syncookies = 1        //这四行标红内容,一般是发现大量TIME_WAIT时的解决办法
 8   kernel.msgmnb = 65536          #每个消息队列的最大字节限制。
 9   kernel.msgmax = 65536          #整个系统的最大数量的消息队列
10   kernel.shmmax = 68719476736              #定义单个共享内存段的最大值
11   kernel.shmall = 4294967296              #控制共享内存页数
12   net.ipv4.tcp_max_tw_buckets = 6000
13   net.ipv4.tcp_sack = 1            #启用有选择的应答
14   net.ipv4.tcp_window_scaling = 1              #设置tcp/ip会话的滑动窗口大小是否可变
15   net.ipv4.tcp_rmem = 4096 87380 4194304              #为每个TCP连接分配的读、写缓冲区内存大小
16   net.ipv4.tcp_wmem = 4096 16384 4194304              #为每个TCP连接分配的读、写缓冲区内存大小
17   net.core.wmem_default = 8388608          # 发送套接字缓冲区大小的默认值
18   net.core.rmem_default = 8388608              #接收套接字缓冲区大小的默认值
19   net.core.rmem_max = 16777216
20   net.core.wmem_max = 16777216
21   net.core.netdev_max_backlog = 262144            #每个网络接口接收数据包的速率比内核处理这些包的速率快时,允许送到队列的数据包的最大数目
22   net.core.somaxconn = 262144
23   net.ipv4.tcp_max_orphans = 3276800
24   net.ipv4.tcp_max_syn_backlog = 262144
25   net.ipv4.tcp_timestamps = 1       //#开启TCP时间戳,这个选择最好加上
26   net.ipv4.tcp_synack_retries = 1              #服务端收到sys,还未发出syn+ack
27   net.ipv4.tcp_syn_retries = 1
28   net.ipv4.tcp_tw_recycle = 1       //开启此功能可以减少TIME-WAIT状态,但是NAT网络模式下打开有可能会导致tcp连接错误,慎重。
29   net.ipv4.tcp_tw_reuse = 1
30   net.ipv4.tcp_mem = 94500000 915000000 927000000
31   net.ipv4.tcp_fin_timeout = 30
32   net.ipv4.tcp_keepalive_time = 30
33   net.ipv4.ip_local_port_range = 1024 65000
34   net.ipv4.ip_conntrack_max = 6553500
35 # sysctl -p