1.验证签名
{
    [self generateRSAKeyPair:kRSA_KEY_SIZE];


    NSData *ttDt = [@"0123456789" dataUsingEncoding:NSASCIIStringEncoding];
    NSData *sha1dg = [ttDt hashDataWith:CCDIGEST_SHA1];

    OSStatus ret;


    //私钥签名,公钥验证签名
    size_t siglen = SecKeyGetBlockSize(privateKeyRef);
    uint8_t *sig = malloc(siglen);
    bzero(sig, siglen);
    ret = SecKeyRawSign(privateKeyRef, kSecPaddingPKCS1SHA256, sha1dg.bytes, sha1dg.length, sig, &siglen);
    NSAssert(ret==errSecSuccess, @"签名失败");


    ret = SecKeyRawVerify(publicKeyRef, kSecPaddingPKCS1SHA256, sha1dg.bytes, sha1dg.length,sig, siglen);
    NSAssert(ret==errSecSuccess, @"验证签名失败");

    if (ret==errSecSuccess) {
        NSLog(@"SIGN VERIFY PASS");
    }
}
-----------------------------------------------------
1.
https://blog.csdn.net/laughing2333/article/details/52292481
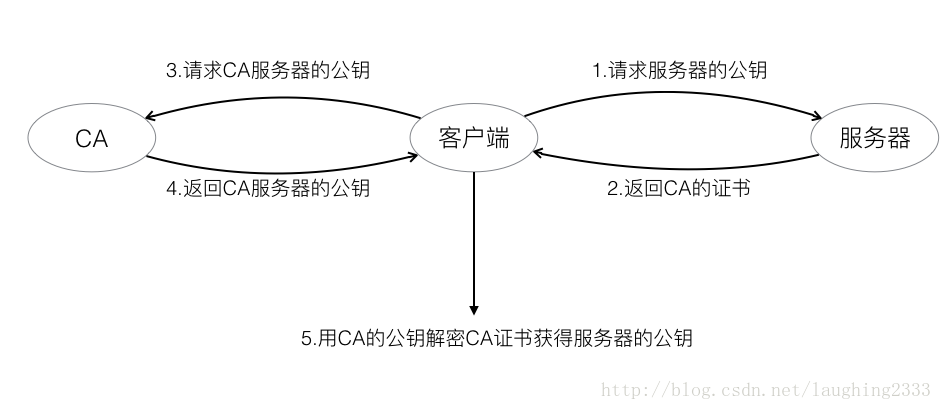
14.这么多机器,第三方机构的公钥怎么跑到了客户端的机器中呢?
其实呢,现实中,浏览器和操作系统都会维护一个权威的第三方机构列表(包括它们的公钥)。因为客户端接收到的证书中会写有颁发机构,客户端就根据这个颁发机构的值在本地找相应的公钥。
https://www.cnblogs.com/ghjbk/p/6738069.html
openssl 给自己颁发证书的步骤:
前提:先建一个cert目录,cd到该目录,以下所有命令的当前路径均为该目录
1. 生成私钥KEY
|
1
|
openssl genrsa -des3 -out server.key 2048 |
这一步执行完以后,cert目录下会生成server.key文件
2. 生成证书请求文件CSR
|
1
|
openssl req -new -key server.key -out server.csr |
该命令先进入交互模式,让你填一堆东西,参考下图:

要注意的是Common Name这里,要填写成使用SSL证书(即:https协议)的域名或主机名,否则浏览器会认为不安全。例如:如果以后打算用https://yjm-docker/xxx 这里就填写yjm-docker
3. 生成CA的证书
前面提过X.509证书的认证者总是CA或由CA指定的人,所以得先生成一个CA的证书
|
1
|
openssl req -new -x509 -key server.key -out ca.crt -days 3650 |
4. 最后用第3步的CA证书给自己颁发一个证书玩玩
|
1
2
3
|
openssl x509 -req -days 3650 -in server.csr -CA ca.crt -CAkey server.key -CAcreateserial -out server.crt |
执行完以后,cert目录下server.crt 就是我们需要的证书。当然,如果要在google等浏览器显示出安全的绿锁标志,自己颁发的证书肯定不好使,得花钱向第三方权威证书颁发机构申请(即:第4步是交给权威机构来做,我们只需要提交server.key、server.csr,哦,还有毛爷爷就好了)
http://www.cnblogs.com/lan1x/p/5872915.html
2.
    unsigned char* bufferArray=new unsigned char[Len];
    int result=fread(bufferArray, 1, Len, file);
    cout << result << endl;

    unsigned char* p;
    p = bufferArray;
    X509* pX509 = NULL;
    d2i_X509(&pX509, (unsigned char const **)&p, Len);
    if (pX509 == NULL)
    {
        cout << "error" << endl;
        return 0;
    }
    else {
        printX509(pX509);
    }
https://www.jianshu.com/p/d049555ce0c7
https://www.cnblogs.com/blfshiye/p/5074965.html
http://blog.chinaunix.net/uid-20054105-id-1979636.html?utm_source=jiancool
https://github.com/certificate-helper/TLS-Inspector
https://www.jianshu.com/p/3e019981c118
3.
SSL
SSL是基于非对称加密的原理,在这之上还进行了对称加密的数据传输。当传送数据量过大的时候,客户端和服务器之间互相商定了一个对话密钥(session key),使用这个对话密钥来进行对称加密加快运算速度。
整个SSL的流程如下:
客户端向服务器请求证书,验证无误后拿到服务器的公钥
双方协商生成一个session key
最后双方采用session key进行加密通信
主要关注前两步,即SSL的握手阶段。
Client Hello
客户端向服务器发出一个随机数,以及支持的传输协议以及加密算法 ,压缩方法。
Server Hello
服务器在确认支持客户端的传输协议等要求后,发送服务器的证书,以及一个随机数,安全需求更高的服务器会要求客户端发送证书来证明客户端的身份。
客户端回应
客户端此时生成第三个随机数(这一个随机数被称为pre-master-key),向CA验证服务器的证书以后拿到服务器的公钥,使用公钥加密第三个随机数,并把加密后的第三个随机数发送给服务器。
客户端在本地利用之前与服务器商量好的加密方法,根据这三个随机数生成一个对话密钥(session key)用于两端通信。
服务端回应
服务端收到第三个随机数后,计算出对话密钥,至此,握手阶段结束。接下来使用对话密钥进行通信即可。
https://blog.csdn.net/laughing2333/article/details/52292481
4.
# 验证server证书
 openssl verify -CAfile ca.crt server.crt
https://github.com/Ztiany/Programming-Notes/blob/ed0f19d9f776d8eaf49e8c5d243dc35e2f8a9894/Network/ProtocolBasic/HTTPS%E6%9D%83%E5%A8%81%E6%8C%87%E5%8D%97-OpenSSL%26Keytool.md
http://blog.51cto.com/ipcpu/1982109
https://www.cnblogs.com/274914765qq/p/4673327.html
5.
https://www.jianshu.com/p/d049555ce0c7
SecTrustSetAnchorCertificates
    NSMutableArray *pinnedCertificates = [NSMutableArray array];
    for (NSData *certificateData in self.pinnedCertificates) {
        [pinnedCertificates addObject:(__bridge_transfer id)SecCertificateCreateWithData(NULL, (__bridge CFDataRef)certificateData)];
    }

    NSString *cerFile = [[NSBundle mainBundle] pathForResource:@"anychat.net.cn.cer" ofType:nil];

    OSStatus            err;
    NSData *            certData;
    SecCertificateRef   cert;
    SecPolicyRef        policy;
    SecTrustRef         serverTrust;
    SecTrustResultType  trustResult;
    SecKeyRef           publicKeyRef;

    certData = [NSData dataWithContentsOfFile:cerFile];
    cert = SecCertificateCreateWithData(NULL, (__bridge CFDataRef) certData);
    policy = SecPolicyCreateBasicX509();
    err = SecTrustCreateWithCertificates(cert, policy, &serverTrust);
    NSAssert(err==errSecSuccess,@"证书加载失败");

    SecTrustSetAnchorCertificates(serverTrust, (__bridge CFArrayRef)pinnedCertificates);

    if (!AAFServerTrustIsValid(serverTrust)) {

    }

    // obtain the chain after being validated, which *should* contain the pinned certificate in the last position (if it's the Root CA)
    NSArray *serverCertificates = AAFCertificateTrustChainForServerTrust(serverTrust);

    for (NSData *trustChainCertificate in [serverCertificates reverseObjectEnumerator]) {
        if ([self.pinnedCertificates containsObject:trustChainCertificate]) {
        }
    }
http://ios.jobbole.com/89070/
https://www.jianshu.com/p/31bcddf44b8d
8.
source 'https://github.com/CocoaPods/Specs.git'
target 'boringssl01' do
platform :ios, '9.0'
# Uncomment the next line if you're using Swift or would like to use dynamic frameworks
# use_frameworks!
pod 'Firebase/Core'
pod 'Firebase/Auth'
pod 'Firebase/Database'
pod 'Firebase/Firestore'
end
9.
In order to fulfill its purpose of verifying the identity of its owner, a certificate contains such information as:
-
The certificate issuer
-
The certificate holder
-
A validity period (the certificate isn’t valid before or after this period)
-
The public key of the certificate’s owner
-
Certificate extensions, which contain additional information such as alternative names for the certificate holder and allowable uses for the private key associated with the certificate
-
A digital signature from the certification authority to ensure that the certificate hasn’t been altered and to indicate the identity of the issuer
The certificate, key, and trust services API provides functions to examine the properties of a certificate. For example, the SecCertificateCopySubjectSummary function returns a human readable summary of the certificate:
https://developer.apple.com/documentation/security/certificate_key_and_trust_services/certificates/examining_a_certificate?language=objc