前面三章介绍了Netty的一些基本用法,这一章介绍怎么使用Netty来实现一个简单的长连接demo。
Netty入门教程——认识Netty
Netty入门教程2——动手搭建HttpServer
Netty入门教程3——Decoder和Encoder
关于长连接的背景知识,可以参考《如何使用Socket实现长连接》
一个简单的长连接demo分为以下几个步骤:
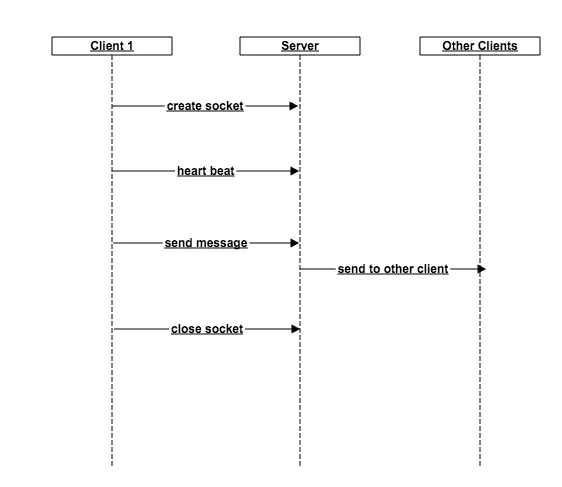
长连接流程
创建连接(Channel)
发心跳包
发消息,并通知其他用户
一段时间没收到心跳包或者用户主动关闭之后关闭连接
看似简单的步骤,里面有两个技术难点:
如何保存已创建的Channel
这里我们是将Channel放在一个Map中,以Channel.hashCode()作为key
其实这样做有一个劣势,就是不适合水平扩展,每个机器都有一个连接数的上线,如果需要实现多用户实时在线,对机器的数量要求会很高,在这里我们不多做讨论,不同的业务场景,设计方案也是不同的,可以在长连接方案和客户端轮询方案中进行选择。
如何自动关闭没有心跳的连接
Netty有一个比较好的Feature,就是ScheduledFuture,他可以通过ChannelHandlerContext.executor().schedule()创建,支持延时提交,也支持取消任务,这就给我们心跳包的自动关闭提供了一个很好的实现方案。
开始动手
首先,我们需要用一个JavaBean来封装通信的协议内容,在这里我们只需要三个数据就行了:
type : byte,表示消息的类型,有心跳类型和内容类型
length : int,表示消息的长度
content : String,表示消息的内容(心跳包在这里没有内容)
然后,因为我们需要将Channel和ScheduledFuture缓存在Map里面,所以需要将两个对象组合成一个JavaBean。
接着,需要完成输入输出流的解析和转换,我们需要重写Decoder和Encoder,具体可以参考Netty笔记3-Decoder和Encoder。
最后,就是需要完成ChannelHandler了,代码如下:
package com.dz.netty.live;
import io.netty.channel.Channel;
import io.netty.channel.ChannelHandlerContext;
import io.netty.channel.SimpleChannelInboundHandler;
import io.netty.util.concurrent.ScheduledFuture;
import org.slf4j.Logger;
import org.slf4j.LoggerFactory;
import java.util.HashMap;
import java.util.Map;
import java.util.concurrent.TimeUnit;
/**
-
Created by RoyDeng on 17/7/20.
*/
public class LiveHandler extends SimpleChannelInboundHandler{ // 1 private static Map<Integer, LiveChannelCache> channelCache = new HashMap<>();
private Logger logger = LoggerFactory.getLogger(LiveHandler.class);@Override
protected void channelRead0(ChannelHandlerContext ctx, LiveMessage msg) throws Exception {
Channel channel = ctx.channel();
final int hashCode = channel.hashCode();
System.out.println("channel hashCode:" + hashCode + " msg:" + msg + " cache:" + channelCache.size());if (!channelCache.containsKey(hashCode)) { System.out.println("channelCache.containsKey(hashCode), put key:" + hashCode); channel.closeFuture().addListener(future -> { System.out.println("channel close, remove key:" + hashCode); channelCache.remove(hashCode); }); ScheduledFuture scheduledFuture = ctx.executor().schedule( () -> { System.out.println("schedule runs, close channel:" + hashCode); channel.close(); }, 10, TimeUnit.SECONDS); channelCache.put(hashCode, new LiveChannelCache(channel, scheduledFuture)); } switch (msg.getType()) { case LiveMessage.TYPE_HEART: { LiveChannelCache cache = channelCache.get(hashCode); ScheduledFuture scheduledFuture = ctx.executor().schedule( () -> channel.close(), 5, TimeUnit.SECONDS); cache.getScheduledFuture().cancel(true); cache.setScheduledFuture(scheduledFuture); ctx.channel().writeAndFlush(msg); break; } case LiveMessage.TYPE_MESSAGE: { channelCache.entrySet().stream().forEach(entry -> { Channel otherChannel = entry.getValue().getChannel(); otherChannel.writeAndFlush(msg); }); break; } }}
@Override
public void channelReadComplete(ChannelHandlerContext ctx) throws Exception {
logger.debug("channelReadComplete");
super.channelReadComplete(ctx);
}@Override
public void exceptionCaught(ChannelHandlerContext ctx, Throwable cause) throws Exception {
logger.debug("exceptionCaught");
if(null != cause) cause.printStackTrace();
if(null != ctx) ctx.close();
}
}
写完服务端之后,我们需要有客户端连接来测试这个项目,教程参考如何使用Socket在客户端实现长连接,代码如下:
package com.dz.test;
import org.slf4j.Logger;
import org.slf4j.LoggerFactory;
import java.io.IOException;
import java.net.InetSocketAddress;
import java.net.Socket;
import java.nio.ByteBuffer;
import java.util.Scanner;
/**
-
Created by RoyDeng on 18/2/3.
*/
public class LongConnTest {private Logger logger = LoggerFactory.getLogger(LongConnTest.class);
String host = "localhost";
int port = 8080;public void testLongConn() throws Exception {
logger.debug("start");
final Socket socket = new Socket();
socket.connect(new InetSocketAddress(host, port));
Scanner scanner = new Scanner(System.in);
new Thread(() -> {
while (true) {
try {
byte[] input = new byte[64];
int readByte = socket.getInputStream().read(input);
logger.debug("readByte " + readByte);
} catch (IOException e) {
e.printStackTrace();
}
}
}).start();
int code;
while (true) {
code = scanner.nextInt();
logger.debug("input code:" + code);
if (code == 0) {
break;
} else if (code == 1) {
ByteBuffer byteBuffer = ByteBuffer.allocate(5);
byteBuffer.put((byte) 1);
byteBuffer.putInt(0);
socket.getOutputStream().write(byteBuffer.array());
logger.debug("write heart finish!");
} else if (code == 2) {
byte[] content = ("hello, I'm" + hashCode()).getBytes();
ByteBuffer byteBuffer = ByteBuffer.allocate(content.length + 5);
byteBuffer.put((byte) 2);
byteBuffer.putInt(content.length);
byteBuffer.put(content);
socket.getOutputStream().write(byteBuffer.array());
logger.debug("write content finish!");
}
}
socket.close();
}// 因为Junit不支持用户输入,所以用main的方式来执行用例
public static void main(String[] args) throws Exception {
new LongConnTest().testLongConn();
}
}
运行main方法之后,输入1表示发心跳包,输入2表示发content,5秒内不输入1则服务端会自动断开连接。
结语
本项目是我一直想研究的一块,这个demo比较简单,不能投入到生产环境中去,因为不能应付连接数大的应用场景。本项目已经上传至github,地址:https://github.com/dzr1990/helloNetty/tree/master,如果有问题欢迎评论留言!
前三篇笔记的快捷通道:
作者:追那个小女孩
链接:https://www.jianshu.com/p/9d89b2299ce4
来源:简书
著作权归作者所有。商业转载请联系作者获得授权,非商业转载请注明出处。