一、简介
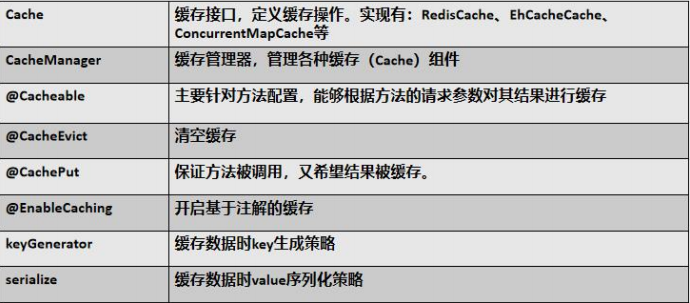
  Spring 从 3.1 开始定义了 org.springframework.cache.Cache 和 org.springframework.cache.CacheManager 接口来统一不同的缓存技术;
并支持使用 JCache(JSR-107)注解简化我们开发;

  Cache 接口为缓存的组件规范定义,包含缓存的各种操作集合; Cache接口下 Spring 提供了各种 xxxCache 的实现;
如 RedisCache , EhCacheCache , ConcurrentMapCache 等;

  每次调用需要缓存功能的方法时,Spring 会检查检查指定参数的指定的目标方法是否已经被调用过;如果有就直接从缓存中获取方法调用后的结果,如果没有就调用方法并缓
存结果后返回给用户。下次调用直接从缓存中获取。

  使用 Spring 缓存抽象时我们需要关注以下两点;
    1、确定方法需要被缓存以及他们的缓存策略
    2、从缓存中读取之前缓存存储的数据
二、基础概念

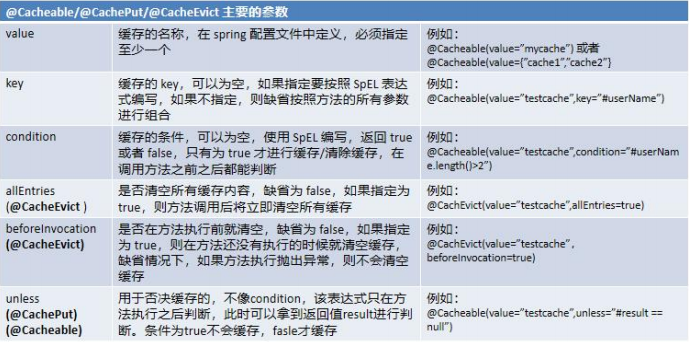
三、注解
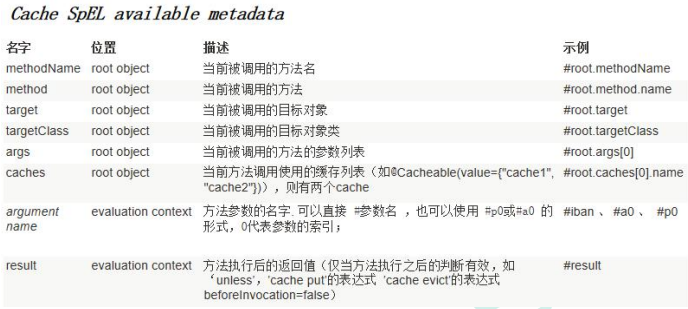
四、表达式语法
五、整合SpringCache简化缓存开发
1、引入依赖
<!--引入redis-->
<dependency>
   <groupId>org.springframework.boot</groupId>
   <artifactId>spring-boot-starter-data-redis</artifactId>
   <exclusions>
      <exclusion>
         <groupId>io.lettuce</groupId>
         <artifactId>lettuce-core</artifactId>
      </exclusion>
   </exclusions>
</dependency>
<dependency>
   <groupId>org.springframework.boot</groupId>
   <artifactId>spring-boot-starter-cache</artifactId>
</dependency>
允许null值缓存
2、写配置
(1)自动配置了哪些
  CacheAutoConfiguration 会导入 RedisCacheConfiguration;
  自动配好了缓存管理器 RedisCacheManager

// 缓存自动配置源码
@Configuration(proxyBeanMethods = false)
@ConditionalOnClass(CacheManager.class)
@ConditionalOnBean(CacheAspectSupport.class)
@ConditionalOnMissingBean(value = CacheManager.class, name = "cacheResolver")
@EnableConfigurationProperties(CacheProperties.class)
@AutoConfigureAfter({ CouchbaseAutoConfiguration.class, HazelcastAutoConfiguration.class,
                     HibernateJpaAutoConfiguration.class, RedisAutoConfiguration.class })
@Import({ CacheConfigurationImportSelector.class, // 看导入什么CacheConfiguration
         CacheManagerEntityManagerFactoryDependsOnPostProcessor.class })
public class CacheAutoConfiguration {

    @Bean
    @ConditionalOnMissingBean
    public CacheManagerCustomizers cacheManagerCustomizers(ObjectProvider<CacheManagerCustomizer<?>> customizers) {
        return new CacheManagerCustomizers(customizers.orderedStream().collect(Collectors.toList()));
    }

    @Bean
    public CacheManagerValidator cacheAutoConfigurationValidator(CacheProperties cacheProperties,
                                                                 ObjectProvider<CacheManager> cacheManager) {
        return new CacheManagerValidator(cacheProperties, cacheManager);
    }

    @ConditionalOnClass(LocalContainerEntityManagerFactoryBean.class)
    @ConditionalOnBean(AbstractEntityManagerFactoryBean.class)
    static class CacheManagerEntityManagerFactoryDependsOnPostProcessor
        extends EntityManagerFactoryDependsOnPostProcessor {

        CacheManagerEntityManagerFactoryDependsOnPostProcessor() {
            super("cacheManager");
        }

    }

@Configuration(proxyBeanMethods = false)
@ConditionalOnClass(RedisConnectionFactory.class)
@AutoConfigureAfter(RedisAutoConfiguration.class)
@ConditionalOnBean(RedisConnectionFactory.class)
@ConditionalOnMissingBean(CacheManager.class)
@Conditional(CacheCondition.class)
class RedisCacheConfiguration {

    @Bean // 放入缓存管理器
    RedisCacheManager cacheManager(CacheProperties cacheProperties,
                                   CacheManagerCustomizers cacheManagerCustomizers,
                                   ObjectProvider<org.springframework.data.redis.cache.RedisCacheConfiguration> redisCacheConfiguration,
                                   ObjectProvider<RedisCacheManagerBuilderCustomizer> redisCacheManagerBuilderCustomizers,
                                   RedisConnectionFactory redisConnectionFactory, ResourceLoader resourceLoader) {
        RedisCacheManagerBuilder builder = RedisCacheManager.builder(redisConnectionFactory).cacheDefaults(
            determineConfiguration(cacheProperties, redisCacheConfiguration, resourceLoader.getClassLoader()));
        List<String> cacheNames = cacheProperties.getCacheNames();
        if (!cacheNames.isEmpty()) {
            builder.initialCacheNames(new LinkedHashSet<>(cacheNames));
        }
        redisCacheManagerBuilderCustomizers.orderedStream().forEach((customizer) -> customizer.customize(builder));
        return cacheManagerCustomizers.customize(builder.build());
    }

(2)配置使用redis作为缓存
新建 application.properties
spring.cache.type=redis
3、测试使用缓存
(a)@Cacheable——触发将数据保存到缓存的操作
(b)@CacheEvict——触发将数据从缓存删除的操作,失效模式使用
(c)@CachePut——不影响方法执行更新缓存,双写模式可以使用
(d)@Caching——组合以上多个操作
(e)@CacheConfig——在类级别共享缓存的相同配置
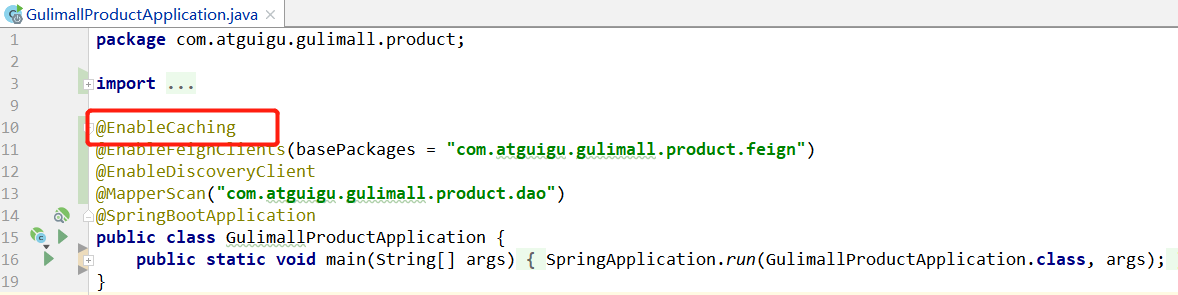
(1)开启缓存功能:@EnableCaching
(2)使用注解完成缓存操作
修改 com.atguigu.gulimall.product.service.impl.CategoryServiceImpl 的 getLevel1Catagories 方法
/**
 * 查询一级分类
* @return
*/
//每一个需要缓存的数据我们都来指定要放到哪个名字的缓存。【缓存的分区(按照业务类型分)】
@Cacheable({"category"})  //代表当前方法的结果需要缓存,如果缓存中有,方法不用调用。如果缓存中没有,会调用方法,最后将方法的结果放入缓存
@Override
public List<CategoryEntity> getLevel1Catagories() {
    System.out.println("getLevel1Catagories......");
    return baseMapper.selectList(new QueryWrapper<CategoryEntity>().eq("parent_cid",0));
}
访问:http://localhost:10000
第一次访问,控制台打印了 “getLevel1Catagories......”,再多次刷新之后没有打印,且redis里面有该缓存信息
说明之后默然查询缓存了


(3)@Cacheable细节处理
上面我们看到redis生成的key名称随机,并且ttl=-1.如何处理这个问题 (a)修改application.properties spring.cache.type=redis spring.cache.redis.time-to-live=3600000
(b)修改 com.atguigu.gulimall.product.service.impl.CategoryServiceImpl 的 getLevel1Catagories 方法 /** * 查询一级分类 * @return */ /** * 1、每一个需要缓存的数据我们都来指定要放到哪个名字的缓存。【缓存的分区(按照业务类型分)】 2、@Cacheable({"category"}) 代表当前方法的结果需要缓存,如果缓存中有,方法不用调用。 如果缓存中没有,会调用方法,最后将方法的结果放入缓存 3、默认行为 (1)如果缓存中有,方法不再调用 (2)key是默认自动生成的:缓存的名字: : SimpleKey [](自主生成的key值) (3)缓存的value值。默认使用jdk序列化机制,将序列化后的数据存到redis (4)默认ttl时间:-1 自定义 (1)指定生成的缓存使用的key;key属性指定,接受一个SpEl表达式 SpEl的详细 (2)指定缓存的数据的存活时间,配置文件中修改ttl (3)将数据保存为json格式 */ @Cacheable(value = {"category"},key = "#root.method.name") @Override public List<CategoryEntity> getLevel1Catagories() { System.out.println("getLevel1Catagories......"); return baseMapper.selectList(new QueryWrapper<CategoryEntity>().eq("parent_cid",0)); }
测试结果:发现过期时间有了,并且缓存的key值成了设置的名称
(4)自定义缓存配置 上面我们发现虽然缓存时间和key值都指定了,但是缓存的内容没有序列化,不是json类型。如何处理这个问题
(a)新建文件 com.atguigu.gulimall.product.config.MyCacheConfig package com.atguigu.gulimall.product.config; import org.springframework.beans.factory.annotation.Autowired; import org.springframework.boot.autoconfigure.cache.CacheProperties; import org.springframework.boot.context.properties.EnableConfigurationProperties; import org.springframework.cache.annotation.EnableCaching; import org.springframework.context.annotation.Bean; import org.springframework.context.annotation.Configuration; import org.springframework.data.redis.cache.RedisCacheConfiguration; import org.springframework.data.redis.serializer.GenericJackson2JsonRedisSerializer; import org.springframework.data.redis.serializer.RedisSerializationContext; import org.springframework.data.redis.serializer.StringRedisSerializer; @EnableConfigurationProperties(CacheProperties.class) @Configuration @EnableCaching public class MyCacheConfig { // @Autowired // CacheProperties cacheProperties; /** * 配置文件中的东西没有用上 * * 1、原来和配置文件绑定的配置类是这样子的 * @ConfigurationProperties(prefix = "spring.cache") * public class CacheProperties * * 2、要让他生效 * @EnableConfigurationProperties(CacheProperties.class) * * @return */ @Bean RedisCacheConfiguration redisCacheConfiguration(CacheProperties cacheProperties){ RedisCacheConfiguration config = RedisCacheConfiguration.defaultCacheConfig(); config = config.serializeKeysWith(RedisSerializationContext.SerializationPair.fromSerializer(new StringRedisSerializer())); config = config.serializeValuesWith(RedisSerializationContext.SerializationPair.fromSerializer(new GenericJackson2JsonRedisSerializer())); //将配置文件中的所有配置都让它生效 CacheProperties.Redis redisProperties = cacheProperties.getRedis(); if(redisProperties.getTimeToLive() != null){ config = config.entryTtl(redisProperties.getTimeToLive()); } if(redisProperties.getKeyPrefix() != null){ config = config.prefixKeysWith(redisProperties.getKeyPrefix()); } if(!redisProperties.isCacheNullValues()){ config = config.disableCachingNullValues(); } if(!redisProperties.isUseKeyPrefix()){ config = config.disableKeyPrefix(); } return config; } } 注意:一定要开启注解 @EnableConfigurationProperties(CacheProperties.class),否则配置文件中的东西没用上
测试结果:可以看到:缓存 key 值,过期时间,内容序列化都有了 (b)修改application.properties,设置其他缓存配置 spring.cache.type=redis spring.cache.redis.time-to-live=3600000 #如果指定了前缀就用我们指定的前缀,如果没有就默认使用缓存的名字作为前缀 spring.cache.redis.key-prefix=CACHE_ spring.cache.redis.use-key-prefix=false #是否缓存空值 防止缓存穿透 spring.cache.redis.cache-null-values=true
具体测试结果不再展示,通常建议开启缓存空值,防止缓存穿透
(5)@CacheEvict注解
(a)修改 application.properties 文件,使用分区的前缀
spring.cache.type=redis

spring.cache.redis.time-to-live=3600000
#如果指定了前缀就用我们指定的前缀,如果没有就默认使用缓存的名字作为前缀
#spring.cache.redis.key-prefix=CACHE_
spring.cache.redis.use-key-prefix=true
#是否缓存空值  防止缓存穿透
spring.cache.redis.cache-null-values=true

 (b)修改 com.atguigu.gulimall.product.service.impl.CategoryServiceImpl 的 updateCascade 方法
  /**
     * 级联更新所有关联的数据
     *  @CacheEvict:失效模式
     * @param category
     */
    @CacheEvict(value = "category", key = "'getLevel1Catagories'")
    //category:key
    @Override
    @Transactional
    public void updateCascade(CategoryEntity category) {
        this.updateById(category);
        categoryBrandRelationService.updateCategory(category.getCatId(), category.getName());

        //同时修改缓存中的数据
        //redis.del("catalogJson");等待下次主动查询进行更新
    }

  测试:
    访问 http://localhost:10000,redis中结果如下:

启动网关、启动renren-fast,修改分类,redis中结果:

思考:如果修改分类要清除多个缓存呢,例如修改分类,需要删除一级、二级和三级缓存
(c)先来修改之前的 getCatalogJson 方法,获取分类的json数据,使用@Cacheable注解缓存数据
@Cacheable(value = "category", key = "#root.methodName")
@Override
public Map<String, List<Catelog2Vo>> getCatalogJson(){
    System.out.println("查询了数据库.....");
    List<CategoryEntity> selectList = baseMapper.selectList(null);
    List<CategoryEntity> level1Catagorys = getParent_cid(selectList, 0L);

    //2、封装数据
    Map<String, List<Catelog2Vo>> parent_cid = level1Catagorys.stream().collect(Collectors.toMap(k -> k.getCatId().toString(), v -> {
        // 1、每一个的一级分类,查到这个以及分类的二级分类
        List<CategoryEntity> categoryEntities = getParent_cid(selectList, v.getCatId());
        //2、封装上面的结果
        List<Catelog2Vo> catelog2Vos = null;
        if (categoryEntities != null) {
            catelog2Vos = categoryEntities.stream().map(l2 -> {
                Catelog2Vo catelog2Vo = new Catelog2Vo(v.getCatId().toString(), null, l2.getCatId().toString(), l2.getName());
                //1、找当前二级分类的三级分类封装成vo
                List<CategoryEntity> level3Catalog = getParent_cid(selectList, l2.getCatId());
                if(level3Catalog!=null){
                    List<Catelog2Vo.Category3Vo> collect = level3Catalog.stream().map(l3 -> {
                        //2、封装成指定格式
                        Catelog2Vo.Category3Vo category3Vo = new Catelog2Vo.Category3Vo(l2.getCatId().toString(), l3.getCatId().toString(), l3.getName());
                        return category3Vo;
                    }).collect(Collectors.toList());
                    catelog2Vo.setCatalog3List(collect);
                }
                return catelog2Vo;
            }).collect(Collectors.toList());
        }
        return catelog2Vos;
    }));
    return parent_cid;
}
  清空redis,启动网关,多次访问gulimall.com。查看一级菜单和json数据是否都只访问了一次数据库

可以看到,多次访问后,一级分类菜单和分类的json数据都只访问了一次数据库,查看redis情况

可以看到,redis中有两个key,一个是一级分类,一个是分类的json数据,并且key的前缀都是 “category”,后缀是方法名
思考:现在我们从管理后台修改分类,如何一次性是这两个key都失效呢
(d)修改 com.atguigu.gulimall.product.service.impl.CategoryServiceImpl 的 updateCascade 方法
使用 @Caching 注解,里面存储数组对象,指定多个删除的key值
/**
 * 级联更新所有关联的数据
 *  @CacheEvict:失效模式
 *      1、同时进行多种缓存操作  @Caching
 * @param category
 */
//@CacheEvict(value = "category", key = "'getLevel1Catagories'")
@Caching(evict = {
        @CacheEvict(value = "category", key = "'getLevel1Catagories'"),
        @CacheEvict(value = "category", key = "'getCatalogJson'")
})
//category:key
@Override
@Transactional
public void updateCascade(CategoryEntity category) {
    this.updateById(category);
    categoryBrandRelationService.updateCategory(category.getCatId(), category.getName());

    //同时修改缓存中的数据
    //redis.del("catalogJson");等待下次主动查询进行更新
}
  测试:
    访问 gulimall.com,然后后台修改分类,发现两个key都被删除了,这里就不再截图展示了
  思考:这样一个一个指定过于麻烦,我们如何一次性操作简便呢

(e)修改 com.atguigu.gulimall.product.service.impl.CategoryServiceImpl 的 updateCascade 方法
使用 @CacheEvict(value = "category", allEntries = true),直接一次性删除分区 “category”里面的数据
  /**
     * 级联更新所有关联的数据
     *  @CacheEvict:失效模式
     *      1、同时进行多种缓存操作  @Caching
     *      2、指定删除某个分区下的所有数据 @CacheEvict(value = "category", allEntries = true)
     *      3、存储同一类型的数据,都可以指定成同一个分区。分区名默认就是缓存的前缀
     * @param category
     */
    //@CacheEvict(value = "category", key = "'getLevel1Catagories'")
//    @Caching(evict = {
//            @CacheEvict(value = "category", key = "'getLevel1Catagories'"),
//            @CacheEvict(value = "category", key = "'getCatalogJson'")
//    })
    //category:key
    @CacheEvict(value = "category", allEntries = true)
    @Override
    @Transactional
    public void updateCascade(CategoryEntity category) {
        this.updateById(category);
        categoryBrandRelationService.updateCategory(category.getCatId(), category.getName());

        //同时修改缓存中的数据
        //redis.del("catalogJson");等待下次主动查询进行更新
    }
六、SpringCache 原理与不足
原理:
  CacheManager(RedisCacheManager)——>Cache(RedisCache)——>Cache负责缓存的读写

(1)读模式
  (a)缓存穿透:查询一个null数据。
    解决方案:缓存空数据,可通过spring.cache.redis.cache-null-values=true
  (b)缓存击穿:大量并发进来同时查询一个正好过期的数据。
    解决方案:加锁 ? 默认是无加锁的;使用sync = true来解决击穿问题
  (c)缓存雪崩:大量的key同时过期。
    解决方案:加随机时间。加上过期时间:spring.cache.redis.time-to-live=3600000
(2)写模式
  (a)读写加锁。
  (b)引入Canal,感知到MySQL的更新去更新Redis
  (c)读多写多,直接去数据库查询就行

(3)总结
  常规数据(读多写少,即时性,一致性要求不高的数据,完全可以使用Spring-Cache);写模式(只要缓存的数据有过期时间就足够了)
  特殊数据:特殊设计