1、图片服务器搭建
1.1什么是FastDFS
FastDFS是用c语言编写的一款开源的分布式文件系统。FastDFS为互联网量身定制,充分考虑了冗余备份、负载均衡、线性扩容等机制,并注重高可用、高性能等指标,
使用FastDFS很容易搭建一套高性能的文件服务器集群提供文件上传、下载等服务。
1.2FastDFS架构

1.3搭建图片服务器
下载FastDFS的安装包。只有linux版。

1.3.1案例架构

1.3.2编译环境
1、需要gcc的环境。需要make
yum install gcc-c++
2、需要安装libevent工具包。
FastDFS依赖libevent库,需要安装:
yum -y install libevent
1.3.3 Tracker server的安装
第一步:需要把FastDFS的源码包上传到服务器。
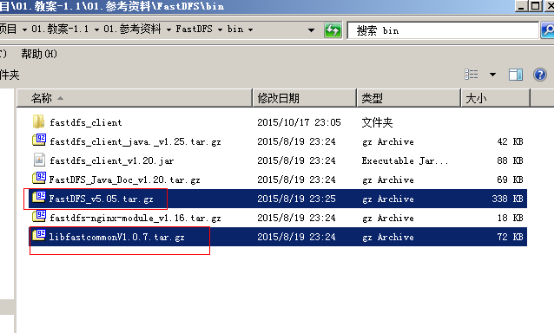
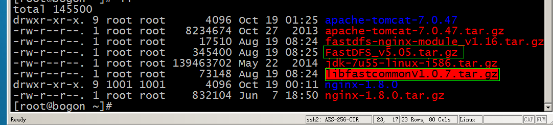
第二步:安装libfastcommonV1.0.7.tar.gz工具包。
1、解压缩
[root@bogon ~]# tar -zxvf libfastcommonV1.0.7.tar.gz
2、Make
[root@bogon libfastcommon-1.0.7]# ./make.sh
3、[root@bogon libfastcommon-1.0.7]# ./make.sh install
在/usr下多一个lib64文件夹---/usr/lib64
4、从/usr/lib64下复制libfastcommon.so到/usr/lib文件夹下。
[root@bogon lib64]# cp libfastcommon.so ../lib
第三步:解压缩FastDFS_v5.05.tar.gz包
第四步:编译FastDFS的源码。使用make.sh
[root@bogon FastDFS]# ./make.sh
第五步:安装。
[root@bogon FastDFS]# ./make.sh install

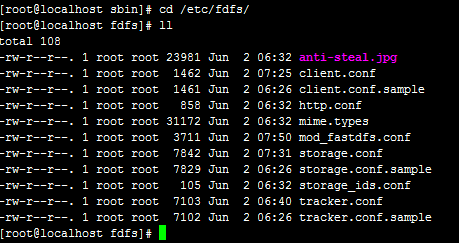
安装在[root@localhost sbin]# cd /etc/fdfs/ 路径下
第六步:在/etc/fdfs/目录下有配置文件的样例。
可以把fast源码包下的配置文件(/root/FastDFS/conf)复制到/etc/fdfs目录下。
[root@bogon conf]# cp * /etc/fdfs/
第七步:修改tracker.conf配置文件。
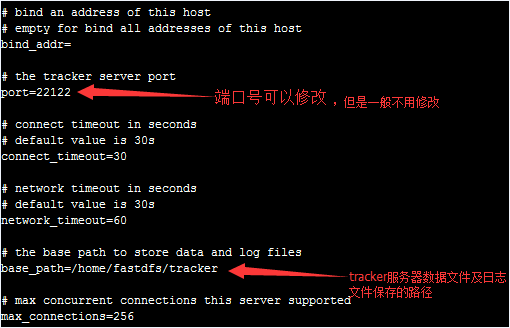
主要是修改配置文件存放的路径,路径必须是存在的。
base_path=/home/fastdfs/tracker
第八步:启动tracker server。
/usr/bin/fdfs_trackerd /etc/fdfs/tracker.conf restart
[root@bogon bin]# ./fdfs_trackerd /etc/fdfs/tracker.conf restart
[root@bogon bin]# ps aux|grep fdfs
root 2935 0.0 0.5 16132 2728 ? Sl 18:55 0:00 ./fdfs_trackerd /etc/fdfs/tracker.conf restart
root 2944 0.0 0.1 4356 724 pts/0 S+ 18:55 0:00 grep fdfs
[root@bogon bin]#
1.3.4 Storage Server安装
第一步:安装libfastcommonV1.0.7.tar.gz工具包
第二步:参考Tracker server安装的三~六步。
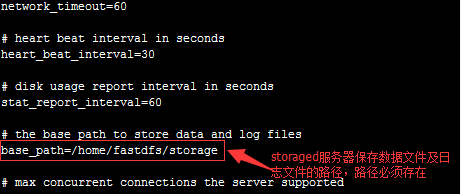
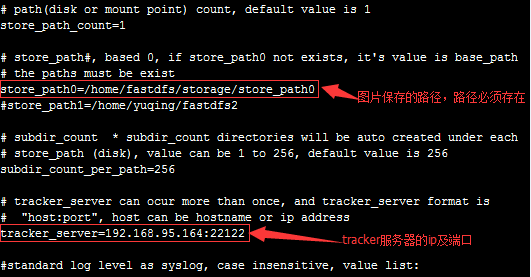
第三步:修改Storaged的配置文件。在/etc/fdfs下
Storaged服务端口2300
第四步:启动Storage服务器
[root@bogon fdfs]# cd /usr/bin/
[root@bogon bin]# ./fdfs_storaged /etc/fdfs/storage.conf restart
第五步:设置开机自动启动
[root@localhost bin]# cd /etc/rc.d/
[root@localhost rc.d]# vi rc.local
加入两个启动命令
/usr/bin/fdfs_trackerd /etc/fdfs/tracker.conf restart
/usr/bin/fdfs_storaged /etc/fdfs/storage.conf restart
1.3.5 测试上传文件
fdfs_test测试文件上传。
修改修改/etc/fdfs/client.conf文件。

[root@bogon bin]# ./fdfs_test /etc/fdfs/client.conf upload /etc/fdfs/anti-steal.jpg
1.3.6 安装 nginx+fastdfs的扩展模块
1.3.6.1 需要的模块

Nginx安装模块需要重新编译。
1.3.6.2 安装步骤
第一步:把模块上传到linux服务器。把nginx的源码上传。

第二步:解压模块的压缩包。进入源码包/root/fastdfs-nginx-module/src
第三步:修改config
把文件中的local去掉。

第四步:把mod_fastdfs.conf配置文件复制到/etc/fdfs目录下。
[root@localhost src]# cp mod_fastdfs.conf /etc/fdfs/


第五步:编译模块。和nginx同时编译。
1、对nginx进行config。生成一个makefile。
./configure
--prefix=/usr/local/nginx
--pid-path=/var/run/nginx/nginx.pid
--lock-path=/var/lock/nginx.lock
--error-log-path=/var/log/nginx/error.log
--http-log-path=/var/log/nginx/access.log
--with-http_gzip_static_module
--http-client-body-temp-path=/var/temp/nginx/client
--http-proxy-temp-path=/var/temp/nginx/proxy
--http-fastcgi-temp-path=/var/temp/nginx/fastcgi
--http-uwsgi-temp-path=/var/temp/nginx/uwsgi
--http-scgi-temp-path=/var/temp/nginx/scgi
--add-module=/root/fastdfs-nginx-module/src
1、make
2、make install
3、配置nginx的配置文件。
[root@localhost src]# cd /usr/local/nginx/
[root@localhost nginx]# pwd
/usr/local/nginx
在nginx.conf配置文件中添加
server {
listen 80;
server_name localhost;
location /group1/M00/{
ngx_fastdfs_module;
}
}
5、启动nginx
[root@localhost nginx]# ./nginx