准备工作:
先启动两个provider:
- dubbo://10.211.55.5:20880/com.alibaba.dubbo.demo.DemoService?anyhost=true&application=demo-provider&dubbo=2.5.7&generic=false&interface=com.alibaba.dubbo.demo.DemoService&methods=sayHello&pid=318&revision=2.5.7&side=provider×tamp=1510225244315
- dubbo://10.10.10.10:20880/com.alibaba.dubbo.demo.DemoService?anyhost=true&application=demo-provider&dubbo=2.0.0&generic=false&interface=com.alibaba.dubbo.demo.DemoService&methods=sayHello&pid=25215&side=provider×tamp=1510225334486
来看一下ReferenceBean的继承实现关系图:
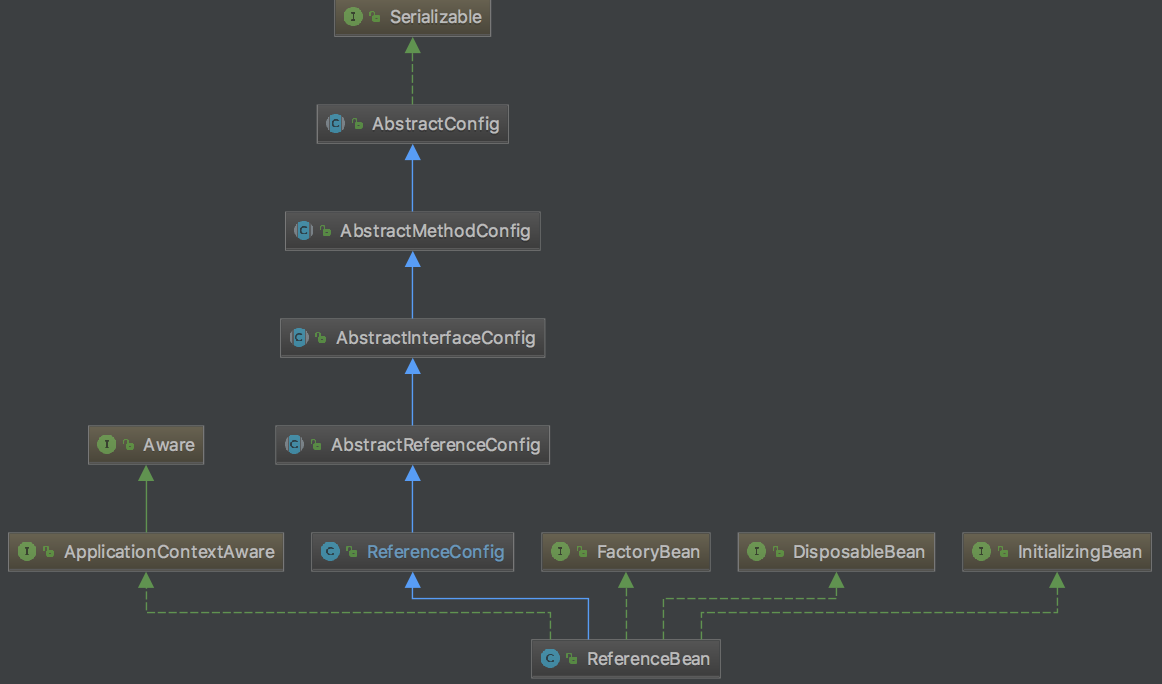
在执行DemoService demoService = (DemoService) context.getBean("demoService")时,由于ReferenceBean是一个FactoryBean,所以这里会通过FactoryBean.getObject方法获取Bean。
来看一下ReferenceBean的核心代码:
    public Object getObject() throws Exception {
        return get();
    }

    public synchronized T get() {
        if (destroyed) {
            throw new IllegalStateException("Already destroyed!");
        }
        if (ref == null) {
            init();
        }
        return ref;
    }

    private void init() {
        ...
        ref = createProxy(map);
    }

    private T createProxy(Map<String, String> map) {
        ...
        if (urls.size() == 1) {
            invoker = refprotocol.refer(interfaceClass, urls.get(0));
        }
        ...
        // 创建服务代理
        return (T) proxyFactory.getProxy(invoker);
    }
最核心的两行代码如上红色。
一 使用Protocol将interfaceClass转化为Invoker
1 invoker = refprotocol.refer(interfaceClass, urls.get(0))
这里的refprotocol是Protocol$Adaptive实例。
public class Protocol$Adaptive implements com.alibaba.dubbo.rpc.Protocol {
    ...
    public com.alibaba.dubbo.rpc.Invoker refer(Class arg0, com.alibaba.dubbo.common.URL arg1) throws com.alibaba.dubbo.rpc.RpcException {
        if (arg1 == null)
            throw new IllegalArgumentException("url == null");
        com.alibaba.dubbo.common.URL url = arg1;
        String extName = (url.getProtocol() == null ? "dubbo" : url.getProtocol());
        if(extName == null)
            throw new IllegalStateException("Fail to get extension(com.alibaba.dubbo.rpc.Protocol) name from url(" + url.toString() + ") use keys([protocol])");
        com.alibaba.dubbo.rpc.Protocol extension = (com.alibaba.dubbo.rpc.Protocol) ExtensionLoader.getExtensionLoader(com.alibaba.dubbo.rpc.Protocol.class).getExtension(extName);
        return extension.refer(arg0, arg1);
    }
    ...
}
这里extName="registry"。之后经过ProtocolListenerWrapper.refer->ProtocolFilterWrapper.refer->RegistryProtocol.refer,前两步什么都不做(registry协议)。来看RegistryProtocol.refer方法核心代码:
1     public <T> Invoker<T> refer(Class<T> type, URL url) throws RpcException {
2         url = url.setProtocol(url.getParameter(Constants.REGISTRY_KEY, Constants.DEFAULT_REGISTRY)).removeParameter(Constants.REGISTRY_KEY);
3         Registry registry = registryFactory.getRegistry(url);
4         ...
5         return doRefer(cluster, registry, type, url);
6     }
参数:
- url:registry://10.211.55.5:2181/com.alibaba.dubbo.registry.RegistryService?application=demo-consumer&dubbo=2.0.0&pid=25267&refer=application=demo-consumer&check=false&dubbo=2.0.0&interface=com.alibaba.dubbo.demo.DemoService&methods=sayHello&pid=25267®ister.ip=10.10.10.10&side=consumer×tamp=1510225913509®istry=zookeeper×tamp=1510225984358
- type: interface com.alibaba.dubbo.demo.DemoService
第一行代码执行完成之后,替换了协议,此时的url为:
zookeeper://10.211.55.5:2181/com.alibaba.dubbo.registry.RegistryService?application=demo-consumer&dubbo=2.0.0&pid=25267&refer=application=demo-consumer&check=false&dubbo=2.0.0&interface=com.alibaba.dubbo.demo.DemoService&methods=sayHello&pid=25267®ister.ip=10.10.10.10&side=consumer×tamp=1510225913509×tamp=1510225984358
之后开始获取Registry。这里的registryFactory是RegistryFactory$Adaptive实例。
 1 public class RegistryFactory$Adaptive implements com.alibaba.dubbo.registry.RegistryFactory {
 2     public com.alibaba.dubbo.registry.Registry getRegistry(com.alibaba.dubbo.common.URL arg0) {
 3         if (arg0 == null)
 4             throw new IllegalArgumentException("url == null");
 5         com.alibaba.dubbo.common.URL url = arg0;
 6         String extName = ( url.getProtocol() == null ? "dubbo" : url.getProtocol() );//zookeeper
 7         if(extName == null)
 8             throw new IllegalStateException("Fail to get extension(com.alibaba.dubbo.registry.RegistryFactory) name from url(" + url.toString() + ") use keys([protocol])");
 9         com.alibaba.dubbo.registry.RegistryFactory extension = (com.alibaba.dubbo.registry.RegistryFactory)ExtensionLoader.getExtensionLoader(com.alibaba.dubbo.registry.RegistryFactory.class).getExtension(extName);
10         return extension.getRegistry(arg0);
11     }
12 }
这里的extName是zookeeper。之后执行ZookeeperRegistryFactory的父类AbstractRegistryFactory.getRegistry,如下:
 1     public Registry getRegistry(URL url) {
 2         url = url.setPath(RegistryService.class.getName())
 3                 .addParameter(Constants.INTERFACE_KEY, RegistryService.class.getName())
 4                 .removeParameters(Constants.EXPORT_KEY, Constants.REFER_KEY);
 5         String key = url.toServiceString();
 6         // 锁定注册中心获取过程,保证注册中心单一实例
 7         LOCK.lock();
 8         try {
 9             Registry registry = REGISTRIES.get(key);
10             if (registry != null) {
11                 return registry;
12             }
13             registry = createRegistry(url);
14             if (registry == null) {
15                 throw new IllegalStateException("Can not create registry " + url);
16             }
17             REGISTRIES.put(key, registry);
18             return registry;
19         } finally {
20             // 释放锁
21             LOCK.unlock();
22         }
23     }
经过处理的url为:
zookeeper://10.211.55.5:2181/com.alibaba.dubbo.registry.RegistryService?application=demo-consumer&dubbo=2.0.0&interface=com.alibaba.dubbo.registry.RegistryService&pid=25267×tamp=1510225984358
之后调用ZookeeperRegistryFactory.createRegistry(URL url):
1     public Registry createRegistry(URL url) {
2         return new ZookeeperRegistry(url, zookeeperTransporter);
3     }
这里的zookeeperTransporter为ZookeeperTransporter$Adaptive实例。
 1     public ZookeeperRegistry(URL url, ZookeeperTransporter zookeeperTransporter) {
 2         super(url);
 3         if (url.isAnyHost()) {
 4             throw new IllegalStateException("registry address == null");
 5         }
 6         String group = url.getParameter(Constants.GROUP_KEY, DEFAULT_ROOT);
 7         if (!group.startsWith(Constants.PATH_SEPARATOR)) {
 8             group = Constants.PATH_SEPARATOR + group;
 9         }
10         this.root = group;
11         zkClient = zookeeperTransporter.connect(url);
12         zkClient.addStateListener(new StateListener() {
13             public void stateChanged(int state) {
14                 if (state == RECONNECTED) {
15                     try {
16                         recover();
17                     } catch (Exception e) {
18                         logger.error(e.getMessage(), e);
19                     }
20                 }
21             }
22         });
23     }
通过super(url)这句代码,调用了ZookeeperRegistry的父类FailbackRegistry(启动失败处理器:注册失败/注销失败/订阅失败/反订阅失败/通知失败)和AbstractRegistry(将信息写入properties文件,进行相应通知-这里没有url的订阅器,所以没做什么事)。
然后获取ZkClient客户端,最后添加失败重连监听器。
执行zookeeperTransporter.connect(url),该类中的extName是"zkClient"(我们在provider部分使用了curator)。之后执行ZkclientZookeeperTransporter.connect:
1     public ZookeeperClient connect(URL url) {
2         return new ZkclientZookeeperClient(url);
3     }
 1     public ZkclientZookeeperClient(URL url) {
 2         super(url);
 3         client = new ZkClientWrapper(url.getBackupAddress(), 30000);
 4         client.addListener(new IZkStateListener() {
 5             public void handleStateChanged(KeeperState state) throws Exception {
 6                 ZkclientZookeeperClient.this.state = state;
 7                 if (state == KeeperState.Disconnected) {
 8                     stateChanged(StateListener.DISCONNECTED);
 9                 } else if (state == KeeperState.SyncConnected) {
10                     stateChanged(StateListener.CONNECTED);
11                 }
12             }
13
14             public void handleNewSession() throws Exception {
15                 stateChanged(StateListener.RECONNECTED);
16             }
17         });
18         client.start();
19     }
此处的client是ZkClientWrapper实例,来看ZkClientWrapper.start():
 1     private ListenableFutureTask<ZkClient> listenableFutureTask;
 2
 3     public ZkClientWrapper(final String serverAddr, long timeout) {
 4         this.timeout = timeout;
 5         listenableFutureTask = ListenableFutureTask.create(new Callable<ZkClient>() {
 6             @Override
 7             public ZkClient call() throws Exception {
 8                 return new ZkClient(serverAddr, Integer.MAX_VALUE);
 9             }
10         });
11     }
12
13     public void start() {
14         if (!started) {
15             Thread connectThread = new Thread(listenableFutureTask);
16             connectThread.setName("DubboZkclientConnector");
17             connectThread.setDaemon(true);
18             connectThread.start();
19             try {
20                 client = listenableFutureTask.get(timeout, TimeUnit.MILLISECONDS);
21             } catch (Throwable t) {
22                 logger.error("Timeout! zookeeper server can not be connected in : " + timeout + "ms!", t);
23             }
24             started = true;
25         } else {
26             logger.warn("Zkclient has already been started!");
27         }
28     }
此处会new ZkClient,连接zookeeper。
之后设置失败重连监听器。到此为止,创建Registry就完成了!再回到RegistryProtocol.refer方法核心代码:
1     public <T> Invoker<T> refer(Class<T> type, URL url) throws RpcException {
2         url = url.setProtocol(url.getParameter(Constants.REGISTRY_KEY, Constants.DEFAULT_REGISTRY)).removeParameter(Constants.REGISTRY_KEY);
3         Registry registry = registryFactory.getRegistry(url);
4         ...
5         return doRefer(cluster, registry, type, url);
6     }
之后执行最后一行代码:
 1     private <T> Invoker<T> doRefer(Cluster cluster, Registry registry, Class<T> type, URL url) {
 2         RegistryDirectory<T> directory = new RegistryDirectory<T>(type, url);
 3         directory.setRegistry(registry);
 4         directory.setProtocol(protocol);
 5         // REFER_KEY的所有属性
 6         Map<String, String> parameters = new HashMap<String, String>(directory.getUrl().getParameters());
 7         URL subscribeUrl = new URL(Constants.CONSUMER_PROTOCOL, parameters.remove(Constants.REGISTER_IP_KEY), 0, type.getName(), parameters);
 8         if (!Constants.ANY_VALUE.equals(url.getServiceInterface())
 9                 && url.getParameter(Constants.REGISTER_KEY, true)) {
10             registry.register(subscribeUrl.addParameters(Constants.CATEGORY_KEY, Constants.CONSUMERS_CATEGORY,
11                     Constants.CHECK_KEY, String.valueOf(false)));
12         }
13         directory.subscribe(subscribeUrl.addParameter(Constants.CATEGORY_KEY,
14                 Constants.PROVIDERS_CATEGORY
15                         + "," + Constants.CONFIGURATORS_CATEGORY
16                         + "," + Constants.ROUTERS_CATEGORY));
17         return cluster.join(directory);
18     }
总体步骤:
- 首先创建RegistryDirectory实例;
- 之后向zk注册消费者
- 然后开启监听器(此处发生了第一次服务发现/长连接的建立/netty客户端的建立)
- 最后使用将RegistryDirectory实例
首先是创建RegistryDirectory,创建完成的实例:
-->List<Router> routers: [MockInvokersSelector实例]
-->Registry registry: 上述的ZookeeperRegistry实例(zookeeper://10.211.55.5:2181/com.alibaba.dubbo.registry.RegistryService?application=demo-consumer&dubbo=2.0.0&interface=com.alibaba.dubbo.registry.RegistryService&pid=25267×tamp=1510225984358)
-->String serviceKey: com.alibaba.dubbo.registry.RegistryService
-->String[] serviceMethods: [sayHello]
-->Class<T> serviceType: interface com.alibaba.dubbo.demo.DemoService
-->URL url: zookeeper://10.211.55.5:2181/com.alibaba.dubbo.registry.RegistryService?application=demo-consumer&dubbo=2.0.0&pid=25267&refer=application=demo-consumer&check=false&dubbo=2.0.0&interface=com.alibaba.dubbo.demo.DemoService&methods=sayHello&pid=25267®ister.ip=10.10.10.10&side=consumer×tamp=1510225913509×tamp=1510225984358
-->URL consumerUrl: zookeeper://10.211.55.5:2181/com.alibaba.dubbo.registry.RegistryService?application=demo-consumer&dubbo=2.0.0&pid=25267&refer=application=demo-consumer&check=false&dubbo=2.0.0&interface=com.alibaba.dubbo.demo.DemoService&methods=sayHello&pid=25267®ister.ip=10.10.10.10&side=consumer×tamp=1510225913509×tamp=1510225984358
-->URL directoryUrl: zookeeper://10.211.55.5:2181/com.alibaba.dubbo.registry.RegistryService?application=demo-consumer&check=false&dubbo=2.0.0&interface=com.alibaba.dubbo.demo.DemoService&methods=sayHello&pid=25267®ister.ip=10.10.10.10&side=consumer×tamp=1510225913509
-->URL overrideDirectoryUrl: zookeeper://10.211.55.5:2181/com.alibaba.dubbo.registry.RegistryService?application=demo-consumer&check=false&dubbo=2.0.0&interface=com.alibaba.dubbo.demo.DemoService&methods=sayHello&pid=25267®ister.ip=10.10.10.10&side=consumer×tamp=1510225913509
-->Map<String, String> queryMap: {side=consumer, application=demo-consumer, register.ip=10.10.10.10, methods=sayHello, dubbo=2.0.0, pid=25267, check=false, interface=com.alibaba.dubbo.demo.DemoService, timestamp=1510225913509}
其中Router是在RegistryDirectory的父类AbstractDirectory中创建的,代码如下:
    public AbstractDirectory(URL url, URL consumerUrl, List<Router> routers) {
        if (url == null)
            throw new IllegalArgumentException("url == null");
        this.url = url;
        this.consumerUrl = consumerUrl;
        setRouters(routers);
    }

    protected void setRouters(List<Router> routers) {
        // copy list
        routers = routers == null ? new ArrayList<Router>() : new ArrayList<Router>(routers);
        // append url router
        String routerkey = url.getParameter(Constants.ROUTER_KEY);
        if (routerkey != null && routerkey.length() > 0) {
            RouterFactory routerFactory = ExtensionLoader.getExtensionLoader(RouterFactory.class).getExtension(routerkey);
            routers.add(routerFactory.getRouter(url));
        }
        // append mock invoker selector
        routers.add(new MockInvokersSelector());
        Collections.sort(routers);
        this.routers = routers;
    }
之后向注册中心注册消费者,注册的方式与服务提供者一样。先是通过FailbackRegistry.register,内部调用子类ZookeeperRegistry的doRegister(),如果失败,加入注册失败列表(会被修复线程后台重新注册)。
 1     public void register(URL url) {
 2         if (destroyed.get()){
 3             return;
 4         }
 5         super.register(url);
 6         failedRegistered.remove(url);
 7         failedUnregistered.remove(url);
 8         try {
 9             // 向服务器端发送注册请求
10             doRegister(url);
11         } catch (Exception e) {
12             Throwable t = e;
13
14             // 如果开启了启动时检测,则直接抛出异常
15             boolean check = getUrl().getParameter(Constants.CHECK_KEY, true)
16                     && url.getParameter(Constants.CHECK_KEY, true)
17                     && !Constants.CONSUMER_PROTOCOL.equals(url.getProtocol());
18             boolean skipFailback = t instanceof SkipFailbackWrapperException;
19             if (check || skipFailback) {
20                 if (skipFailback) {
21                     t = t.getCause();
22                 }
23                 throw new IllegalStateException("Failed to register " + url + " to registry " + getUrl().getAddress() + ", cause: " + t.getMessage(), t);
24             } else {
25                 logger.error("Failed to register " + url + ", waiting for retry, cause: " + t.getMessage(), t);
26             }
27
28             // 将失败的注册请求记录到失败列表,定时重试
29             failedRegistered.add(url);
30         }
31     }
最后来看ZookeeperRegistry的doRegister方法:
1     protected void doRegister(URL url) {
2         try {
3             zkClient.create(toUrlPath(url), url.getParameter(Constants.DYNAMIC_KEY, true));
4         } catch (Throwable e) {
5             throw new RpcException("Failed to register " + url + " to zookeeper " + getUrl() + ", cause: " + e.getMessage(), e);
6         }
7     }
在zk上创建临时节点:/dubbo/com.alibaba.dubbo.demo.DemoService/consumers/consumer://10.10.10.10/com.alibaba.dubbo.demo.DemoService?application=demo-consumer&category=consumers&check=false&dubbo=2.0.0&interface=com.alibaba.dubbo.demo.DemoService&methods=sayHello&pid=25267&side=consumer×tamp=1510225913509
到此,消费者注册完成!之后directory.subscribe进行订阅。RegistryDirectory.subscribe(URL url):
1     public void subscribe(URL url) {
2         setConsumerUrl(url);
3         registry.subscribe(url, this);
4     }
FailbackRegistry.subscribe(URL url, NotifyListener listener)核心代码:
 1     public void subscribe(URL url, NotifyListener listener) {
 2         ...
 3         super.subscribe(url, listener);
 4         removeFailedSubscribed(url, listener);
 5         try {
 6             // 向服务器端发送订阅请求
 7             doSubscribe(url, listener);
 8         } catch (Exception e) {
 9             ...
10             // 将失败的订阅请求记录到失败列表,定时重试
11             addFailedSubscribed(url, listener);
12         }
13     }
ZookeeperRegistry.doSubscribe(final URL url, final NotifyListener listener)
 1     protected void doSubscribe(final URL url, final NotifyListener listener) {
 2         try {
 3             ...
 4             List<URL> urls = new ArrayList<URL>();
 5             for (String path : toCategoriesPath(url)) {
 6                 ConcurrentMap<NotifyListener, ChildListener> listeners = zkListeners.get(url);
 7                 if (listeners == null) {
 8                     zkListeners.putIfAbsent(url, new ConcurrentHashMap<NotifyListener, ChildListener>());
 9                     listeners = zkListeners.get(url);
10                 }
11                 ChildListener zkListener = listeners.get(listener);
12                 if (zkListener == null) {
13                     listeners.putIfAbsent(listener, new ChildListener() {
14                         public void childChanged(String parentPath, List<String> currentChilds) {
15                             ZookeeperRegistry.this.notify(url, listener, toUrlsWithEmpty(url, parentPath, currentChilds));
16                         }
17                     });
18                     zkListener = listeners.get(listener);
19                 }
20                 zkClient.create(path, false);
21                 List<String> children = zkClient.addChildListener(path, zkListener);
22                 if (children != null) {
23                     urls.addAll(toUrlsWithEmpty(url, path, children));
24                 }
25             }
26             notify(url, listener, urls);
27         } catch (Throwable e) {
28             throw new RpcException("Failed to subscribe " + url + " to zookeeper " + getUrl() + ", cause: " + e.getMessage(), e);
29         }
30     }
这里的for循环是3次:
- /dubbo/com.alibaba.dubbo.demo.DemoService/providers
- /dubbo/com.alibaba.dubbo.demo.DemoService/configurators
- /dubbo/com.alibaba.dubbo.demo.DemoService/routers
执行完上述for循环后,来看此时的:
ConcurrentMap<URL, ConcurrentMap<NotifyListener, ChildListener>> zkListeners:
1 { 2 consumer://10.10.10.10/com.alibaba.dubbo.demo.DemoService?application=demo-consumer&category=providers,configurators,routers&check=false&dubbo=2.0.0&interface=com.alibaba.dubbo.demo.DemoService&methods=sayHello&pid=25267&side=consumer×tamp=1510225913509 3 = 4 {RegistryDirectory实例=ZookeeperRegistry中的匿名内部类ChildListener实例} 5 }
List<URL> urls:(4个元素)
[ dubbo://10.211.55.5:20880/com.alibaba.dubbo.demo.DemoService?anyhost=true&application=demo-provider&dubbo=2.5.7&generic=false&interface=com.alibaba.dubbo.demo.DemoService&methods=sayHello&pid=318&revision=2.5.7&side=provider×tamp=1510225244315, dubbo://10.10.10.10:20880/com.alibaba.dubbo.demo.DemoService?anyhost=true&application=demo-provider&dubbo=2.0.0&generic=false&interface=com.alibaba.dubbo.demo.DemoService&methods=sayHello&pid=25215&side=provider×tamp=1510225334486, empty://10.10.10.10/com.alibaba.dubbo.demo.DemoService?application=demo-consumer&category=configurators&check=false&dubbo=2.0.0&interface=com.alibaba.dubbo.demo.DemoService&methods=sayHello&pid=25267&side=consumer×tamp=1510225913509, empty://10.10.10.10/com.alibaba.dubbo.demo.DemoService?application=demo-consumer&category=routers&check=false&dubbo=2.0.0&interface=com.alibaba.dubbo.demo.DemoService&methods=sayHello&pid=25267&side=consumer×tamp=1510225913509 ]
注意:前边两个元素是在执行List<String> children = zkClient.addChildListener(path, zkListener)代码时,会返回当前path下的节点(实际上就是第一次服务发现)。
之后一路执行到AbstractRegistry.notify(URL url, NotifyListener listener, List<URL> urls)
 1     protected void notify(URL url, NotifyListener listener, List<URL> urls) {
 2         ...
 3         Map<String, List<URL>> result = new HashMap<String, List<URL>>();
 4         for (URL u : urls) {
 5             if (UrlUtils.isMatch(url, u)) {
 6                 String category = u.getParameter(Constants.CATEGORY_KEY, Constants.DEFAULT_CATEGORY);
 7                 List<URL> categoryList = result.get(category);
 8                 if (categoryList == null) {
 9                     categoryList = new ArrayList<URL>();
10                     result.put(category, categoryList);
11                 }
12                 categoryList.add(u);
13             }
14         }
15         if (result.size() == 0) {
16             return;
17         }
18         Map<String, List<URL>> categoryNotified = notified.get(url);
19         if (categoryNotified == null) {
20             notified.putIfAbsent(url, new ConcurrentHashMap<String, List<URL>>());
21             categoryNotified = notified.get(url);
22         }
23         for (Map.Entry<String, List<URL>> entry : result.entrySet()) {
24             String category = entry.getKey();
25             List<URL> categoryList = entry.getValue();
26             categoryNotified.put(category, categoryList);
27             saveProperties(url);
28             listener.notify(categoryList);
29         }
30     }
首先是一个for循环对传入的url列表进行分类,分类结果如下:
Map<String, List<URL>> result:
{
configurators=[
empty://10.10.10.10/com.alibaba.dubbo.demo.DemoService?application=demo-consumer&category=configurators&check=false&dubbo=2.0.0&interface=com.alibaba.dubbo.demo.DemoService&methods=sayHello&pid=25267&side=consumer×tamp=1510225913509
],
routers=[
empty://10.10.10.10/com.alibaba.dubbo.demo.DemoService?application=demo-consumer&category=routers&check=false&dubbo=2.0.0&interface=com.alibaba.dubbo.demo.DemoService&methods=sayHello&pid=25267&side=consumer×tamp=1510225913509
],
providers=[
dubbo://10.211.55.5:20880/com.alibaba.dubbo.demo.DemoService?anyhost=true&application=demo-provider&dubbo=2.5.7&generic=false&interface=com.alibaba.dubbo.demo.DemoService&methods=sayHello&pid=318&revision=2.5.7&side=provider×tamp=1510225244315,
dubbo://10.10.10.10:20880/com.alibaba.dubbo.demo.DemoService?anyhost=true&application=demo-provider&dubbo=2.0.0&generic=false&interface=com.alibaba.dubbo.demo.DemoService&methods=sayHello&pid=25215&side=provider×tamp=1510225334486
]
}
之后执行第二个for循环,对上述的result进行遍历,分别进行保存文件和通知。其中前两个entry没做什么核心事,直接来看providers的entry的通知。代码RegistryDirectory.
notify(List<URL> urls)。这里的urls就是上边的providers的两个value值。
 1     public synchronized void notify(List<URL> urls) {
 2         List<URL> invokerUrls = new ArrayList<URL>();
 3         List<URL> routerUrls = new ArrayList<URL>();
 4         List<URL> configuratorUrls = new ArrayList<URL>();
 5         for (URL url : urls) {
 6             String protocol = url.getProtocol();
 7             String category = url.getParameter(Constants.CATEGORY_KEY, Constants.DEFAULT_CATEGORY);
 8             if (Constants.ROUTERS_CATEGORY.equals(category)
 9                     || Constants.ROUTE_PROTOCOL.equals(protocol)) {
10                 routerUrls.add(url);
11             } else if (Constants.CONFIGURATORS_CATEGORY.equals(category)
12                     || Constants.OVERRIDE_PROTOCOL.equals(protocol)) {
13                 configuratorUrls.add(url);
14             } else if (Constants.PROVIDERS_CATEGORY.equals(category)) {
15                 invokerUrls.add(url);
16             } else {
17                 logger.warn("Unsupported category " + category + " in notified url: " + url + " from registry " + getUrl().getAddress() + " to consumer " + NetUtils.getLocalHost());
18             }
19         }
20         // configurators
21         if (configuratorUrls != null && configuratorUrls.size() > 0) {
22             this.configurators = toConfigurators(configuratorUrls);
23         }
24         // routers
25         if (routerUrls != null && routerUrls.size() > 0) {
26             List<Router> routers = toRouters(routerUrls);
27             if (routers != null) { // null - do nothing
28                 setRouters(routers);
29             }
30         }
31         List<Configurator> localConfigurators = this.configurators; // local reference
32         // 合并override参数
33         this.overrideDirectoryUrl = directoryUrl;
34         if (localConfigurators != null && localConfigurators.size() > 0) {
35             for (Configurator configurator : localConfigurators) {
36                 this.overrideDirectoryUrl = configurator.configure(overrideDirectoryUrl);
37             }
38         }
39         // providers
40         refreshInvoker(invokerUrls);
41     }
这里首先将输入的两个provider的url存放在invokerUrls列表中,之后调用refreshInvoker(invokerUrls)。
 1     private void refreshInvoker(List<URL> invokerUrls) {
 2             ...
 3             Map<String, Invoker<T>> oldUrlInvokerMap = this.urlInvokerMap; // local reference
 4             ...
 5             this.cachedInvokerUrls = new HashSet<URL>();
 6             this.cachedInvokerUrls.addAll(invokerUrls);//缓存invokerUrls列表,便于交叉对比
 7             ...
 8             Map<String, Invoker<T>> newUrlInvokerMap = toInvokers(invokerUrls);// 将URL列表转成Invoker列表
 9             Map<String, List<Invoker<T>>> newMethodInvokerMap = toMethodInvokers(newUrlInvokerMap); // 换方法名映射Invoker列表
10             this.methodInvokerMap = multiGroup ? toMergeMethodInvokerMap(newMethodInvokerMap) : newMethodInvokerMap;
11             this.urlInvokerMap = newUrlInvokerMap;
12             ...
13     }
 1     private Map<String, Invoker<T>> toInvokers(List<URL> urls) {
 2         Map<String, Invoker<T>> newUrlInvokerMap = new HashMap<String, Invoker<T>>();
 3         ...
 4         for (URL providerUrl : urls) {
 5             String key = url.toFullString(); // URL参数是排序的
 6             ...
 7             Invoker<T> invoker = new InvokerDelegete<T>(protocol.refer(serviceType, url), url, providerUrl);
 8
 9             newUrlInvokerMap.put(key, invoker);
10         }
11         ...
12         return newUrlInvokerMap;
13     }
这里会遍历两个providerUrl:protocol是Protocol$Adaptive实例,依旧是走listener->filter->DubboProtocol,看一下filter部分:
1     public <T> Invoker<T> refer(Class<T> type, URL url) throws RpcException {
2         if (Constants.REGISTRY_PROTOCOL.equals(url.getProtocol())) {
3             return protocol.refer(type, url);
4         }
5         return buildInvokerChain(protocol.refer(type, url), Constants.REFERENCE_FILTER_KEY, Constants.CONSUMER);
6     }
两个常量是:reference.filter和consumer。最后来看DubboProtocol.refer
1     public <T> Invoker<T> refer(Class<T> serviceType, URL url) throws RpcException {
2         // create rpc invoker.
3         DubboInvoker<T> invoker = new DubboInvoker<T>(serviceType, url, getClients(url), invokers);
4         invokers.add(invoker);
5         return invoker;
6     }
这里首先执行getClients创建Netty客户端,创建客户端与服务端的长连接,之后封装为DubboInvoker,最后返回。返回之后进行filter链包装该DubboInvoker实例。最后又会使用InvokerDelegete包装带有filter链的DubboInvoker实例。在最后,将该InvokerDelegete实例放置到newUrlInvokerMap缓存中,这就是整个toInvokers(List<URL> urls)的逻辑。最后再将newUrlInvokerMap转换封装到Map<String, List<Invoker<T>>> newMethodInvokerMap缓存中。这就是整个refreshInvoker(List<URL> invokerUrls)的逻辑。执行完成之后,订阅通知就执行完了。
来看一下getClients(url):
 1     private ExchangeClient[] getClients(URL url) {
 2         //是否共享连接
 3         boolean service_share_connect = false;
 4         int connections = url.getParameter(Constants.CONNECTIONS_KEY, 0);
 5         //如果connections不配置,则共享连接,否则每服务每连接
 6         if (connections == 0) {
 7             service_share_connect = true;
 8             connections = 1;
 9         }
10
11         ExchangeClient[] clients = new ExchangeClient[connections];
12         for (int i = 0; i < clients.length; i++) {
13             if (service_share_connect) {
14                 clients[i] = getSharedClient(url);
15             } else {
16                 clients[i] = initClient(url);
17             }
18         }
19         return clients;
20     }
21
22     /**
23      * 获取共享连接
24      */
25     private ExchangeClient getSharedClient(URL url) {
26         String key = url.getAddress();
27         ReferenceCountExchangeClient client = referenceClientMap.get(key);
28         if (client != null) {
29             if (!client.isClosed()) {
30                 client.incrementAndGetCount();
31                 return client;
32             } else {
33                 referenceClientMap.remove(key);
34             }
35         }
36         synchronized (key.intern()) {
37             ExchangeClient exchangeClient = initClient(url);
38             client = new ReferenceCountExchangeClient(exchangeClient, ghostClientMap);
39             referenceClientMap.put(key, client);
40             ghostClientMap.remove(key);
41             return client;
42         }
43     }
44
45
46     /**
47      * 创建新连接.
48      */
49     private ExchangeClient initClient(URL url) {
50
51         // client type setting.
52         String str = url.getParameter(Constants.CLIENT_KEY, url.getParameter(Constants.SERVER_KEY, Constants.DEFAULT_REMOTING_CLIENT));
53
54         String version = url.getParameter(Constants.DUBBO_VERSION_KEY);
55         boolean compatible = (version != null && version.startsWith("1.0."));
56         url = url.addParameter(Constants.CODEC_KEY, DubboCodec.NAME);
57         //默认开启heartbeat
58         url = url.addParameterIfAbsent(Constants.HEARTBEAT_KEY, String.valueOf(Constants.DEFAULT_HEARTBEAT));
59
60         // BIO存在严重性能问题,暂时不允许使用
61         if (str != null && str.length() > 0 && !ExtensionLoader.getExtensionLoader(Transporter.class).hasExtension(str)) {
62             throw new RpcException("Unsupported client type: " + str + "," +
63                     " supported client type is " + StringUtils.join(ExtensionLoader.getExtensionLoader(Transporter.class).getSupportedExtensions(), " "));
64         }
65
66         ExchangeClient client;
67         try {
68             //设置连接应该是lazy的
69             if (url.getParameter(Constants.LAZY_CONNECT_KEY, false)) {
70                 client = new LazyConnectExchangeClient(url, requestHandler);
71             } else {
72                 client = Exchangers.connect(url, requestHandler);
73             }
74         } catch (RemotingException e) {
75             throw new RpcException("Fail to create remoting client for service(" + url + "): " + e.getMessage(), e);
76         }
77         return client;
78     }
注意:这里由于使用了共享链接,实际上就是在一个消费者机器和一个服务提供者机器之间只建立一条nio长连接,也可以指定连接数,那样就会建立多条连接。
最后执行到HeaderExchanger.connect(URL url, ExchangeHandler handler)
1     public ExchangeClient connect(URL url, ExchangeHandler handler) throws RemotingException {
2         return new HeaderExchangeClient(Transporters.connect(url, new DecodeHandler(new HeaderExchangeHandler(handler))), true);
3     }
执行Transporters.connect:
 1     public static Client connect(URL url, ChannelHandler... handlers) throws RemotingException {
 2         if (url == null) {
 3             throw new IllegalArgumentException("url == null");
 4         }
 5         ChannelHandler handler;
 6         if (handlers == null || handlers.length == 0) {
 7             handler = new ChannelHandlerAdapter();
 8         } else if (handlers.length == 1) {
 9             handler = handlers[0];
10         } else {
11             handler = new ChannelHandlerDispatcher(handlers);
12         }
13         return getTransporter().connect(url, handler);
14     }
执行NettyTransporter.connect:
1     public Client connect(URL url, ChannelHandler listener) throws RemotingException {
2         return new NettyClient(url, listener);
3     }
1     public NettyClient(final URL url, final ChannelHandler handler) throws RemotingException {
2         super(url, wrapChannelHandler(url, handler));
3     }
这里继续包装handler。和provider一样,6层。之后进行一系列的赋值后,打开netty客户端:
 1     protected void doOpen() throws Throwable {
 2         NettyHelper.setNettyLoggerFactory();
 3         bootstrap = new ClientBootstrap(channelFactory);
 4         // config
 5         // @see org.jboss.netty.channel.socket.SocketChannelConfig
 6         bootstrap.setOption("keepAlive", true);
 7         bootstrap.setOption("tcpNoDelay", true);
 8         bootstrap.setOption("connectTimeoutMillis", getTimeout());
 9         final NettyHandler nettyHandler = new NettyHandler(getUrl(), this);
10         bootstrap.setPipelineFactory(new ChannelPipelineFactory() {
11             public ChannelPipeline getPipeline() {
12                 NettyCodecAdapter adapter = new NettyCodecAdapter(getCodec(), getUrl(), NettyClient.this);
13                 ChannelPipeline pipeline = Channels.pipeline();
14                 pipeline.addLast("decoder", adapter.getDecoder());
15                 pipeline.addLast("encoder", adapter.getEncoder());
16                 pipeline.addLast("handler", nettyHandler);
17                 return pipeline;
18             }
19         });
20     }
之后进行连接netty服务端:
 1     protected void doConnect() throws Throwable {
 2         long start = System.currentTimeMillis();
 3         ChannelFuture future = bootstrap.connect(getConnectAddress());
 4         try {
 5             boolean ret = future.awaitUninterruptibly(getConnectTimeout(), TimeUnit.MILLISECONDS);
 6
 7             if (ret && future.isSuccess()) {
 8                 Channel newChannel = future.getChannel();
 9                 newChannel.setInterestOps(Channel.OP_READ_WRITE);
10                 try {
11                     // 关闭旧的连接
12                     Channel oldChannel = NettyClient.this.channel; // copy reference
13                     if (oldChannel != null) {
14                         try {
15                             if (logger.isInfoEnabled()) {
16                                 logger.info("Close old netty channel " + oldChannel + " on create new netty channel " + newChannel);
17                             }
18                             oldChannel.close();
19                         } finally {
20                             NettyChannel.removeChannelIfDisconnected(oldChannel);
21                         }
22                     }
23                 } finally {
24                     if (NettyClient.this.isClosed()) {
25                         try {
26                             if (logger.isInfoEnabled()) {
27                                 logger.info("Close new netty channel " + newChannel + ", because the client closed.");
28                             }
29                             newChannel.close();
30                         } finally {
31                             NettyClient.this.channel = null;
32                             NettyChannel.removeChannelIfDisconnected(newChannel);
33                         }
34                     } else {
35                         NettyClient.this.channel = newChannel;
36                     }
37                 }
38             } else if (future.getCause() != null) {
39                 throw new RemotingException(this, "client(url: " + getUrl() + ") failed to connect to server "
40                         + getRemoteAddress() + ", error message is:" + future.getCause().getMessage(), future.getCause());
41             } else {
42                 throw new RemotingException(this, "client(url: " + getUrl() + ") failed to connect to server "
43                         + getRemoteAddress() + " client-side timeout "
44                         + getConnectTimeout() + "ms (elapsed: " + (System.currentTimeMillis() - start) + "ms) from netty client "
45                         + NetUtils.getLocalHost() + " using dubbo version " + Version.getVersion());
46             }
47         } finally {
48             if (!isConnected()) {
49                 future.cancel();
50             }
51         }
52     }
到此为止NettyClient就创建好了,之后将该client封装为HeaderExchangeClient中。
 1     public HeaderExchangeClient(Client client, boolean needHeartbeat) {
 2         if (client == null) {
 3             throw new IllegalArgumentException("client == null");
 4         }
 5         this.client = client;
 6         this.channel = new HeaderExchangeChannel(client);
 7         String dubbo = client.getUrl().getParameter(Constants.DUBBO_VERSION_KEY);
 8         this.heartbeat = client.getUrl().getParameter(Constants.HEARTBEAT_KEY, dubbo != null && dubbo.startsWith("1.0.") ? Constants.DEFAULT_HEARTBEAT : 0);
 9         this.heartbeatTimeout = client.getUrl().getParameter(Constants.HEARTBEAT_TIMEOUT_KEY, heartbeat * 3);
10         if (heartbeatTimeout < heartbeat * 2) {
11             throw new IllegalStateException("heartbeatTimeout < heartbeatInterval * 2");
12         }
13         if (needHeartbeat) {
14             startHeatbeatTimer();
15         }
16     }
启动心跳。
最后将HeaderExchangeClient实例封装为ReferenceCountExchangeClient:
1     public ReferenceCountExchangeClient(ExchangeClient client, ConcurrentMap<String, LazyConnectExchangeClient> ghostClientMap) {
2         this.client = client;
3         refenceCount.incrementAndGet();
4         this.url = client.getUrl();
5         if (ghostClientMap == null) {
6             throw new IllegalStateException("ghostClientMap can not be null, url: " + url);
7         }
8         this.ghostClientMap = ghostClientMap;
9     }
最后放到缓存Map<String, ReferenceCountExchangeClient> referenceClientMap中。最后将ReferenceCountExchangeClient封装到DubboInvoker中。我们来看此时的DubboInvoker:
-->Map<String, String> attachment: {interface=com.alibaba.dubbo.demo.DemoService}
-->ExchangeClient[] clients:[ReferenceCountExchangeClient实例]//如果设置了多条连接,此处有多个client
-->Class<T> type: interface com.alibaba.dubbo.demo.DemoService
-->Url url: dubbo://10.211.55.5:20880/com.alibaba.dubbo.demo.DemoService?anyhost=true&application=demo-consumer&check=false&dubbo=2.5.7&generic=false&interface=com.alibaba.dubbo.demo.DemoService&methods=sayHello&pid=25267®ister.ip=10.10.10.10&remote.timestamp=1510225244315&revision=2.5.7&side=consumer×tamp=1510225913509
之后对DubboInvoker实例进行filter链的包装。
ConsumerContextFilter->FutureFilter->MonitorFilter->DubboInvoker.
最后将包装后的Invoker实例包装为InvokerDelegete实例。最后的最后,我们的终极目的:初始化RegistryDirectory的两个属性:
Map<String, List<Invoker<T>>> methodInvokerMap={
sayHello=[provider1的RegistryDirectory$InvokerDelegete实例, provider2的RegistryDirectory$InvokerDelegete实例], *=[provider1的RegistryDirectory$InvokerDelegete实例, provider2的RegistryDirectory$InvokerDelegete实例]}
Map<String, Invoker<T>> urlInvokerMap={dubbo://10.10.10.10:20880/com.alibaba.dubbo.demo.DemoService?anyhost=true&application=demo-consumer&check=false&dubbo=2.0.0&generic=false&interface=com.alibaba.dubbo.demo.DemoService&methods=sayHello&pid=25267®ister.ip=10.10.10.10&remote.timestamp=1510225334486&side=consumer×tamp=1510225913509
=
provider1的RegistryDirectory$InvokerDelegete实例, dubbo://10.211.55.5:20880/com.alibaba.dubbo.demo.DemoService?anyhost=true&application=demo-consumer&check=false&dubbo=2.5.7&generic=false&interface=com.alibaba.dubbo.demo.DemoService&methods=sayHello&pid=25267®ister.ip=10.10.10.10&remote.timestamp=1510225244315&revision=2.5.7&side=consumer×tamp=1510225913509=provider2的RegistryDirectory$InvokerDelegete实例}
到此为止,订阅就完成了。现在来看RegistryProtocol.doRefer的最后一行代码:return cluster.join(directory)
这里的cluster是Cluster$Adaptive实例:
 1 public class Cluster$Adaptive implements com.alibaba.dubbo.rpc.cluster.Cluster {
 2     public com.alibaba.dubbo.rpc.Invoker join(com.alibaba.dubbo.rpc.cluster.Directory arg0) throws com.alibaba.dubbo.rpc.RpcException {
 3         if (arg0 == null)
 4             throw new IllegalArgumentException("com.alibaba.dubbo.rpc.cluster.Directory argument == null");
 5         if (arg0.getUrl() == null)
 6             throw new IllegalArgumentException("com.alibaba.dubbo.rpc.cluster.Directory argument getUrl() == null");
 7         com.alibaba.dubbo.common.URL url = arg0.getUrl();
 8         String extName = url.getParameter("cluster", "failover");
 9         if (extName == null)
10             throw new IllegalStateException("Fail to get extension(com.alibaba.dubbo.rpc.cluster.Cluster) name from url(" + url.toString() + ") use keys([cluster])");
11         com.alibaba.dubbo.rpc.cluster.Cluster extension = (com.alibaba.dubbo.rpc.cluster.Cluster) ExtensionLoader.getExtensionLoader(com.alibaba.dubbo.rpc.cluster.Cluster.class).getExtension(extName);
12         return extension.join(arg0);
13     }
14 }
这里的extName="failover",这里会进行aop:MockClusterWrapper包装FailoverCluster。
 1 public class MockClusterWrapper implements Cluster {
 2     private Cluster cluster;
 3
 4     public MockClusterWrapper(Cluster cluster) {
 5         this.cluster = cluster;
 6     }
 7
 8     public <T> Invoker<T> join(Directory<T> directory) throws RpcException {
 9         return new MockClusterInvoker<T>(directory,
10                 this.cluster.join(directory));
11     }
12 }
这里的cluster是FailoverCluster实例。
 1 /**
 2  * 失败转移,当出现失败,重试其它服务器,通常用于读操作,但重试会带来更长延迟。
 3  */
 4 public class FailoverCluster implements Cluster {
 5     public final static String NAME = "failover";
 6
 7     public <T> Invoker<T> join(Directory<T> directory) throws RpcException {
 8         return new FailoverClusterInvoker<T>(directory);
 9     }
10 }
1     public FailoverClusterInvoker(Directory<T> directory) {
2         super(directory);
3     }
这里实际上就是创建一个FailoverClusterInvokers实例,通过其父类AbstractClusterInvoker存储属性。
最后创建一个MockClusterInvoker实例:
1     private final Directory<T> directory;
2     private final Invoker<T> invoker;
3
4     public MockClusterInvoker(Directory<T> directory, Invoker<T> invoker) {
5         this.directory = directory;
6         this.invoker = invoker;
7     }
到此为止,下边的第一行代码就结束了!最终得到一个MockClusterInvoker实例:
- directory=RegistryDirectory实例:
- invoker=FailoverClusterInvokers实例(该实例中又包含一个Directory<T> directory属性,值为上述的RegistryDirectory实例)
1     private T createProxy(Map<String, String> map) {
2         ...
3         if (urls.size() == 1) {
4             invoker = refprotocol.refer(interfaceClass, urls.get(0));
5         }
6         ...
7         // 创建服务代理
8         return (T) proxyFactory.getProxy(invoker);
9     }
二 使用ProxyFactory创建代理
1 (T) proxyFactory.getProxy(invoker)
上述的proxyFactory是ProxyFactory$Adaptive实例,其getProxy内部最终得到是一个被StubProxyFactoryWrapper包装后的JavassistProxyFactory。直接来看JavassistProxyFactory.getProxy方法
1     public <T> T getProxy(Invoker<T> invoker, Class<?>[] interfaces) {
2         return (T) Proxy.getProxy(interfaces).newInstance(new InvokerInvocationHandler(invoker));
3     }
- invoker:MockClusterInvoker实例
- interfaces:[interface com.alibaba.dubbo.demo.DemoService, interface com.alibaba.dubbo.rpc.service.EchoService]
注意这里的Proxy不是jdk的,而是dubbo的。
Proxy.getProxy(interfaces)
 1     public static Proxy getProxy(ClassLoader cl, Class<?>... ics) {
 2         ...
 3         Proxy proxy = null;
 4         ...
 5         // create ProxyInstance class.
 6         String pcn = pkg + ".proxy" + id;
 7         ccp.setClassName(pcn);
 8         ccp.addField("public static java.lang.reflect.Method[] methods;");
 9         ccp.addField("private " + InvocationHandler.class.getName() + " handler;");
10         ccp.addConstructor(Modifier.PUBLIC, new Class<?>[]{InvocationHandler.class}, new Class<?>[0], "handler=$1;");
11         ccp.addDefaultConstructor();
12         Class<?> clazz = ccp.toClass();
13         clazz.getField("methods").set(null, methods.toArray(new Method[0]));
14
15         // create Proxy class.
16         String fcn = Proxy.class.getName() + id;
17         ccm = ClassGenerator.newInstance(cl);
18         ccm.setClassName(fcn);
19         ccm.addDefaultConstructor();
20         ccm.setSuperClass(Proxy.class);
21         ccm.addMethod("public Object newInstance(" + InvocationHandler.class.getName() + " h){ return new " + pcn + "($1); }");
22         Class<?> pc = ccm.toClass();
23         proxy = (Proxy) pc.newInstance();
24         ...
25         return proxy;
26     }
从代码来看,会生成两个Class对象:pc是创建代理类的工厂类;clazz是真实对象的代理类。最终返回的proxy是如下Proxy0对象;之后调用了Proxy0.newInstance(InvocationHandler paramInvocationHandler)方法:创建出了proxy0对象,并初始化了其中的InvocationHandler handler对象为InvokerInvocationHandler。
最终会生成两个类:(这两个类都是笔者都是直接导出.class文件之后通过jd-gui反编译出来的)。
工厂类:
1 package com.alibaba.dubbo.common.bytecode;
2
3 import java.lang.reflect.InvocationHandler;
4
5 public class Proxy0 extends Proxy {
6     public Object newInstance(InvocationHandler paramInvocationHandler) {
7         return new proxy0(paramInvocationHandler);
8     }
9 }
真实对象代理类:
 1 package com.alibaba.dubbo.common.bytecode;
 2
 3 import com.alibaba.dubbo.demo.DemoService;
 4 import com.alibaba.dubbo.rpc.service.EchoService;
 5 import java.lang.reflect.InvocationHandler;
 6 import java.lang.reflect.Method;
 7
 8 public class proxy0 implements EchoService, DemoService {
 9     public static Method[] methods;
10     private InvocationHandler handler;
11
12     public String sayHello(String paramString) {
13         Object[] arrayOfObject = new Object[1];
14         arrayOfObject[0] = paramString;
15         Object localObject = this.handler.invoke(this, methods[0], arrayOfObject);
16         return (String) localObject;
17     }
18
19     public Object $echo(Object paramObject) {
20         Object[] arrayOfObject = new Object[1];
21         arrayOfObject[0] = paramObject;
22         Object localObject = this.handler.invoke(this, methods[1], arrayOfObject);
23         return (Object) localObject;
24     }
25
26     public proxy0() {
27     }
28
29     public proxy0(InvocationHandler paramInvocationHandler) {
30         this.handler = paramInvocationHandler;
31     }
32 }
上边的methods数组实际上已经包含了两个元素:
[public abstract java.lang.String com.alibaba.dubbo.demo.DemoService.sayHello(java.lang.String),
public abstract java.lang.Object com.alibaba.dubbo.rpc.service.EchoService.$echo(java.lang.Object)]
如上所示,我们最终返回的代理对象其实是一个proxy0对象,当我们调用其sayHello方法时,其调用内部的handler.invoke方法。
 1 public class InvokerInvocationHandler implements InvocationHandler {
 2     private final Invoker<?> invoker;
 3
 4     public InvokerInvocationHandler(Invoker<?> handler) {
 5         this.invoker = handler;
 6     }
 7
 8     public Object invoke(Object proxy, Method method, Object[] args) throws Throwable {
 9         String methodName = method.getName();
10         Class<?>[] parameterTypes = method.getParameterTypes();
11         if (method.getDeclaringClass() == Object.class) {
12             return method.invoke(invoker, args);
13         }
14         if ("toString".equals(methodName) && parameterTypes.length == 0) {
15             return invoker.toString();
16         }
17         if ("hashCode".equals(methodName) && parameterTypes.length == 0) {
18             return invoker.hashCode();
19         }
20         if ("equals".equals(methodName) && parameterTypes.length == 1) {
21             return invoker.equals(args[0]);
22         }
23         return invoker.invoke(new RpcInvocation(method, args)).recreate();
24     }
25
26 }
这里的invoke是上述的MockClusterInvoker实例。
到此为止,DemoService demoService = (DemoService) context.getBean("demoService"); 该行代码就结束了。最终得到的demoService是一个proxy0实例(是一个代理)!