mybatis-plus入门了解和简单使用
MyBatis-Plus (简称 MP)是一个 MyBatis 的增强工具,在 MyBatis 的基础上只做增强不做改变,为简化开发、提高效率而生。
特性:
-
无侵入:只做增强不做改变,引入它不会对现有工程产生影响,如丝般顺滑
-
损耗小:启动即会自动注入基本 CURD,性能基本无损耗,直接面向对象操作
-
强大的 CRUD 操作:内置通用 Mapper、通用 Service,仅仅通过少量配置即可实现单表大部分 CRUD 操作,更有强大的条件构造器,满足各类使用需求
-
支持 Lambda 形式调用:通过 Lambda 表达式,方便的编写各类查询条件,无需再担心字段写错
-
支持主键自动生成:支持多达 4 种主键策略(内含分布式唯一 ID 生成器 - Sequence),可自由配置,完美解决主键问题
-
支持 ActiveRecord 模式:支持 ActiveRecord 形式调用,实体类只需继承 Model 类即可进行强大的 CRUD 操作
-
支持自定义全局通用操作:支持全局通用方法注入( Write once, use anywhere )
-
内置代码生成器:采用代码或者 Maven 插件可快速生成 Mapper 、 Model 、 Service 、 Controller 层代码,支持模板引擎,更有超多自定义配置等您来使用
-
内置分页插件:基于 MyBatis 物理分页,开发者无需关心具体操作,配置好插件之后,写分页等同于普通 List 查询
-
分页插件支持多种数据库:支持 MySQL、MariaDB、Oracle、DB2、H2、HSQL、SQLite、Postgre、SQLServer2005、SQLServer 等多种数据库
-
内置性能分析插件:可输出 Sql 语句以及其执行时间,建议开发测试时启用该功能,能快速揪出慢查询
-
内置全局拦截插件:提供全表 delete 、 update 操作智能分析阻断,也可自定义拦截规则,预防误操作
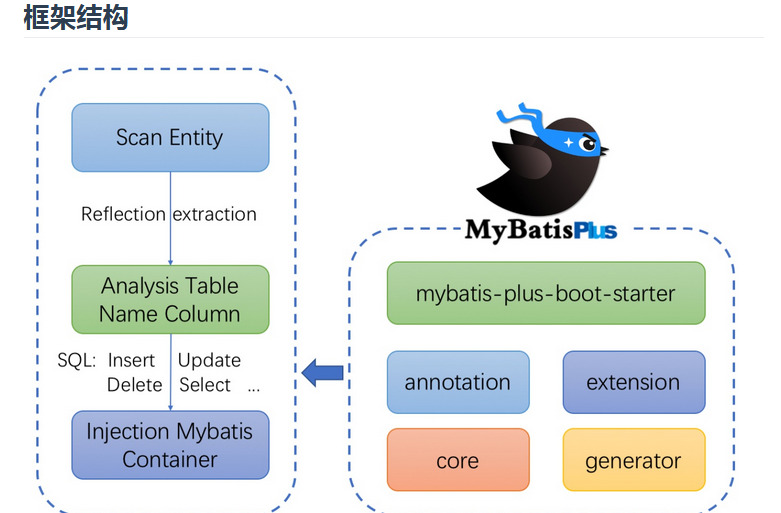
它的框架结构:
下面是我实现的简单crud操作。
第一步先导入依赖
    <dependencies>
        <!--web启动器-->
        <dependency>
            <groupId>org.springframework.boot</groupId>
            <artifactId>spring-boot-starter-web</artifactId>
        </dependency>
        <!--热部署工具-->
        <dependency>
            <groupId>org.springframework.boot</groupId>
            <artifactId>spring-boot-devtools</artifactId>
            <scope>runtime</scope>
            <optional>true</optional>
        </dependency>
		<!--mysql驱动-->
        <dependency>
            <groupId>mysql</groupId>
            <artifactId>mysql-connector-java</artifactId>
            <scope>runtime</scope>
        </dependency>
        <!--mybatis-plus启动器-->
        <dependency>
            <groupId>com.baomidou</groupId>
            <artifactId>mybatis-plus-boot-starter</artifactId>
            <version>3.1.1</version>
        </dependency>

        <!--h2内存数据库-->
        <!-- <dependency>
             <groupId>com.h2database</groupId>
             <artifactId>h2</artifactId>
             <scope>runtime</scope>
         </dependency>-->

        <!--可以帮忙省略掉 Get/Set 方法用于简化代码-->
        <dependency>
            <groupId>org.projectlombok</groupId>
            <artifactId>lombok</artifactId>
            <optional>true</optional>
        </dependency>
        <!--springboot 模板引擎-->
        <dependency>
            <groupId>org.springframework.boot</groupId>
            <artifactId>spring-boot-starter-thymeleaf</artifactId>
        </dependency>
        <!--测试依赖-->
        <dependency>
            <groupId>org.springframework.boot</groupId>
            <artifactId>spring-boot-starter-test</artifactId>
            <scope>test</scope>
        </dependency>
    </dependencies>
第二步建topic表并且插入数据
CREATE TABLE `topic` (
  `id` int(11) NOT NULL AUTO_INCREMENT,
  `title` varchar(255) DEFAULT NULL,
  `content` varchar(255) DEFAULT NULL,
  `tag` varchar(255) DEFAULT NULL,
  `in_time` datetime DEFAULT NULL,
  PRIMARY KEY (`id`)
) ENGINE=InnoDB AUTO_INCREMENT=14 DEFAULT CHARSET=utf8;

INSERT INTO `topic` (`id`, `title`, `content`, `tag`, `in_time`)
VALUES
	(1, 'title1', 'content1', 'tag1', '2019-04-15 09:33:35'),
	(2, 'title2', 'content2', 'tag2', '2019-04-15 09:33:35'),
	(3, 'title3', 'content3', 'tag3', '2019-04-15 09:33:35'),
第三步创建实体类
@Data //该注释可以帮助我们建立setter和getter方法
public class Topic {
    private Integer id;
    private String title;
    private String content;
    private String tag;

    @DateTimeFormat(pattern = "yyyy-MM-dd")
    private Date inTime;
}
第四步创建mapper文件
//需要建立这么一个接口并且继承BaseMapper即可
public interface TopicMapper extends BaseMapper<Topic> {
}
第五步编写service方法
@Service
public class TopicService {
    @Autowired
    private TopicMapper topicMapper;
	//查询所有
    public List<Topic> list() {
        return topicMapper.selectList(new QueryWrapper<>());
    }
	//根据id查询
    public Topic selectbyId(int id) {
        return topicMapper.selectOne(new QueryWrapper<Topic>().eq("id", id));
    }
	//插入数据
    public void insert(Topic topic) {
        topicMapper.insert(topic);
    }
	//根据id删除数据
    public void deletebyid(int id){
        topicMapper.deleteById(id);
    }
}
第六步编写控制器
@Controller
public class TopicController {
    @Autowired
    private TopicService topicService;

    @RequestMapping("/list")
    @ResponseBody
    public Object list() {
        return topicService.list();
    }

    @RequestMapping("/selectbyid/{id}")
    @ResponseBody
    public Topic selectOne(@PathVariable int id) {
        return topicService.selectbyId(id);
    }

    //添加操作是使用的是thymeleaf页面模板
    @RequestMapping("/add")
    public String add(Model model) {
        model.addAttribute("topic", new Topic());
        return "add";
    }

    @RequestMapping("/save")
    @ResponseBody
    public List<Topic> sava(@ModelAttribute Topic topic) {
        topicService.insert(topic);
        return topicService.list();
    }

    //删除操作
    @RequestMapping("/delete/{id}")
    @ResponseBody
    public List<Topic> del(@PathVariable int id){
        topicService.deletebyid(id);
        return topicService.list();
    }
}
页面模板
<!DOCTYPE html>
<html lang="en" xmlns:th="http://www.thymeleaf.org"
xmlns="http://www.w3.org/1999/xhtml">
<head>
<meta charset="UTF-8">
<title>添加页面</title>
</head>
<body>
<form th:action="@{/save}" method="post">
<label>
<input type="text" th:field="${topic.id}" placeholder="请输入id">
</label><br>
<label>
<input type="text" th:field="${topic.title}" placeholder="请输入title">
</label><br>
<label>
<input type="text" th:field="${topic.content}" placeholder="请输入content">
</label><br>
<label>
<input type="text" th:field="${topic.tag}" placeholder="请输入tag">
</label><br>
<label>
<input type="date" th:field="${topic.inTime}" placeholder="请输入date">
</label><br>
<input type="submit" value="提交">
<input type="reset" value="重置">
</form>
</body>
</html>
启动类
@SpringBootApplication
@MapperScan("cn.jason.demo.mapper")
public class DemoApplication {
    public static void main(String[] args) {
        SpringApplication.run(DemoApplication.class, args);
    }
}
通过以上几个步骤就可以实现简单的crud操作,mybatis-plus真的强大,mapper接口文件只需要继承baseMapper即可。太简化了。
但是在导入包的时候需要注意的是,在导入时只需要导入mybatis-plus-boot-starter就可以了,还有就是mybatis-plus,其他的就不要导入了。
今天先就了解这么多,后面仔细学一学这个强大的玩意儿。
它的更多信息可以查看官网以及慕课网入门视频
mybatis-plus官网链接:https://mp.baomidou.com/guide/#特性
mybatis-plus慕课网入门视频链接:https://www.imooc.com/learn/1130