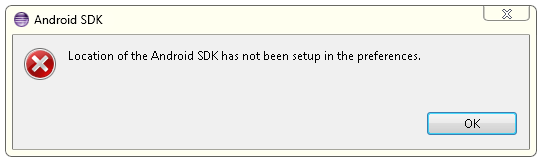
打开eclipse时出现无法识别android的项目,即所有android项目均显示红色错误标记。点击菜单Window的Android Virtual Device Manager 插件的标志时出现了Location of the Android SDK has not been setup in the preferences. 如下图所示:
单击“OK”按钮,会出现如下对话框(没有的话,选择eclipse菜单Window的Preferences):
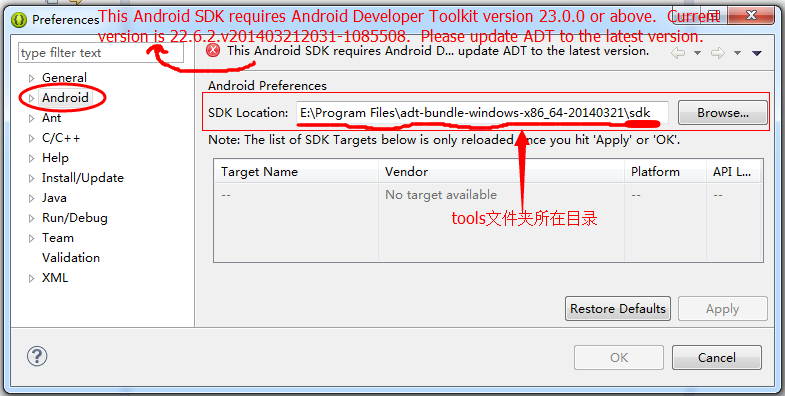
SDK Location设置正确后,仍然有“This Android SDK requires Android Developer Toolkit version 23.0.0 or above. Current version is 22.6.2.v201403212031-1085508. Please update ADT to the latest version.”的错误提示,这是因为SDK与ADT版本不匹配导致AVD打不开造成的。SDK更新后,adt-bundle安装目录sdk oolslibplugin.prop文件的内容变为“# begin plugin.propplugin.version=23.0.0# end plugin.prop”,而Eclipse在查看该文件时,查找到plugin.version=23.0.0,认为当前的sdk需要23.0.0版本以上的插件,但我们还是以前旧的22.6.2插件。
解决方法有两种:
解决方法一:降低SDK版本
将plugin.version的版本信息改为旧版本的版本号,诸如22.6.2,保存,重启Eclipse。
解决方法二:升级ADT版本
1.在线升级
途径一:设置好正确的SDK Location后,重启Eclipse时,一般情况下应该会出现如下提示升级的窗口,单击“Check for Updates”升级;

途径二:选择Eclipse菜单Help -> Check for Updates 升级。
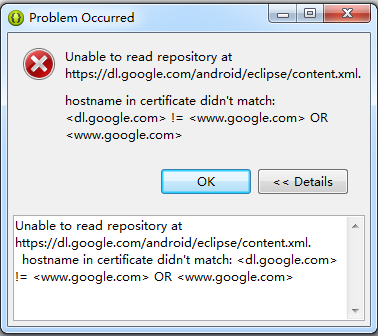
由于某些原因,谷歌的服务器总是很难连接的上的,所以如上两种方式有可能最终出现如下失败的提示,如何解决我也还没找到,知道的朋友还请告诉我一下哦。
2.离线升级(其实这个服务器一样也是很难连接得上,反正我失败了,但网上总有热心的人乐于分享)
下载ADT http://developer.android.com/intl/zh-CN/sdk/installing/installing-adt.html#Download
下载之后不要解压(其实官网上已经有说明了),步骤如下:
- Start Eclipse, then select Help > Install New Software.
- Click Add, in the top-right corner.
- In the Add Repository dialog, click Archive.
- Select the downloaded ADT-23.0.0.zip file and click OK.
- Enter “ADT Plugin” for the name and click OK.
- In the Available Software dialog, select the checkbox next to Developer Tools and click Next.
- In the next window, you’ll see a list of the tools to be downloaded. Click Next.
- Read and accept the license agreements, then click Finish.
If you get a security warning saying that the authenticity or validity of the software can’t be established, click OK.
- When the installation completes, restart Eclipse.