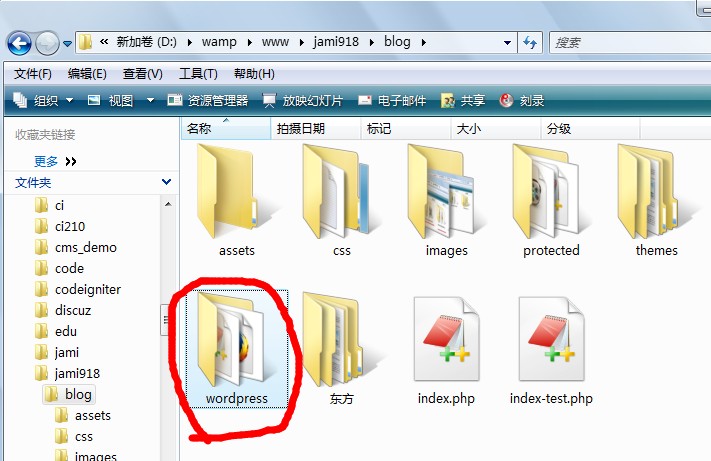
第一步,安装yii和wp:


第二步,创建protected/components/ExceptionHandler.php文件
<?php
class ExceptionHandler
{
    public function __construct()
    {
        define('YII_ENABLE_EXCEPTION_HANDLER',false);
        set_exception_handler(array($this,'handleException'));
    }

    public function handleException($exception)
    {
        // disable error capturing to avoid recursive errors
        restore_error_handler();
        restore_exception_handler();

        $event=new CExceptionEvent($this,$exception);
        if($exception instanceof CHttpException && $exception->statusCode == 404)
        {
            try
            {
                Yii::app()->runController("blog/index");
            }
            catch(Exception $e) {}
            // if we throw an exception in WordPress on a 404, we can use
            // our main error handler to handle the error
        }

        if(!$event->handled)
        {
            Yii::app()->handleException($exception);
        }
    }
}
?>
第三步,把wp的目录移到yii中。。修改 yii 的入口文件 /xxx/website/index.php
这一步使得 yii 程序启动时加载 wordpress 的程序

<?php

define('WP_USE_THEMES', true);
$wp_did_header = true;
require_once('wordpress/wp-load.php');

require_once(dirname(__FILE__) . '/protected/components/ExceptionHandler.php');
$router = new ExceptionHandler();

// change the following paths if necessary
$yii=dirname(__FILE__).'/../../framework/yii.php';
$config=dirname(__FILE__).'/protected/config/main.php';

// remove the following line when in production mode
// defined('YII_DEBUG') or define('YII_DEBUG',true);

require_once($yii);
Yii::createWebApplication($config)->run();
第四步,在 yii 中运行 wordpress:protected/controllers/SiteController.php
修改里面的 actionIndex函数为
$this->layout = false; // note that we disable the layout
try {
    //spl_autoload_unregister(array('YiiBase', 'autoload'));
    wp();
    require_once( ABSPATH . WPINC . '/template-loader.php' );
    //spl_autoload_register(array('YiiBase', 'autoload'));

    Yii::app()->end();
}
// if we threw an exception in a WordPress functions.php
// when we find a 404 header, we could use our main Yii
// error handler to handle the error, log as desired
// and then throw the exception on up the chain and
// let Yii handle things from here

// without the above, WordPress becomes our 404 error
// handler for the entire Yii app
catch (Exception $e) {
    throw $e;
}
好了,在浏览器中输入你的域名,一个整合在 yii 里的 wordpress 就呈现啦。
第五步,让 yii 的页面使用 wordpress 的主题:
如果希望你的网站统一用 wordpress 的主题,同时又想用 yii 来写页面,那么再做下面一个小修改就好了。
打开/protected/views/layouts/main.php 将里面的内容替换为
<?php get_header(); ?>
<div id="primary" class="site-content">
    <div id="content" role="main">
        <?php
             // echos Yii content
             echo $content;
        ?>
    </div>
</div>
<?php get_sidebar(); ?>
<?php get_footer(); ?>
OK,大功告成。当然如果你对 yii 熟悉,这些 controller、layout 什么都可以随便搞。
转自http://www.shannap.com/yii-integrate-wordpress.html