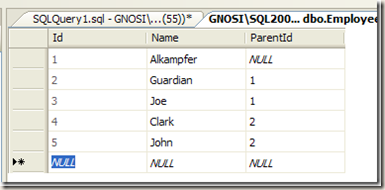
很多时候您需要在数据库中存储逻辑树的层次结构。这个问题有很多种实现方式,但最常见的是使用一个简单自关联的表,如下图所示
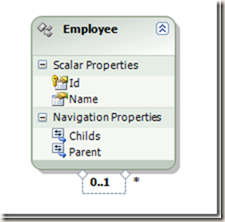
如果您映射此表与实体框架您将自动获得一个树状结构,您需将关系字段重命名,因为他们被命名为Employee和 Employee1,将他们重命名微Parent和Childs,这样使结构更清晰和易于理解。
现在我创建一个简单控制台应用程序,以递归的方式打印整棵树,代码如下:
public static void Print(Employee employee, Int32 level)
{
   Console.WriteLine("{0}{1}", new String('-', level), employee.Name);
   if (!employee.Childs.IsLoaded)
   {
      employee.Childs.Load();
   }

   foreach (Employee child in employee.Childs)
   {
      Print(child, level + 1);
   }
}
上面的Print方法以递归的方式打印整棵树的所有节点,接下来在main方法中调用该方法
public static void Main()
{
   Console.WriteLine("Test");
   using (TestEntities context = new TestEntities())
   {
      Employee root = context.Employee
         .Where(e => e.Parent == null).First();
      Print(root, 0);
   }
}
实体框架在内存中构建整个树,输出结果如下:
Test
Alkampfer
-Guardian
--Clark
--John
-Joe
修改树的结构很简单,你只需要修改它的父节点就可以了。代码如下:
Employee Clark = context.Employee
   .Where(e => e.Name == "Clark").First();
Employee Joe = context.Employee
   .Where(e => e.Name == "Joe").First();
Clark.Parent = Joe;
删除节点时有点麻烦,因为删除包含子节点的节点时,EF会报告异常。所以最好的做法是建立一个方法遍历所有子节点。
public static void Visit(Employee employee, Action<Employee> visitAction)
{
   visitAction(employee);
   if (!employee.Childs.IsLoaded)
      employee.Childs.Load();
   foreach (Employee child in employee.Childs)
      Visit(child, visitAction);
}
调用以上方法,遍历所有子节点完成删除。
using (TestEntities context = new TestEntities())
{
   Employee root = context.Employee
      .Where(e => e.Parent == null).First();
   List<Employee> nodes = new List<Employee>();
   Visit(root, nodes.Add);
   nodes.ForEach(context.DeleteObject);
   context.SaveChanges();
}
值得注意的是以上方法存在性能问题!
外语水平有限,大家可以直接看原文
原文:http://www.codewrecks.com/blog/index.php/2009/02/27/manage-trees-with-entity-framework/

