服务器初始化(这是在建立在新的服务器基础上做的初始化)关闭防火墙、selinux,添加epel常用源,安装常用工具、添加普通用户并禁止root
1、服务器批量初始化
[root@fwd ansible]# cat init.yml  系统初始化脚本
---
- hosts: all

  tasks:
    - name: disable selinux、firewalls,replace ali sources
      shell: |
        sed -i 's/SELINUX=enforcing/SELINUX=disabled/' /etc/selinux/config
        systemctl disable firewalld
        mkdir -p /etc/yum.repos.d/backup
        mv /etc/yum.repos.d/* /etc/yum.repos.d/backup/
        curl -o /etc/yum.repos.d/CentOS-Base.repo http://mirrors.aliyun.com/repo/Centos-7.repo

    - name: ensure a list of packages installed
      yum:
        name: "{{ packages }}"
      vars:
        packages:
        - wget
        - vim
        - sysstat
        - lrzsz
        - lsof

    - name: Add the user centos
      user:
        name: centos
        group: wheel

    - name:  disabled root remote login
      replace:
        path: /etc/ssh/sshd_config
        regexp: '#PermitRootLogin yes'
        replace: 'PermitRootLogin no'
        backup: yes

    - name: modify ssh port
      shell: sed -i '/^#Port/aPort 22201' /etc/ssh/sshd_config

    - name: restart ssh
      service:
        name: sshd
        state: restarted

    - name: Add epel and reboot server
      shell: |
        reboot
2、检测语法
[root@fwd ansible]# ansible-playbook -C init.yml

PLAY [all] *******************************************************************************************************************************************************************************************************************************************************************

TASK [Gathering Facts] *******************************************************************************************************************************************************************************************************************************************************
ok: [192.168.9.22]
ok: [192.168.9.14]
ok: [192.168.9.132]

TASK [disable selinux、firewalls,replace ali sources] *************************************************************************************************************************************************************************************************************************
skipping: [192.168.9.132]
skipping: [192.168.9.14]
skipping: [192.168.9.22]

TASK [ensure a list of packages installed] ***********************************************************************************************************************************************************************************************************************************
changed: [192.168.9.22]
changed: [192.168.9.14]
changed: [192.168.9.132]

TASK [Add the user centos] ***************************************************************************************************************************************************************************************************************************************************
changed: [192.168.9.22]
changed: [192.168.9.132]
changed: [192.168.9.14]

TASK [disabled root remote login] ********************************************************************************************************************************************************************************************************************************************
changed: [192.168.9.132]
changed: [192.168.9.22]
changed: [192.168.9.14]

TASK [modify ssh port] *******************************************************************************************************************************************************************************************************************************************************
skipping: [192.168.9.22]
skipping: [192.168.9.132]
skipping: [192.168.9.14]

TASK [restart ssh] ***********************************************************************************************************************************************************************************************************************************************************
changed: [192.168.9.22]
changed: [192.168.9.132]
changed: [192.168.9.14]

TASK [Add epel and reboot server] ********************************************************************************************************************************************************************************************************************************************
skipping: [192.168.9.22]
skipping: [192.168.9.132]
skipping: [192.168.9.14]

PLAY RECAP *******************************************************************************************************************************************************************************************************************************************************************
192.168.9.132              : ok=5    changed=4    unreachable=0    failed=0
192.168.9.14               : ok=5    changed=4    unreachable=0    failed=0
192.168.9.22               : ok=5    changed=4    unreachable=0    failed=0
3、mysql 安装,并创建zabbix 需要数据库
[root@fwd ~]# wget http://repo.mysql.com/mysql-community-release-el7-5.noarch.rpm
[root@fwd ~]# rpm -ivh mysql-community-release-el7-5.noarch.rpm
[root@fwd ~]# yum install mysql-server
Loaded plugins: fastestmirror
Loading mirror speeds from cached hostfile
 * base: mirrors.aliyun.com
 * extras: mirrors.aliyun.com
 * updates: mirrors.aliyun.com
mysql-connectors-community                                                                                   | 2.5 kB  00:00:00
mysql-tools-community                                                                                        | 2.5 kB  00:00:00
mysql56-community                                                                                            | 2.5 kB  00:00:00
(1/3): mysql-connectors-community/x86_64/primary_db                                                          |  41 kB  00:00:00
(2/3): mysql-tools-community/x86_64/primary_db                                                               |  58 kB  00:00:00
(3/3): mysql56-community/x86_64/primary_db                                                                   | 226 kB  00:00:00
Resolving Dependencies
--> Running transaction check
---> Package Percona-Server-server-56.x86_64 0:5.6.43-rel84.3.el7 will be installed
--> Processing Dependency: Percona-Server-client-56 for package: Percona-Server-server-56-5.6.43-rel84.3.el7.x86_64
--> Processing Dependency: Percona-Server-shared-56 for package: Percona-Server-server-56-5.6.43-rel84.3.el7.x86_64
--> Running transaction check
---> Package Percona-Server-client-56.x86_64 0:5.6.43-rel84.3.el7 will be installed
---> Package Percona-Server-shared-56.x86_64 0:5.6.43-rel84.3.el7 will be obsoleting
---> Package mariadb-libs.x86_64 1:5.5.60-1.el7_5 will be obsoleted
--> Finished Dependency Resolution

Dependencies Resolved

====================================================================================================================================
 Package                              Arch               Version                           Repository                          Size
====================================================================================================================================
Installing:
 Percona-Server-server-56             x86_64             5.6.43-rel84.3.el7                percona-release-x86_64              18 M
 Percona-Server-shared-56             x86_64             5.6.43-rel84.3.el7                percona-release-x86_64             619 k
     replacing  mariadb-libs.x86_64 1:5.5.60-1.el7_5
Installing for dependencies:
 Percona-Server-client-56             x86_64             5.6.43-rel84.3.el7                percona-release-x86_64             5.5 M

Transaction Summary
====================================================================================================================================
Install  2 Packages (+1 Dependent package)

Total size: 24 M
Is this ok [y/d/N]: y
Downloading packages:
warning: /var/cache/yum/x86_64/7/percona-release-x86_64/packages/Percona-Server-client-56-5.6.43-rel84.3.el7.x86_64.rpm: Header V4 RSA/SHA256 Signature, key ID 8507efa5: NOKEY
Retrieving key from file:///etc/pki/rpm-gpg/RPM-GPG-KEY-Percona


The GPG keys listed for the "Percona-Release YUM repository - x86_64" repository are already installed but they are not correct for this package.
Check that the correct key URLs are configured for this repository.


 Failing package is: Percona-Server-client-56-5.6.43-rel84.3.el7.x86_64
 GPG Keys are configured as: file:///etc/pki/rpm-gpg/RPM-GPG-KEY-Percon
 报错Percona-Release YUM存储库 -  x86_64”存储库列出的GPG密钥已经安装!
 解决办法如下:
[root@fwd ~]# yum update percona-release
[root@fwd ~]# systemctl start mysqld
3.1、修改mysql 密码 授权zabbix用户
[root@fwd ~]# mysql_secure_installatio
[root@fwd ~]# mysqladmin -u root password "123456";  2中方法随意
[root@fwd ~]# mysql -uroot -p
Enter password:
mysql> create database zabbix character set utf8 collate utf8_bin;
mysql> grant all privileges on zabbix.* to zabbix@localhost identified by '123456';
mysql> quit;
3.2、安装zabbix 4.0 server 添加zabbix 4.0 存储库, 并使用mysql 支持zabbix前端
[root@fwd ~]# yum install -y https://repo.zabbix.com/zabbix/4.0/rhel/7/x86_64/zabbix-release-4.0-1.el7.noarch.rpm
[root@fwd ~]# yum install -y zabbix-server-mysql zabbix-web-mysql zabbix-agent zabbix-get
3.3、导入表结构
[root@fwd ~]# zcat /usr/share/doc/zabbix-server-mysql*/create.sql.gz | mysql -uzabbix -p zabbix
3.4、修改配置文件
编辑 /etc/httpd/conf.d/zabbix.conf
php_value date.timezone Europe/Riga  修改为 php_value date.timezone Asia/Shanghai
编辑 /etc/zabbix/zabbix_server.conf
DBPassword=123456
3.5、开启服务,并设置开机自启
[root@fwd ~]# systemctl restart zabbix-server zabbix-agent httpd
[root@fwd ~]# systemctl enable zabbix-server zabbix-agent httpd
4、批量部署zabbix-agent 客户端
[root@fwd ansible]# pwd
/etc/ansible
[root@fwd ansible]# tree
.
├── ansible.cfg
├── comon_site.retry
├── comon_site.yml
├── hosts
├── init.retry
├── init.yml
├── roles
│   ├── common
│   │   ├── defaults
│   │   │   └── main.yml
│   │   ├── files
│   │   │   ├── common_id_rsa.pub
│   │   │   ├── common_sshd_config
│   │   │   └── common_sysctl.conf
│   │   ├── handlers
│   │   │   └── main.yml
│   │   ├── tasks
│   │   │   └── main.yml
│   │   ├── templates
│   │   │   ├── common_motd
│   │   │   └── common_sshd_config
│   │   └── vars
│   │       └── main.yml
│   └── zabbix_agent
│       ├── files
│       │   └── zabbix-agent-4.0.2-1.el7.x86_64.rpm
│       ├── tasks
│       │   └── main.yml
│       └── templates
│           └── zabbix_agentd.conf.j2
4.1、查看hosts 文件
[root@fwd ansible]# cat hosts
[james]
192.168.9.22
192.168.9.132
192.168.9.14
[root@fwd ansible]# cat zabbix_agent.yml
- hosts: all
  user: root
  vars:
     zabbix_serverip: 192.168.9.129 # zabbix 服务器IP
     zabbix_activeip: 192.168.9.129 # zabbix 服务器IP
     agent_hostname: '{{ ansible_hostname }}' # 客户端hostname
     agent_ip: '{{ ansible_ens33.ipv4.address }}' # 客户端IP 根据实际情况修改自己的网卡名字ens33 改成自己服务器
  roles:
    - zabbix_agent
4.2、在/etc/ansible/roles/zabbix_agent/ 创建tasks 目录 添加 main.yml 文件
[root@fwd tasks]# cat main.yml   # 这里写的是zabbix-agent 安装剧本
- name: copy zabbix_agentd
  copy: src=/etc/ansible/roles/zabbix_agent/files/zabbix-agent-4.0.2-1.el7.x86_64.rpm dest=/usr/local/src/zabbix-agent-4.0.2-1.el7.x86_64.rpm
- name: install zabbix-agend
  shell: rpm -ivh /usr/local/src/zabbix-agent-4.0.2-1.el7.x86_64.rpm # 安装zabbix agentd
- name: up zabbix-agent file client  # 上传配置文件
  template: src=zabbix_agentd.conf.j2 dest=/etc/zabbix/zabbix_agentd.conf
- name: enabled service zabbix-agent # 打开zabbix-agent 开机启动
  service: name=zabbix-agent enabled=yes
- name: start  service zabbix-agent # 启动zabbix-agent
  service: name=zabbix-agent  state=started
4.3、在/etc/ansible/roles/zabbix_agent/ 下创建 templates 文件,定义zabbix_agent.conf .js模板文件
[root@fwd templates]# cat zabbix_agentd.conf.j2
PidFile=/var/run/zabbix/zabbix_agentd.pid
LogFile=/var/log/zabbix/zabbix_agentd.log
EnableRemoteCommands=1  #远程执行命令的选项
Server={{zabbix_serverip}} #自定义server IP 变量
ListenPort=10050
ServerActive={{zabbix_activeip}}
Hostname={{ansible_hostname}}  #自定义主机名变量
AllowRoot=1
UnsafeUserParameters=1   #设置为1 表示允许用户自定义key值
HostMetadataItem=system.uname
Include=/etc/zabbix/zabbix_agentd.d/*.confgather_facts: false
5、执行批量安装
[root@fwd ansible]# ansible-playbook zabbix_agent.yml

PLAY [all] *************************************************************************************************************************

TASK [Gathering Facts] *************************************************************************************************************
ok: [192.168.9.22]
ok: [192.168.9.14]
ok: [192.168.9.132]

TASK [zabbix_agent : copy zabbix_agentd] *******************************************************************************************
changed: [192.168.9.132]
changed: [192.168.9.22]
changed: [192.168.9.14]

TASK [zabbix_agent : install zabbix-agend] *****************************************************************************************
changed: [192.168.9.132]
changed: [192.168.9.22]
changed: [192.168.9.14]

TASK [zabbix_agent : up zabbix-agent file client] **********************************************************************************
changed: [192.168.9.22]
changed: [192.168.9.132]
changed: [192.168.9.14]

TASK [zabbix_agent : enabled service zabbix-agent] *********************************************************************************
changed: [192.168.9.132]
changed: [192.168.9.22]
changed: [192.168.9.14]

TASK [zabbix_agent : start  service zabbix-agent] **********************************************************************************
changed: [192.168.9.132]
changed: [192.168.9.22]
changed: [192.168.9.14]

PLAY RECAP *************************************************************************************************************************
192.168.9.132              : ok=6    changed=5    unreachable=0    failed=0
192.168.9.14               : ok=6    changed=5    unreachable=0    failed=0
192.168.9.22               : ok=6    changed=5    unreachable=0    failed=0
检查客户端zabbix_agent服务是否启动
[root@fwd ansible]# ansible james -m shell -a "ps -ef | grep zabbix_agent"
192.168.9.132 | CHANGED | rc=0 >>
root       9512      1  0 13:26 ?        00:00:00 /usr/sbin/zabbix_agentd -c /etc/zabbix/zabbix_agentd.conf
root       9513   9512  0 13:26 ?        00:00:00 /usr/sbin/zabbix_agentd: collector [idle 1 sec]
root       9514   9512  0 13:26 ?        00:00:00 /usr/sbin/zabbix_agentd: listener #1 [waiting for connection]
root       9515   9512  0 13:26 ?        00:00:00 /usr/sbin/zabbix_agentd: listener #2 [waiting for connection]
root       9516   9512  0 13:26 ?        00:00:00 /usr/sbin/zabbix_agentd: listener #3 [waiting for connection]
root       9517   9512  0 13:26 ?        00:00:00 /usr/sbin/zabbix_agentd: active checks #1 [idle 1 sec]
root       9566   9565  0 13:26 pts/0    00:00:00 /bin/sh -c ps -ef | grep zabbix_agent
root       9568   9566  0 13:26 pts/0    00:00:00 grep zabbix_agent

192.168.9.14 | CHANGED | rc=0 >>
root       8847      1  0 13:26 ?        00:00:00 /usr/sbin/zabbix_agentd -c /etc/zabbix/zabbix_agentd.conf
root       8848   8847  0 13:26 ?        00:00:00 /usr/sbin/zabbix_agentd: collector [idle 1 sec]
root       8849   8847  0 13:26 ?        00:00:00 /usr/sbin/zabbix_agentd: listener #1 [waiting for connection]
root       8850   8847  0 13:26 ?        00:00:00 /usr/sbin/zabbix_agentd: listener #2 [waiting for connection]
root       8851   8847  0 13:26 ?        00:00:00 /usr/sbin/zabbix_agentd: listener #3 [waiting for connection]
root       8852   8847  0 13:26 ?        00:00:00 /usr/sbin/zabbix_agentd: active checks #1 [idle 1 sec]
root       8902   8901  0 13:26 pts/1    00:00:00 /bin/sh -c ps -ef | grep zabbix_agent
root       8904   8902  0 13:26 pts/1    00:00:00 grep zabbix_agent

192.168.9.22 | CHANGED | rc=0 >>
root       8982      1  0 13:26 ?        00:00:00 /usr/sbin/zabbix_agentd -c /etc/zabbix/zabbix_agentd.conf
root       8983   8982  0 13:26 ?        00:00:00 /usr/sbin/zabbix_agentd: collector [idle 1 sec]
root       8984   8982  0 13:26 ?        00:00:00 /usr/sbin/zabbix_agentd: listener #1 [waiting for connection]
root       8985   8982  0 13:26 ?        00:00:00 /usr/sbin/zabbix_agentd: listener #2 [waiting for connection]
root       8986   8982  0 13:26 ?        00:00:00 /usr/sbin/zabbix_agentd: listener #3 [waiting for connection]
root       8987   8982  0 13:26 ?        00:00:00 /usr/sbin/zabbix_agentd: active checks #1 [idle 1 sec]
root       9037   9036  0 13:26 pts/1    00:00:00 /bin/sh -c ps -ef | grep zabbix_agent
root       9039   9037  0 13:26 pts/1    00:00:00 grep zabbix_agent

[root@fwd ansible]# ansible james -m shell -a "netstat -plunt"
192.168.9.22 | CHANGED | rc=0 >>
Active Internet connections (only servers)
Proto Recv-Q Send-Q Local Address           Foreign Address         State       PID/Program name
tcp        0      0 0.0.0.0:8080            0.0.0.0:*               LISTEN      6769/httpd
tcp        0      0 0.0.0.0:22              0.0.0.0:*               LISTEN      7343/sshd
tcp        0      0 0.0.0.0:10050           0.0.0.0:*               LISTEN      8982/zabbix_agentd
tcp6       0      0 :::22                   :::*                    LISTEN      7343/sshd
tcp6       0      0 :::10050                :::*                    LISTEN      8982/zabbix_agentd

192.168.9.132 | CHANGED | rc=0 >>
Active Internet connections (only servers)
Proto Recv-Q Send-Q Local Address           Foreign Address         State       PID/Program name
tcp        0      0 0.0.0.0:8080            0.0.0.0:*               LISTEN      6865/httpd
tcp        0      0 0.0.0.0:22              0.0.0.0:*               LISTEN      7826/sshd
tcp        0      0 0.0.0.0:10050           0.0.0.0:*               LISTEN      9512/zabbix_agentd
tcp6       0      0 :::873                  :::*                    LISTEN      6869/xinetd
tcp6       0      0 :::22                   :::*                    LISTEN      7826/sshd
tcp6       0      0 :::10050                :::*                    LISTEN      9512/zabbix_agentd
udp        0      0 0.0.0.0:68              0.0.0.0:*                           7643/dhclient

192.168.9.14 | CHANGED | rc=0 >>
Active Internet connections (only servers)
Proto Recv-Q Send-Q Local Address           Foreign Address         State       PID/Program name
tcp        0      0 0.0.0.0:22              0.0.0.0:*               LISTEN      7245/sshd
tcp        0      0 0.0.0.0:10050           0.0.0.0:*               LISTEN      8847/zabbix_agentd
tcp6       0      0 :::22                   :::*                    LISTEN      7245/sshd
tcp6       0      0 :::10050                :::*                    LISTEN      8847/zabbix_agentd
5.1、这里介绍下忘记zabbix 登录密码怎么办,因为我经常忘记 查看md5秘钥
[root@fwd templates]# mysql -uroot -p -e "select * from zabbix.usersG"
Enter password:
*************************** 1. row ***************************
        userid: 1
         alias: Admin
          name: Zabbix
       surname: Administrator
        passwd: 5fce1b3e34b520afeffb37ce08c7cd66
           url:
     autologin: 1
    autologout: 0
          lang: en_GB
       refresh: 30s
          type: 3
         theme: default
attempt_failed: 0
    attempt_ip:
 attempt_clock: 0
 rows_per_page: 50
*************************** 2. row ***************************
        userid: 2
         alias: guest
          name:
       surname:
        passwd: d41d8cd98f00b204e9800998ecf8427e
           url:
     autologin: 0
    autologout: 15m
          lang: en_GB
       refresh: 30s
          type: 1
         theme: default
attempt_failed: 0
    attempt_ip:
 attempt_clock: 0
 rows_per_page: 50
[root@fwd templates]# mysql -uroot -p
Enter password:
    mysql>use zabbix ;  进入到zabbix数据库
    mysql>update users set passwd='5fce1b3e34b520afeffb37ce08c7cd66' where userid='1';
    因为5fce1b3e34b520afeffb37ce08c7cd66 = zabbix  你现在就可以用 Admin zabbix 登录了~
6、zabbix自动发现,自动添加(我们批量安装zabbix_agent的目的就是因为以后服务器越来越多,面对越来越多的服务器,我们一台一台添加明显有点不现实!所以就要用到zabbix的自动发现登录zabbix http://localhost/zabbix)
6.1、配置自动发现规则

6.2、配置-动作-触发器-创建动作
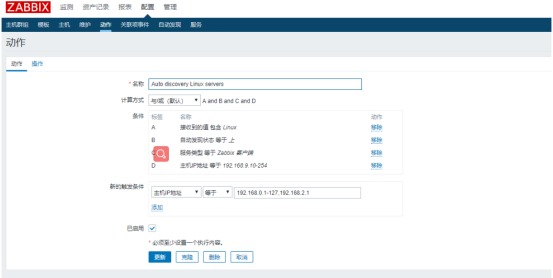

6.3、配置完毕,几分钟后zabbix--监控中--自动发现

6.4、自动注册 配置-动作-自动注册

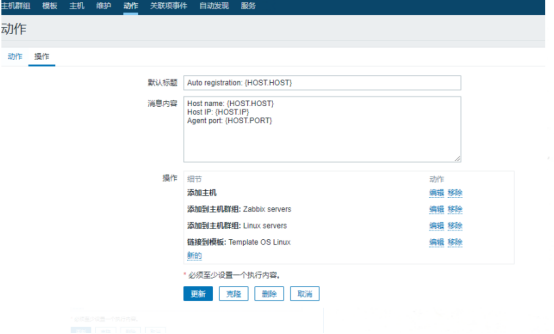
更新过后,刷新就会发现发现的主机已经自动添加了
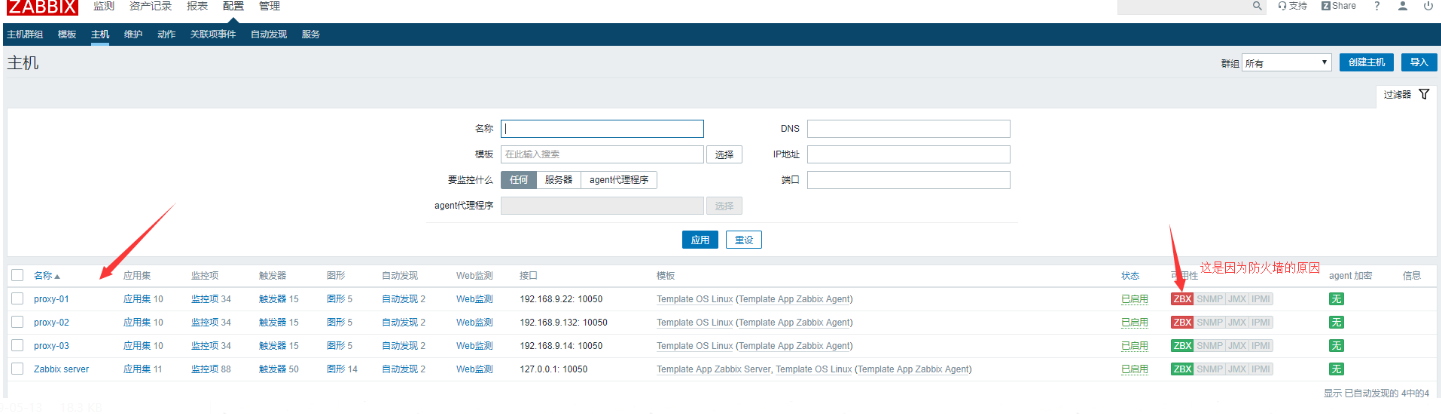
报错主机无法被监控是因为我客户端防火墙开启了,没对外开放10050端口,给防火墙添加条规则就可以
[root@proxy-01 network-scripts]# cat /etc/sysconfig/iptables
# sample configuration for iptables service
# you can edit this manually or use system-config-firewall
# please do not ask us to add additional ports/services to this default configuration
*filter
:INPUT ACCEPT [0:0]
:FORWARD ACCEPT [0:0]
:OUTPUT ACCEPT [0:0]
-A INPUT -m state --state RELATED,ESTABLISHED -j ACCEPT
-A INPUT -p icmp -j ACCEPT
-A INPUT -i lo -j ACCEPT
-A INPUT -p tcp -m state --state NEW -m tcp --dport 22 -j ACCEPT
-A INPUT -p tcp --dport 10050 -j ACCEPT   添加规则 对外开放10050端口
-A INPUT -j REJECT --reject-with icmp-host-prohibited
-A FORWARD -j REJECT --reject-with icmp-host-prohibited
COMMIT
[root@proxy-01 network-scripts]# systemctl restart iptables.service
[root@proxy-01 network-scripts]# iptables -nvL
Chain INPUT (policy ACCEPT 0 packets, 0 bytes)
 pkts bytes target     prot opt in     out     source               destination
   30  1980 ACCEPT     all  --  *      *       0.0.0.0/0            0.0.0.0/0            state RELATED,ESTABLISHED
    0     0 ACCEPT     icmp --  *      *       0.0.0.0/0            0.0.0.0/0
    0     0 ACCEPT     all  --  lo     *       0.0.0.0/0            0.0.0.0/0
    0     0 ACCEPT     tcp  --  *      *       0.0.0.0/0            0.0.0.0/0            state NEW tcp dpt:22
    0     0 ACCEPT     tcp  --  *      *       0.0.0.0/0            0.0.0.0/0            tcp dpt:10050
    0     0 REJECT     all  --  *      *       0.0.0.0/0            0.0.0.0/0            reject-with icmp-host-prohibited

Chain FORWARD (policy ACCEPT 0 packets, 0 bytes)
 pkts bytes target     prot opt in     out     source               destination
    0     0 REJECT     all  --  *      *       0.0.0.0/0            0.0.0.0/0            reject-with icmp-host-prohibited

Chain OUTPUT (policy ACCEPT 16 packets, 1552 bytes)
 pkts bytes target     prot opt in     out     source               destination