一、Tomcat目录
bin:存储Tomcat相关可执行脚本,如启动和关闭Tomcat的命令start.sh和shutdown.sh
conf:存储Tomcat相关的配置文件
- server.xml:Tomcat的服务配置,Tomcat启动就代表一个Server,需要配置Server下的Service、Connector、Engine、Hosts等组件
- web.xml:Tomcat的Servlet规范标准的配置文件,Tomcat本质上就是一个Servlet,主要配置了两个Servlet,一个是DefaultServlet处理所有请求,一个是JspServlet专门负责处理.jsp的请求
- tomcat-users.xml:Tomcat相关的用户和角色配置,常规情况下用不到
- context.xml:所有Host的默认配置信息
logs:存储Tomcat运行时的日志文件
work:存储jsp编译后产生的.class文件
webapps:存储Tomcat主要web发布目录
lib:存储Tomcat程序依赖的jar包
二、Tomcat的组件及整体架构
2.1、Tomcat的组件
Server:Server表示服务器,每启动一个Tomcat实例就相当于启动一个JVM,也就代表一个Server;
Service:Service表示服务器的一个服务,默认服务名称是Catalina,每个Service都需要关联一个引擎Engine和一组连接器Connector;
Connector:连接器,用于监听指定端口,接收指定通信协议的请求并将请求转发给关联的引擎Engine处理,然后把处理结果返回给客户端;
Engine:Servlet引擎,相当于一个Servlet的实例,Engine需要将Connector转发过来的请求根据请求host将请求交给对应的Host来处理;
Host:表示一个主机,用于处理Engine分配的请求
Context:表示一个Web应用程序,根据Host处理的请求路径匹配
2.2、Tomcat组件配置
server配置
标签为<Server>,主要属性有port和shutdown表示监听指定端口接收指定的shutdown命令用于关闭Tomcat服务器,配置如下:
<Server port="8005" shutdown="SHUTDOWN">
则表示Tomcat服务会监听8005端口,并接收shutdown命令,用于关闭Tomcat服务器。如果同一个物理机器需要启动多个Tomcat实例那么就需要定义不同的port。<Server>标签可以配置属性如下
port:监听的端口
shutdown:接收用于关闭Tomcat的命令,默认是SHUTDOWN
className:实现Server的类名,默认是org.apache.catalina.core.StandardServer
Service配置
标签为<Service>, 主要属性有name和className,默认name为Catalina,默认className为org.apache.core.StandardServic
每个<Service>需要关联一个<Engine>和至少一个<Connector>,如配置如下
<Service name="Catalina">
Connector配置
标签为<Connector>,Tomcat的连接器类型有多个,分别有HTTP连接器、SSL连接器、AJP1.3连接器、proxy连接器,不同连接器使用场景不同配置的属性也不同,连接器需要关联一个引擎Engine,但是一个Engine可以关联多个连接器Connector。配置如下:
<Connector port="8080" protocol="HTTP/1.1" connectionTimeout="20000"
                  maxPostSize="-1" URIEncoding="UTF-8"
                  maxThreads="200"  redirectPort="8443" />
表示这个连接器监听8080端口和HTTP1.1协议,链接超时时间为20秒,最大并发线程为200各个线程
Connector标签主要参数如下:
| 参数 | 说明 | 取值 |
| port | 连接器监听端口号 | 默认8080 |
| protocol | 协议类型 |
可选BIO、NIO、NIO2、APR四种类型,取值分别为 BIO:HTTP1.1 NIO:org.apache.coyote.http11.Http11NioProtocol NIO2:org.apache.coyote.http11.Http11Nio2Protocol APR:org.apache.coyote.http11.Http11AprProtocol |
| connectionTimeout | 连接超时时间,请求已经被接收,但是还未被处理,也就是等待处理的超时时间 | 单位毫秒,默认值为60000 |
| maxThreads | 处理请求的最大线程数 | 默认值为200 |
| minSpareThreads | 处理请求的最小线程数 | 默认值为10 |
| acceptCount | 等待队列的最大数,表示等待处理的请求等待队列 | 默认值为100,通常可以设置为maxThreads大小 |
| maxConnections | 在任何给定的时间内,服务器将接受和处理的最大连接数,超过最大连接数就不在处理连接 | NIO和NIO2默认值为10000,APR默认值为8192 |
| maxHttpHeaderSize | 请求和响应的HTTP请求头最大大小 | 单位为字节,默认是8192也就是8K |
| tcpNoDelay | 配置TCP的TCP_NO_DELAY属性,是否禁用Nagle算法 | 默认为true |
| compression | 是否启用gzip压缩 | 默认为关闭状态off,可选值为on压缩文本数据,force强制压缩所有数据 |
| compressionMinSize | gzip压缩的最小值,也就是数据大小超过该值时compression=on的配置才有效 | 默认是2048也就是2K |
| URIEncoding | 设置URL编码字符集 | 可以设置为UTF-8 |
| executor | 处理请求的线程池,请求会放到线程池中执行 | 需要配置线程池,然后将线程池名称赋值给executor属性 |
| redirectPort | 重定向端口,如果协议为HTTP,当接收HTTPS请求时转发到该端口 | 默认是443 |
Engine配置
标签为<Engine>表示一个处理Servlet引擎,属性有name和defalutHost,配置如下
<Engine name="Catalina" defaultHost="localhost">
defaultHost:Tomcat支持基于FQDN的虚拟主机,这些虚拟主机可以通过在Engine容器中定义多个不同的Host组件来实现;但如果此引擎的连接器收到一个发往非非明确定义虚拟主机的请求时则需要将此请求发往一个默认的虚拟主机进行处理,因此,在Engine中定义的多个虚拟主机的主机名称中至少要有一个跟defaultHost定义的主机名称同名;
name:Engine组件的名称,用于日志和错误信息记录时区别不同的引擎
Host配置
标签为<Host>位于Engine容器中用于接收请求并进行相应处理的主机或虚拟主机,配置如下:
<Host name="local" appBase="webapps" unpackWARS="true" autoDeploy="true">
常有属性说明
appBase:webapp目录,即存放非归档的web应用程序的目录或归档后的WAR文件的目录路径;可以使用基于$CATALINA_HOME的相对路径;
unpackWARS:在启用此webapps时是否对WAR格式的归档文件先进行展开,也就是是否解压WAR包;默认为true;
autoDeploy:在Tomcat处于运行状态时放置于appBase目录中的应用程序文件是否自动进行deploy;默认为true;
Context配置
标签为<Context>,一个Context代表一个web应用程序,配置如下:
<Context path="/order" docBase="/web/order" >
其中path表示相当于web服务器根路径而言的URL,如果没有配置则为webapp根路径;docBase表示对应的web应用程序存放位置,可以是绝对路径,也可以是相对路径,相对路径是在Host的appBase之下的路径。
2.3、Tomcat整体架构
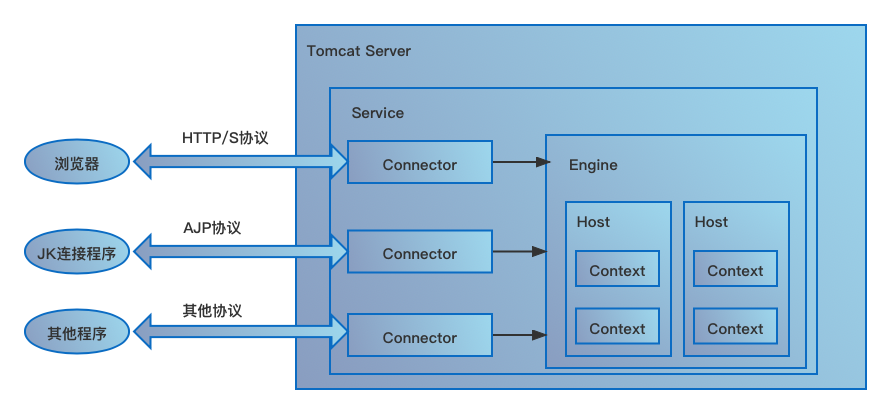
Tomcat整体架构如上图示,Tomcat程序启动代表一个Tomcat Server,Server下包含多个Service,每个Service代表一个服务,Service需要包含一个Engine和多个Connector,其中Engine和Connector关联,Connector负责监听端口接收客户端请求,并将请求转发给Engine,Engine是处理请求引擎专门用于处理请求,Engine下面包含多个Host,Engine会根据请求的host信息匹配对应的Host,将请求交给Host,Host再根据具体的请求路径匹配对应的Context,Context再处理对应的具体请求。Context就代表具体的Web应用程序。
2.4、Tomcat的请求处理流程
1、客户端发送HTTP请求,如路径为 http://localhost:8080/order/createOrder;
2、监听8080端口和HTTP协议的Connector接收到请求,并将请求交给关联的Engine;
3、Engine获取请求的host为localhost,在所有的虚拟主机Host中进行匹配,找到匹配的Host,并将请求交给对应的Host,如果匹配不到就交给默认的localhost的Host;
4、Host根据请求路径/order匹配所有Context的path,根据Context的path找到对应的Context,如果匹配不到就将请求交给path=""的Context处理;
5、Context根据路径集合找到对应路径的Servlet,构造HttpServletRequest和HttpServletResponse对象,调用对应Servlet的处理方法,根据请求类型分别调用doGet、doPost、doPut、doDelete等方法;
6、Servlet处理请求并将结果HttpServletResponse返回给Host;
7、Host将结果HttpServletResponse返回给Engine;
8、Engine将结果HttpServletResponse返回给Connector;
9、Connector将结果HttpServletResponse返回给客户端;
三、Tomcat的实现原理
3.1、Tomcat启动实现原理
Tomcat文件夹bin目录下有很多脚本文件,和启动有关的主要是startup.sh、catalina.sh和setclasspath.sh三个文件
Tomcat启动执行的脚本为startup.sh(window系统为startup.bat),该脚本的作用是找到catalina.sh并且执行;而catalina.sh的主要作用就是配置环境变量,然后找到setclasspath.sh并且执行,另外catalina.sh还可以设置JAVA_OPTS来配置应用程序的启动参数,
然后定义Tomcat的启动类为MAINCLASS=org.apache.catalina.startup.Bootstrap并执行Bootstrap类的main方法启动Tomcat
虽然总结起来流程比较简单,但是实际上这三个脚本文件的内容还是有很多的,有兴趣可以自行查看研究。
从启动文件可以得知Tomcat启动实际就是执行了org.apache.catalina.startup.Bootstrap的main方法,所以可以从这个main方法入手来了解Tomcat是如何启动的,Bootstrap的main方法源码如下:
 1 public static void main(String args[]) {
 2         /** 同步保证同一时间只启动一次*/
 3         synchronized (daemonLock) {
 4             if (daemon == null) {
 5                 Bootstrap bootstrap = new Bootstrap();
 6                 try {
 7                     /** 1.执行初始化方法 */
 8                     bootstrap.init();
 9                 } catch (Throwable t) {
10                     handleThrowable(t);
11                     t.printStackTrace();
12                     return;
13                 }
14                 daemon = bootstrap;
15             } else {
16                 Thread.currentThread().setContextClassLoader(daemon.catalinaLoader);
17             }
18         }
19
20         try {
21             /** 2.从启动参数中获取命令 */
22             String command = "start";
23             if (args.length > 0) {
24                 command = args[args.length - 1];
25             }
26
27             if (command.equals("startd")) {//启动
28                 args[args.length - 1] = "start";
29                 daemon.load(args);
30                 daemon.start();
31             } else if (command.equals("stopd")) {//关闭
32                 args[args.length - 1] = "stop";
33                 daemon.stop();
34             } else if (command.equals("start")) {//启动
35                 daemon.setAwait(true);
36                 daemon.load(args);
37                 daemon.start();
38                 if (null == daemon.getServer()) {
39                     System.exit(1);
40                 }
41             } else if (command.equals("stop")) {//关闭
42                 daemon.stopServer(args);
43             } else if (command.equals("configtest")) {//配置
44                 daemon.load(args);
45                 if (null == daemon.getServer()) {
46                     System.exit(1);
47                 }
48                 System.exit(0);
49             }
50         } catch (Throwable t) {
51             System.exit(1);
52         }
53     }
核心逻辑比较简单流程也比较清晰,首先在同步代码块中调用Bootstrap对象的init方法进行初始化,然后根据启动参数的命令执行对应的方法,分别调用load、start、stop或stopServer等方法。
实际上Tomcat启动流程主要分成两大步骤,第一步是核心组件的初始化,第二步是启动,而Catalina的load方法就是初始化过程,Catalina的start方法就是真正的启动过程。
3.1.1、Catalina初始化源码解析
Bootstrap的init方法源码如下:
 1 public void init() throws Exception {
 2         /** 1.初始化类加载器 */
 3         initClassLoaders();
 4
 5         Thread.currentThread().setContextClassLoader(catalinaLoader);
 6
 7         SecurityClassLoad.securityClassLoad(catalinaLoader);
 8
 9         Class<?> startupClass = catalinaLoader.loadClass("org.apache.catalina.startup.Catalina");
10         Object startupInstance = startupClass.getConstructor().newInstance();
11
12         String methodName = "setParentClassLoader";
13         Class<?> paramTypes[] = new Class[1];
14         paramTypes[0] = Class.forName("java.lang.ClassLoader");
15         Object paramValues[] = new Object[1];
16         paramValues[0] = sharedLoader;
17         Method method = startupInstance.getClass().getMethod(methodName, paramTypes);
18         /** 2.通过反射调用Catalina的setParentClassLoader方法 */
19         method.invoke(startupInstance, paramValues);
20
21         catalinaDaemon = startupInstance;
22     }
init方法主要是初始化了类加载器,然后通过反射调用了Catalina的多setParentClassLoader方法。
而load、start、stop和stopServer等方法的实现和init方法一样,实际就是通过反射调用了Catalina类的对应方法,如Bootstrap的start方法源码如下:
1 public void start() throws Exception {
2         if (catalinaDaemon == null) {
3             init();
4         }
5         /** 通过反射直接调用Catalina对象的start方法 */
6         Method method = catalinaDaemon.getClass().getMethod("start", (Class [])null);
7         method.invoke(catalinaDaemon, (Object [])null);
8     }
Catalina的load方法主要是完成了初始化工作,主要是初始化了代表整个Tomcat的Server对象,Catalina的load方法核心逻辑如下:
 1 public void load() {
 2         /** 1.初始化目录 */
 3         initDirs();
 4         initNaming();
 5         ConfigFileLoader.setSource(new CatalinaBaseConfigurationSource(Bootstrap.getCatalinaBaseFile(), getConfigFile()));
 6         /** 2.读取配置文件 */
 7         File file = configFile();
 8         /** 3.创建Digester对象,用于xml文件解析 */
 9         Digester digester = createStartDigester();
10
11         /** 4.通过Digester解析server.xml文件,分别解析Server、Service、Connector、Engine、Host、Context等标签 */
12         try (ConfigurationSource.Resource resource = ConfigFileLoader.getSource().getServerXml()) {
13             InputStream inputStream = resource.getInputStream();
14             InputSource inputSource = new InputSource(resource.getURI().toURL().toString());
15             inputSource.setByteStream(inputStream);
16             digester.push(this);
17             digester.parse(inputSource);
18         } catch (Exception e) {
19         }
20
21         getServer().setCatalina(this);
22         getServer().setCatalinaHome(Bootstrap.getCatalinaHomeFile());
23         getServer().setCatalinaBase(Bootstrap.getCatalinaBaseFile());
24
25         initStreams();
26         try {
27             /** 5.初始化Server */
28             getServer().init();
29         } catch (LifecycleException e) {
30         }
31     }
主要是通过Digester解析server.xml配置文件,依次读取并解析<Server>、<Service>、<Connector>、<Engine>、<Host>、<Context>等标签,分别初始化对应的实例StandardServer、StandardService、Connector、StandardEngine、Host、Context等对象。
然后调用Server的实例StandardServer对象的init方法进行初始化,StandardService的初始化方法执行的是父类的LifecycleBase的init方法,代码如下:
 1 public final synchronized void init() throws LifecycleException {
 2         if (!state.equals(LifecycleState.NEW)) {
 3             invalidTransition(Lifecycle.BEFORE_INIT_EVENT);
 4         }
 5
 6         try {
 7             /** 1.设置生命周期状态,并抛出开始初始化事件 */
 8             setStateInternal(LifecycleState.INITIALIZING, null, false);
 9             /** 2.执行初始化操作 */
10             initInternal();
11             /** 3.设置生命周期状态,并抛出完成初始化事件 */
12             setStateInternal(LifecycleState.INITIALIZED, null, false);
13         } catch (Throwable t) {
14             handleSubClassException(t, "lifecycleBase.initFail", toString());
15         }
16     }
其中initInternal方法实际是调用子类也就是StandardServer本身的initInternal方法,该方法的核心逻辑是依次遍历所有Service,然后依次调用Service的init方法,代码如下:
 1 protected void initInternal() throws LifecycleException {
 2
 3         super.initInternal();
 4
 5         // Initialize utility executor
 6         reconfigureUtilityExecutor(getUtilityThreadsInternal(utilityThreads));
 7         register(utilityExecutor, "type=UtilityExecutor");
 8         onameStringCache = register(new StringCache(), "type=StringCache");
 9         MBeanFactory factory = new MBeanFactory();
10         factory.setContainer(this);
11         onameMBeanFactory = register(factory, "type=MBeanFactory");
12         globalNamingResources.init();
13         if (getCatalina() != null) {
14             ClassLoader cl = getCatalina().getParentClassLoader();
15             // Walk the class loader hierarchy. Stop at the system class loader.
16             // This will add the shared (if present) and common class loaders
17             while (cl != null && cl != ClassLoader.getSystemClassLoader()) {
18                 if (cl instanceof URLClassLoader) {
19                     URL[] urls = ((URLClassLoader) cl).getURLs();
20                     for (URL url : urls) {
21                         if (url.getProtocol().equals("file")) {
22                             try {
23                                 File f = new File (url.toURI());
24                                 if (f.isFile() &&
25                                         f.getName().endsWith(".jar")) {
26                                     ExtensionValidator.addSystemResource(f);
27                                 }
28                             } catch (URISyntaxException e) {
29                                 // Ignore
30                             } catch (IOException e) {
31                                 // Ignore
32                             }
33                         }
34                     }
35                 }
36                 cl = cl.getParent();
37             }
38         }
39         /** 初始化Server下所有的Service,调用对应Service的init方法 */
40         for (int i = 0; i < services.length; i++) {
41             services[i].init();
42         }
43     }
Service的实例是StandardService对象,初始化方法和StandardServer初始化方法逻辑类似,也是执行了本身的initInternal方法,逻辑就是初始化调用了对应的Engine的init方法和所有Connector的init方法,代码如下:
 1 protected void initInternal() throws LifecycleException {
 2         super.initInternal();
 3         if (engine != null) {
 4             /** 1.初始化Engine */
 5             engine.init();
 6         }
 7         for (Executor executor : findExecutors()) {
 8             if (executor instanceof JmxEnabled) {
 9                 ((JmxEnabled) executor).setDomain(getDomain());
10             }
11             /** 2.初始化线程池*/
12             executor.init();
13         }
14         mapperListener.init();
15         /** 3.初始化所有Connector */
16         synchronized (connectorsLock) {
17             for (Connector connector : connectors) {
18                 connector.init();
19             }
20         }
21     }
其中Engine的初始化方法主要是初始化Realm,Connector初始化主要是初始化ProtocolHandler对象,ProtocolHandler是具体的通信协议处理器,Connector初始化比较重要,相当于初始化后就开始监听指定协议的指定端口了。
Connector的ProcotolHandler初始化需要根据<Connector>标签的属性配置来决定使用哪个实现,如protocol=HTTP/1.1那么就是Http11NioProtocol,如果protocol=AJP/1.1那么就是AjpNioProtocol,如果是APR那么就是对应协议的PRO处理器,
默认是Http11NioProtocol,Connector对象创建时会通过反射创建对应协议处理器。Connector初始化initInternal方法源码如下:
protected void initInternal() throws LifecycleException {

        super.initInternal();

        if (protocolHandler == null) {
            throw new LifecycleException(
                    sm.getString("coyoteConnector.protocolHandlerInstantiationFailed"));
        }

        /** 初始化Coyote适配器 */
        adapter = new CoyoteAdapter(this);
        protocolHandler.setAdapter(adapter);
        if (service != null) {
            /** 设置ProtocolHandler处理线程池 */
            protocolHandler.setUtilityExecutor(service.getServer().getUtilityExecutor());
        }

        // Make sure parseBodyMethodsSet has a default
        if (null == parseBodyMethodsSet) {
            setParseBodyMethods(getParseBodyMethods());
        }

        if (protocolHandler.isAprRequired() && !AprLifecycleListener.isInstanceCreated()) {
            throw new LifecycleException(sm.getString("coyoteConnector.protocolHandlerNoAprListener",
                    getProtocolHandlerClassName()));
        }
        if (protocolHandler.isAprRequired() && !AprLifecycleListener.isAprAvailable()) {
            throw new LifecycleException(sm.getString("coyoteConnector.protocolHandlerNoAprLibrary",
                    getProtocolHandlerClassName()));
        }
        if (AprLifecycleListener.isAprAvailable() && AprLifecycleListener.getUseOpenSSL() &&
                protocolHandler instanceof AbstractHttp11JsseProtocol) {
            AbstractHttp11JsseProtocol<?> jsseProtocolHandler =
                    (AbstractHttp11JsseProtocol<?>) protocolHandler;
            if (jsseProtocolHandler.isSSLEnabled() &&
                    jsseProtocolHandler.getSslImplementationName() == null) {
                // OpenSSL is compatible with the JSSE configuration, so use it if APR is available
                jsseProtocolHandler.setSslImplementationName(OpenSSLImplementation.class.getName());
            }
        }

        try {
            /** 初始化ProtocolHandler */
            protocolHandler.init();
        } catch (Exception e) {
            throw new LifecycleException(
                    sm.getString("coyoteConnector.protocolHandlerInitializationFailed"), e);
        }
    }
可以看出Connector初始化的重点是调用了ProtocolHandler的init方法进行初始化,以Http11NioProtocol为例,init方法实际是执行的父类AbstractProtocol的init方法,核心逻辑是初始化NioEndpoint对象,并调用NioEndpoint的init方法进行初始化。
NioEndpoint的init方法执行的是父类AbstractEndpoint的init方法,源码如下:


 1 public final void init() throws Exception {
 2         // 初始化时绑定端口
 3         if (bindOnInit) {
 4             /** 绑定端口号 */
 5             bindWithCleanup();
 6             bindState = BindState.BOUND_ON_INIT;
 7         }
 8         if (this.domain != null) {
 9             // Register endpoint (as ThreadPool - historical name)
10             oname = new ObjectName(domain + ":type=ThreadPool,name=\"" + getName() + "\"");
11             Registry.getRegistry(null, null).registerComponent(this, oname, null);
12
13             ObjectName socketPropertiesOname = new ObjectName(domain +
14                     ":type=ThreadPool,name=\"" + getName() + "\",subType=SocketProperties");
15             socketProperties.setObjectName(socketPropertiesOname);
16             Registry.getRegistry(null, null).registerComponent(socketProperties, socketPropertiesOname, null);
17
18             for (SSLHostConfig sslHostConfig : findSslHostConfigs()) {
19                 registerJmx(sslHostConfig);
20             }
21         }
22     }
23
24     private void bindWithCleanup() throws Exception {
25         try {
26             /** 绑定端口号 */
27             bind();
28         } catch (Throwable t) {
29             ExceptionUtils.handleThrowable(t);
30             /** 异常情况解绑端口 */
31             unbind();
32             throw t;
33         }
34     }
实际上最终还是调用了NioEndpoint的bind方法进行端口绑定,源码如下:
public void bind() throws Exception {
        /** 初始化ServerSocket,绑定端口 */
        initServerSocket();
        setStopLatch(new CountDownLatch(1));
        /** 初始化SSL*/
        initialiseSsl();
        /** 打开Selector监听端口*/
        selectorPool.open(getName());
    }
实际就是初始化ServerSocket监听端口号,并初始化了多路复用选择器Selector
3.1.2、Catalina启动源码解析
Catalina的start方法源码核心逻辑如下:
public void start() {
        try {
            /** 调用StandardServer的start方法
             *  实际是执行父类Lifecycle的start方法 */
            getServer().start();
        } catch (LifecycleException e) {
            try {
                getServer().destroy();
            } catch (LifecycleException e1) {
            }
            return;
        }
    }

    /** Lifecycle的start方法*/
    public final synchronized void start() throws LifecycleException {
        /** 状态检查*/
        if (state.equals(LifecycleState.NEW)) {
            init();
        } else if (state.equals(LifecycleState.FAILED)) {
            stop();
        } else if (!state.equals(LifecycleState.INITIALIZED) &&
                !state.equals(LifecycleState.STOPPED)) {
            invalidTransition(Lifecycle.BEFORE_START_EVENT);
        }
        try {
            /** 设置状态*/
            setStateInternal(LifecycleState.STARTING_PREP, null, false);
            /** 调用子类的startInternal方法 */
            startInternal();
            if (state.equals(LifecycleState.FAILED)) {
                stop();
            } else if (!state.equals(LifecycleState.STARTING)) {
                invalidTransition(Lifecycle.AFTER_START_EVENT);
            } else {
                setStateInternal(LifecycleState.STARTED, null, false);
            }
        } catch (Throwable t) {
            handleSubClassException(t, "lifecycleBase.startFail", toString());
        }
    }
直接调用getServer().start()调用StandardServer的start方法,而StandardServer是LifecycleBase的子类,所以执行的是LifecycleBase的start方法,最终调用子类的startInternal方法启动,也就是执行了StandardServer的startInternal方法,源码如下:
 1 protected void startInternal() throws LifecycleException {
 2         /** 1.发送生命周期变化事件*/
 3         fireLifecycleEvent(CONFIGURE_START_EVENT, null);
 4         /** 2.设置状态为启动状态*/
 5         setState(LifecycleState.STARTING);
 6         globalNamingResources.start();
 7         /** 3.遍历启动所有service*/
 8         synchronized (servicesLock) {
 9             for (int i = 0; i < services.length; i++) {
10                 services[i].start();
11             }
12         }
13
14         if (periodicEventDelay > 0) {
15             monitorFuture = getUtilityExecutor().scheduleWithFixedDelay(
16                     new Runnable() {
17                         @Override
18                         public void run() {
19                             startPeriodicLifecycleEvent();
20                         }
21                     }, 0, 60, TimeUnit.SECONDS);
22         }
23     }
Server的start方法实际就是调用所有Service的start方法,Service的start方法实际执行的是startInternal方法,源码如下:
/** StandardService 启动方法 */
    protected void startInternal() throws LifecycleException {

        /** 1.设置状态为启动中 */
        setState(LifecycleState.STARTING);

        /** 2.启动Engine */
        if (engine != null) {
            synchronized (engine) {
                engine.start();
            }
        }
        /** 3.启动线程池 */
        synchronized (executors) {
            for (Executor executor: executors) {
                executor.start();
            }
        }

        /** 4.启动MapperListener */
        mapperListener.start();

        /** 5.启动所有Connector,监听端口 */
        synchronized (connectorsLock) {
            for (Connector connector: connectors) {
                // If it has already failed, don't try and start it
                if (connector.getState() != LifecycleState.FAILED) {
                    connector.start();
                }
            }
        }
    }
核心逻辑就是启动了Service对应的Engine和所有的Connector,分别调用各自的start方法,实际就是分别调用StandardEngine和Connector的startInternal方法。
3.1.3、Engine启动
StandardEngine的startInternal实际调用的是父类ContainerBase的startInternal,Container表示容器,Engine、Host、Context都是容器的实现。ContainerBase的startInternal方法源码核心逻辑如下:
 1 protected synchronized void startInternal() throws LifecycleException {
 2
 3         //。。。。。。
 4
 5         /** 1.查询所有子容器*/
 6         Container children[] = findChildren();
 7         List<Future<Void>> results = new ArrayList<>();
 8         for (int i = 0; i < children.length; i++) {
 9             /** 2.依次启动子容器 */
10             results.add(startStopExecutor.submit(new StartChild(children[i])));
11         }
12
13         MultiThrowable multiThrowable = null;
14
15         for (Future<Void> result : results) {
16             try {
17                 result.get();
18             } catch (Throwable e) {
19                 log.error(sm.getString("containerBase.threadedStartFailed"), e);
20                 if (multiThrowable == null) {
21                     multiThrowable = new MultiThrowable();
22                 }
23                 multiThrowable.add(e);
24             }
25
26         }
27         /** 3.设置状态*/
28         setState(LifecycleState.STARTING);
29         if (backgroundProcessorDelay > 0) {
30             monitorFuture = Container.getService(ContainerBase.this).getServer()
31                     .getUtilityExecutor().scheduleWithFixedDelay(
32                             new ContainerBackgroundProcessorMonitor(), 0, 60, TimeUnit.SECONDS);
33         }
34     }
首先是找到所有子容器,然后分别启动子容器,Engine的子容器就是Host,所以对于Engine而言启动子容器实际就是启动了StandardHost,而StandardHost的startInternal实际就是调用了所有的StandardContext的start方法。
StandardContext的startInternal方法源码比较多,核心逻辑如下:
  1 protected synchronized void startInternal() throws LifecycleException {
  2
  3         setConfigured(false);
  4         boolean ok = true;
  5
  6         /** 1.创建临时工作目录 */
  7         postWorkDirectory();
  8         /** 2.初始化Context使用的WebResourceRoot并启动, WebResourceRoot维护Web应用所有资源文件*/
  9         if (getResources() == null) {
 10             try {
 11                 setResources(new StandardRoot(this));
 12             } catch (IllegalArgumentException e) {
 13                 ok = false;
 14             }
 15         }
 16         if (ok) {
 17             resourcesStart();
 18         }
 19
 20         /** 3.创建web应用类加载器 */
 21         if (getLoader() == null) {
 22             WebappLoader webappLoader = new WebappLoader(getParentClassLoader());
 23             webappLoader.setDelegate(getDelegate());
 24             setLoader(webappLoader);
 25         }
 26
 27         /** 4.创建Cookie处理器 */
 28         if (cookieProcessor == null) {
 29             cookieProcessor = new Rfc6265CookieProcessor();
 30         }
 31
 32         /** 5.初始化字符集 */
 33         getCharsetMapper();
 34
 35         /** 6.依赖检查 */
 36         boolean dependencyCheck = true;
 37         try {
 38             dependencyCheck = ExtensionValidator.validateApplication
 39                     (getResources(), this);
 40         } catch (IOException ioe) {
 41             log.error(sm.getString("standardContext.extensionValidationError"), ioe);
 42             dependencyCheck = false;
 43         }
 44
 45         if (!dependencyCheck) {
 46             ok = false;
 47         }
 48
 49         /** 7.注册NamingContextListener */
 50         String useNamingProperty = System.getProperty("catalina.useNaming");
 51         if ((useNamingProperty != null)
 52                 && (useNamingProperty.equals("false"))) {
 53             useNaming = false;
 54         }
 55
 56         if (ok && isUseNaming()) {
 57             if (getNamingContextListener() == null) {
 58                 NamingContextListener ncl = new NamingContextListener();
 59                 ncl.setName(getNamingContextName());
 60                 ncl.setExceptionOnFailedWrite(getJndiExceptionOnFailedWrite());
 61                 addLifecycleListener(ncl);
 62                 setNamingContextListener(ncl);
 63             }
 64         }
 65
 66         /** 8.绑定线程 */
 67         ClassLoader oldCCL = bindThread();
 68
 69         try {
 70             if (ok) {
 71                 /** 9.启动web应用类加载器*/
 72                 Loader loader = getLoader();
 73                 if (loader instanceof Lifecycle) {
 74                     ((Lifecycle) loader).start();
 75                 }
 76                 setClassLoaderProperty("clearReferencesRmiTargets",
 77                         getClearReferencesRmiTargets());
 78                 setClassLoaderProperty("clearReferencesStopThreads",
 79                         getClearReferencesStopThreads());
 80                 setClassLoaderProperty("clearReferencesStopTimerThreads",
 81                         getClearReferencesStopTimerThreads());
 82                 setClassLoaderProperty("clearReferencesHttpClientKeepAliveThread",
 83                         getClearReferencesHttpClientKeepAliveThread());
 84                 setClassLoaderProperty("clearReferencesObjectStreamClassCaches",
 85                         getClearReferencesObjectStreamClassCaches());
 86                 setClassLoaderProperty("clearReferencesObjectStreamClassCaches",
 87                         getClearReferencesObjectStreamClassCaches());
 88                 setClassLoaderProperty("clearReferencesThreadLocals",
 89                         getClearReferencesThreadLocals());
 90
 91                 unbindThread(oldCCL);
 92                 oldCCL = bindThread();
 93                 logger = null;
 94                 getLogger();
 95                 /** 10.启动安全组件Realm */
 96                 Realm realm = getRealmInternal();
 97                 if(null != realm) {
 98                     if (realm instanceof Lifecycle) {
 99                         ((Lifecycle) realm).start();
100                     }
101                     CredentialHandler safeHandler = new CredentialHandler() {
102                         @Override
103                         public boolean matches(String inputCredentials, String storedCredentials) {
104                             return getRealmInternal().getCredentialHandler().matches(inputCredentials, storedCredentials);
105                         }
106
107                         @Override
108                         public String mutate(String inputCredentials) {
109                             return getRealmInternal().getCredentialHandler().mutate(inputCredentials);
110                         }
111                     };
112                     context.setAttribute(Globals.CREDENTIAL_HANDLER, safeHandler);
113                 }
114
115                 /** 11.发布启动事件CONFIGURE_START_EVENT */
116                 fireLifecycleEvent(Lifecycle.CONFIGURE_START_EVENT, null);
117
118                 /** 12.查询子节点并启动,实际就是Wrapper,负责管理Servlet*/
119                 for (Container child : findChildren()) {
120                     if (!child.getState().isAvailable()) {
121                         child.start();
122                     }
123                 }
124
125                 /** 13.启动Context的pipeline */
126                 if (pipeline instanceof Lifecycle) {
127                     ((Lifecycle) pipeline).start();
128                 }
129
130                 /** 14.创建会话管理器 */
131                 Manager contextManager = null;
132                 Manager manager = getManager();
133                 if (manager == null) {
134                     if (log.isDebugEnabled()) {
135                         log.debug(sm.getString("standardContext.cluster.noManager",
136                                 Boolean.valueOf((getCluster() != null)),
137                                 Boolean.valueOf(distributable)));
138                     }
139                     if ((getCluster() != null) && distributable) {
140                         try {
141                             contextManager = getCluster().createManager(getName());
142                         } catch (Exception ex) {
143                             log.error(sm.getString("standardContext.cluster.managerError"), ex);
144                             ok = false;
145                         }
146                     } else {
147                         contextManager = new StandardManager();
148                     }
149                 }
150
151                 // Configure default manager if none was specified
152                 if (contextManager != null) {
153                     if (log.isDebugEnabled()) {
154                         log.debug(sm.getString("standardContext.manager",
155                                 contextManager.getClass().getName()));
156                     }
157                     setManager(contextManager);
158                 }
159
160                 if (manager!=null && (getCluster() != null) && distributable) {
161                     //let the cluster know that there is a context that is distributable
162                     //and that it has its own manager
163                     getCluster().registerManager(manager);
164                 }
165             }
166
167             if (!getConfigured()) {
168                 log.error(sm.getString("standardContext.configurationFail"));
169                 ok = false;
170             }
171
172             /** 15.将Context的web资源添加到ServletContext中 */
173             if (ok)
174                 getServletContext().setAttribute
175                         (Globals.RESOURCES_ATTR, getResources());
176
177             /** 16.创建实例管理器,负责创建Servlet、Filter等实例*/
178             if (ok ) {
179                 if (getInstanceManager() == null) {
180                     setInstanceManager(createInstanceManager());
181                 }
182                 getServletContext().setAttribute(
183                         InstanceManager.class.getName(), getInstanceManager());
184                 InstanceManagerBindings.bind(getLoader().getClassLoader(), getInstanceManager());
185             }
186
187             /** 17.将jar包扫描器添加到ServletContext中 */
188             if (ok) {
189                 getServletContext().setAttribute(
190                         JarScanner.class.getName(), getJarScanner());
191             }
192
193             // Set up the context init params
194             mergeParameters();
195
196             // Call ServletContainerInitializers
197             for (Map.Entry<ServletContainerInitializer, Set<Class<?>>> entry :
198                     initializers.entrySet()) {
199                 try {
200                     entry.getKey().onStartup(entry.getValue(),
201                             getServletContext());
202                 } catch (ServletException e) {
203                     log.error(sm.getString("standardContext.sciFail"), e);
204                     ok = false;
205                     break;
206                 }
207             }
208
209             /** 18.创建应用事件监听器ApplicationListener */
210             if (ok) {
211                 if (!listenerStart()) {
212                     log.error(sm.getString("standardContext.listenerFail"));
213                     ok = false;
214                 }
215             }
216
217             // Check constraints for uncovered HTTP methods
218             // Needs to be after SCIs and listeners as they may programmatically
219             // change constraints
220             if (ok) {
221                 checkConstraintsForUncoveredMethods(findConstraints());
222             }
223
224             try {
225                 /** 19.启动会话管理器 */
226                 Manager manager = getManager();
227                 if (manager instanceof Lifecycle) {
228                     ((Lifecycle) manager).start();
229                 }
230             } catch(Exception e) {
231                 log.error(sm.getString("standardContext.managerFail"), e);
232                 ok = false;
233             }
234
235             /** 20.初始化Filter,并执行Filter的init方法 */
236             if (ok) {
237                 if (!filterStart()) {
238                     log.error(sm.getString("standardContext.filterFail"));
239                     ok = false;
240                 }
241             }
242
243             /** 21. 加载并启动Servlet,并执行Servlet的init方法 */
244             if (ok) {
245                 if (!loadOnStartup(findChildren())){
246                     log.error(sm.getString("standardContext.servletFail"));
247                     ok = false;
248                 }
249             }
250
251             /** 22.启动后台定时线程 */
252             super.threadStart();
253         } finally {
254             // Unbinding thread
255             unbindThread(oldCCL);
256         }
257
258         // Set available status depending upon startup success
259         if (ok) {
260             if (log.isDebugEnabled())
261                 log.debug("Starting completed");
262         } else {
263             log.error(sm.getString("standardContext.startFailed", getName()));
264         }
265
266         startTime=System.currentTimeMillis();
267
268         // Send j2ee.state.running notification
269         if (ok && (this.getObjectName() != null)) {
270             Notification notification =
271                     new Notification("j2ee.state.running", this.getObjectName(),
272                             sequenceNumber.getAndIncrement());
273             broadcaster.sendNotification(notification);
274         }
275
276         /** 23.释放资源*/
277         getResources().gc();
278
279         // Reinitializing if something went wrong
280         if (!ok) {
281             setState(LifecycleState.FAILED);
282         } else {
283             setState(LifecycleState.STARTING);
284         }
285     }
3.1.4、Connector启动
Connector的startInternal方法实际就是调用了ProcotolHandler的start方法,而ProcotolHandler的start方法实际是调用了具体的Endpoint的start方法,以NioEndpoint为例,实际最终执行的是NioEndpoint的startInternal方法,源码如下:
 1 /** NioEndpoint startInternal方法*/
 2     public void startInternal() throws Exception {
 3         if (!running) {
 4             running = true;
 5             paused = false;
 6
 7             if (socketProperties.getProcessorCache() != 0) {
 8                 processorCache = new SynchronizedStack<>(SynchronizedStack.DEFAULT_SIZE,
 9                         socketProperties.getProcessorCache());
10             }
11             if (socketProperties.getEventCache() != 0) {
12                 eventCache = new SynchronizedStack<>(SynchronizedStack.DEFAULT_SIZE,
13                         socketProperties.getEventCache());
14             }
15             if (socketProperties.getBufferPool() != 0) {
16                 nioChannels = new SynchronizedStack<>(SynchronizedStack.DEFAULT_SIZE,
17                         socketProperties.getBufferPool());
18             }
19
20             /** 1.创建work线程 */
21             if (getExecutor() == null) {
22                 createExecutor();
23             }
24
25             /** 2.初始化连接限制,值为Connector的maxConnections配置 */
26             initializeConnectionLatch();
27
28             /** 3.创建并启动Poller线程,作用是传教启动Selector监听本地端口 */
29             poller = new Poller();
30             Thread pollerThread = new Thread(poller, getName() + "-ClientPoller");
31             pollerThread.setPriority(threadPriority);
32             pollerThread.setDaemon(true);
33             pollerThread.start();
34
35             /** 4.创建并启动Acceptor线程,作用是接收客户端连接请求 */
36             startAcceptorThread();
37         }
38     }
NioEndpoint中涉及到几个对象,LimitLatch表示连接限制器,用于控制连接数不会超过最大连接数,默认最大为10000,超过阈值会拒绝新的连接;Poller负责启动Selector轮训处理就绪的事件;Acceptor负责接收并处理客户端连接请求。
LimitLatch是通过AQS的共享资源方法来控制并发,而重点是Poller线程和Acceptor线程
Poller线程处理逻辑如下:
 1 public void run() {
 2         /** 死循环处理直到Tomcat关闭*/
 3         while (true) {
 4
 5             boolean hasEvents = false;
 6             try {
 7                 /** 如果没有关闭 */
 8                 if (!close) {
 9                     hasEvents = events();
10                     /** 1.1.如果被唤醒则立即执行select,不会阻塞线程 */
11                     if (wakeupCounter.getAndSet(-1) > 0) {
12                         keyCount = selector.selectNow();
13                     } else {
14                         /** 1.2.如果没有唤醒则超时执行select */
15                         keyCount = selector.select(selectorTimeout);
16                     }
17                     //重置wakeupCount
18                     wakeupCounter.set(0);
19                 }
20                 /** 如果已经关闭, 关闭Selector*/
21                 if (close) {
22                     events();
23                     timeout(0, false);
24                     try {
25                         selector.close();
26                     } catch (IOException ioe) {
27                         log.error(sm.getString("endpoint.nio.selectorCloseFail"), ioe);
28                     }
29                     break;
30                 }
31             } catch (Throwable x) {
32                 ExceptionUtils.handleThrowable(x);
33                 log.error(sm.getString("endpoint.nio.selectorLoopError"), x);
34                 continue;
35             }
36             // Either we timed out or we woke up, process events first
37             if (keyCount == 0) {
38                 hasEvents = (hasEvents | events());
39             }
40
41             Iterator<SelectionKey> iterator =
42                     keyCount > 0 ? selector.selectedKeys().iterator() : null;
43             /** 遍历处理器Selector监听到的事件 */
44             while (iterator != null && iterator.hasNext()) {
45                 SelectionKey sk = iterator.next();
46                 NioSocketWrapper socketWrapper = (NioSocketWrapper) sk.attachment();
47                 if (socketWrapper == null) {
48                     iterator.remove();
49                 } else {
50                     iterator.remove();
51                     /** 处理IO读写事件 */
52                     processKey(sk, socketWrapper);
53                 }
54             }
55
56             /** 处理超时事件 */
57             timeout(keyCount,hasEvents);
58         }
59
60         getStopLatch().countDown();
61     }
62
63     /** 是否有事件*/
64     public boolean events() {
65         boolean result = false;
66         PollerEvent pe = null;
67         for (int i = 0, size = events.size(); i < size && (pe = events.poll()) != null; i++ ) {
68             result = true;
69             try {
70                 /** 如果有PollerEvent事件,遍历执行事件线程 */
71                 pe.run();
72                 pe.reset();
73                 if (running && !paused && eventCache != null) {
74                     eventCache.push(pe);
75                 }
76             } catch ( Throwable x ) {
77                 log.error(sm.getString("endpoint.nio.pollerEventError"), x);
78             }
79         }
80         return result;
81     }
Poller线程就是通过Selector监听IO事件,如果有IO事件就直接处理IO事件,并且还会处理PollerEvent事件
Acceptor线程处理逻辑如下:
 1 public void run() {
 2
 3         int errorDelay = 0;
 4         /** 死循环处理直到Tomcat关闭 */
 5         while (endpoint.isRunning()) {
 6
 7             /** 暂停Endpoint*/
 8             while (endpoint.isPaused() && endpoint.isRunning()) {
 9                 state = AcceptorState.PAUSED;
10                 try {
11                     Thread.sleep(50);
12                 } catch (InterruptedException e) {
13                     // Ignore
14                 }
15             }
16
17             if (!endpoint.isRunning()) {
18                 break;
19             }
20             state = AcceptorState.RUNNING;
21
22             try {
23                 /** 1.检验连接数是否达到最大连接数,相当于提前获取一个连接数的票据 */
24                 endpoint.countUpOrAwaitConnection();
25                 if (endpoint.isPaused()) {
26                     continue;
27                 }
28
29                 U socket = null;
30                 try {
31                     /** 2.调用ServerSocket的accept方法接收客户端连接请求并创建客户端Socket */
32                     socket = endpoint.serverSocketAccept();
33                 } catch (Exception ioe) {
34                     endpoint.countDownConnection();
35                     if (endpoint.isRunning()) {
36                         // Introduce delay if necessary
37                         errorDelay = handleExceptionWithDelay(errorDelay);
38                         // re-throw
39                         throw ioe;
40                     } else {
41                         break;
42                     }
43                 }
44                 errorDelay = 0;
45                 if (endpoint.isRunning() && !endpoint.isPaused()) {
46                     /** 3.处理成功连接的socket*/
47                     if (!endpoint.setSocketOptions(socket)) {
48                         endpoint.closeSocket(socket);
49                     }
50                 } else {
51                     endpoint.destroySocket(socket);
52                 }
53             } catch (Throwable t) {
54                 ExceptionUtils.handleThrowable(t);
55                 String msg = sm.getString("endpoint.accept.fail");
56                 if (t instanceof Error) {
57                     Error e = (Error) t;
58                     if (e.getError() == 233) {
59                         log.warn(msg, t);
60                     } else {
61                         log.error(msg, t);
62                     }
63                 } else {
64                     log.error(msg, t);
65                 }
66             }
67         }
68         state = AcceptorState.ENDED;
69     }
主要逻辑就是先校验最大连接数,然后通过ServerSocket的accept接收客户端连接请求并初始化客户端Socket,然后调用Endpoint的setSocketOptions方法设置客户端socket,熟悉NIO的童鞋应该可以猜到该方法的逻辑就是要注册socket的事件了。
NioEndpoint的setSocketOptions方法源码如下:
/** 配置客户端Socket */
    protected boolean setSocketOptions(SocketChannel socket) {
        NioChannel channel = null;
        boolean success = false;
        try {
            /** 1.设置非阻塞 */
            socket.configureBlocking(false);
            Socket sock = socket.socket();
            socketProperties.setProperties(sock);

            /** 2.获取或创建客户端Channel*/
            if (nioChannels != null) {
                channel = nioChannels.pop();
            }
            if (channel == null) {
                SocketBufferHandler bufhandler = new SocketBufferHandler(
                        socketProperties.getAppReadBufSize(),
                        socketProperties.getAppWriteBufSize(),
                        socketProperties.getDirectBuffer());
                if (isSSLEnabled()) {
                    channel = new SecureNioChannel(bufhandler, selectorPool, this);
                } else {
                    channel = new NioChannel(bufhandler);
                }
            }
            /** 3.包装客户端Socket */
            NioSocketWrapper socketWrapper = new NioSocketWrapper(channel, this);
            /** 4.存储当前channel到Map中*/
            connections.put(channel, socketWrapper);
            /** 5.重置channel信息 */
            channel.reset(socket, socketWrapper);
            socketWrapper.setReadTimeout(getConnectionTimeout());
            socketWrapper.setWriteTimeout(getConnectionTimeout());
            socketWrapper.setKeepAliveLeft(NioEndpoint.this.getMaxKeepAliveRequests());
            socketWrapper.setSecure(isSSLEnabled());
            /** 6.将客户端channel注册到Selector中*/
            poller.register(channel, socketWrapper);
            success = true;
        } catch (Throwable t) {
            ExceptionUtils.handleThrowable(t);
            try {
                log.error(sm.getString("endpoint.socketOptionsError"), t);
            } catch (Throwable tt) {
                ExceptionUtils.handleThrowable(tt);
            }
        } finally {
            if (!success && channel != null) {
                connections.remove(channel);
                channel.free();
            }
        }
        return success;
    }
主要逻辑就是配置客户端的Socket并和channel绑定,然后将channel注册到选择器Selector上,Poller类的注册逻辑如下:
 1 /** 注册客户端Channel到Selector进行监听 */
 2     public void register(final NioChannel socket, final NioSocketWrapper socketWrapper) {
 3         /** 1.注册监听OP_READ读事件*/
 4         socketWrapper.interestOps(SelectionKey.OP_READ);
 5         PollerEvent r = null;
 6         /** 2.从缓存中获取PollerEvent事件*/
 7         if (eventCache != null) {
 8             r = eventCache.pop();
 9         }
10         /** 3.如果缓存中没有就创建PollerEvent事件*/
11         if (r == null) {
12             r = new PollerEvent(socket, OP_REGISTER);
13         } else {
14             r.reset(socket, OP_REGISTER);
15         }
16         /** 4.添加事件*/
17         addEvent(r);
18     }
这里会将注册行为封装成PollerEvent事件,该事件是可执行任务实现了Runnable接口,然后将事件添加到Poller的事件队列中交给Poller的线程执行。而PollerEvent的run方法执行逻辑如下:
/** PollerEvent 执行逻辑 */
    public void run() {
        /** 1.如果感兴趣事件为注册事件*/
        if (interestOps == OP_REGISTER) {
            try {
                /** 2.注册读事件到Selector中*/
                socket.getIOChannel().register(socket.getSocketWrapper().getPoller().getSelector(), SelectionKey.OP_READ, socket.getSocketWrapper());
            } catch (Exception x) {
                log.error(sm.getString("endpoint.nio.registerFail"), x);
            }
        } else {
            /** 2.如果不是注册事件,则取消事件监听*/
            final SelectionKey key = socket.getIOChannel().keyFor(socket.getSocketWrapper().getPoller().getSelector());
            try {
                if (key == null) {
                    try {
                        socket.socketWrapper.close();
                    } catch (Exception ignore) {
                    }
                } else {
                    final NioSocketWrapper socketWrapper = (NioSocketWrapper) key.attachment();
                    if (socketWrapper != null) {
                        // We are registering the key to start with, reset the fairness counter.
                        int ops = key.interestOps() | interestOps;
                        socketWrapper.interestOps(ops);
                        key.interestOps(ops);
                    } else {
                        socket.getSocketWrapper().getPoller().cancelledKey(key, socket.getSocketWrapper());
                    }
                }
            } catch (CancelledKeyException ckx) {
                try {
                    socket.getSocketWrapper().getPoller().cancelledKey(key, socket.getSocketWrapper());
                } catch (Exception ignore) {}
            }
        }
    }
真正的执行了channel注册到Selector的逻辑,监听事件为OR_READ读事件
总结:
1、Connector启动执行了startInternal方法,调用了ProcotolHandler实例的start方法;
2、ProtocolHandler的start方法,调用了AbstractEndpoint的start方法,AbstractEndpoint执行bindWithCleanup方法,实际调用实现类的bind方法;
3、NioEndpoint的bind方法初始化服务器ServerSocket和Selector;然后执行NioEndpoint的startInternal方法
4、NioEndpoint的startInternal初始化最大连接数,初始化Poller线程和Acceptor线程
5、Poller线程负责死循环处理Selector监听到的Channel中的事件并处理,同时还需要处理客户端Channel的注册到Selector的逻辑
6、Acceptor线程负责接收客户端连接请求,初始化客户端Socket和Channel,并封装成注册事件PollerEvent交给Poller线程处理
7、PollerEvent运行逻辑是将客户端channel和ON_READ读事件注册到Poller监听的Selector上
所以Connector启动相当于服务器绑定指定端口监听客户端连接事件并初始化Selector,然后将客户端连接和读事件注册到Selector上监听,然后就一直通过Selector监听客户端Channel的可读事件即可处理客户端的请求了。
3.2、Tomcat处理请求原理
客户端连接服务器之后,服务器Selector会一直监听客户端Channel的ON_READ事件,读取客户端请求。读取到请求之后执行processKey方法处理,如果OperationState存在就交给OperationState的process方法来处理,实际是由子类处理,如NioOperationState。
run方法执行逻辑如下:
 1 public void run() {
 2         long nBytes = 0;
 3         if (getError() == null) {
 4             try {
 5                 synchronized (this) {
 6                     if (read) {
 7                         /** 1.处理读事件 */
 8                         if (!socketBufferHandler.isReadBufferEmpty()) {
 9                             socketBufferHandler.configureReadBufferForRead();
10                             /** 1.1.从缓冲区读取数据*/
11                             for (int i = 0; i < length && !socketBufferHandler.isReadBufferEmpty(); i++) {
12                                 nBytes += transfer(socketBufferHandler.getReadBuffer(), buffers[offset + i]);
13                             }
14                         }
15                         if (nBytes == 0) {
16                             /** 1.2.执行read方法处理数据 */
17                             nBytes = getSocket().read(buffers, offset, length);
18                             updateLastRead();
19                         }
20                     } else {
21                         /** 2.处理写事件 */
22                         boolean doWrite = true;
23                         if (!socketBufferHandler.isWriteBufferEmpty()) {
24                             socketBufferHandler.configureWriteBufferForRead();
25                             do {
26                                 /** 2.2.执行write方法写数据*/
27                                 nBytes = getSocket().write(socketBufferHandler.getWriteBuffer());
28                             } while (!socketBufferHandler.isWriteBufferEmpty() && nBytes > 0);
29                             if (!socketBufferHandler.isWriteBufferEmpty()) {
30                                 doWrite = false;
31                             }
32                             // Preserve a negative value since it is an error
33                             if (nBytes > 0) {
34                                 nBytes = 0;
35                             }
36                         }
37                         if (doWrite) {
38                             nBytes = getSocket().write(buffers, offset, length);
39                             updateLastWrite();
40                         }
41                     }
42                     if (nBytes != 0) {
43                         completionDone = false;
44                     }
45                 }
46             } catch (IOException e) {
47                 setError(e);
48             }
49         }
50         if (nBytes > 0) {
51             // The bytes processed are only updated in the completion handler
52             completion.completed(Long.valueOf(nBytes), this);
53         } else if (nBytes < 0 || getError() != null) {
54             IOException error = getError();
55             if (error == null) {
56                 error = new EOFException();
57             }
58             completion.failed(error, this);
59         } else {
60             // As soon as the operation uses the poller, it is no longer inline
61             inline = false;
62             if (read) {
63                 registerReadInterest();
64             } else {
65                 registerWriteInterest();
66             }
67         }
68     }
如果OperationState不存在,就执行processSocket方法处理,源码如下:
 1 public boolean processSocket(SocketWrapperBase<S> socketWrapper,
 2                                  SocketEvent event, boolean dispatch) {
 3         try {
 4             if (socketWrapper == null) {
 5                 return false;
 6             }
 7             SocketProcessorBase<S> sc = null;
 8             /** 1.从缓存中获取SocketProcessorBase对象*/
 9             if (processorCache != null) {
10                 sc = processorCache.pop();
11             }
12             /**
13              * 2.缓存不存在就新建;缓存中存在就重置
14              * */
15             if (sc == null) {
16                 sc = createSocketProcessor(socketWrapper, event);
17             } else {
18                 sc.reset(socketWrapper, event);
19             }
20             /** 3.如果有线程池就将SocketProcessorBase任务交给线程池;
21              *    如果没有线程池就执行运行SocketProcessorBase*/
22             Executor executor = getExecutor();
23             if (dispatch && executor != null) {
24                 executor.execute(sc);
25             } else {
26                 sc.run();
27             }
28         } catch (Throwable t) {
29         }
30         return true;
31     }
这里会将请求交给SocketProcessorBase来处理,而SocketProcessorBase最终会执行子类的doRun方法处理,如NioEndPoint的内部类SocketProcessor,处理逻辑如下:
 1 protected void doRun() {
 2         /** 1.客户端Socket Channel*/
 3         NioChannel socket = socketWrapper.getSocket();
 4         /** 2.客户端的事件SelectKey*/
 5         SelectionKey key = socket.getIOChannel().keyFor(socket.getSocketWrapper().getPoller().getSelector());
 6         Poller poller = NioEndpoint.this.poller;
 7         if (poller == null) {
 8             socketWrapper.close();
 9             return;
10         }
11
12         try {
13             /** 3.客户端握手状态 */
14             int handshake = -1;
15             try {
16                 if (key != null) {
17                     if (socket.isHandshakeComplete()) {
18                         handshake = 0;
19                     } else if (event == SocketEvent.STOP || event == SocketEvent.DISCONNECT ||
20                             event == SocketEvent.ERROR) {
21                         handshake = -1;
22                     } else {
23                         /** 4.如果当前没有握手,则先处理客户端握手操作*/
24                         handshake = socket.handshake(key.isReadable(), key.isWritable());
25                         event = SocketEvent.OPEN_READ;
26                     }
27                 }
28             } catch (IOException x) {
29                 handshake = -1;
30                 if (log.isDebugEnabled()) log.debug("Error during SSL handshake",x);
31             } catch (CancelledKeyException ckx) {
32                 handshake = -1;
33             }
34             /** 5.根据握手状态处理请求 */
35             if (handshake == 0) {
36                 //5.1.握手成功处理请求
37                 SocketState state = SocketState.OPEN;
38                 //处理事件
39                 if (event == null) {
40                     state = getHandler().process(socketWrapper, SocketEvent.OPEN_READ);
41                 } else {
42                     state = getHandler().process(socketWrapper, event);
43                 }
44                 if (state == SocketState.CLOSED) {
45                     poller.cancelledKey(key, socketWrapper);
46                 }
47             } else if (handshake == -1 ) {
48                 //5.2.握手失败取消请求
49                 getHandler().process(socketWrapper, SocketEvent.CONNECT_FAIL);
50                 poller.cancelledKey(key, socketWrapper);
51             } else if (handshake == SelectionKey.OP_READ){
52                 //5.3.读就绪注册读事件
53                 socketWrapper.registerReadInterest();
54             } else if (handshake == SelectionKey.OP_WRITE){
55                 //5.4.写就绪注册写事件
56                 socketWrapper.registerWriteInterest();
57             }
58         } catch (CancelledKeyException cx) {
59             poller.cancelledKey(key, socketWrapper);
60         } catch (VirtualMachineError vme) {
61             ExceptionUtils.handleThrowable(vme);
62         } catch (Throwable t) {
63             log.error(sm.getString("endpoint.processing.fail"), t);
64             poller.cancelledKey(key, socketWrapper);
65         } finally {
66             socketWrapper = null;
67             event = null;
68             //return to cache
69             if (running && !paused && processorCache != null) {
70                 processorCache.push(this);
71             }
72         }
73     }
这里主要是根据客户端的握手状态判断是否要处理请求,如果没有握手就先握手,如果握手失败就取消请求,如果握手成功就处理请求。处理请求的逻辑交给了Handler来处理,实现是ConnectionHandler,处理逻辑是process方法,方法逻辑比较长,核心逻辑如下:
/** ConnectionHandler处理客户端请求 */
    public SocketState process(SocketWrapperBase<S> wrapper, SocketEvent status) {
        S socket = wrapper.getSocket();
        /** 1.获取封装socket的处理器,如HTTP/1.1对应的就是Http11Processor */
        Processor processor = (Processor) wrapper.getCurrentProcessor();

        /** 2.标记主线程*/
        ContainerThreadMarker.set();

        try {
            /** 3.如果处理器不存在,那么就根据当前请求的协议来初始化处理器*/
            if (processor == null) {
                String negotiatedProtocol = wrapper.getNegotiatedProtocol();
                if (negotiatedProtocol != null && negotiatedProtocol.length() > 0) {
                    UpgradeProtocol upgradeProtocol =
                            getProtocol().getNegotiatedProtocol(negotiatedProtocol);
                    if (upgradeProtocol != null) {
                        processor = upgradeProtocol.getProcessor(
                                wrapper, getProtocol().getAdapter());
                    } else if (negotiatedProtocol.equals("http/1.1")) {
                    } else {
                        return SocketState.CLOSED;
                    }
                }
            }
            /** 4.从缓存队列中获取Processor,如果获取不到就通过createProcessor创建*/
            if (processor == null) {
                processor = recycledProcessors.pop();
            }
            if (processor == null) {
                processor = getProtocol().createProcessor();
                register(processor);
            }
            processor.setSslSupport(wrapper.getSslSupport(getProtocol().getClientCertProvider()));
            /** 5.将socket和处理器关联*/
            wrapper.setCurrentProcessor(processor);
            SocketState state = SocketState.CLOSED;
            do {
                /** 6.执行处理器的process方法处理请求 */
                state = processor.process(wrapper, status);
                if (state == SocketState.UPGRADING) {
                    // HTTP协议升级处理
                }
            } while ( state == SocketState.UPGRADING);

            /** 7.根据执行结果后置处理*/
            if (state == SocketState.LONG) {
                longPoll(wrapper, processor);
                if (processor.isAsync()) {
                    getProtocol().addWaitingProcessor(processor);
                }
            } else if (state == SocketState.OPEN) {
                wrapper.setCurrentProcessor(null);
                release(processor);
                wrapper.registerReadInterest();
            } else if (state == SocketState.SENDFILE) {
            } else if (state == SocketState.UPGRADED) {
                if (status != SocketEvent.OPEN_WRITE) {
                    longPoll(wrapper, processor);
                    getProtocol().addWaitingProcessor(processor);
                }
            } else if (state == SocketState.SUSPENDED) {
                //......
            } else {
                //连接关闭,释放processor
                wrapper.setCurrentProcessor(null);
                //......
                release(processor);
            }
            return state;
        } catch (ProtocolException e) {
        }
        /** 释放processor */
        wrapper.setCurrentProcessor(null);
        release(processor);
        return SocketState.CLOSED;
    }
核心逻辑是获取请求对应协议的处理器,如果HTTP1.1协议处理器是Http11Processor,然后调用处理器的process方法真正的处理请求,以Http11Processor为例,首先先执行父类AbstractProcessor的process方法,然后调用了Adapter的asyncDispatch方法。
最终执行了connector.getService().getContainer().getPipeline().getFirst().invoke(request, response)方法。这里涉及到Tomcat的责任链模式,每一层容器都有一个pipeline,每一个pipeline都包含了Valve,具体执行交给具体的Valve执行。
首先是connector.getService().getContainer()方法返回Engine对象,执行invoke方法实际就是执行了StandardEngineValve的invoke方法,该方法继续调用StandardHostValve的invoke方法,然后执行StandardContextValve的invoke方法,最后执行了
StandardWrapperValve的invoke方法,wrapper是Tomcat容器的最小容器,所以这里就需要处理具体的逻辑了, 核心处理逻辑如下:
 1 public final void invoke(Request request, Response response)
 2             throws IOException, ServletException {
 3
 4         boolean unavailable = false;
 5         StandardWrapper wrapper = (StandardWrapper) getContainer();
 6         Servlet servlet = null;
 7         Context context = (Context) wrapper.getParent();
 8
 9         try {
10             /** 1.初始化Servlet */
11             if (!unavailable) {
12                 servlet = wrapper.allocate();
13             }
14         } catch (UnavailableException e) {
15             //异常处理
16         } catch (ServletException e) {
17         } catch (Throwable e) {
18         }
19
20         MessageBytes requestPathMB = request.getRequestPathMB();
21         DispatcherType dispatcherType = DispatcherType.REQUEST;
22         if (request.getDispatcherType()==DispatcherType.ASYNC) dispatcherType = DispatcherType.ASYNC;
23         request.setAttribute(Globals.DISPATCHER_TYPE_ATTR,dispatcherType);
24         request.setAttribute(Globals.DISPATCHER_REQUEST_PATH_ATTR,
25                 requestPathMB);
26         /** 2.创建过滤器链路 */
27         ApplicationFilterChain filterChain = ApplicationFilterFactory.createFilterChain(request, wrapper, servlet);
28         Container container = this.container;
29         try {
30             if ((servlet != null) && (filterChain != null)) {
31                 if (context.getSwallowOutput()) {
32                     try {
33                         if (request.isAsyncDispatching()) {
34                             request.getAsyncContextInternal().doInternalDispatch();
35                         } else {
36                             /** 3.执行过滤器链 */
37                             filterChain.doFilter(request.getRequest(), response.getResponse());
38                         }
39                     } finally {
40                     }
41                 } else {
42                     if (request.isAsyncDispatching()) {
43                         request.getAsyncContextInternal().doInternalDispatch();
44                     } else {
45                         filterChain.doFilter(request.getRequest(), response.getResponse());
46                     }
47                 }
48
49             }
50         } catch (ClientAbortException | CloseNowException e) {
51             //异常处理
52         } catch (IOException e) {
53         } catch (UnavailableException e) {
54         } catch (ServletException e) {
55         } catch (Throwable e) {
56         } finally {
57             //释放资源
58         }
59     }
核心逻辑分别是执行wrapper.allocation初始化Servlet,然后调用ApplicationFilterChain的doFilter方法执行过滤器链,初始化Servlet方法会创建Servlet对象并执行Servlet的init方法,而执行过滤器链方法如下:
public void doFilter(ServletRequest request, ServletResponse response)
            throws IOException, ServletException {

        if( Globals.IS_SECURITY_ENABLED ) {
            final ServletRequest req = request;
            final ServletResponse res = response;
            try {
                java.security.AccessController.doPrivileged(
                        new java.security.PrivilegedExceptionAction<Void>() {
                            @Override
                            public Void run() throws ServletException, IOException {
                                internalDoFilter(req,res);
                                return null;
                            }
                        }
                );
            } catch( PrivilegedActionException pe) {
            }
        } else {
            internalDoFilter(request,response);
        }
    }

    private void internalDoFilter(ServletRequest request,
                                  ServletResponse response)
            throws IOException, ServletException {

        if (pos < n) {
            ApplicationFilterConfig filterConfig = filters[pos++];
            try {
                Filter filter = filterConfig.getFilter();

                if (request.isAsyncSupported() && "false".equalsIgnoreCase(
                        filterConfig.getFilterDef().getAsyncSupported())) {
                    request.setAttribute(Globals.ASYNC_SUPPORTED_ATTR, Boolean.FALSE);
                }
                if( Globals.IS_SECURITY_ENABLED ) {
                    final ServletRequest req = request;
                    final ServletResponse res = response;
                    Principal principal =
                            ((HttpServletRequest) req).getUserPrincipal();

                    Object[] args = new Object[]{req, res, this};
                    SecurityUtil.doAsPrivilege ("doFilter", filter, classType, args, principal);
                } else {
                    /** 1.依次执行所有Filter的doFilter方法 */
                    filter.doFilter(request, response, this);
                }
            } catch (IOException | ServletException | RuntimeException e) {
                throw e;
            }
            return;
        }
        try {

            if (request.isAsyncSupported() && !servletSupportsAsync) {
                request.setAttribute(Globals.ASYNC_SUPPORTED_ATTR, Boolean.FALSE);
            }
            if ((request instanceof HttpServletRequest) &&
                    (response instanceof HttpServletResponse) &&
                    Globals.IS_SECURITY_ENABLED ) {
                final ServletRequest req = request;
                final ServletResponse res = response;
                Principal principal =
                        ((HttpServletRequest) req).getUserPrincipal();
                Object[] args = new Object[]{req, res};
                /** 2.执行servlet的service方法*/
                SecurityUtil.doAsPrivilege("service",servlet, classTypeUsedInService, args,principal);
            } else {
                /** 2.执行servlet的service方法*/
                servlet.service(request, response);
            }
        } catch (IOException | ServletException | RuntimeException e) {
            throw e;
        } catch (Throwable e) {
        } finally {
        }
    }
ApplicationFilterChain的doFilter实际就依次执行了所有的Filter的doFilter方法,然后执行了Servlet的service方法,而Servlet的service实际就是用于处理具体的业务逻辑的。
四、Tomcat进阶
4.1、Tomcat配置优化
1、JVM配置优化
Tomcat本质是一个JVM进程,所以可以通过优化JVM配置参数来对Tomcat进行性能优化,可以参考JVM配置调优的方式优化,本文不再赘述。
2、Connector配置优化
Connector配置比较多,可以从多个参数来进行优化
maxThreads:最大线程数
acceptCount:接收等待请求数
maxConnections:最大连接数
executor:线程池
3、IO配置优化
Tomcat提高了BIO、NIO和APR三种IO通信模式,Tomcat7默认是BIO,但是Tomcat8默认是NIO,NIO的通信效率要远远大于BIO的通信效率。APR默认需要系统中安装了APR才可以支持,但是效率最高。
4.2、Tomcat异步处理
Tomcat处理请求默认是同步处理,每个请求都需要一个Tomcat线程去处理,而Tomcat线程数是有限的,当大量并发请求过来时,线程数超过Tomcat最大线程数,那么多余的请求就会处于等待状态。而异步Servlet的处理就是接收请求的是Tomcat线程,但是处理业务的多是应用线程,可以采用线程池。这样Tomcat线程只需要接收请求即可,而不需要处理业务逻辑,这样就大大提高了Tomcat的整体吞吐量。但是客户端单次请求的耗时并不会减少,反而可能会增加,因为多了线程上下文切换的消耗。
测试案例如下:
@WebServlet(name = "asyncServlet", urlPatterns = "/async", asyncSupported=true)
public class AsyncServlet extends HttpServlet {

    ExecutorService executorService = Executors.newFixedThreadPool(20);
    @Override
    public void doGet(HttpServletRequest req, HttpServletResponse res){
        try {
            final AsyncContext context = req.startAsync();
            executorService.execute(new Runnable() {
                @Override
                public void run() {
                    try {
                        Thread.sleep(1000L);
                        context.getResponse().getWriter().println("异步处理成功");
                        context.complete();
                    } catch (Exception e) {
                        e.printStackTrace();
                    }
                }
            });
        }catch (Exception e){
            e.printStackTrace();
        }
    }
}
异步Servlet需要注解@WebServlet配置asyncSupported=true,处理业务时首先调用HttpServletRequest的startAsync()开启异步处理,然后将业务逻辑交给线程池,在线程池的线程中处理业务返回结果,然后调用异步上下文AsyncContext的complete()完成异步处理。
所以异步Servlet的处理核心就在HttpServletRequest的startAsync方法和AsyncContext的complete方法。
startAsync方法是获取一个异步上下文AsyncContext对象,代码如下:
 1  /** 开启异步,获取异步上下文*/
 2     public AsyncContext startAsync(ServletRequest request, ServletResponse response) {
 3         /** 1.判断是否支持异步*/
 4         if (!isAsyncSupported()) {
 5             IllegalStateException ise =
 6                     new IllegalStateException(sm.getString("request.asyncNotSupported"));
 7             log.warn(sm.getString("coyoteRequest.noAsync",
 8                     StringUtils.join(getNonAsyncClassNames())), ise);
 9             throw ise;
10         }
11         /** 2.创建异步上下文对象 */
12         if (asyncContext == null) {
13             asyncContext = new AsyncContextImpl(this);
14         }
15         /** 3.上下文属性设置 */
16         asyncContext.setStarted(getContext(), request, response, request==getRequest() && response==getResponse().getResponse());
17         asyncContext.setTimeout(getConnector().getAsyncTimeout());
18         return asyncContext;
19     }
当处理完业务逻辑后,执行complete方法完成操作,和同步请求的处理逻辑类似。
4.3、如何设计一个Tomcat?
设计一个Tomcat首先需要梳理完成一个Tomcat需要哪些组件,核心组件如下:
1、连接器:监听端口,接收客户端连接和请求;
2、编解码器:将客户端请求根据不同的协议进行编解码;
3、业务处理器:用于处理客户端请求,返回处理结果
4、路径映射:将接口路径和业务处理器进行绑定映射;
5、请求转发:根据请求路径将客户端分配给指定业务处理方法;
整体设计图如下:
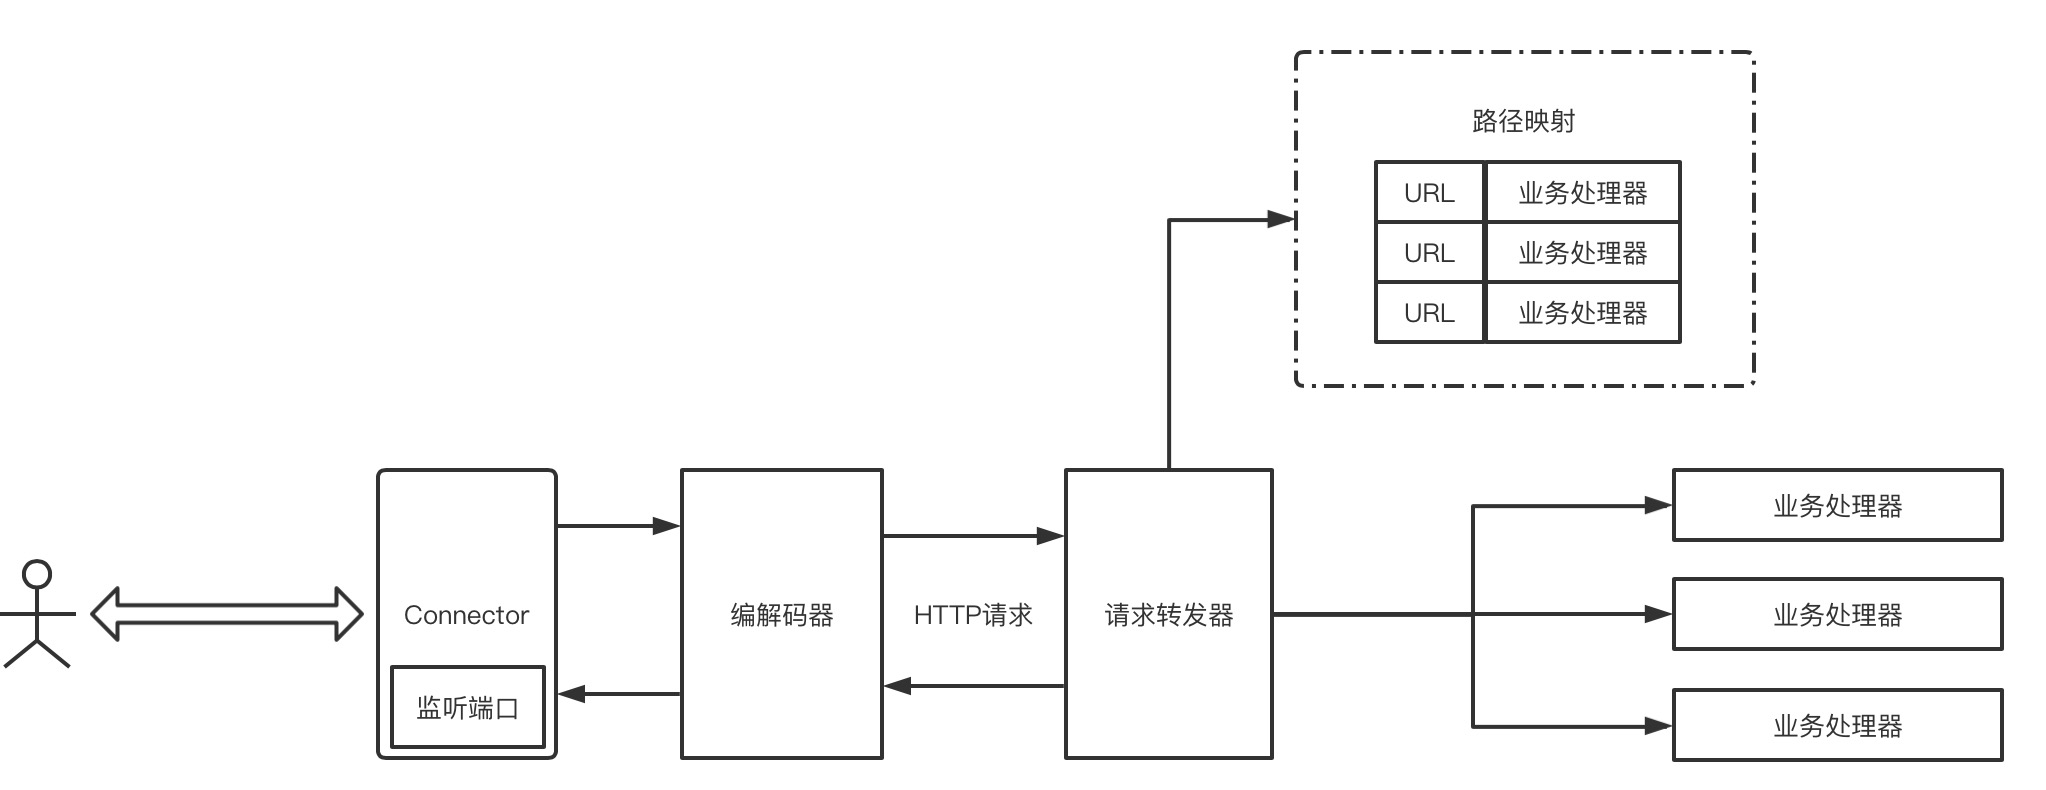
连接器Connector负责监听本地端口,接收客户端请求,将客户端发送来的请求通过编解码器按指定通信协议解析,如将HTTP协议的请求解析成HTTP请求交给请求转发器,请求转发器根据路径映射关系,将请求分配给指
定的业务处理器进行处理同时返回处理结果。
Netty作为目前最热门的NIO通信框架,就可以作为Tomcat服务器的基本框架来实现Tomcat的功能。
首先Netty服务器开启boss线程池监听客户端连接请求,然后将客户端业务请求交给work线程池处理,同时Netty封装了多种通信协议编解码的封装,而业务处理器可以用Servlet或SpringMVC,剩下只剩下请求转发器和路径
映射需要自行实现即可。
基于Netty实现简易Tomcat源码如下:
public class TomcatServer {

    /** 路径映射关系 */
    static Map<String, UrlMapping> controllerMap = new HashMap<>();

    /** 业务处理线程池 */
    static ExecutorService executorService = Executors.newFixedThreadPool(50);

    public static void main(String[] args) throws InterruptedException {
        /** 1.启动Spring容器 */
        ApplicationContext context = new ClassPathXmlApplicationContext("application.xml");
        /** 2.解析Controller路径映射关系 */
        parseMapping(context);
        /** 3.启动Netty */
        startServer(8000);
    }

    /** 解析Spring容器中Controller的接口方法*/
    private static void parseMapping(ApplicationContext context){
        /** 1.遍历所有被@Controller注解修饰的bean*/
        for(String beanName:context.getBeanNamesForAnnotation(Controller.class)){
            Object bean = context.getBean(beanName);
            RestController controller = bean.getClass().getAnnotation(RestController.class);
            String basePath = controller.value();
            Method[] methods = bean.getClass().getMethods();
            for(Method method : methods){
                /** 2.遍历Controller中所有被@RequestMapping注解修饰的方法 */
                RequestMapping requestMapping = null;
                if((requestMapping=method.getAnnotation(RequestMapping.class))!=null){
                    String methodPath = requestMapping.value()[0];
                    UrlMapping urlMapping = new UrlMapping();
                    urlMapping.setController(bean);
                    urlMapping.setMethod(method);
                    urlMapping.setUrl(basePath + "/" + methodPath);
                    /** 3.缓存URL和方法的映射关系 */
                    controllerMap.put(urlMapping.getUrl(), urlMapping);
                }
            }
        }
    }

    private static void startServer(int port) throws InterruptedException {
        /** 初始化服务器引导对象*/
        ServerBootstrap bootstrap = new ServerBootstrap();
        int processorsCount = Runtime.getRuntime().availableProcessors();
        /** 初始化boss线程池,线程数为2*/
        NioEventLoopGroup bossGroup = new NioEventLoopGroup(2);
        /** 初始化worker线程池,线程数为CPU核数两倍*/
        NioEventLoopGroup workGroup = new NioEventLoopGroup(processorsCount * 2);
        /** 设置boss线程池和work线程池 */
        bootstrap.group(bossGroup, workGroup);
        /** 设置boss线程池在的Channel实现类类型 */
        bootstrap.channel(NioServerSocketChannel.class);
        /** 设置ServerChannel的配置*/
        bootstrap.option(ChannelOption.SO_BACKLOG, 1024);
        /** 主线程ServerChannel添加ChannelHandler */
        bootstrap.handler(new LoggingHandler());

        /** 初始化客户端Channel的ChannelPipeline和ChannelHandler */
        bootstrap.childHandler(new ChannelInitializer<SocketChannel>() {
            @Override
            protected void initChannel(SocketChannel socketChannel) throws Exception {
                /** 创建ChannelPipeline对象 */
                ChannelPipeline pipeline = socketChannel.pipeline();

                /** channelPipeline添加HTTP编解码相关handler*/
                pipeline.addLast(new HttpServerCodec());
                pipeline.addLast(new ChunkedWriteHandler());
                pipeline.addLast(new HttpObjectAggregator(64 * 1024));
                /** 自定义业务请求处理器*/
                pipeline.addLast(new TomcatHttpHandler());
            }
        });

        /** 绑定端口号 */
        bootstrap.bind(port).sync();
    }

    /** HTTP请求处理器 */
    static class TomcatHttpHandler extends ChannelInboundHandlerAdapter{
        @Override
        public void channelRead(ChannelHandlerContext ctx, Object msg) throws Exception {
            if(msg instanceof FullHttpRequest){
                /** 根据请求路径找到对应的映射关系 */
                FullHttpRequest request = (FullHttpRequest)msg;
                QueryStringDecoder decoder = new QueryStringDecoder(request.uri());
                Map<String, Object> params = new HashMap<>();
                decoder.parameters().entrySet().forEach((v)->{
                    params.put(v.getKey(), v.getValue().get(0));
                });
                String url = request.uri().replaceFirst("/","");
                String path = url.substring(0, url.indexOf("?"));

                UrlMapping mapping = controllerMap.get(path);
                if(mapping != null){
                    executorService.execute(new Runnable() {
                        @Override
                        public void run() {
                            try {
                                /** 反射调用映射的Controller的指定方法 */
                                Object result = mapping.getMethod().invoke(mapping.getController(), params.values().toArray());
                                FullHttpResponse response = new DefaultFullHttpResponse(HttpVersion.HTTP_1_1, HttpResponseStatus.NOT_FOUND);
                                response.headers().set("Content-Type", "application/json");
                                response.content().writeBytes(JSON.toJSONString(result).getBytes());
                                /** 返回处理结果*/
                                ctx.writeAndFlush(response);
                            } catch (IllegalAccessException e) {
                                e.printStackTrace();
                            } catch (InvocationTargetException e) {
                                e.printStackTrace();
                            }
                        }
                    });
                }
            }else {
                FullHttpResponse response = new DefaultFullHttpResponse(HttpVersion.HTTP_1_1, HttpResponseStatus.NOT_FOUND);
                response.headers().set("Content-Type", "text/html;");
                ctx.writeAndFlush(response);
            }
        }
    }
}
接口路径映射关系实体类
public class UrlMapping {

    /** 路径*/
    private String url;

    /** controller*/
    private Object controller;

    /** 方法*/
    private Method method;

    public String getUrl() {
        return url;
    }

    public void setUrl(String url) {
        this.url = url;
    }

    public Object getController() {
        return controller;
    }

    public void setController(Object controller) {
        this.controller = controller;
    }

    public Method getMethod() {
        return method;
    }

    public void setMethod(Method method) {
        this.method = method;
    }
}
业务层Controller
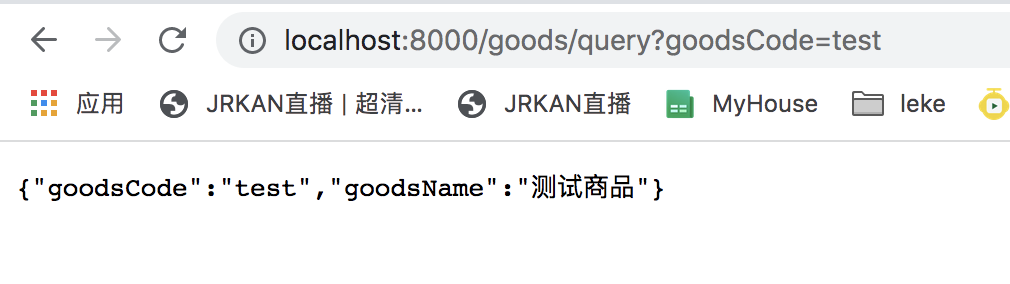
 1 @RestController(value = "goods")
 2 public class GoodsController {
 3
 4     @RequestMapping(value = "query")
 5     public Goods queryGoods(String goodsCode){
 6         Goods goods = new Goods();
 7         goods.setGoodsCode(goodsCode);
 8         goods.setGoodsName("测试商品");
 9         return goods;
10     }
11
12
13     static class Goods{
14         private String goodsCode;
15         private String goodsName;
16
17         public String getGoodsCode() {
18             return goodsCode;
19         }
20
21         public void setGoodsCode(String goodsCode) {
22             this.goodsCode = goodsCode;
23         }
24
25         public String getGoodsName() {
26             return goodsName;
27         }
28
29         public void setGoodsName(String goodsName) {
30             this.goodsName = goodsName;
31         }
32     }
33 }
测试请求路径 http://localhost:8000/goods/query?goodsCode=test 测试结果如下: