这里分三种,1、测普通方法或通过原生java API接口调用 2、基于spring依赖注入调用 3、controller层调用
需要引入依赖:默认springboot已经引入
     <dependency>
            <groupId>org.springframework.boot</groupId>
            <artifactId>spring-boot-starter-test</artifactId>
            <scope>test</scope>
        </dependency>
在src/test/java下建立test类
1、测普通方法或通过原生java API接口调用
public class commonTest {

    @Test
    public void testPrint() {
        System.out.println(2222222);
    }
}
2、基于spring依赖注入调用 内部可以通过@autowired、@Resourced等注入对象实例
@RunWith(SpringRunner.class)
@SpringBootTest
public class applicationTest {
    //注入的接口类
    @Autowired
    private TestService testService;
    @Test
    public void contextLoads() throws Exception{
        testService.print();
    }
}
public interface TestService {

    public void print()throws Exception;
}
@Service("testService")
public class TestServiceImpl implements TestService {

    @Override
    public void print() throws Exception {
        // TODO Auto-generated method stub
        System.out.println("service print test...");
    }

}
3、 controller层调用
@SpringBootTest
public class ControllerTest {
    private MockMvc mockMvc;
    //@Before注解的表示在测试启动的时候优先执行,一般用作资源初始化。
    //这里初始化生成controller类单例
    @Before
    public void setUp()throws Exception{
        mockMvc=MockMvcBuilders.standaloneSetup(new TestController()).build();
    }
        @Test
        public void controllerTest()throws Exception{
             String returnJson = mockMvc.perform(MockMvcRequestBuilders.post("/list")).andReturn().getResponse().getContentAsString();
             System.out.println(returnJson);
        }
}
@RestController
public class TestController {
    @RequestMapping(value="/list",method={RequestMethod.POST})
    public List<TestVO> getTestList() {
        List<TestVO> vos = new ArrayList<TestVO>();
        TestVO vo = new TestVO();
        vo.setAge(13);
        vo.setName("薛邵");
        vo.setSex(true);
        vo.setDate(new Date());
        vos.add(vo);
        TestVO vo1 = new TestVO();
        vo1.setAge(15);
        vo1.setName("xiaoming");
        vo1.setSex(false);
        vo1.setDate(new Date());
        vos.add(vo1);
        return vos;
    }
}
MockMvc 调用controller接口的几个示例:
A
//get请求一个查询/test/hhhhhhh/99,控制台打印http请求和响应信息
//print()方法,需要静态引入import static org.springframework.test.web.servlet.result.MockMvcResultHandlers.print;
mockMvc.perform(MockMvcRequestBuilders.get("/test/hhhhhhh/99").accept(MediaType.APPLICATION_JSON_UTF8)).andDo(print());
打印示例如下: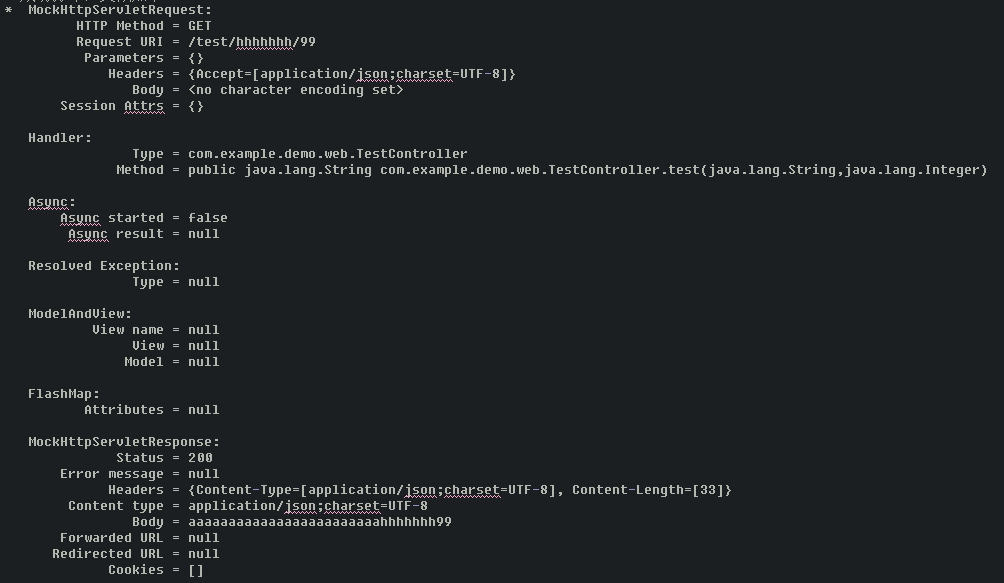
其中Body= aaaaaaaaaaaaaaaaaaaaaaaahhhhhhh99即我们预期打印的内容,也就是controller接口返回的文本
B
//通过.addExpect来判断预期内容是否符合,如果符合控制台无信息,如果不符合,junit控制台会显示具体错误信息
//.accept(MediaType.APPLICATION_JSON_UTF8)
//这句主要是设置JSON返回编码,避免出现中文乱码问题
mockMvc.perform(MockMvcRequestBuilders.get("/test/hhhhhhh/99").accept(MediaType.APPLICATION_JSON_UTF8)).andExpect(MockMvcResultMatchers.content().string(Matchers.containsString("hhhhhhh991")));
C
//获取返回内容直接输出打印
String returnJson = mockMvc.perform(MockMvcRequestBuilders.post("/testvo")).andReturn().getResponse().getContentAsString();
System.out.println(returnJson);
D
//设置参数POST提交
mockMvc.perform(MockMvcRequestBuilders.post("/v")
// .param("age", "28")
// .param("name", "aaa")
// .param("list", "["bb","cc"]")
// .param("card", "123456789012345678")
// .param("date", "2019-10-01 11:09:11")
// .param("weight", "99.99")
// .param("sex", "true")
//// .param("tmp", "")
//// .param("phone", "")
// .param("dicimal", "18")
// .param("email", "aaa")
);