Pyspider
- pyspider的功能:
- 提供了方便易用的webUi系统,可视化地编写和调试爬虫
- 提供爬取进度监控、爬取结果查看、爬虫项目管理等功能
- 支持多种后端数据库,如mysql,mongodb、redis、sqllite等
- 支持多种消息队列,如rabbitMq,redis等
- 提供了优先级控制、失败重试、定时抓取等功能。
- 对接了phantmjs,可以抓取JavaScript渲染结果
- 支持单机和分布式部署,支持ducker部署
- pyspider的架构:
- pyspider的架构主要分为Scheduler(调度器)、Fetcher(抓取器)、Processer(处理器)三个部分,整个爬取过程受到Monitor(监控器)的监控,抓取的结果被Result Worker(结果处理器)处理:
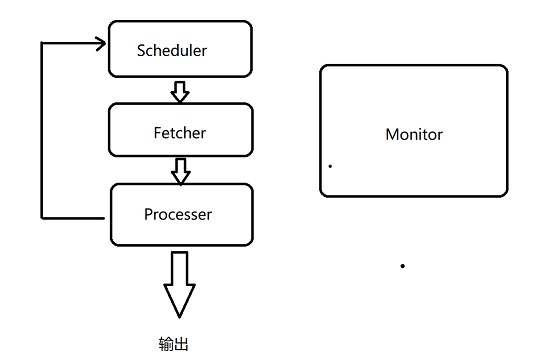
- Schdule发起任务调度,Fetcher负责抓取网页内容,Process负责解析网页内容,然后将新生的Request发给Scheduler进行调度,将生成的结果提取输出保存。
- pyspider的架构主要分为Scheduler(调度器)、Fetcher(抓取器)、Processer(处理器)三个部分,整个爬取过程受到Monitor(监控器)的监控,抓取的结果被Result Worker(结果处理器)处理:
- pyspider的安装:
- 安装pycurl:
- 链接:https://pan.baidu.com/s/1nmISakN3O9Za1gapsecKyQ 提取码:fo4n
-
python3.6的64位安装版本
- 安装pyspider
- pip install pyspider
- 若出现一下报错
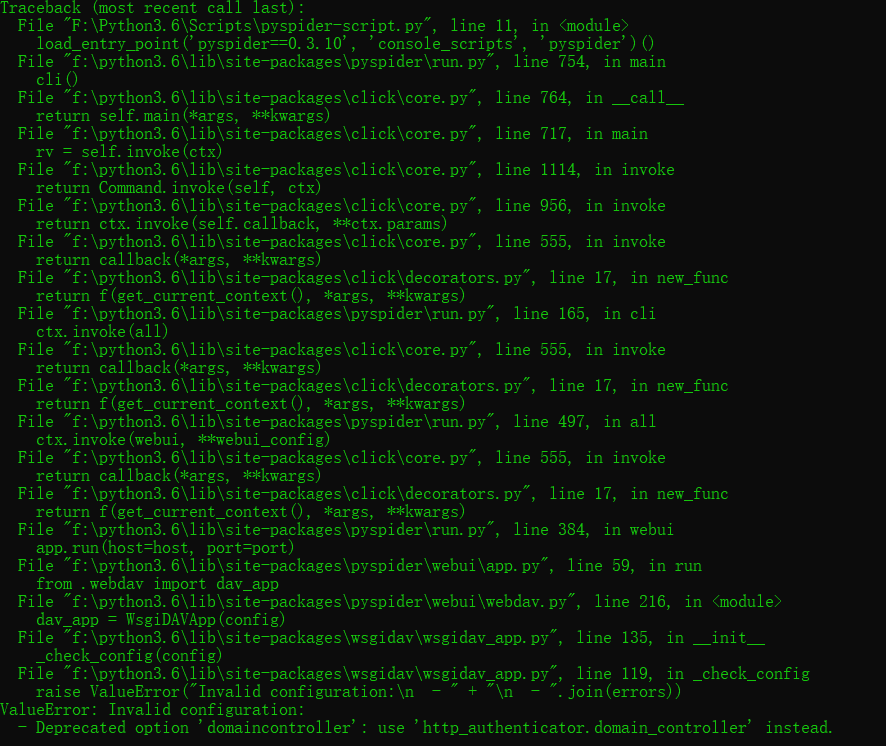
执行命令:pip install wsgidav==2.4.1
- 启动pyspider
- 控制输入:pyspider
- 浏览器打开: http://localhost:5000/

安装成功页面
- 具体安装详情参考:https://cuiqingcai.com/5416.html
- 创建项目:
- 点击Create:
- 输入项目名和起始url
- 点击save和run就开始运行的了项目
- 所有的文件都在C盘User下的当前用户的data文件夹目录下
-
 1 #!/usr/bin/env python
 2 # -*- encoding: utf-8 -*-
 3 # Created on 2019-05-15 22:47:43
 4 # Project: baidu
 5
 6 from pyspider.libs.base_handler import *
 7
 8
 9 class Handler(BaseHandler):
10     crawl_config = {
11     }
12     # 配置信息,可在里面配置headers和代理等
13
14     @every(minutes=24 * 60)  # 调度频率,分钟为单位
15     def on_start(self):
16         self.crawl('http://www.baidu.com', callback=self.index_page)
17
18     @config(age=10 * 24 * 60 * 60)  #过期时间,秒为单位
19     def index_page(self, response):
20         for each in response.doc('a[href^="http"]').items():
21             self.crawl(each.attr.href, callback=self.detail_page, validate_cert=False) # 设置不验证证书
22
23     @config(priority=2)
24     def detail_page(self, response):
25         return {
26             "url": response.url,
27             "title": response.doc('title').text(),
28         }
29     # 返回解析结果
- 点击Create:
- 安装pycurl: