1. 什么是ES
ES中文网:https://www.elastic.co/guide/cn/elasticsearch/guide/current/index.html
ES:是一款基于Lucene编写的搜索引擎框架,它提供了分布式的全文搜索功能,提供了一个统一的基于RESTful风格的Web接口,简化Lucene的复杂性。
- Lucene:是一套信息检索工具包。它是Apache下面的产物,使用起来非常复杂,基于Lucene的搜索引擎框架还有一个Solor。
- 全文检索:就是能将一段词语进行分词,且将分出来的单个词语统一的放到一个分词库中,在搜索时,根据关键字去分词库中检索,找到匹配的内容。【倒排索引】
- RESTful风格的Web接口:操作ES很简单,只需要发送一个HTTP请求,根据请求方式的不同,执行相应的功能。
- 倒排索引:
      a) 将存放的数据以一定的方式进行分词,并将分词的内容放在一个单独的分词库中。
      b) 当用户去查询数据时,会将用户的查询关键字进行分词。
      c) 然后去分词库中匹配内容,最终得到数据的id标识。
      d) 根据id标识去存放数据的位置拉取到指定的数据。
1.1 为什么要使用ES
在海量数据中执行搜索功能时,MySQL效率太低。且ES支持全文搜索,还可以将关键字以红色字体展示。
2. ES安装
Windows下安装ES:
https://www.cnblogs.com/tinyj/p/10028875.html
bin:启动文件
config:配置文件
      log4j2.properties:日志配置文件
      jvm.options:java虚拟机的配置
      elasticsearch.yml:es的配置文件
data:索引数据目录
lib:相关类库Jar包
logs:日志目录
modules:功能模块
plugins:插件
Windows下安装Kibana:
https://www.cnblogs.com/aaronthon/p/12178100.html
https://www.cnblogs.com/a438842265/p/12325972.html
Kibana的页面是英文的,到Kibana的config目录下,找到kibana.yml,在最后面加i18n.locale: "zh-CN",重启就是中文的了。
IK分词器安装:
https://zhuanlan.zhihu.com/p/114643497
原生的分词器:在搜索时会把自己的搜索信息进行分词,分词是将每个字一个一个拆分。这种不符合我们中文的分词情况。所以我们需要采用ik分词器来解决这个问题。
使用ik分词器的效果: 转自:https://www.cnblogs.com/laoyeye/p/13289034.html
### 原生分词
GET /_analyze
{
  "analyzer": "standard",
  "text": "中华人民共和国"
}
效果:
{
  "tokens" : [
    {
      "token" : "中",
      "start_offset" : 0,
      "end_offset" : 1,
      "type" : "<IDEOGRAPHIC>",
      "position" : 0
    },
    {
      "token" : "华",
      "start_offset" : 1,
      "end_offset" : 2,
      "type" : "<IDEOGRAPHIC>",
      "position" : 1
    },
    {
      "token" : "人",
      "start_offset" : 2,
      "end_offset" : 3,
      "type" : "<IDEOGRAPHIC>",
      "position" : 2
    },
    {
      "token" : "民",
      "start_offset" : 3,
      "end_offset" : 4,
      "type" : "<IDEOGRAPHIC>",
      "position" : 3
    },
    {
      "token" : "共",
      "start_offset" : 4,
      "end_offset" : 5,
      "type" : "<IDEOGRAPHIC>",
      "position" : 4
    },
    {
      "token" : "和",
      "start_offset" : 5,
      "end_offset" : 6,
      "type" : "<IDEOGRAPHIC>",
      "position" : 5
    },
    {
      "token" : "国",
      "start_offset" : 6,
      "end_offset" : 7,
      "type" : "<IDEOGRAPHIC>",
      "position" : 6
    }
  ]
}
ik_smart会将文本做最粗粒度的拆分:
# ik_smart:会做最粗粒度的拆分
GET /_analyze
{
  "analyzer": "ik_smart",
  "text": "中华人民共和国"
}
效果:
{
  "tokens" : [
    {
      "token" : "中华人民共和国",
      "start_offset" : 0,
      "end_offset" : 7,
      "type" : "CN_WORD",
      "position" : 0
    }
  ]
}
ik_max_word会将文本做最细粒度的拆分:
## ik_max_word会将文本做最细粒度的拆分
GET /_analyze
{
  "analyzer": "ik_max_word",
  "text": "中华人民共和国"
}
效果:
{
  "tokens" : [
    {
      "token" : "中华人民共和国",
      "start_offset" : 0,
      "end_offset" : 7,
      "type" : "CN_WORD",
      "position" : 0
    },
    {
      "token" : "中华人民",
      "start_offset" : 0,
      "end_offset" : 4,
      "type" : "CN_WORD",
      "position" : 1
    },
    {
      "token" : "中华",
      "start_offset" : 0,
      "end_offset" : 2,
      "type" : "CN_WORD",
      "position" : 2
    },
    {
      "token" : "华人",
      "start_offset" : 1,
      "end_offset" : 3,
      "type" : "CN_WORD",
      "position" : 3
    },
    {
      "token" : "人民共和国",
      "start_offset" : 2,
      "end_offset" : 7,
      "type" : "CN_WORD",
      "position" : 4
    },
    {
      "token" : "人民",
      "start_offset" : 2,
      "end_offset" : 4,
      "type" : "CN_WORD",
      "position" : 5
    },
    {
      "token" : "共和国",
      "start_offset" : 4,
      "end_offset" : 7,
      "type" : "CN_WORD",
      "position" : 6
    },
    {
      "token" : "共和",
      "start_offset" : 4,
      "end_offset" : 6,
      "type" : "CN_WORD",
      "position" : 7
    },
    {
      "token" : "国",
      "start_offset" : 6,
      "end_offset" : 7,
      "type" : "CN_CHAR",
      "position" : 8
    }
  ]
}
对于上面两个分词效果的解释:
如果未安装ik分词器,那么,你如果写 "analyzer": "ik_max_word",那么程序就会报错,因为你没有安装ik分词器
如果你安装了ik分词器之后,你不指定分词器,不加上 "analyzer": "ik_max_word" 这句话,那么其分词效果跟你没有安装ik分词器是一致的,也是分词成每个汉字。
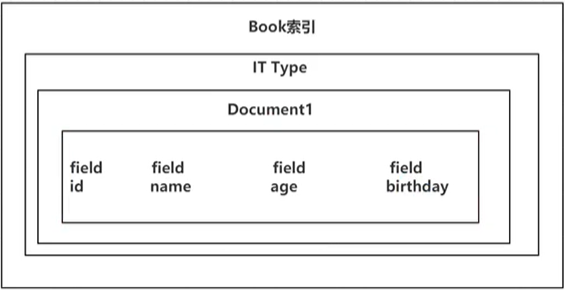
3. ES的结构
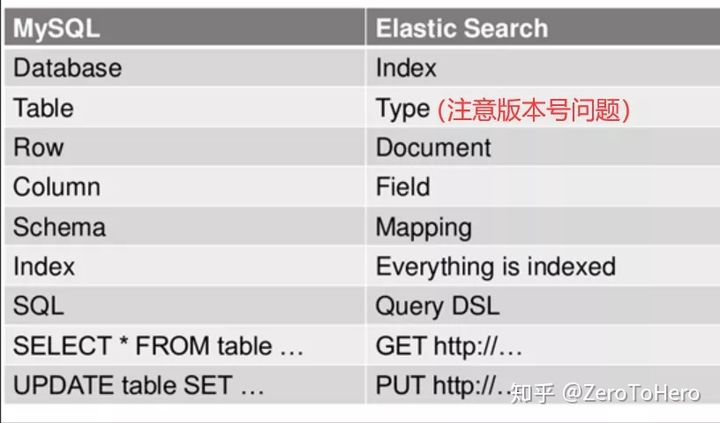
3.1 索引——————索引相当于MySQL中的一个“数据库”:
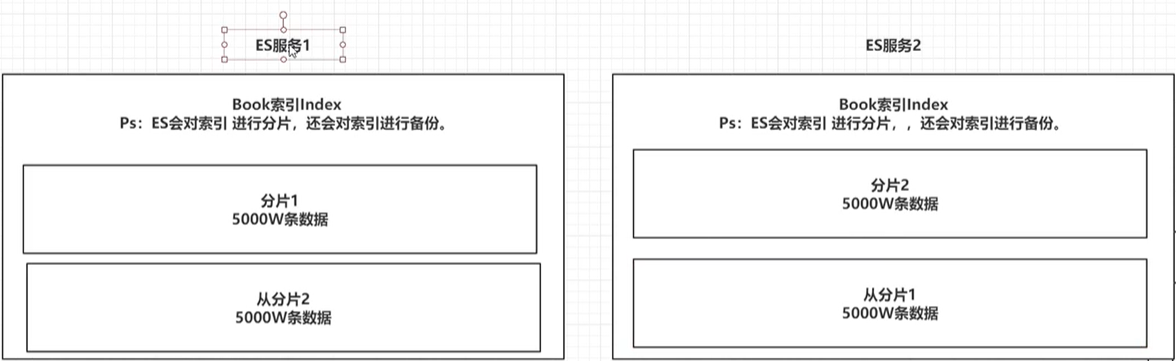
ES将数据存储于一个或多个索引中,ES中可以创建多个索引。
ES会对索引进行分片,[默认一个索引分5片]——————就是说 比如一个索引存了1W条数据,他默认会将其分成5片,每片2000条数据。
ES会对索引的分片进行备份,每一个分片会至少存在一个备份分片【防止数据丢失】,备份的分片称为从分片,一般情况下,从分片不会帮助检索数据,当检索压力特别大才会帮助。
备份的分片应该放在不同的服务器中。如果没有搭建集群,那么分片就只会保存在一个ES服务上。
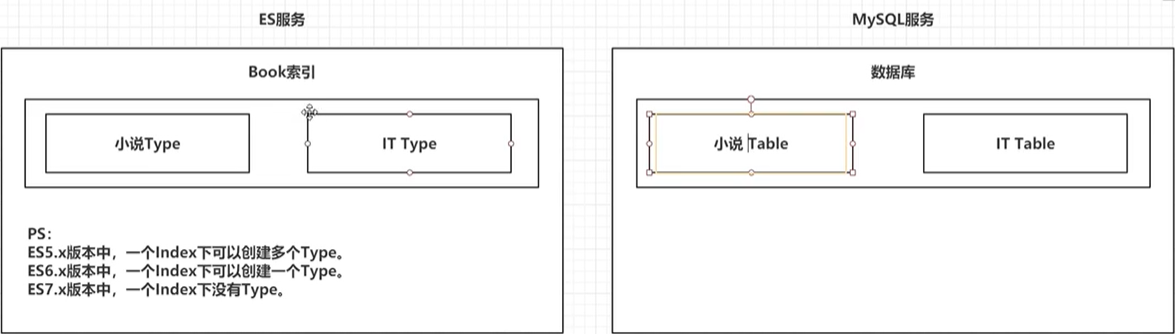
3.2 类型——————类型相当于MySQL中的一个“表”:
类型是索引内部的逻辑分区,一个索引内部可定义一个或多个类型(type)。
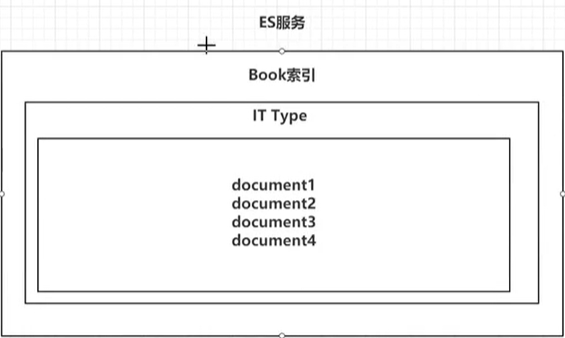
3.1 文档——————相当于mysql表中的“一行数据”:
一个类型下,可以又多个文档。
文档是Lucene索引和搜索的原子单位,它是包含了一个或多个域的容器,基于JSON格式进行表示。
文档由一个或多个域组成,每个域拥有一个名字及一个或多个值,有多个值的域通常称为“多值域”。
每个文档可以存储不同的域集,但同一类型下的文档至应该有某种程度上的相似之处。
3.2 属性——————相当于mysql表中的“一列数据”:
一个文档中,可以包含多个属性。类似于MySQL表中的一行数据存在多个列。
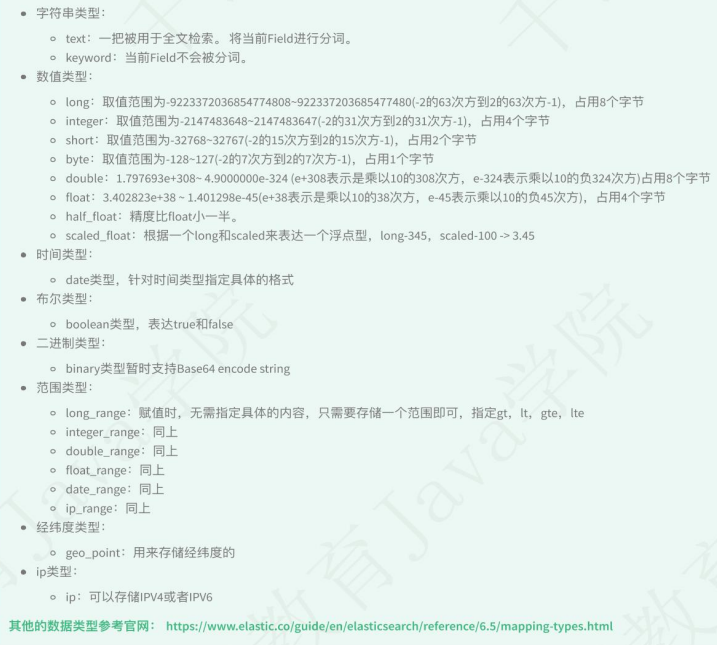
4. 操作ES的RESTful语法


Field可以指定的类型:
4.1 索引的操作
4.1.0 查看所有索引的状态
GET _cat/indices?v
4.1.1 创建索引不指定结构
PUT /person
{
   "settings": {
        "number_of_shards": 5,             # 指定分片数
        "number_of_replicas": 1            # 备份数
   }
}
4.1.2 查看索引信息
GET /person
4.1.3 删除索引信息
DELETE /person
4.1.4 创建索引并指定结构
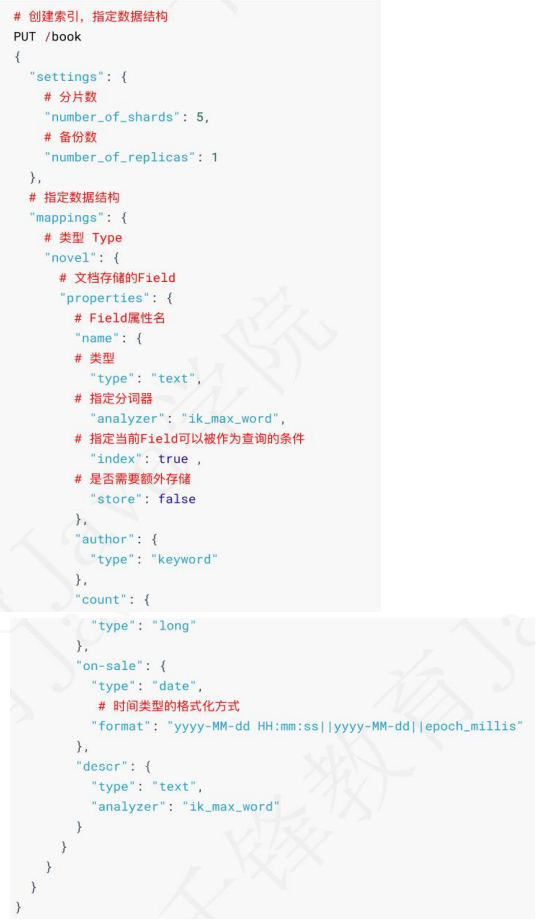
4.2 文档的操作
在ES中,_index,_type,_id 三个内容锁定一个文档。
4.2.1 文档的增删改查
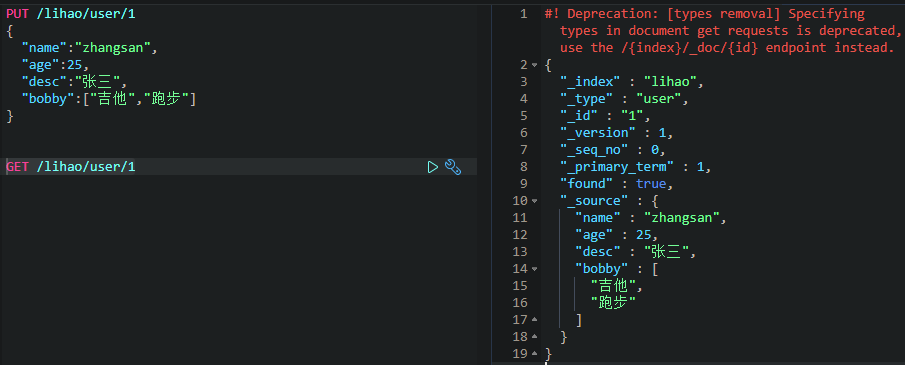
创建数据PUT【POST也可以】
要先有Index索引,再来创建文档,我这里没有截图User索引。
使用PUT时,若指定了id,会先去判断该数据是否存在,若存在则是修改操作。
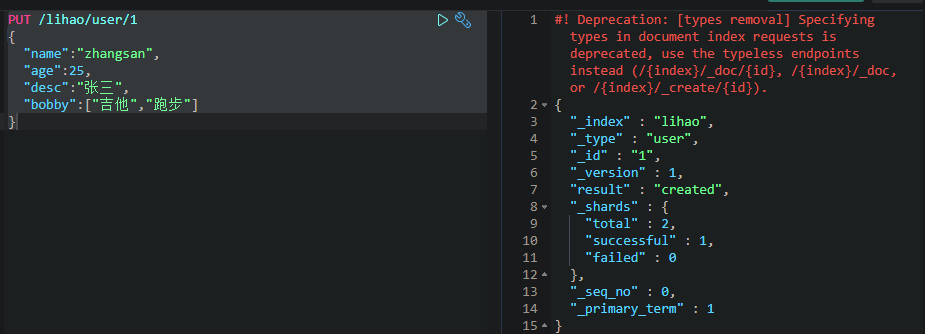
      _id相当于关系型数据库的主键id,若不指定,则会默认生成一个20位的uuid,属性相当于关系型数据库的column(列)。
      结果中的result是操作类型,created:表示第一次创建,若再次执行该命令,result的类型将变为updated。
                             version:表示当前版本,每改一次就加一。
      若数据不存在,则新增该条数据。若新增的数据原本就存在,则表示修改该条数据。
查询数据GET
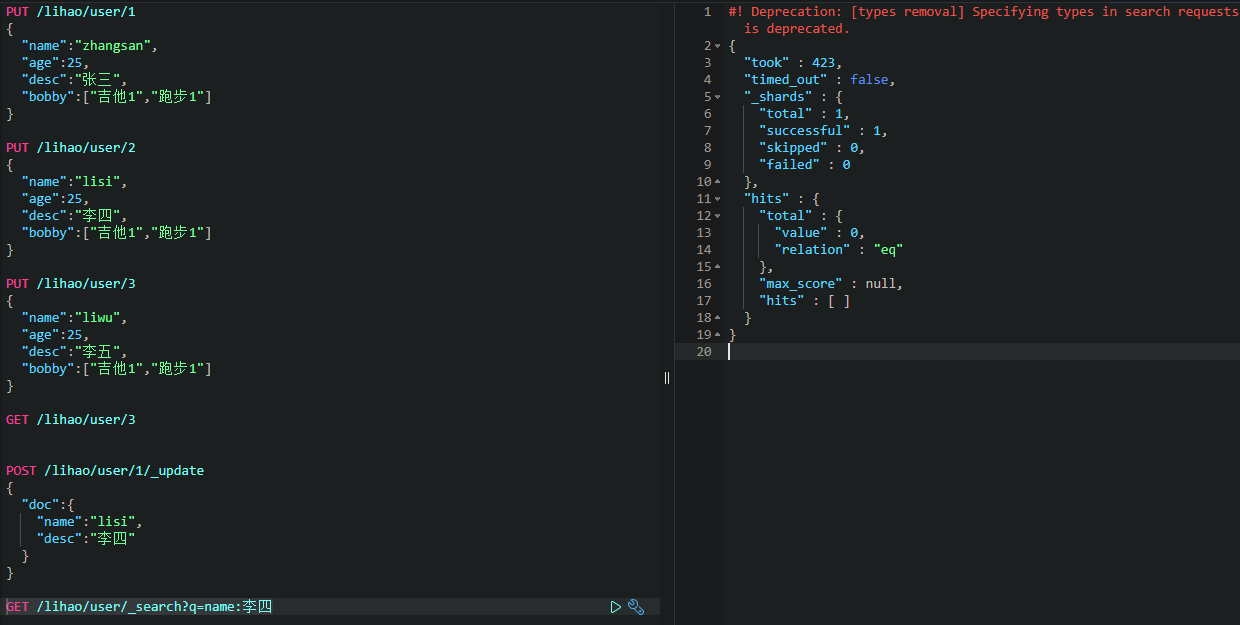
更新数据PUT/POST【常用】

      若数据不存在,则新增该条数据。若新增的数据原本就存在,则表示修改该条数据。

      我们是用POST命令,在id后面跟 _update,将要修改的内容放到doc属性中即可。不修改的不会将其变成null。类似于我们mysql的动态sql
删除数据DELETE
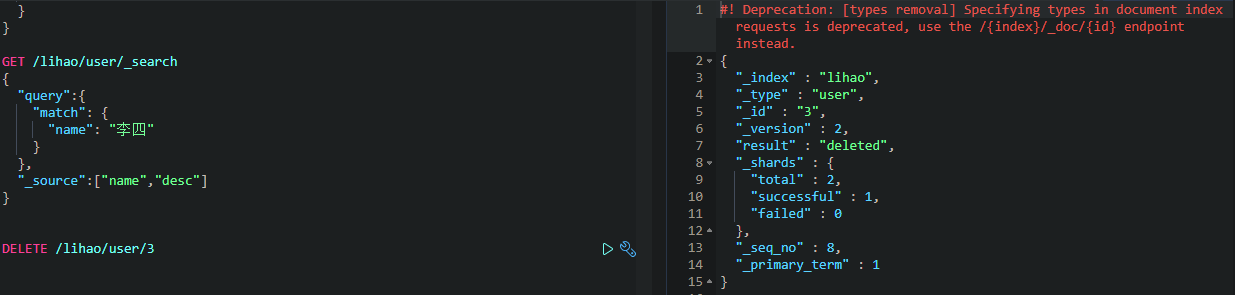
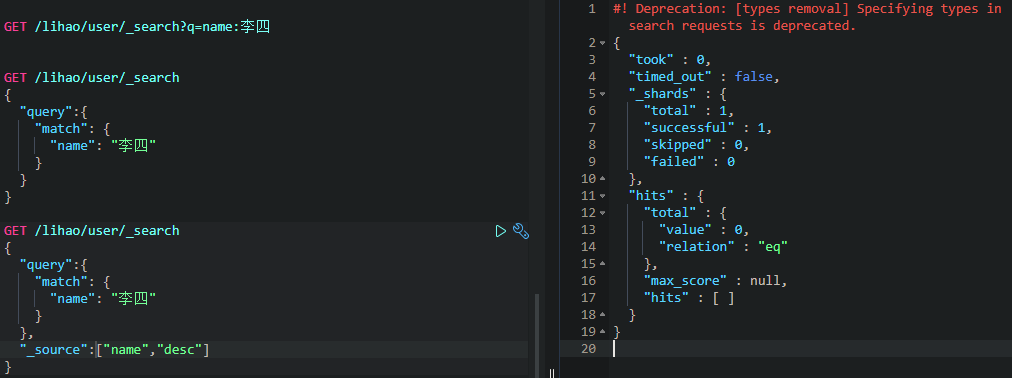
条件查询
返回的不是数据本身,是一个hits,其中_score表示得分,根据算法去和查询条件进行匹配计算,若匹配度越高,分就越高,查询出来就越靠前。
构建查询
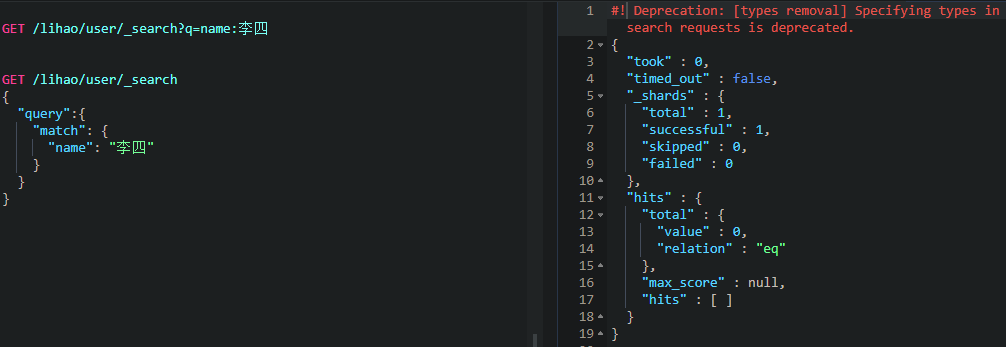
上例方式和条件查询结果是一样的。推荐使用构建查询,其能构建更加复杂的查询条件,结构更清晰。
将构建查询条键放在query属性下。
只查询特定的属性
比如:我们现在只查看name和desc两个属性。
5. Java操作ES
ES官网指导文档:https://www.elastic.co/guide/index.html
API文档:https://artifacts.elastic.co/javadoc/org/elasticsearch/client/elasticsearch-rest-high-level-client/7.10.2/index.html
5.1 导入依赖 一定要保证我们导入的依赖与我们的ES版本一直【最好别使用springboot帮我们自动依赖的版本,哪怕你用的是最新的springboot,它搭载的ES版本可能很旧。可能与你安装的ES版本不符】
	    <!--        1. elasticsearch-->
	    <dependency>
	        <groupId>org.elasticsearch</groupId>
	        <artifactId>elasticsearch</artifactId>
	        <version>6.5.4</version>
	    </dependency>

	    <!--        2. elasticsearch的高级API-->
	    <dependency>
	        <groupId>org.elasticsearch.client</groupId>
	        <artifactId>elasticsearch-rest-high-level-client</artifactId>
	        <version>6.5.4</version>
	    </dependency>
5.2 连接ES
Java方式集成ES

public static RestHighLevelClient getClient(){
	HttpHost httpHost = new HttpHost("127.0.0.1", 9200);
	RestClientBuilder clientBuilder = RestClient.builder(httpHost);

	RestHighLevelClient client = new RestHighLevelClient(clientBuilder);
	return client;
}

public static void main(String[] args) {
	RestHighLevelClient client = ShopLeaseController.getClient();
	System.out.println(client);
}
SpringBoot集成ES

@Configuration
public class ElasticsearchConfig {
    @Bean
    public RestHighLevelClient elasticsearchClient(){
        return new RestHighLevelClient(
                RestClient.builder(new HttpHost("106.13.84.80", 9201, "http")));
    }

}
5.3 操作索引
5.3.1 增删索引/索引是否存在
public class Demo2 {
    // 获取 RestHighLevelClient 对象
    RestHighLevelClient client = ESClient.getClient();
    String index = "person";  // 指定索引
    String type = "man";   // 指定类型

    @Test
    public void delete() throws IOException {
        //1. 准备request对象
        DeleteIndexRequest request = new DeleteIndexRequest();
        request.indices(index);

        //2. 通过client对象执行
        AcknowledgedResponse delete = client.indices().delete(request, RequestOptions.DEFAULT);

        //3. 获取返回结果
        System.out.println(delete.isAcknowledged());
    }

    @Test
    public void exists() throws IOException {
        //1. 准备request对象
        GetIndexRequest request = new GetIndexRequest();
        request.indices(index);

        //2. 通过client去操作
        boolean exists = client.indices().exists(request, RequestOptions.DEFAULT);


        //3. 输出
        System.out.println(exists);
    }


    @Test
    public void createIndex() throws IOException {
        //1. 准备关于索引的settings
        Settings.Builder settings = Settings.builder()
                .put("number_of_shards", 3)
                .put("number_of_replicas", 1);

        //2. 准备关于索引的结构mappings
        XContentBuilder mappings = JsonXContent.contentBuilder()
                .startObject()
                    .startObject("properties")
                        .startObject("name")
                            .field("type","text")
                        .endObject()
                        .startObject("age")
                            .field("type","integer")
                        .endObject()
                        .startObject("birthday")
                            .field("type","date")
                            .field("format","yyyy-MM-dd")
                        .endObject()
                    .endObject()
                .endObject();


        //3. 将settings和mappings封装到一个Request对象    不同的索引操作 Request也是不同的
        CreateIndexRequest request = new CreateIndexRequest(index)
                .settings(settings)
                .mapping(type,mappings);

        //4. 通过client对象去连接ES并执行创建索引
        CreateIndexResponse resp = client.indices().create(request, RequestOptions.DEFAULT);

        //5. 输出
        System.out.println("resp:" + resp.toString());

    }
}
5.3.2 操作文档【增删改,批量添加/删除】
public class Demo3 {

    ObjectMapper mapper = new ObjectMapper();
    RestHighLevelClient client = ESClient.getClient();
    String index = "person";
    String type = "man";

    /**
     * 批量删除
     **/
    @Test
    public void bulkDeleteDoc() throws IOException {
        //1. 封装Request对象
        BulkRequest request = new BulkRequest();
        request.add(new DeleteRequest(index,type,"1"));
        request.add(new DeleteRequest(index,type,"2"));
        request.add(new DeleteRequest(index,type,"3"));

        //2. client执行
        BulkResponse resp = client.bulk(request, RequestOptions.DEFAULT);

        //3. 输出
        System.out.println(resp);
    }

    /**
     * 批量创建
     **/
    @Test
    public void bulkCreateDoc() throws IOException {
        //1. 准备多个json数据
        Person p1 = new Person(1,"张三",23,new Date());
        Person p2 = new Person(2,"李四",24,new Date());
        Person p3 = new Person(3,"王五",25,new Date());

        String json1 = mapper.writeValueAsString(p1);
        String json2 = mapper.writeValueAsString(p2);
        String json3 = mapper.writeValueAsString(p3);

        //2. 创建Request,将准备好的数据封装进去
        BulkRequest request = new BulkRequest();
        request.add(new IndexRequest(index,type,p1.getId().toString()).source(json1,XContentType.JSON));
        request.add(new IndexRequest(index,type,p2.getId().toString()).source(json2,XContentType.JSON));
        request.add(new IndexRequest(index,type,p3.getId().toString()).source(json3,XContentType.JSON));

        //3. 用client执行
        BulkResponse resp = client.bulk(request, RequestOptions.DEFAULT);

        //4. 输出结果
        System.out.println(resp.toString());
    }

    /**
     * 删除文档
     **/
    @Test
    public void deleteDoc() throws IOException {
        //1. 封装Request对象
        DeleteRequest request = new DeleteRequest(index,type,"1");

        //2. client执行
        DeleteResponse resp = client.delete(request, RequestOptions.DEFAULT);

        //3. 输出结果
        System.out.println(resp.getResult().toString());
    }

    /**
     * 修改文档
     **/
    @Test
    public void updateDoc() throws IOException {
        //1. 创建一个Map,指定需要修改的内容
        Map<String,Object> doc = new HashMap<>();
        doc.put("name","张大三");
        String docId = "1";

        //2. 创建request对象,封装数据
        UpdateRequest request = new UpdateRequest(index,type,docId);
        request.doc(doc);

        //3. 通过client对象执行
        UpdateResponse update = client.update(request, RequestOptions.DEFAULT);

        //4. 输出返回结果
        System.out.println(update.getResult().toString());
    }

    /**
     * 创建文档
     **/
    @Test
    public void createDoc() throws IOException {
        //1. 准备一个json数据
        //TODO 注意的id并没有生效,传给ES没用,ES创建文档不是这样创建的。所以我们可以在Person类上使用@JsonIgnore来忽略这个属性。
        //TODO 注意这里的Date对象也不会生效,因为上面我创建索引的时候,指定了我的Date数据格式是“yyyy-MM-dd”格式。所以这里给ES一个Date(没有转换格式的),ES并不能识别。所以我们可以在Person类的Date属性上使用@JsonFormat("yyyy-MM-dd")来格式化这个属性。
        Person person = new Person(1,"张三",23,new Date());
        // 将类序列化成JSON字符串【此处用的是jackson的api】
        String json = mapper.writeValueAsString(person);

        //2. 准备一个request对象(他有很多中构造,有手动指定id的,还有自动指定id的....)
        //手动指定id
        IndexRequest request = new IndexRequest(index,type,person.getId().toString());
        request.source(json, XContentType.JSON);

        //3. 通过client对象执行添加
        IndexResponse resp = client.index(request, RequestOptions.DEFAULT);

        //4. 输出返回结果
        System.out.println(resp.getResult().toString());
    }

}