你们项目中有用到Swagger吗?你真的会用这个框架吗?哈哈,都说用了Swagger的都不用写文档了,但是打开项目的Swagger地址看看,惨不忍睹啊!都是些什么东西啊,完全看不到任何有用的信息,东西没用好就是这样的结果!
概念
Swagger 是一个规范和完整的框架,用于生成、描述、调用和可视化 RESTful 风格的 Web 服务。官网
作用
- 1.接口的文档在线自动生成
- 2.功能测试
导入依赖
<!-- https://mvnrepository.com/artifact/io.springfox/springfox-swagger2 -->
<dependency>
    <groupId>io.springfox</groupId>
    <artifactId>springfox-swagger2</artifactId>
    <version>2.9.2</version>
</dependency>
<!-- https://mvnrepository.com/artifact/io.springfox/springfox-swagger-ui -->
<dependency>
    <groupId>io.springfox</groupId>
    <artifactId>springfox-swagger-ui</artifactId>
    <version>2.9.2</version>
</dependency>
之前我们说springboot用啥就引入对应的starter就好了,那么这里你也可以引入对应的starter,但是这个是默认UI的没法改!
<dependency>
    <groupId>com.spring4all</groupId>
    <artifactId>swagger-spring-boot-starter</artifactId>
    <version>1.7.0.RELEASE</version>
</dependency>
注:Springfox是践行OAS的一个项目,它将Swagger融合进流行的Spring框架,根据OpenAPI规范,帮助开发者自动生成API文档
开启Swagger及其配置
@Configuration
public class SwaggerConfig {

    // 注册bean Docket
    @Bean
    public Docket docket(){
        return new Docket(DocumentationType.SWAGGER_2).;
    }
}

@SpringBootApplication
@EnableSwagger2// 使Swagger生效,默认是不开启!
public class SpringStudyApplication {

	public static void main(String[] args) {
		SpringApplication.run(SpringStudyApplication.class, args);
	}
}
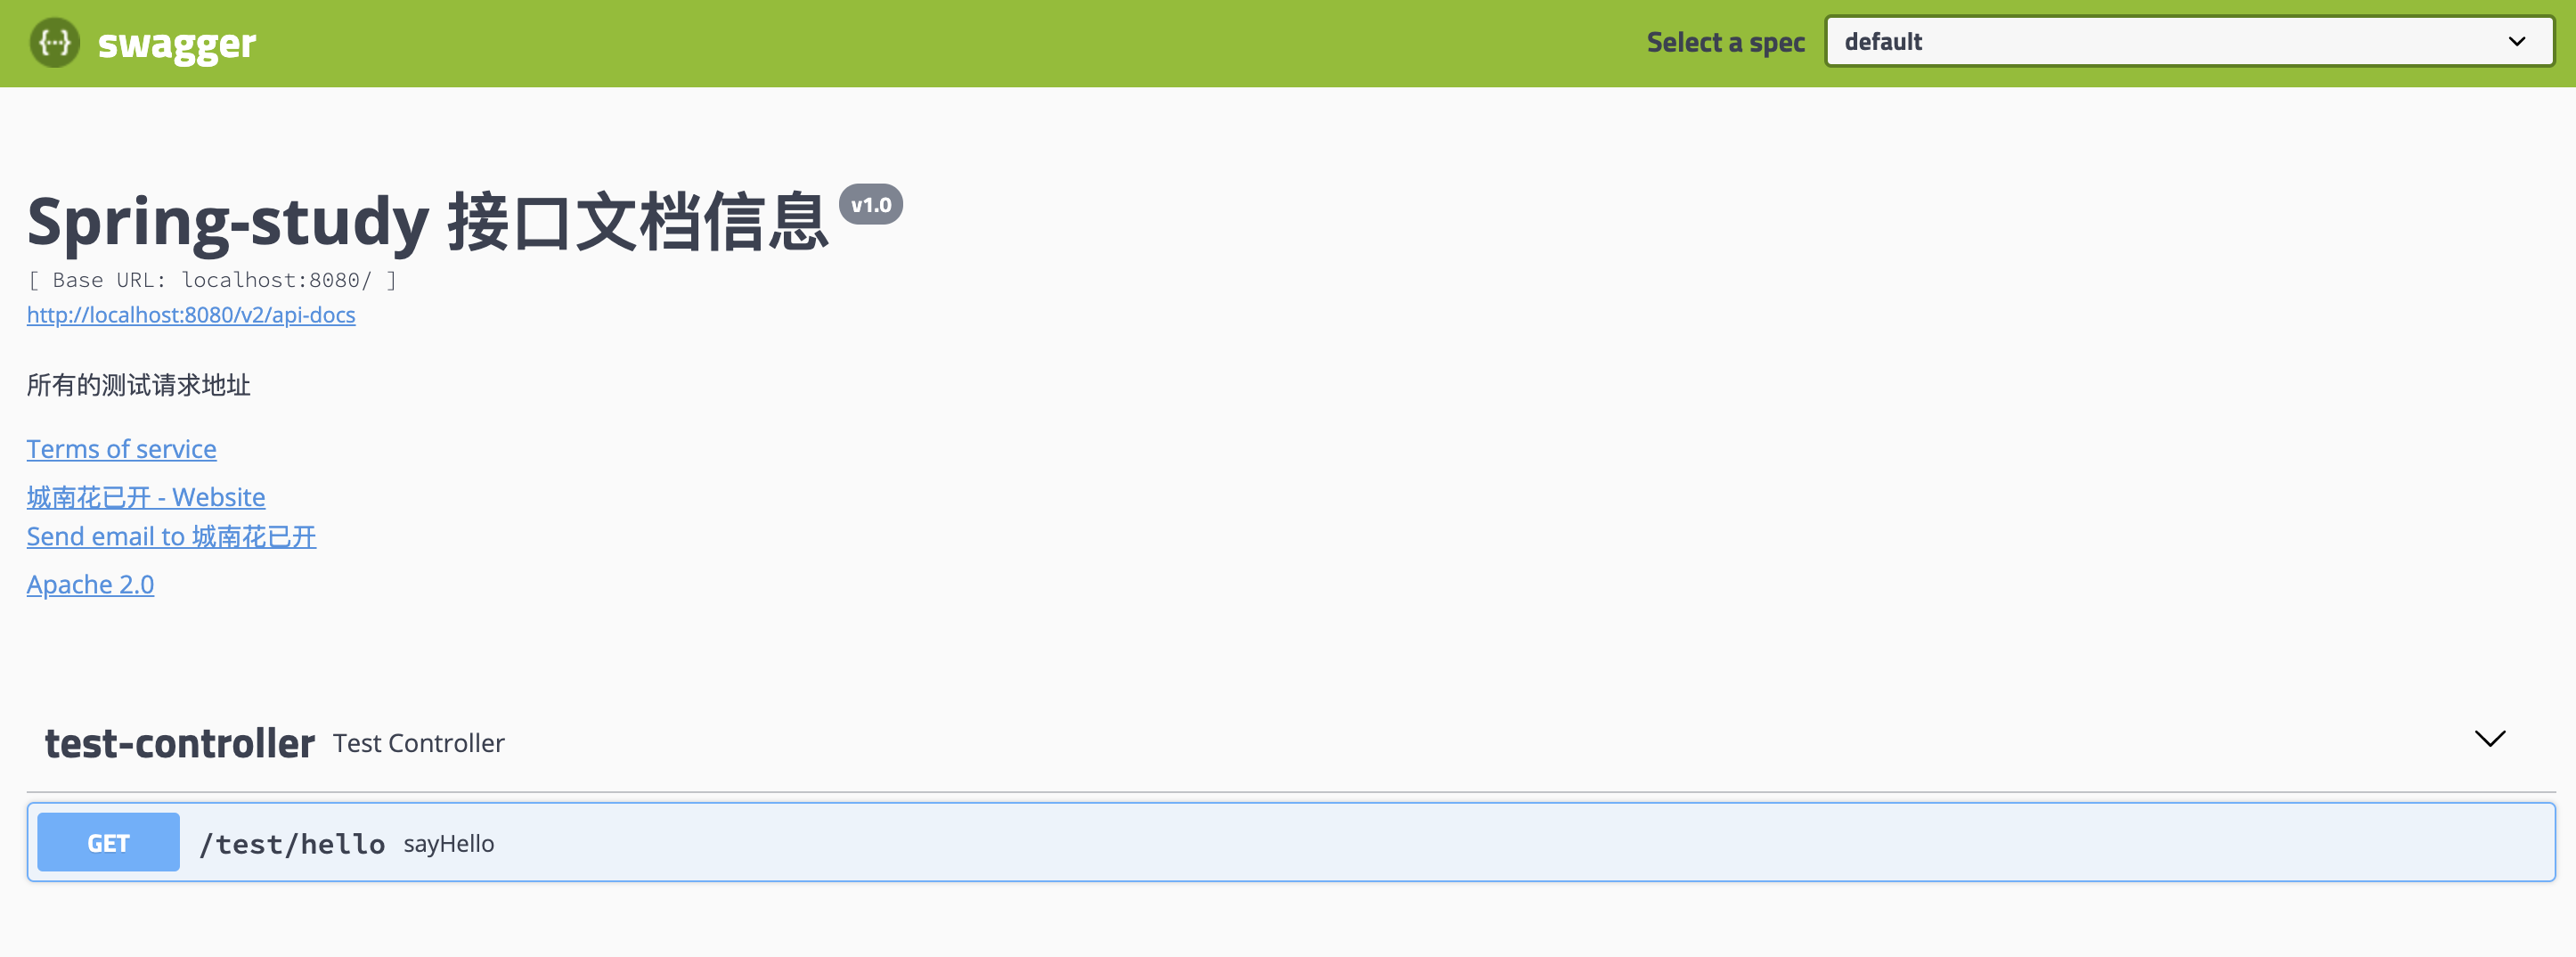
启动测试
默认地址:http://localhost:8080/swagger-ui.html
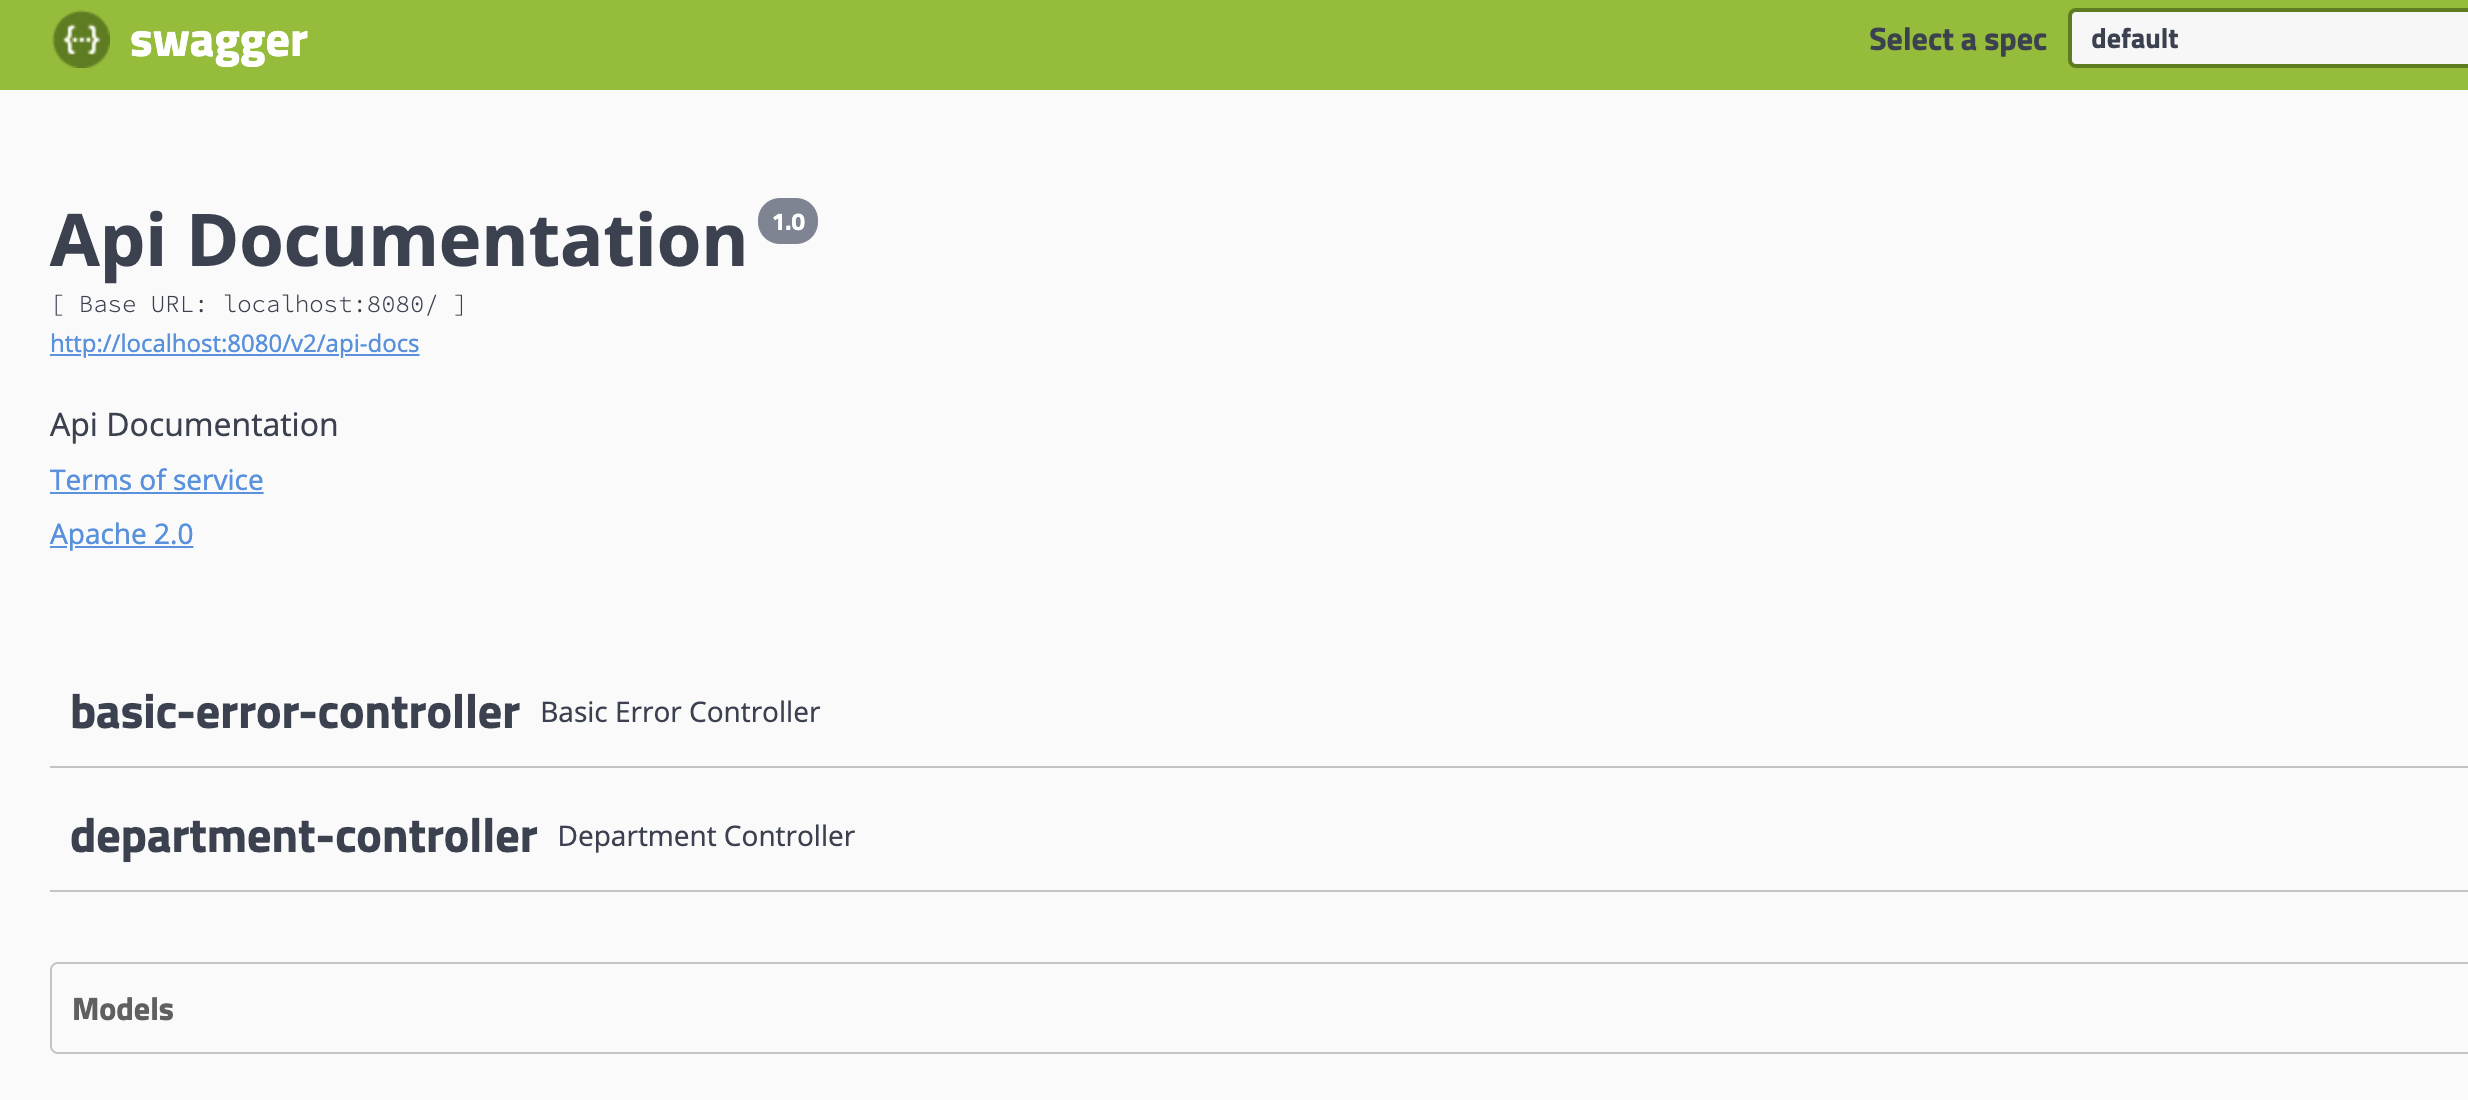
可以看到这里有一个basic-error-controller 和我们自己定义的一个controller
点开我们自己定义的一个controller看下:
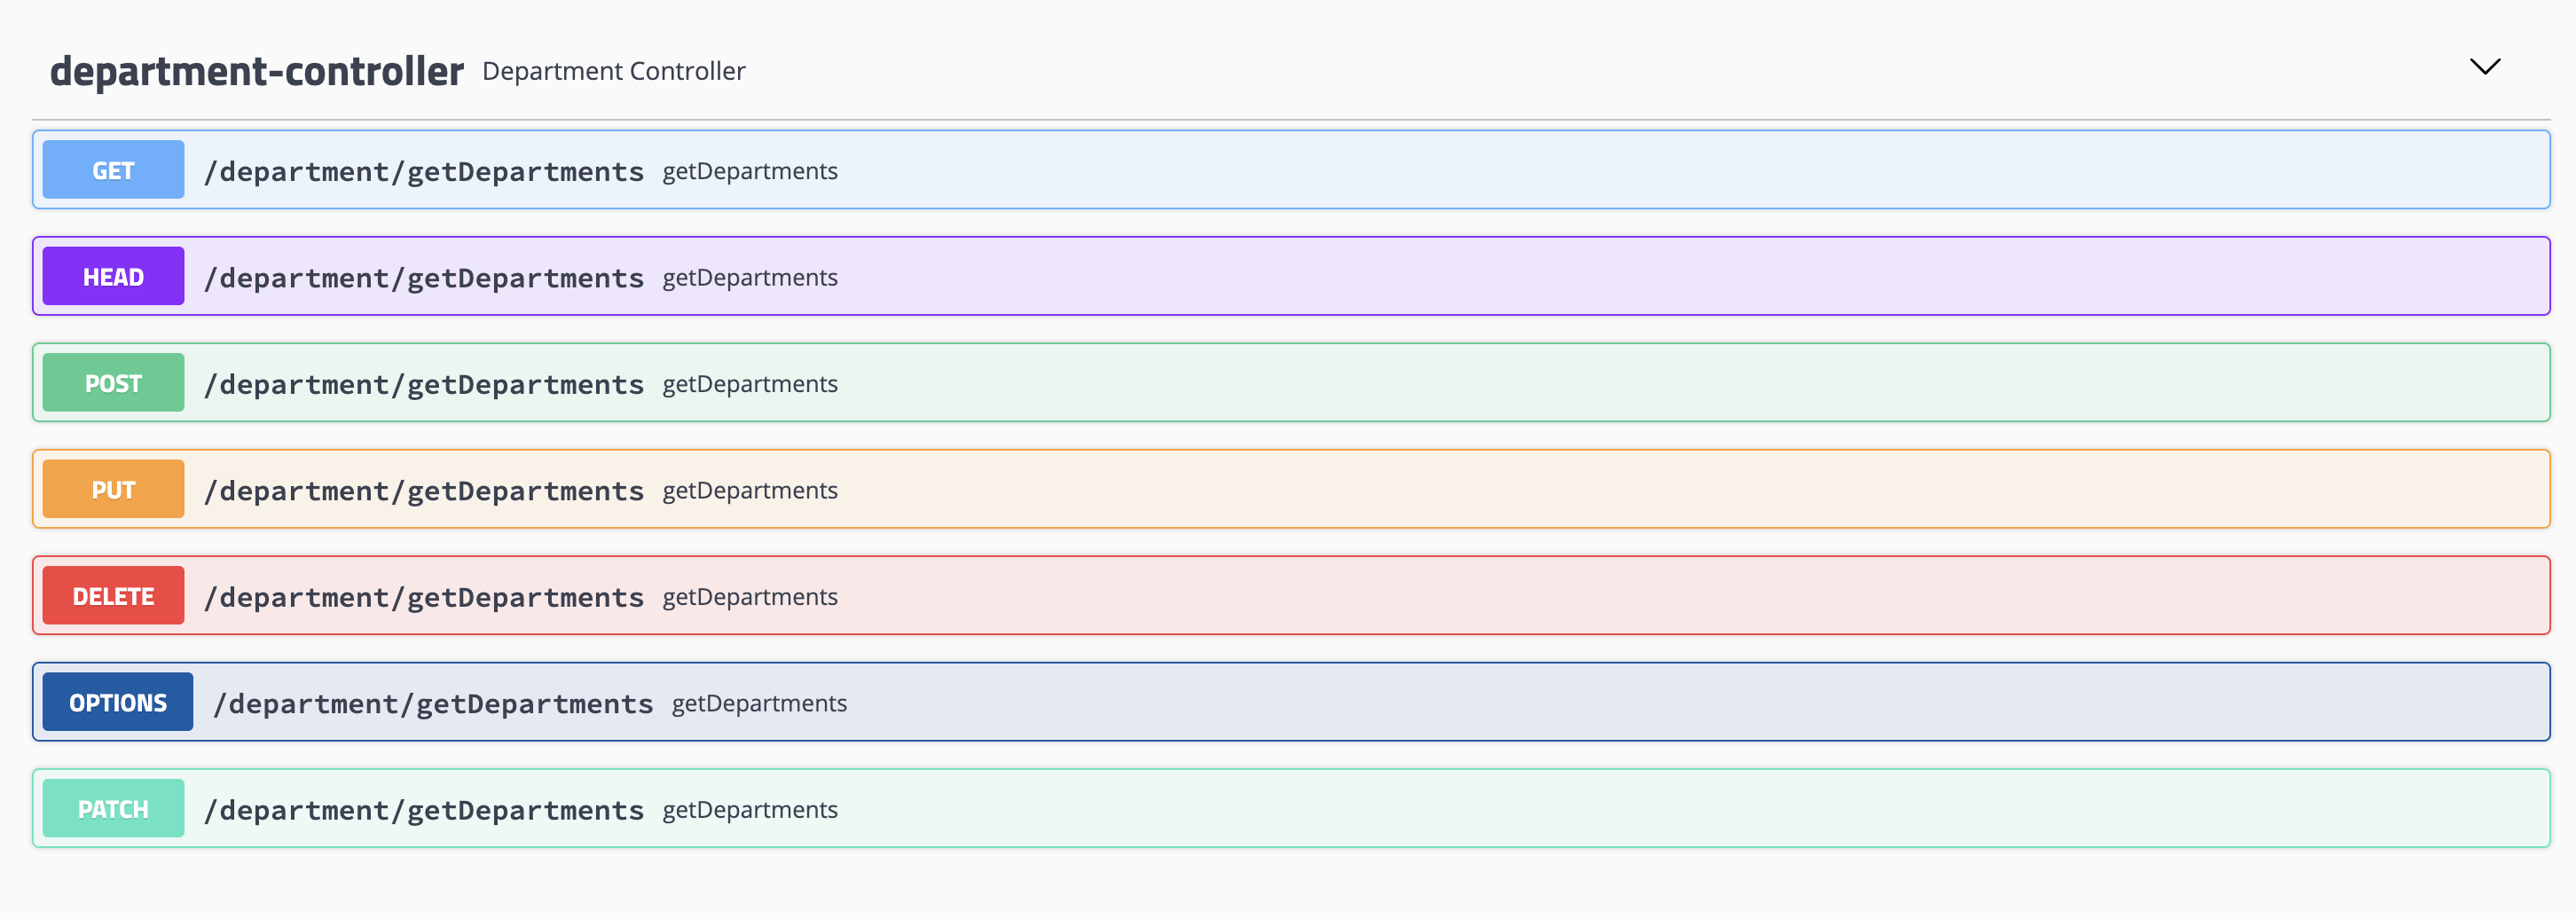
可以看到一个接口各种类型的请求,这是为什么呢?是因为我用到是@RequestMapping注解,且没有指定请求类型。
我们改成@RequestMapping(value="/getDepartments",method= RequestMethod.GET)或@GetMapping(value="/getDepartments")再看:

现在就只剩一个方式的请求了,所以写接口请求方式这里一定要定义清楚,别偷懒,习惯真的很重要!
但是很多人用就仅仅用到这一步了,打开看看别说前端看不懂时间长了自己写的都认不得了!
再配置及规范
配置docket
可以点进源码看看,阅读源码的方法:看其实现和继承->看其构造方法->看其重写方法->看其其他方法实现
这里就不再赘述,直接看其构造方法,配置Swagger的参数!
package com.springstudy.config;

import org.springframework.context.annotation.Bean;
import org.springframework.context.annotation.Configuration;
import org.springframework.core.env.Environment;
import org.springframework.core.env.Profiles;
import springfox.documentation.builders.PathSelectors;
import springfox.documentation.builders.RequestHandlerSelectors;
import springfox.documentation.service.ApiInfo;
import springfox.documentation.service.Contact;
import springfox.documentation.spi.DocumentationType;
import springfox.documentation.spring.web.plugins.Docket;
import java.util.ArrayList;

@Configuration
public class SwaggerConfig {
//注册bean Docket
    @Bean
    public Docket docket(Environment env){
        // 设置要显示swagger的环境 在application.properties 中配置spring.profiles.active=dev
        // spring 配置的优先级是properties>yaml文件的
        // 所以我一般保留一个properties来配置最高权限的配置
        // 而application.yaml用来配置数据库连接池等通用配置
        Profiles pro = Profiles.of("dev","test");
        // 判断是否是对应的环境
        boolean enable = env.acceptsProfiles(pro);
        return new Docket(DocumentationType.SWAGGER_2)
                .apiInfo(apiInfo()) // 配置文档信息!
                .enable(enable) // 如果是false就无法在浏览器中访问,可以配置
                .select()
                //配置哪些目录下的被扫描
                .apis(RequestHandlerSelectors.basePackage("com.springstudy.controller"))
                .paths(PathSelectors.ant("/test/**")) //配置只扫描/test开头的请求
                .build();
    }

    // 配置文档信息 apiInfo
    private ApiInfo apiInfo(){
        Contact contact = new Contact("城南花已开","http://imecho.life","1156947957@qq.com");
        //public static final Contact DEFAULT_CONTACT = new Contact("name", "url", "email");
        //DEFAULT = new ApiInfo(
        // "Api Documentation",
        // "Api Documentation",
        // "1.0", "urn:tos",
        // DEFAULT_CONTACT,
        // "Apache 2.0",
        // "http://www.apache.org/licenses/LICENSE-2.0",
        // new ArrayList());
        return new ApiInfo(
                "SpringBoot-study 接口文档信息",
                "所有的测试请求地址",
                "v1.0",
                "http://imecho.life", //服务地址,可以配置公司官网
                contact,//组织连接
                "Apache 2.0",
                "http://www.apache.org/licenses/LICENSE-2.0",
                new ArrayList());
    }
}
补充说明:
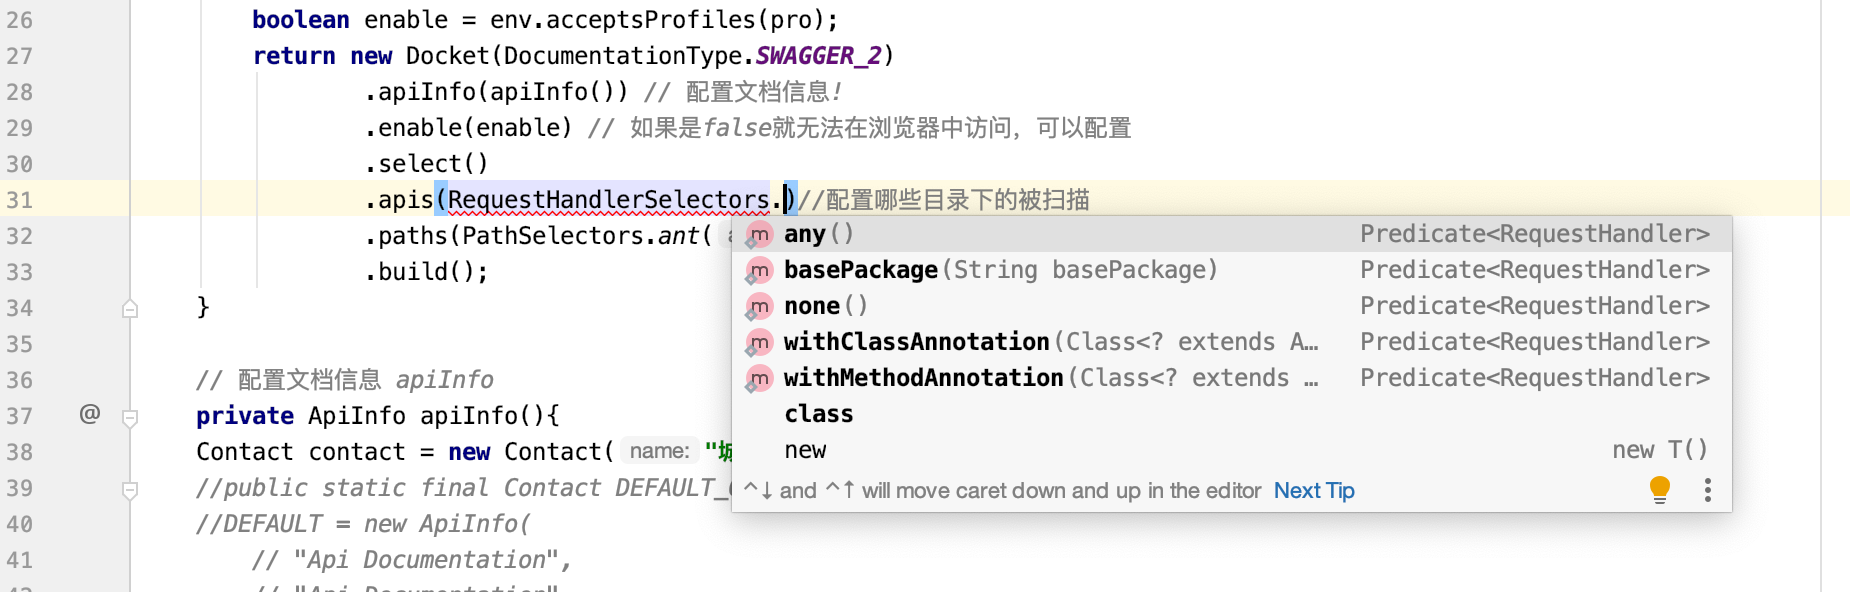
any() // 扫描所有,项目的所有接口都会被扫描的
none() // 不扫描接口
basePackage() // 根据包路径扫描
withMethodAnnotation(GetMapping.class) // 通过方法注解扫描! 比如 GetMapping.class
withClassAnnotation(Controller.class) // 通过类上的注解扫描! 比如 Controller.class
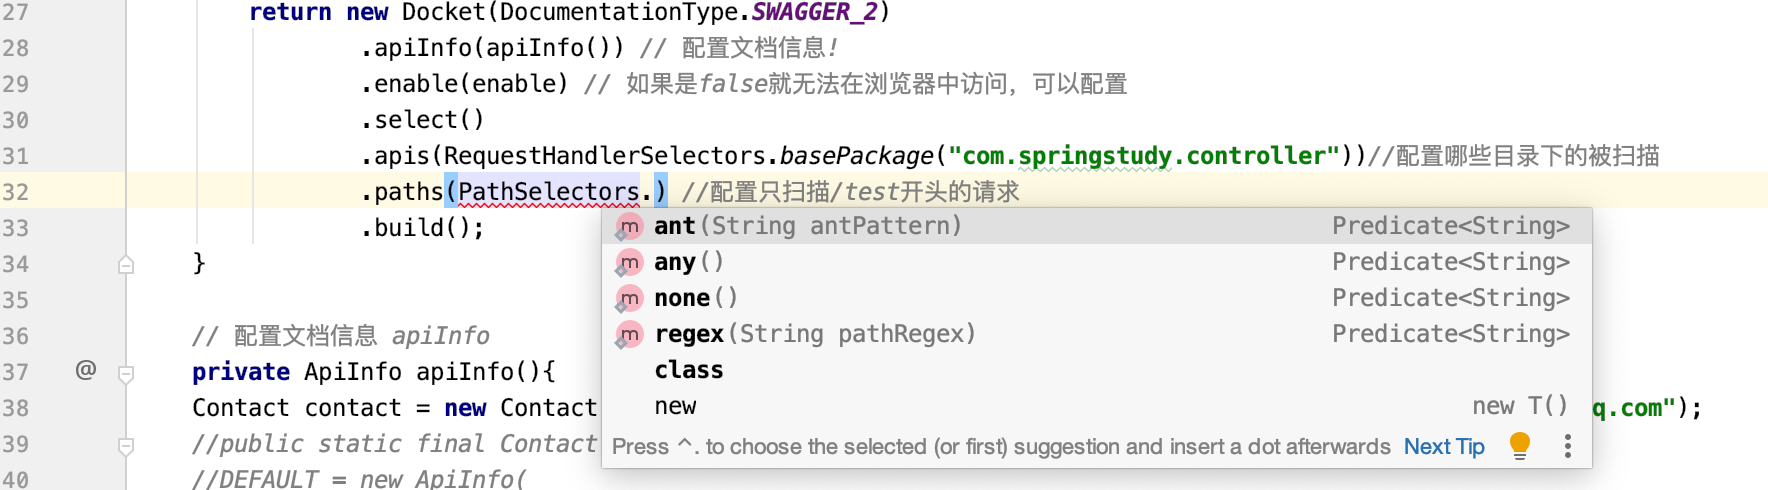
ant() // 指定扫描路径
any() // 扫描整个项目
none() // 都不扫描
regex() // 根据正则匹配扫描
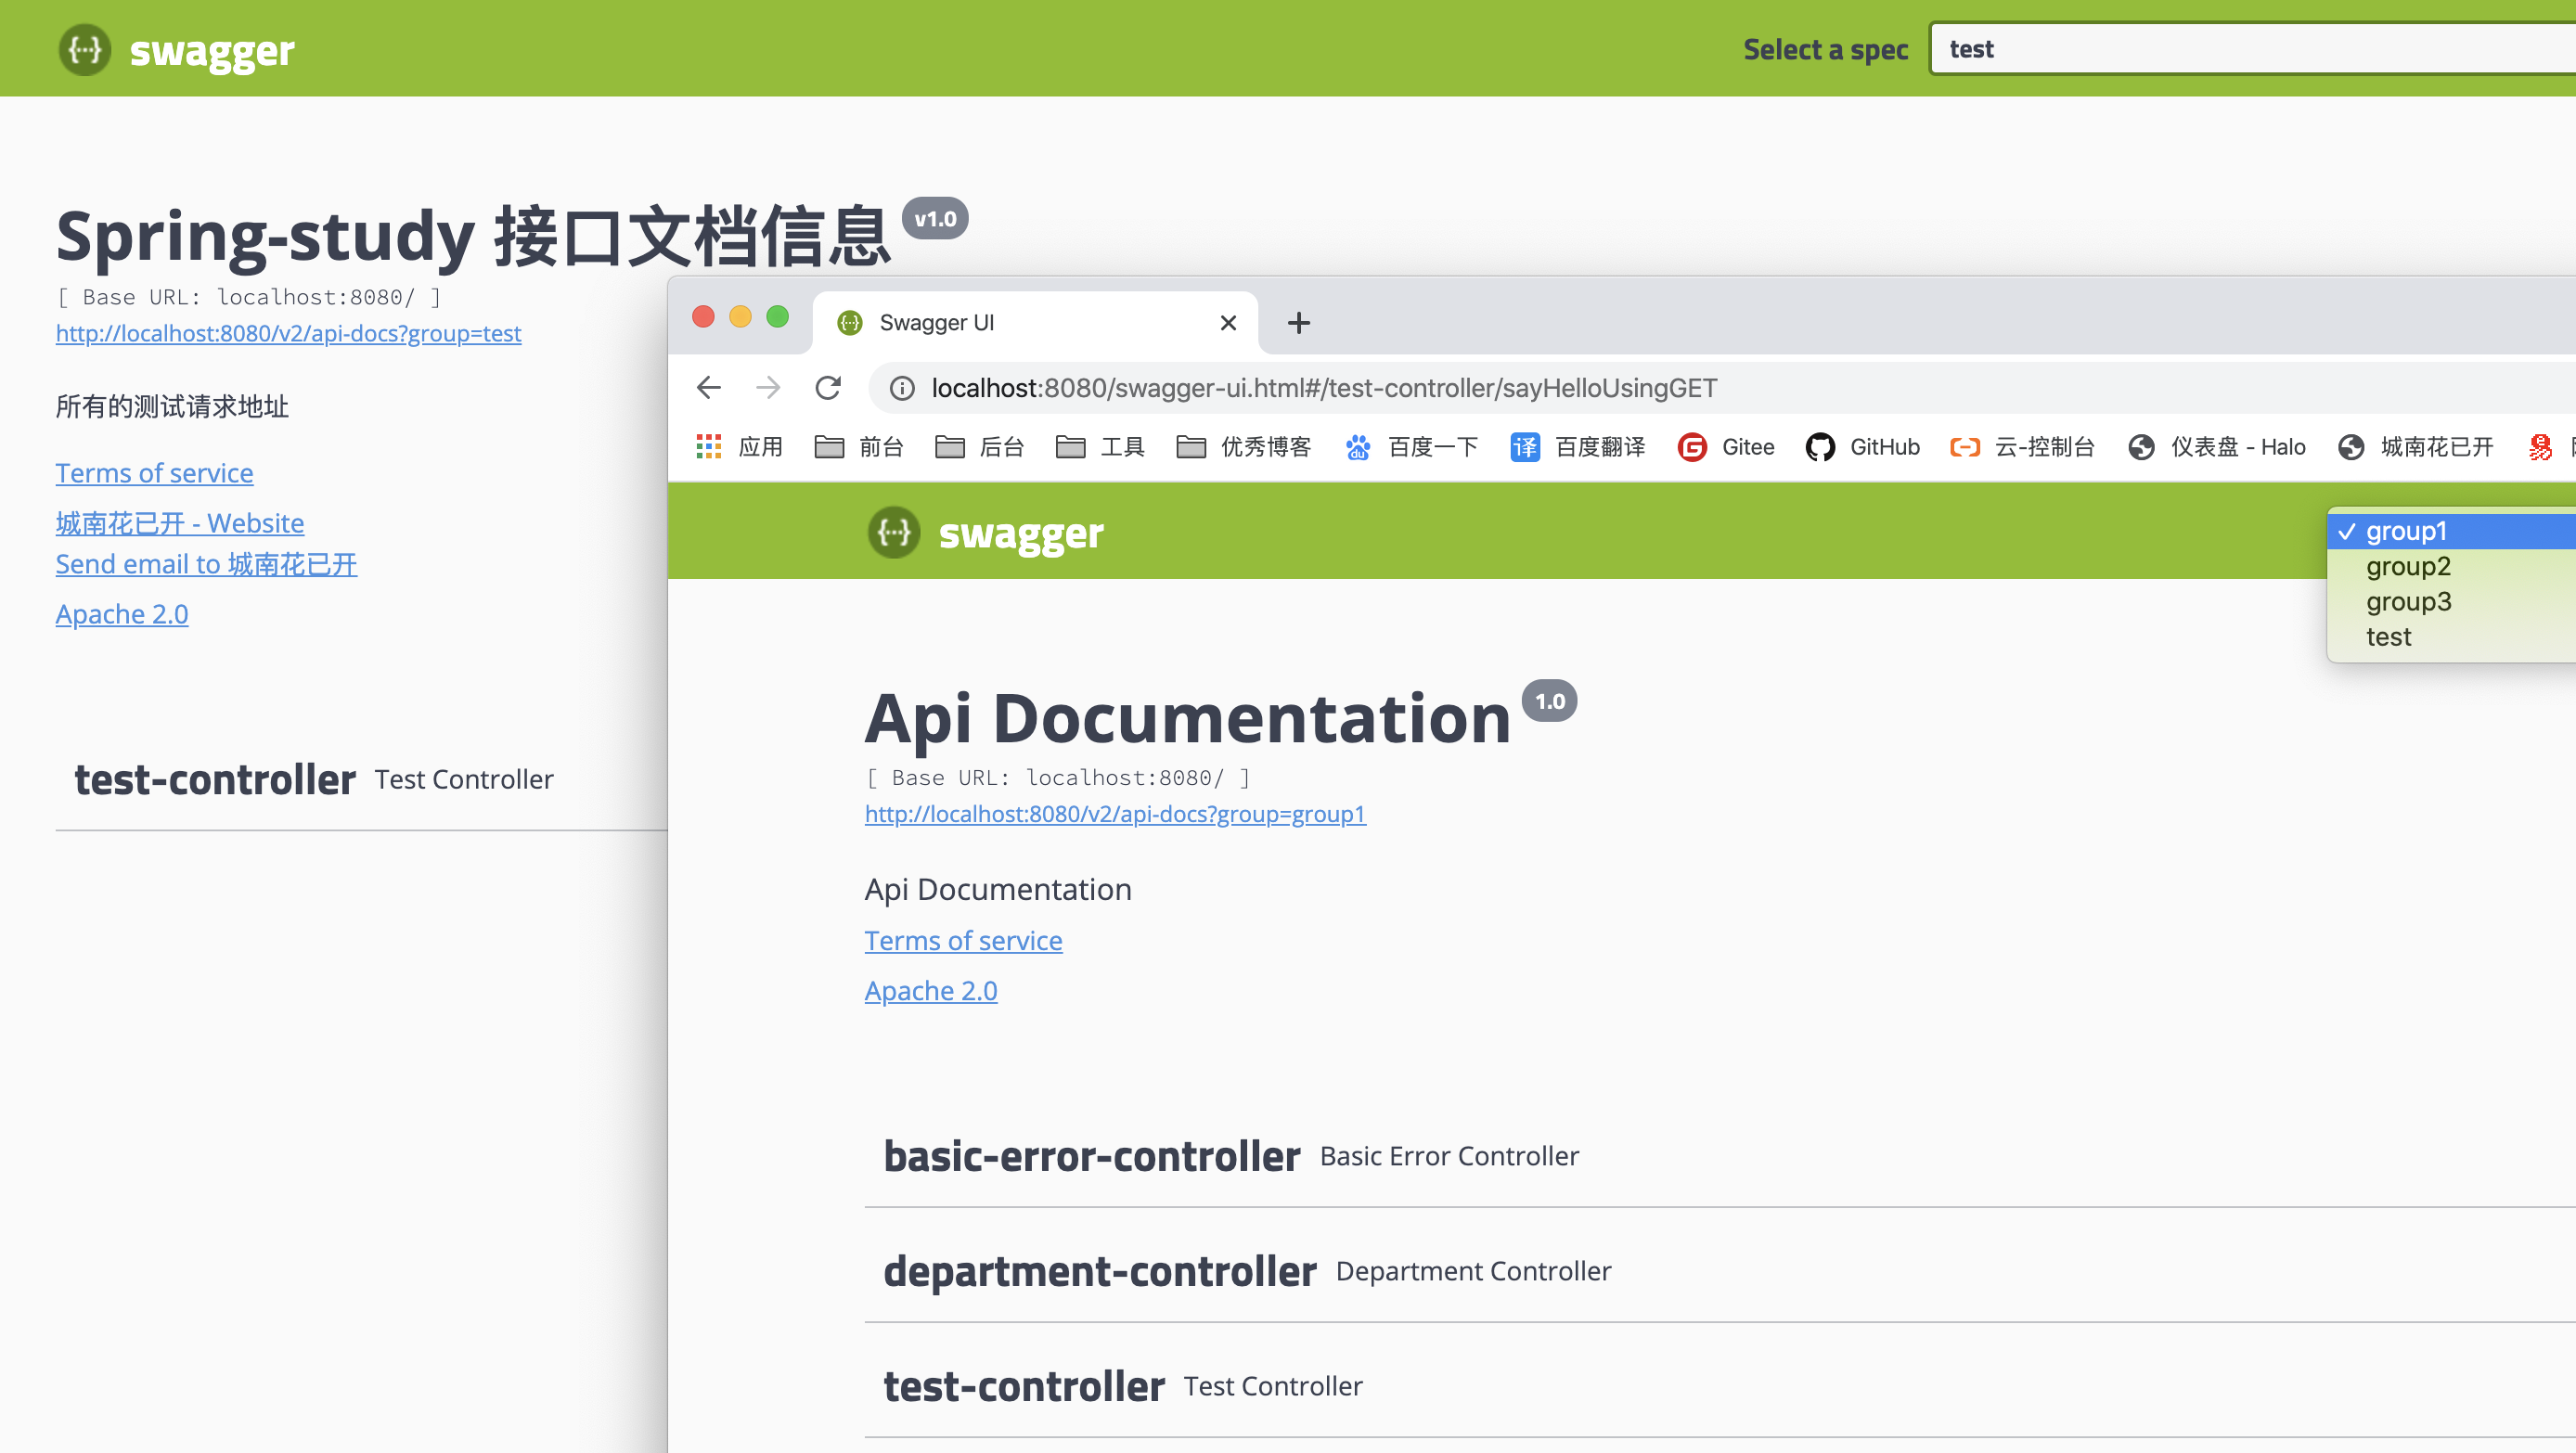
新增“/test/hello"路径下接口我们来看下效果:
分组
return new Docket(DocumentationType.SWAGGER_2)
        .groupName("test")//新增分组配置
        // ...其他代码省略
@Bean
public Docket docket1(){
return new Docket(DocumentationType.SWAGGER_2).groupName("group1");
}
@Bean
public Docket docket2(){
return new Docket(DocumentationType.SWAGGER_2).groupName("group2");
}
@Bean
public Docket docket3(){
return new Docket(DocumentationType.SWAGGER_2).groupName("group3");
}
看下分组效果:
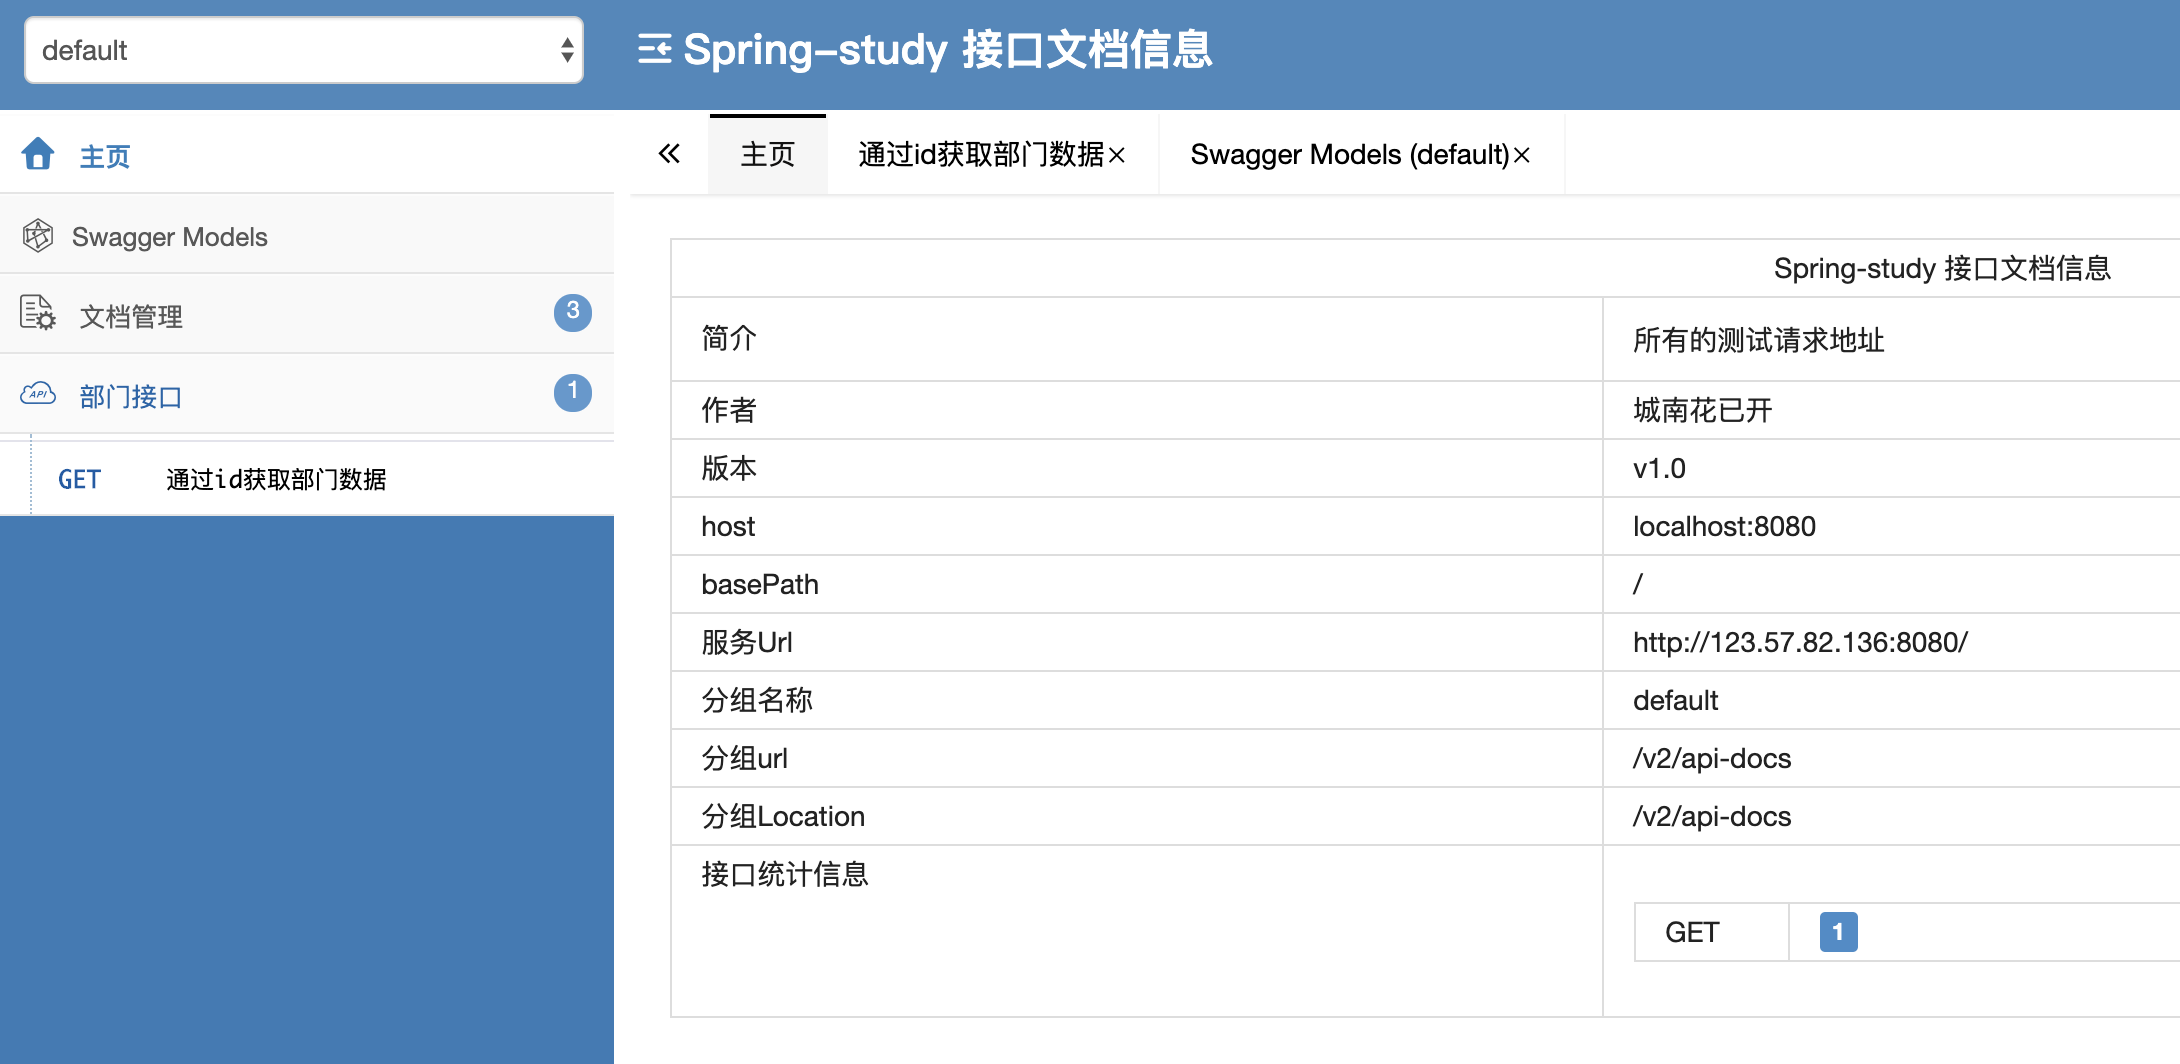
swagger注解
实体:
package com.springstudy.entity;

import io.swagger.annotations.ApiModel;
import io.swagger.annotations.ApiModelProperty;
import lombok.Data;

@Data
@ApiModel("部门实体")
public class Department {

    @ApiModelProperty("部门id")
    private Integer id;

    @ApiModelProperty("部门名称")
    private String departmentName;
}
controller :
package com.springstudy.controller;

import com.springstudy.dao.DepartmentMapper;
import com.springstudy.entity.Department;
import io.swagger.annotations.Api;
import io.swagger.annotations.ApiOperation;
import io.swagger.annotations.ApiParam;
import org.springframework.beans.factory.annotation.Autowired;
import org.springframework.web.bind.annotation.*;

@RestController
@RequestMapping("/department")
@Api(tags={"部门接口"})
public class DepartmentController {

    @Autowired
    DepartmentMapper departmentMapper;

    @ApiOperation("通过id获取部门数据")
    @GetMapping("/getDepartment/{id}")
    public Department getDepartment(@ApiParam("部门id") @PathVariable("id") Integer id){
        return departmentMapper.getDepartment(id);
    }
}
基本写到这样就可以来哈,太多了也显得乱!简洁明了即可
ui选型
- 1.默认的
http://localhost:8080/swagger-ui.html
<!-- https://mvnrepository.com/artifact/io.springfox/springfox-swagger-ui -->
<dependency>
    <groupId>io.springfox</groupId>
    <artifactId>springfox-swagger-ui</artifactId>
    <version>2.9.2</version>
</dependency>
- 2.BootStrap-ui
http://localhost:8080/doc.html
<!-- https://mvnrepository.com/artifact/com.github.xiaoymin/swagger-bootstrap-ui -->
<dependency>
    <groupId>com.github.xiaoymin</groupId>
    <artifactId>swagger-bootstrap-ui</artifactId>
    <version>1.9.6</version>
</dependency>
个人最喜欢这款,其他的自己去尝试,或者可以研究下底层api接口自己写个皮肤出来,然后开源出来嘛!
- 3.Layui的框架
http://localhost:8080/docs.html
<!-- https://mvnrepository.com/artifact/com.github.caspar-chen/swagger-ui-layer -->
<dependency>
    <groupId>com.github.caspar-chen</groupId>
    <artifactId>swagger-ui-layer</artifactId>
    <version>1.1.3</version>
</dependency>
- 4.mg-ui
http://localhost:8080/document.html
<dependency>
    <groupId>com.zyplayer</groupId>
    <artifactId>swagger-mg-ui</artifactId>
    <version>1.0.6</version>
</dependency>
本来没想写swagger的,但是最近改别个系统遗留下的bug,前台传参巨复杂,后台代码写的及其没有层次感,关键地方一句注释没有,真是要了老命,想着看看swagger-ui 上接口及返回值有没有说明,发现啥也没有。可真是骂人的心都有了,怎么一点规范都没有呢?!这东西也不是有多难,但是吧一直觉得用一个东西,如果不能用好还不如不用!