1、工厂方法模式
1-1 普通工厂模式
举例如下:(我们举一个发送邮件和短信的例子)
首先,创建二者的共同接口:
1     public interface Sender {
2         public void Send();
3     }
其次,创建实现类:
1     public class MailSender implements Sender {
2         @Override
3         public void Send() {
4             System.out.println("this is mailsender!");
5         }
6     }
1     public class SmsSender implements Sender {
2
3         @Override
4         public void Send() {
5             System.out.println("this is sms sender!");
6         }
7     }
最后,建工厂类:
 1     public class SendFactory {
 2
 3         public Sender produce(String type) {
 4             if ("mail".equals(type)) {
 5                 return new MailSender();
 6             } else if ("sms".equals(type)) {
 7                 return new SmsSender();
 8             } else {
 9                 System.out.println("请输入正确的类型!");
10                 return null;
11             }
12         }
13     }
我们来测试下:
    public class FactoryTest {

        public static void main(String[] args) {
            SendFactory factory = new SendFactory();
            Sender sender = factory.produce("sms");
            sender.Send();
        }
    }
输出:this is sms sender!
1-2 多个工厂方法模式
将上面的代码做下修改,改动下SendFactory类就行,如下:
 1 public class SendFactory {
 2        public Sender produceMail(){
 3
 4             return new MailSender();
 5         }
 6
 7         public Sender produceSms(){
 8             return new SmsSender();
 9         }
10 }
测试类如下:
1     public class FactoryTest {
2
3         public static void main(String[] args) {
4             SendFactory factory = new SendFactory();
5             Sender sender = factory.produceMail();
6             sender.Send();
7         }
8     }
输出:this is mailsender!
1-3、静态工厂方法模式
将上面的多个工厂方法模式里的方法置为静态的,不需要创建实例,直接调用即可。
 1     public class SendFactory {
 2
 3         public static Sender produceMail(){
 4             return new MailSender();
 5         }
 6
 7         public static Sender produceSms(){
 8             return new SmsSender();
 9         }
10     }
1     public class FactoryTest {
2
3         public static void main(String[] args) {
4             Sender sender = SendFactory.produceMail();
5             sender.Send();
6         }
7     }
输出:this is mailsender!
2、抽象工厂模式
1     public interface Sender {
2         public void Send();
3     }
两个实现类:
1     public class MailSender implements Sender {
2         @Override
3         public void Send() {
4             System.out.println("this is mailsender!");
5         }
6     }
1 public class SmsSender implements Sender {
2
3     @Override
4     public void Send() {
5         System.out.println("this is sms sender!");
6     }
7 }
两个工厂类:
1     public class SendMailFactory implements Provider {
2
3         @Override
4         public Sender produce(){
5             return new MailSender();
6         }
7     }
1 public class SendSmsFactory implements Provider{
2
3     @Override
4     public Sender produce() {
5         return new SmsSender();
6     }
7 }
在提供一个接口:
1 public interface Provider {
2     public Sender produce();
3 }
测试类:
1     public class Test {
2
3         public static void main(String[] args) {
4             Provider provider = new SendMailFactory();
5             Sender sender = provider.produce();
6             sender.Send();
7         }
8     }
Spring中工厂设计模式的使用
Spring使用工厂模式可以通过 BeanFactory 或 ApplicationContext 创建 bean 对象。
两者对比:
BeanFactory:延迟注入(使用到某个 bean 的时候才会注入),相比于BeanFactory来说会占用更少的内存,程序启动速度更快。ApplicationContext:容器启动的时候,不管你用没用到,一次性创建所有 bean 。BeanFactory仅提供了最基本的依赖注入支持,ApplicationContext扩展了BeanFactory,除了有BeanFactory的功能之外还有额外更多功能,所以一般开发人员使用ApplicationContext会更多。
ApplicationContext的三个实现类:
ClassPathXmlApplication:把上下文文件当成类路径资源。FileSystemXmlApplication:从文件系统中的 XML 文件载入上下文定义信息。XmlWebApplicationContext:从Web系统中的XML文件载入上下文定义信息。
Example:
 1 import org.springframework.context.ApplicationContext;
 2 import org.springframework.context.support.FileSystemXmlApplicationContext;
 3
 4 public class App {
 5     public static void main(String[] args) {
 6         ApplicationContext context = new FileSystemXmlApplicationContext(
 7                 "C:/work/IOC Containers/springframework.applicationcontext/src/main/resources/bean-factory-config.xml");
 8
 9         HelloApplicationContext obj = (HelloApplicationContext) context.getBean("helloApplicationContext");
10         obj.getMsg();
11     }
12 }
3、单例模式
首先我们写一个简单的单例类:
 1     public class Singleton {
 2
 3         /* 持有私有静态实例,防止被引用,此处赋值为null,目的是实现延迟加载 */
 4         private static Singleton instance = null;
 5
 6         /* 私有构造方法,防止被实例化 */
 7         private Singleton() {
 8         }
 9
10         /* 静态工程方法,创建实例 */
11         public static Singleton getInstance() {
12             if (instance == null) {
13                 instance = new Singleton();
14             }
15             return instance;
16         }
17
18     }
这个类可以满足基本要求,但是,像这样毫无线程安全保护的类,如果我们把它放入多线程的环境下,肯定就会出现问题了,如何解决?我们首先会想到对getInstance方法加synchronized关键字,如下:
1     public static synchronized Singleton getInstance() {
2             if (instance == null) {
3                 instance = new Singleton();
4             }
5             return instance;
6         }
但是,synchronized关键字锁住的是这个对象,这样的用法,在性能上会有所下降,因为每次调用getInstance(),都要对对象上锁,事实上,只有在第一次创建对象的时候需要加锁,之后就不需要了,所以,这个地方需要改进。我们改成下面这个:
 1     public static Singleton getInstance() {
 2             if (instance == null) {
 3                 synchronized (instance) {
 4                     if (instance == null) {
 5                         instance = new Singleton();
 6                     }
 7                 }
 8             }
 9             return instance;
10         }
 1      public class Singleton {
 2
 3          /* 持有私有静态实例,防止被引用,此处赋值为null,目的是实现延迟加载 */
 4          private static volatile Singleton instance = null;
 5
 6          /* 私有构造方法,防止被实例化 */
 7          private Singleton() {
 8          }
 9
10          /* 静态工程方法,创建实例 */
11          public static Singleton getInstance() {
12              if (instance == null) {
13                  synchronized(instance){
                         if(instance == null){
14                           instance = new Singleton();
                         }
15                  }
16
17              }
18              return instance;
19          }
20
21      }
 1     public class Singleton {
 2
 3         /* 私有构造方法,防止被实例化 */
 4         private Singleton() {
 5         }
 6
 7         /* 此处使用一个内部类来维护单例 */
 8         private static class SingletonFactory {
 9             private static Singleton instance = new Singleton();
10         }
11
12         /* 获取实例 */
13         public static Singleton getInstance() {
14             return SingletonFactory.instance;
15         }
16
17     }
也有人这样实现:因为我们只需要在创建类的时候进行同步,所以只要将创建和getInstance()分开,单独为创建加synchronized关键字,也是可以的:
 1     public class SingletonTest {
 2
 3         private static volatile SingletonTest instance = null;
 4
 5         private SingletonTest() {
 6         }
 7
 8         private static synchronized void syncInit() {
 9             if (instance == null) {
10                 instance = new SingletonTest();
11             }
12         }
13
14         public static SingletonTest getInstance() {
15             if (instance == null) {
16                 syncInit();
17             }
18             return instance;
19         }
20     }
以上都是懒汉式单例,下面实现一个饿汉式的单例
 1     public class SingletonTest {
 2
 3         private static final SingletonTest instance =new SingletonTest();
 4
 5         private SingletonTest() {
 6         }
 7
 8         public static SingletonTest getInstance() {
 9             return instance;
10         }
11     }
枚举单例
 1 class Resource{
 2 }
 3
 4 public enum SomeThing {
 5     INSTANCE;
 6     private Resource instance;
 7     SomeThing() {
 8         instance = new Resource();
 9     }
10     public Resource getInstance() {
11         return instance;
12     }
13 }
Spring中单例设计模式的使用
Spring中bean的默认作用域就是singleton(单例)的,除了singleton作用域,Spring中bean还有下面几种作用域:
- prototype : 每次请求都会创建一个新的 bean 实例。
- request : 每一次HTTP请求都会产生一个新的bean,该bean仅在当前HTTP request内有效。
- session : 每一次HTTP请求都会产生一个新的 bean,该bean仅在当前 HTTP session 内有效。
- global-session: 全局session作用域,仅仅在基于portlet的web应用中才有意义,Spring5已经没有了。Portlet是能够生成语义代码(例如:HTML)片段的小型Java Web插件。它们基于portlet容器,可以像servlet一样处理HTTP请求。但是,与 servlet 不同,每个 portlet 都有不同的会话
Spring实现单例的方式:
- xml:
<bean id="userService" class="top.snailclimb.UserService" scope="singleton"/> - 注解:
@Scope(value = "singleton")
Spring通过ConcurrentHashMap实现单例注册表的特殊方式实现单例模式。Spring实现单例的核心代码如下:
 1 // 通过 ConcurrentHashMap(线程安全) 实现单例注册表
 2 private final Map<String, Object> singletonObjects = new ConcurrentHashMap<String, Object>(64);
 3
 4 public Object getSingleton(String beanName, ObjectFactory<?> singletonFactory) {
 5         Assert.notNull(beanName, "'beanName' must not be null");
 6         synchronized (this.singletonObjects) {
 7             // 检查缓存中是否存在实例
 8             Object singletonObject = this.singletonObjects.get(beanName);
 9             if (singletonObject == null) {
10                 //...省略了很多代码
11                 try {
12                     singletonObject = singletonFactory.getObject();
13                 }
14                 //...省略了很多代码
15                 // 如果实例对象在不存在,我们注册到单例注册表中。
16                 addSingleton(beanName, singletonObject);
17             }
18             return (singletonObject != NULL_OBJECT ? singletonObject : null);
19         }
20     }
21     //将对象添加到单例注册表
22     protected void addSingleton(String beanName, Object singletonObject) {
23             synchronized (this.singletonObjects) {
24                 this.singletonObjects.put(beanName, (singletonObject != null ? singletonObject : NULL_OBJECT));
25
26             }
27         }
28 }
4、建造者模式
(1) 产品角色:包含多个组成部件的复杂对象。
 1     class Product{
 2         private String partA;
 3         private String partB;
 4         private String partC;
 5         public void setPartA(String partA){
 6             this.partA=partA;
 7         }
 8         public void setPartB(String partB){
 9             this.partB=partB;
10         }
11         public void setPartC(String partC) {
12             this.partC=partC;
13         }
14         public void show(){
15             //显示产品的特性
16         }
17     }
(2) 抽象建造者:包含创建产品各个子部件的抽象方法。
 1 abstract class Builder
 2 {
 3     //创建产品对象
 4     protected Product product=new Product();
 5     public abstract void buildPartA();
 6     public abstract void buildPartB();
 7     public abstract void buildPartC();
 8     //返回产品对象
 9     public Product getResult()
10     {
11         return product;
12     }
13 }
(3) 具体建造者:实现了抽象建造者接口。
 1 public class ConcreteBuilder extends Builder
 2 {
 3     public void buildPartA()
 4     {
 5         product.setPartA("建造 PartA");
 6     }
 7     public void buildPartB()
 8     {
 9         product.setPartA("建造 PartB");
10     }
11     public void buildPartC()
12     {
13         product.setPartA("建造 PartC");
14     }
15 }
(4) 指挥者:调用建造者中的方法完成复杂对象的创建。
 1 class Director
 2 {
 3     private Builder builder;
 4     public Director(Builder builder)
 5     {
 6         this.builder=builder;
 7     }
 8     //产品构建与组装方法
 9     public Product construct()
10     {
11         builder.buildPartA();
12         builder.buildPartB();
13         builder.buildPartC();
14         return builder.getResult();
15     }
16 }
(5) 客户类。
 1 public class Client
 2 {
 3     public static void main(String[] args)
 4     {
 5         Builder builder=new ConcreteBuilder();
 6         Director director=new Director(builder);
 7         Product product=director.construct();
 8         product.show();
 9     }
10 }
Spring中建造者模式的使用
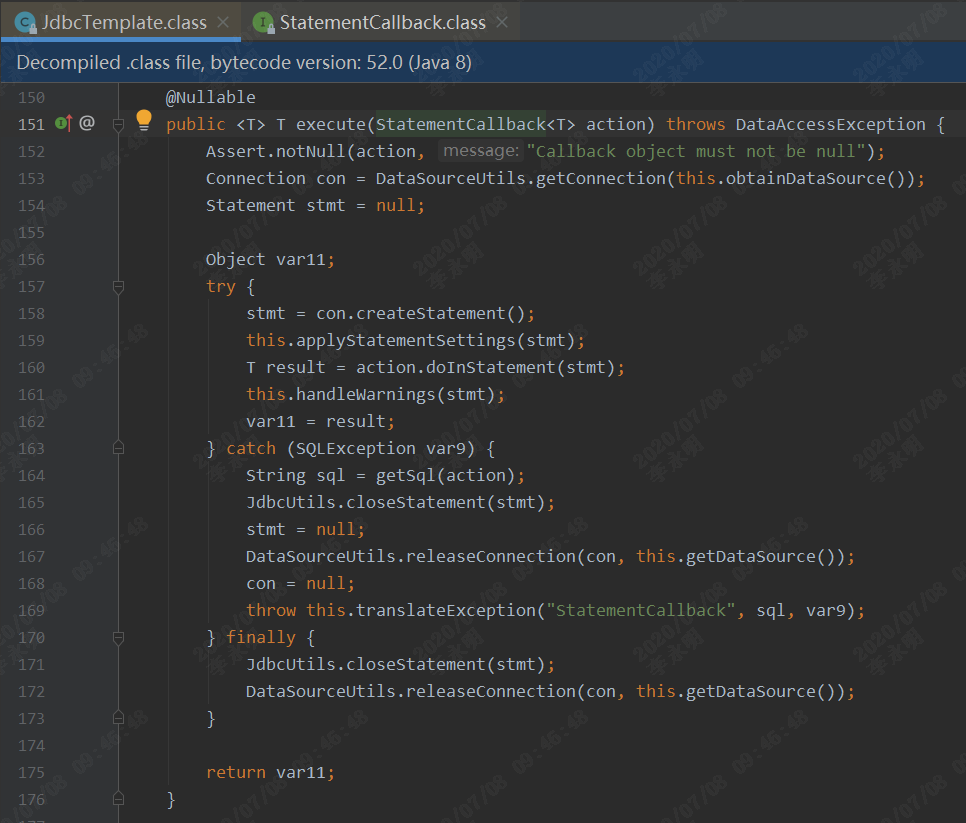
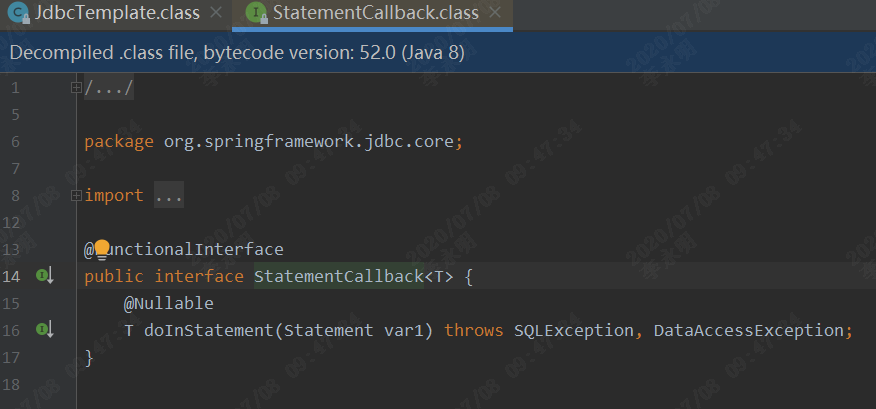
spring框架,主要是用来管理对象,创建一个对象是极其复杂的,建造者模式在解析xml文件,创建BeanDefinition中发挥很大的作用。不想在这里做更细节的分析,但是可以找段代码,分析spring是如何使用它。
段落1:spring-security中解析xml
 1 private BeanReference registerMethodSecurityInterceptor(ParserContext pc,
 2       String authMgrRef, String accessManagerId, String runAsManagerId,
 3       BeanReference metadataSource,
 4       List<BeanMetadataElement> afterInvocationProviders, Object source,
 5       boolean useAspectJ) {
 6     // 建造者:建造方法拦截器beanDefinition,如果开启切面,则使用AspectJMethodSecurityInterceptor,若没有开启切面,则使用MethodSecurityInterceptor
 7    BeanDefinitionBuilder bldr = BeanDefinitionBuilder
 8          .rootBeanDefinition(useAspectJ ? AspectJMethodSecurityInterceptor.class
 9                : MethodSecurityInterceptor.class);
10     // 建造者:添加资源
11    bldr.getRawBeanDefinition().setSource(source);
12     // 建造者:添加“决策(放行)管理器”
13    bldr.addPropertyReference("accessDecisionManager", accessManagerId);
14     // 建造者:定义“鉴权管理器”BeanDefinition
15    RootBeanDefinition authMgr = new RootBeanDefinition(
16          AuthenticationManagerDelegator.class);
17     // 建造者:将自定义“鉴权管理实现”注入到鉴权管理BeanDifinition
18    authMgr.getConstructorArgumentValues().addGenericArgumentValue(authMgrRef);
19    bldr.addPropertyValue("authenticationManager", authMgr);
20     // 安全相关数据源BeanReference
21    bldr.addPropertyValue("securityMetadataSource", metadataSource);
22
23     // 建造者:如果拥有赋权,也将添加到beanDefinition中
24    if (StringUtils.hasText(runAsManagerId)) {
25       bldr.addPropertyReference("runAsManager", runAsManagerId);
26    }
27
28     // 如果自定义了处理器,也要为处理器制作一个BeanDefinition,这里使用RootBeanDefinition是在2.5以前的做法,表示作为根BeanDefinition.
29     // 对应的还有childBeanDefinition,RootBeanDefinition / ChildBeanDefinition用来预定义具有parent/child关系的bean definition。
30     // 所以RootBeanDefinition是一个可合并的BeanDefinition
31    if (!afterInvocationProviders.isEmpty()) {
32       BeanDefinition afterInvocationManager;
33       afterInvocationManager = new RootBeanDefinition(
34             AfterInvocationProviderManager.class);
35       afterInvocationManager.getPropertyValues().addPropertyValue("providers",
36             afterInvocationProviders);
37     // 建造者:然后将只做好的处理器beanDefinition添加到方法拦截器的beanDefinition中
38       bldr.addPropertyValue("afterInvocationManager", afterInvocationManager);
39    }
40
41     // 建造者:在建造师处理好之后获取最终的BeanDefinition
42    BeanDefinition bean = bldr.getBeanDefinition();
43    String id = pc.getReaderContext().generateBeanName(bean);
44    pc.registerBeanComponent(new BeanComponentDefinition(bean, id));
45
46
47    return new RuntimeBeanReference(id);
48 }
49
50
51 //关于切面的支持
52 // 如果打开了切面支持,则要为增强切面添加BeanDefinition
53    if (useAspectJ) {
54       BeanDefinitionBuilder aspect = BeanDefinitionBuilder
55             .rootBeanDefinition("org.springframework.security.access.intercept.aspectj.aspect.AnnotationSecurityAspect");
56       aspect.setFactoryMethod("aspectOf");
57       aspect.setRole(BeanDefinition.ROLE_INFRASTRUCTURE);
58       aspect.addPropertyValue("securityInterceptor", interceptor);
59       String id = pc.getReaderContext().registerWithGeneratedName(
60             aspect.getBeanDefinition());
61       pc.registerBeanComponent(new BeanComponentDefinition(aspect
62             .getBeanDefinition(), id));
63    }
64     // 如果需要,增加动态代理处理器
65    else {
66       registerAdvisor(pc, interceptor, metadataSource, source,
67             element.getAttribute(ATT_ADVICE_ORDER));
68       AopNamespaceUtils.registerAutoProxyCreatorIfNecessary(pc, element);
69    }
段落2:spring中关于解析自定义标签生成BeanDefinition。(在模板模式笔记中,曾引用过这段,builder在spring中应用广泛)
 1 // 这个定义在AbstractSingleBeanDefinitionParser中,是我们自定义解析器的父类。
 2 @Override
 3 protected final AbstractBeanDefinition parseInternal(Element element, ParserContext parserContext) {
 4     // 建造者:获取建造者,建造的对象是:GenericBeanDefinition
 5
 6     //在执行我们自定义的解析器中的方法之前,先执行一些准备工作,也可以叫做预解析,对beanClass、scope、lazyInit等属性的准备
 7    BeanDefinitionBuilder builder = BeanDefinitionBuilder.genericBeanDefinition();
 8    String parentName = getParentName(element);
 9    if (parentName != null) {
10       builder.getRawBeanDefinition().setParentName(parentName);
11    }
12     // 这个是自定义解析器中重写的getBeanClass方法
13    Class<?> beanClass = getBeanClass(element);
14    if (beanClass != null) {
15     // 建造者:我们取得了beanClass,它将作为对象的零件,先‘安装’在对象上
16       builder.getRawBeanDefinition().setBeanClass(beanClass);
17    }
18    else {
19         // 如果没有重写getBeanClass方法,就看有没有重写getBeanClassName方法;
20       String beanClassName = getBeanClassName(element);
21       if (beanClassName != null) {
22       //  建造者:如果取得了beanClassName,‘安装’在对象上
23          builder.getRawBeanDefinition().setBeanClassName(beanClassName);
24       }
25    }
26    // 建造者:安装其他零件
27    builder.getRawBeanDefinition().setSource(parserContext.extractSource(element));
28    BeanDefinition containingBd = parserContext.getContainingBeanDefinition();
29    if (containingBd != null) {
30         //如果存在父类,就使用父类的scope属性
31       // Inner bean definition must receive same scope as containing bean.
32       builder.setScope(containingBd.getScope());
33    }
34    if (parserContext.isDefaultLazyInit()) {
35         //  建造者:安装‘零件’懒加载方式。设为延迟懒加载
36       // Default-lazy-init applies to custom bean definitions as well.
37       builder.setLazyInit(true);
38    }
39     // 模板模式:doParse被我们自定义的解析器重写;实现模板模式。
40    doParse(element, parserContext, builder);
41    //  建造者:获取最终的BeanDefiniton对象(最开始的GenericBeanDefinition)。
42    return builder.getBeanDefinition();
43 }
 1 public final class BeanDefinitionBuilder {
 2     private final AbstractBeanDefinition beanDefinition;
 3     private int constructorArgIndex;
 4
 5     //......
 6
 7     public AbstractBeanDefinition getBeanDefinition() {
 8         this.beanDefinition.validate();
 9         return this.beanDefinition;
10     }
11
12     //......
13
14 }
JDK中的StringBuilder使用了建造者模式
- Appendable接口定义了append抽象方法,就是一个抽象的建造者。
- AbstractStringBuilder实现了Appendable,就是一个具体的建造者,但是不能实例化。
- StringBuilder继承了AbstarctStringBuilder,相当于一个具体建造者角色,同时还是一个指挥者角色。
5、原型模式
 1     public class Prototype implements Cloneable, Serializable {
 2
 3         private static final long serialVersionUID = 1L;
 4         private String string;
 5
 6         private SerializableObject obj;
 7
 8         /* 浅复制 */
 9         public Object clone() throws CloneNotSupportedException {
10             Prototype proto = (Prototype) super.clone();
11             return proto;
12         }
13
14         /* 深复制 */
15         public Object deepClone() throws IOException, ClassNotFoundException {
16
17             /* 写入当前对象的二进制流 */
18             ByteArrayOutputStream bos = new ByteArrayOutputStream();
19             ObjectOutputStream oos = new ObjectOutputStream(bos);
20             oos.writeObject(this);
21
22             /* 读出二进制流产生的新对象 */
23             ByteArrayInputStream bis = new ByteArrayInputStream(bos.toByteArray());
24             ObjectInputStream ois = new ObjectInputStream(bis);
25             return ois.readObject();
26         }
27
28         public String getString() {
29             return string;
30         }
31
32         public void setString(String string) {
33             this.string = string;
34         }
35
36         public SerializableObject getObj() {
37             return obj;
38         }
39
40         public void setObj(SerializableObject obj) {
41             this.obj = obj;
42         }
43
44     }
45
46     class SerializableObject implements Serializable {
47         private static final long serialVersionUID = 1L;
48     }
Spring中原型模式的使用
ArrayList中clone()方法的源码
 1     public Object clone() {
 2         try {
 3             ArrayList<?> v = (ArrayList<?>) super.clone();
 4             v.elementData = Arrays.copyOf(elementData, size);
 5             v.modCount = 0;
 6             return v;
 7         } catch (CloneNotSupportedException e) {
 8             // this shouldn't happen, since we are Cloneable
 9             throw new InternalError(e);
10         }
11     }
6、适配器模式
一、类适配器
1.1、有个传统的Micro USB的充电线

package com.cn.adapter.classAdapter;

/**
 * 有个传统的Micro USB的充电线
 *
 * @author cfang
 * 2018年6月1日 下午4:13:01
 */
public interface MicroUSB {

    void isMicroUSB();
}
1.2、手机充电口为typec
package com.cn.adapter.classAdapter;

/**
 * 手机充电口为typec
 *
 * @author cfang
 * 2018年6月1日 下午4:14:28
 */
public interface TypeC {

    void isTypeC();
}
package com.cn.adapter.classAdapter;


public class TypeCImpl implements TypeC{

    @Override
    public void isTypeC() {
        System.out.println("typec充电口");
    }

}
1.3、整个适配器adapter,将MicroUSB 转化成typec
package com.cn.adapter.classAdapter;

/**
 * 用于将MicroUSB接口转化成tytpec接口
 *
 * @author cfang
 * 2018年6月1日 下午4:46:28
 */
public class Adapter extends TypeCImpl implements MicroUSB{

    @Override
    public void isMicroUSB() {
        isTypeC();
    }

}
1.4、测试main方法
package com.cn.adapter.classAdapter;

public class App {

    public static void main(String[] args) {

        MicroUSB microUSB = new Adapter();
        microUSB.isMicroUSB();
    }
}
二、对象适配器
2.1、TypeC接口、MicroUSB接口以及实现同上
2.3、适配器类
package com.cn.adapter.objectAdapter;

import com.cn.adapter.classAdapter.MicroUSB;
import com.cn.adapter.classAdapter.TypeC;

public class Adapter implements MicroUSB{

    private TypeC typeC;
    public Adapter(TypeC typeC){
        this.typeC = typeC;
    }

    @Override
    public void isMicroUSB() {
        typeC.isTypeC();
    }


}
2.4、测试main方法
package com.cn.adapter.objectAdapter;

import com.cn.adapter.classAdapter.MicroUSB;
import com.cn.adapter.classAdapter.TypeC;
import com.cn.adapter.classAdapter.TypeCImpl;

public class App {

    public static void main(String[] args) {

        TypeC typeC = new TypeCImpl();
        MicroUSB microUSB = new Adapter(typeC);
        microUSB.isMicroUSB();
    }
}
三、接口的适配器。
 1 package com.example.springboot.dto;
 2
 3 public interface A {
 4     void a0();
 5     void a1();
 6     void a2();
 7     void a3();
 8     void a4();
 9 }
10
11 /**
12  * 接口适配器
13  */
14 public abstract  class Adapter implements A {
15
16     public void a0() {
17
18     }
19
20     public void a1() {
21
22     }
23
24     public void a2() {
25
26     }
27
28     public void a3() {
29
30     }
31
32     public void a4() {
33
34     }
35 }
36 public class B extends Adapter{
37
38     public void a2() {
39         super.a2();
40     }
41 }
例子:用一个生活中的充电器的例子来讲解下适配器,我国民用电都是 220V,而我们的手机充电一般需要 5V。
220V 的交流电相当于被适配者 Adaptee,我们的目标 Target 是 5V 直流电,充电器本身相当于一个 Adapter,将220V 的输入电压变换为 5V 输出。
1.首先是我们的名用电(我国是 220V,当然还可以有其他国家的其他准备,可随时扩展)
1 public class Volatage220V {
2     public final int output = 220;
3     public int output220V(){
4         System.out.println("输出电压" + output);
5         return output;
6     }
7 }
2.适配接口
1 public interface IVoltage5V {
2     int output5V();
3 }
3.我们的手机充电,只支持 5V 电压
1 public class Phone {
2     public void charging(IVoltage5V v){
3         if(v.output5V() == 5){
4             System.out.println("电压5V,符合充电标准,开始充电");
5         }else{
6             System.out.println("电压不符合标准,无法充电");
7         }
8     }
9 }
4.适配器
 1 public class VoltageAdapter implements IVoltage5V{
 2     //聚合
 3     private Volatage220V volatage220V;
 4
 5     public VoltageAdapter(Volatage220V v){
 6         this.volatage220V = v;
 7     }
 8
 9     @Override
10     public int output5V() {
11         int dst = 0;
12         if(volatage220V != null){
13             int src = volatage220V.output220V();
14             System.out.println("适配器工作~~~~~~");
15             dst = src/44;
16             System.out.println("适配器工作完成,输出电压" + dst);
17         }
18         return dst;
19     }
20 }
5.工作,如果去国外旅游,有不同的电压,只需要扩展适配器即可。
1 public class Client {
2     public static void main(String[] args) {
3         Phone phone = new Phone();
4         phone.charging(new VoltageAdapter(new Volatage220V()));
5     }
6 }
Spring中的适配器模式
Spring MVC中的适配器模式主要用于执行目标 Controller中的请求处理方法。
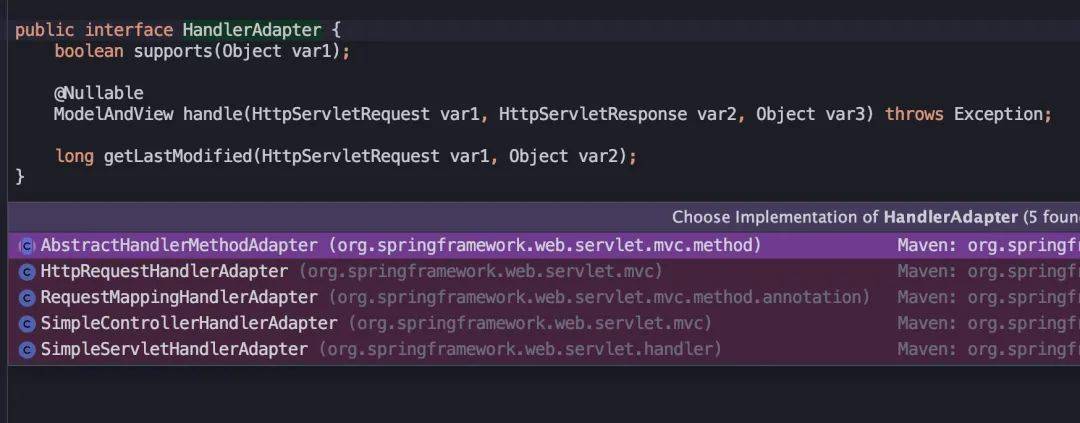
在Spring MVC中,DispatcherServlet作为用户,HandlerAdapter作为期望接口,具体的适配器实现类用于对目标类进行适配,Controller作为需要适配的类。
为什么要在 Spring MVC 中使用适配器模式?Spring MVC 中的 Controller种类众多,不同类型的 Controller通过不同的方法来对请求进行处理。如果不利用适配器模式的话,DispatcherServlet直接获取对应类型的 Controller,需要的自行来判断,像下面这段代码一样:
        if(mappedHandler.getHandler instanceof MultiActionController){

            ((MultiActionController)mappedHandler.getHandler).xxx

        } else if(mappedHandler.getHandler instanceof XXX){
            ...
        } else if(...){
            ...
        }
这样假设如果我们增加一个 Controller,就要在代码中加入一行 if 语句,这种形式就使得程序难以维护,也违反了设计模式中的开闭原则 – 对扩展开放,对修改关闭。
我们通过源码看看 SpringMVC 是如何实现的,首先看下核心类 DispatcherServlet:
public class DispatcherServlet extends FrameworkServlet{

//......

//维护所有HandlerAdapter类的集合

@Nullable

private List<HandlerAdapter> handlerAdapters;

//初始化handlerAdapters

private void initHandlerAdapters(ApplicationContext context){

    this.handlerAdapters = null;

    if( this.detectAllHandlerAdapters) {

         Map<String, HandlerAdapter> matchingBeans =     BeanFactoryUtils.beansOfTypeIncludingAncestors(context,  HandlerAdapter.class, true, false);

         if(!matchingBeans.isEmpty) {

               this.handlerAdapters = new ArrayList(matchingBeans.values);

               AnnotationAwareOrderComparator.sort( this.handlerAdapters);

}

} else{

try{

      HandlerAdapter ha = (HandlerAdapter)context.getBean( "handlerAdapter", HandlerAdapter.class);

     this.handlerAdapters = Collections.singletonList(ha);

} catch(NoSuchBeanDefinitionException var3) {

}

}

     if( this.handlerAdapters == null) {

         this.handlerAdapters = this.getDefaultStrategies(context, HandlerAdapter.class);

        if( this.logger.isTraceEnabled) {

             this.logger.trace( "No HandlerAdapters declared for servlet '"this.getServletName "': using default strategies from DispatcherServlet.properties");

        }

    }

}

//dispatch 方法中会获取 HandlerAdapter

protected void doDispatch(HttpServletRequest request, HttpServletResponse response)throwsException {

//...

//获得controller对应的适配器

HandlerAdapter ha = this.getHandlerAdapter(mappedHandler.getHandler);

//调用适配器的handler方法处理请求,并返回ModelAndView

mv = ha.handle(processedRequest, response, mappedHandler.getHandler);

//...

}

//返回对应的controller的处理器

protected HandlerAdapter getHandlerAdapter(Object handler) throws ServletException {

if(this.handlerAdapters != null) {

Iterator var2 = this.handlerAdapters.iterator;

while(var2.hasNext) {

HandlerAdapter adapter = (HandlerAdapter)var2.next;

if(adapter.supports(handler)) {

return adapter;

}

}

}

}
接着看下 HandlerAdapter 的源码,也就是适配器接口:
 1 public interface HandlerAdapter{
 2
 3     boolean supports(Object var1);
 4
 5     @Nullable
 6
 7     ModelAndView handle(HttpServletRequest var1, HttpServletResponse var2, Object var3)throws Exception ;
 8
 9     long  getLastModified(HttpServletRequest var1, Object var2);
10
11 }
再来屡一下这个流程:
1.首先是适配器接口 DispatchServlet 中有一个集合维护所有的 HandlerAdapter,如果配置文件中没有对适配器进行配置,那么 DispatchServlet 会在创建时对该变量进行初始化,注册所有默认的 HandlerAdapter。
2.当一个请求过来时,DispatchServlet 会根据传过来的 handler 类型从该集合中寻找对应的 HandlerAdapter子类进行处理,并且调用它的 handler 方法。
3.对应的 HandlerAdapter 中的 handler 方法又会执行对应 Controller 的 handleRequest 方法。
适配器与 handler 有对应关系,而各个适配器又都是适配器接口的实现类,因此,它们都遵循相同的适配器标准,所以用户可以按照相同的方式,通过不同的 handler 去处理请求。当然了,Spring 框架中也为我们定义了一些默认的 Handler 对应的适配器。
通过适配器模式我们将所有的 controller统一交给 HandlerAdapter处理,免去了写大量的 if-else语句对 Controller进行判断,也更利于扩展新的 Controller类型。
7、装饰器模式
示例一
创建一个接口
1 public interface Train {
2
3     public void run2();
4
5 }
步骤2、实现接口的实体类
1 public class TrainCar  implements Train{
2
3     @Override
4     public void run2() {
5         System.out.println("火车拉人");
6
7     }
8 }
步骤3、创建实现了 Train接口的抽象装饰类 (抓住最主要的目标对象,一切都是围绕着目标对象来进行动态增加功能,动态撤销)
 1 public class TrainCarDecorator  implements Train{
 2
 3 //  目标对象
 4     private TrainCar trainCar;
 5
 6     public TrainCarDecorator(TrainCar trainCar){
 7         this.trainCar=trainCar;
 8     }
 9
10     @Override
11     public void run2() {
12         System.out.println("火车装饰来拉货");
13         trainCar.run2();
14     }
15
16 }
示例二
实现
我们将创建一个 Shape 接口和实现了 Shape 接口的实体类。然后我们创建一个实现了 Shape 接口的抽象装饰类 ShapeDecorator,并把 Shape 对象作为它的实例变量。
RedShapeDecorator 是实现了 ShapeDecorator 的实体类。
DecoratorPatternDemo,我们的演示类使用 RedShapeDecorator 来装饰 Shape 对象。
步骤 1
创建一个接口:
Shape.java
1 public interface Shape {
2    void draw();
3 }
步骤 2
创建实现接口的实体类。
Rectangle.java
1 public class Rectangle implements Shape {
2
3    @Override
4    public void draw() {
5       System.out.println("Shape: Rectangle");
6    }
7 }
Circle.java
1 public class Circle implements Shape {
2
3    @Override
4    public void draw() {
5       System.out.println("Shape: Circle");
6    }
7 }
步骤 3
创建实现了 Shape 接口的抽象装饰类。
ShapeDecorator.java
 1 public abstract class ShapeDecorator implements Shape {
 2    protected Shape decoratedShape;
 3
 4    public ShapeDecorator(Shape decoratedShape){
 5       this.decoratedShape = decoratedShape;
 6    }
 7
 8    public void draw(){
 9       decoratedShape.draw();
10    }
11 }
步骤 4
创建扩展了 ShapeDecorator 类的实体装饰类。
RedShapeDecorator.java
 1 public class RedShapeDecorator extends ShapeDecorator {
 2
 3    public RedShapeDecorator(Shape decoratedShape) {
 4       super(decoratedShape);
 5    }
 6
 7    @Override
 8    public void draw() {
 9       decoratedShape.draw();
10       setRedBorder(decoratedShape);
11    }
12
13    private void setRedBorder(Shape decoratedShape){
14       System.out.println("Border Color: Red");
15    }
16 }
步骤 5
使用 RedShapeDecorator 来装饰 Shape 对象。
DecoratorPatternDemo.java
 1 public class DecoratorPatternDemo {
 2    public static void main(String[] args) {
 3
 4       Shape circle = new Circle();
 5       ShapeDecorator redCircle = new RedShapeDecorator(new Circle());
 6       ShapeDecorator redRectangle = new RedShapeDecorator(new Rectangle());
 7       //Shape redCircle = new RedShapeDecorator(new Circle());
 8       //Shape redRectangle = new RedShapeDecorator(new Rectangle());
 9       System.out.println("Circle with normal border");
10       circle.draw();
11
12       System.out.println("
Circle of red border");
13       redCircle.draw();
14
15       System.out.println("
Rectangle of red border");
16       redRectangle.draw();
17    }
18 }
步骤 6
执行程序,输出结果:
Circle with normal border
Shape: Circle

Circle of red border
Shape: Circle
Border Color: Red

Rectangle of red border
Shape: Rectangle
Border Color: Red
装饰器模式在Java I/O系统中的实现
前面总结了这么多,再从大神们的作品中找一个实际应用例子吧,毕竟那是经历实战检验的,肯定是有道理的。嗯,在平时的留意中我发现Java I/O系统的设计中用到了这一设计模式,因为Java I/O类库需要多种不同功能的组合。这里我就以InputStream为例简单说明一下,同样我们还是来看一下其类图:
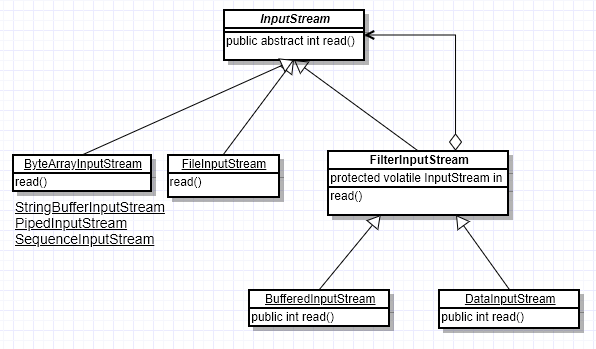
InputStream作为抽象构件,其下面大约有如下几种具体基础构件,从不同的数据源产生输入:
- ByteArrayInputStream,从字节数组产生输入;
- FileInputStream,从文件产生输入;
- StringBufferInputStream,从String对象产生输入;
- PipedInputStream,从管道产生输入;
- SequenceInputStream,可将其他流收集合并到一个流内;
FilterInputStream作为装饰器在JDK中是一个普通类,其下面有多个具体装饰器比如BufferedInputStream、DataInputStream等。我们以BufferedInputStream为例,使用它就是避免每次读取时都进行实际的写操作,起着缓冲作用。我们可以在这里稍微深入一下,站在源码的角度来管中窥豹。
FilterInputStream内部封装了基础构件:
protected volatile InputStream in;
而BufferedInputStream在调用其read()读取数据时会委托基础构件来进行更底层的操作,而它自己所起的装饰作用就是缓冲,在源码中可以很清楚的看到这一切:
    public synchronized int read() throws IOException {
        if (pos >= count) {
            fill();
            if (pos >= count)
                return -1;
        }
        return getBufIfOpen()[pos++] & 0xff;
    }


    private void fill() throws IOException {
        byte[] buffer = getBufIfOpen();
        if (markpos < 0)
            pos = 0;            /* no mark: throw away the buffer */
        else if (pos >= buffer.length)  /* no room left in buffer */
            if (markpos > 0) {  /* can throw away early part of the buffer */
                int sz = pos - markpos;
                System.arraycopy(buffer, markpos, buffer, 0, sz);
                pos = sz;
                markpos = 0;
            } else if (buffer.length >= marklimit) {
                markpos = -1;   /* buffer got too big, invalidate mark */
                pos = 0;        /* drop buffer contents */
            } else if (buffer.length >= MAX_BUFFER_SIZE) {
                throw new OutOfMemoryError("Required array size too large");
            } else {            /* grow buffer */
                int nsz = (pos <= MAX_BUFFER_SIZE - pos) ?
                        pos * 2 : MAX_BUFFER_SIZE;
                if (nsz > marklimit)
                    nsz = marklimit;
                byte nbuf[] = new byte[nsz];
                System.arraycopy(buffer, 0, nbuf, 0, pos);
                if (!bufUpdater.compareAndSet(this, buffer, nbuf)) {
                    throw new IOException("Stream closed");
                }
                buffer = nbuf;
            }
        count = pos;
        // 看这行就行了,委托基础构件来进行更底层的操作
        int n = getInIfOpen().read(buffer, pos, buffer.length - pos);
        if (n > 0)
            count = n + pos;
    }

    private InputStream getInIfOpen() throws IOException {
        InputStream input = in;
        if (input == null)
            throw new IOException("Stream closed");
        return input;
    }
这部分的代码很多,这里我们没有必要考虑这段代码的具体逻辑,只需要看到在BufferedInputStream的read方法中通过getInIfOpen()获取基础构件从而委托其进行更底层的操作(在这里是读取单个字节)就可以说明本文所要说的一切了。
至于I/O类库中的其他设计诸如OutputStream、Writer、Reader,是一致的,这里就不再赘述了。
8、代理模式
 1 /**
 2  * @author Rollen-Holt 设计模式之 代理模式
 3  */
 4
 5 interface NetWork{
 6     public abstract void browser();
 7 }
 8
 9 /**
10  * Real 类代表用户上网的实际动作,比如查看网页
11  * */
12 class Real implements NetWork{
13     public void browser(){
14         System.out.println("上网浏览信息");
15     }
16 }
17
18 /**
19  * 此处使用代理类来完成中间代理的工作,屏蔽实现代理的细节
20  * */
21 class proxy implements NetWork{
22     private NetWork netWork;
23
24     proxy(NetWork netWork){
25         this.netWork = netWork;
26     }
27
28     public void browser(){
29         checkName();
30         this.netWork.browser();
31     }
32
33     private void checkName(){
34         // Other codes
35     }
36 }
37
38 class hello{
39     public static void main(String[] a){
40         new proxy(new Real()).browser();
41     }
42 }
1.JDK动态代理 2.cglib代理
1、如果目标对象实现了接口,默认情况下会采用JDK的动态代理实现AOP
2、如果目标对象实现了接口,可以强制使用CGLIB实现AOP
3、如果目标对象没有实现了接口,必须采用CGLIB库,spring会自动在JDK动态代理和CGLIB之间转换
9、外观模式
实例一
public class CPU {

    public void startup(){
        System.out.println("cpu startup!");
    }

    public void shutdown(){
        System.out.println("cpu shutdown!");
    }
}


public class Memory {

    public void startup(){
        System.out.println("memory startup!");
    }

    public void shutdown(){
        System.out.println("memory shutdown!");
    }
}


public class Disk {

    public void startup(){
        System.out.println("disk startup!");
    }

    public void shutdown(){
        System.out.println("disk shutdown!");
    }
}

public class Computer {
    private CPU cpu;
    private Memory memory;
    private Disk disk;

    public Computer(){
        cpu = new CPU();
        memory = new Memory();
        disk = new Disk();
    }

    public void startup(){
        System.out.println("start the computer!");
        cpu.startup();
        memory.startup();
        disk.startup();
        System.out.println("start computer finished!");
    }

    public void shutdown(){
        System.out.println("begin to close the computer!");
        cpu.shutdown();
        memory.shutdown();
        disk.shutdown();
        System.out.println("computer closed!");
    }
}

public class User {

    public static void main(String[] args) {
        Computer computer = new Computer();
        computer.startup();
        computer.shutdown();
    }
}
输出:
start the computer!
cpu startup!
memory startup!
disk startup!
start computer finished!
begin to close the computer!
cpu shutdown!
memory shutdown!
disk shutdown!
computer closed!
实例二
实现
我们将创建一个 Shape 接口和实现了 Shape 接口的实体类。下一步是定义一个外观类 ShapeMaker。
ShapeMaker 类使用实体类来代表用户对这些类的调用。
步骤 1
创建一个接口。
Shape.java
1 public interface Shape {
2    void draw();
3 }
步骤 2
创建实现接口的实体类。
Rectangle.java
1 public class Rectangle implements Shape {
2
3    @Override
4    public void draw() {
5       System.out.println("Rectangle::draw()");
6    }
7 }
Square.java
1 public class Square implements Shape {
2
3    @Override
4    public void draw() {
5       System.out.println("Square::draw()");
6    }
7 }
Circle.java
1 public class Circle implements Shape {
2
3    @Override
4    public void draw() {
5       System.out.println("Circle::draw()");
6    }
7 }
步骤 3
创建一个外观类。
ShapeMaker.java
 1 public class ShapeMaker {
 2    private Shape circle;
 3    private Shape rectangle;
 4    private Shape square;
 5
 6    public ShapeMaker() {
 7       circle = new Circle();
 8       rectangle = new Rectangle();
 9       square = new Square();
10    }
11
12    public void drawCircle(){
13       circle.draw();
14    }
15    public void drawRectangle(){
16       rectangle.draw();
17    }
18    public void drawSquare(){
19       square.draw();
20    }
21 }
步骤 4
使用该外观类画出各种类型的形状。
FacadePatternDemo.java
1 public class FacadePatternDemo {
2    public static void main(String[] args) {
3       ShapeMaker shapeMaker = new ShapeMaker();
4
5       shapeMaker.drawCircle();
6       shapeMaker.drawRectangle();
7       shapeMaker.drawSquare();
8    }
9 }
步骤 5
执行程序,输出结果:
Circle::draw()
Rectangle::draw()
Square::draw()
思考:外观模式跟适配器模式有什么区别?
10、桥接模式
  //抽象类
  public abstract class Pen {
      protected Color color;
      public void setColor(Color color) {
          this.color=color;
      }
      public abstract void draw(String name);
  }

  //扩充抽象类
  public class SmallPen extends Pen {
      public void draw(String name) {
          String penType="小号毛笔绘制";
          this.color.bepaint(penType,name);
      }
  }

  //扩充抽象类
  public class MiddlePen extends Pen {
      public void draw(String name) {
          String penType="中号毛笔绘制";
          this.color.bepaint(penType,name);
      }
  }

  //扩充抽象类
  public class BigPen extends Pen {
      public void draw(String name) {
          String penType="大号毛笔绘制";
          this.color.bepaint(penType,name);
      }
  }

  //实现类接口
  public interface Color {
      void bepaint(String penType,String name);
  }

  //扩充实现类
  public class Red implements Color {
      public void bepaint(String penType,String name) {
          System.out.println(penType + "红色的"+ name + ".");
      }
  }

  //扩充实现类
  public class Green implements Color {
      public void bepaint(String penType,String name) {
          System.out.println(penType + "绿色的"+ name + ".");
      }
  }

  //扩充实现类
  public class Blue implements Color {
      public void bepaint(String penType,String name) {
          System.out.println(penType + "蓝色的"+ name + ".");
      }
  }

  //扩充实现类
  public class White implements Color {
      public void bepaint(String penType,String name) {
          System.out.println(penType + "白色的"+ name + ".");
      }
  }

  //扩充实现类
  public class Black implements Color {
      public void bepaint(String penType,String name) {
          System.out.println(penType + "黑色的"+ name + ".");
      }
  }

  //配置文件configPen.xml
  <?xml version="1.0"?>
  <config>
      <className>Blue</className>
      <className>SmallPen</className>
  </config>

 //使用java反射创建具体的颜色和画笔
 import javax.xml.parsers.*;
 import org.w3c.dom.*;
 import org.xml.sax.SAXException;
 import java.io.*;
 public class XMLUtilPen {
 //该方法用于从XML配置文件中提取具体类类名,并返回一个实例对象
     public static Object getBean(String args) {
         try {
             //创建文档对象
             DocumentBuilderFactory dFactory = DocumentBuilderFactory.newInstance();
             DocumentBuilder builder = dFactory.newDocumentBuilder();
             Document doc;
             doc = builder.parse(new File("configPen.xml"));
             NodeList nl=null;
             Node classNode=null;
             String cName=null;
             nl = doc.getElementsByTagName("className");

             if(args.equals("color")) {
                 //获取包含类名的文本节点
                 classNode=nl.item(0).getFirstChild();

             } else if(args.equals("pen")) {
                //获取包含类名的文本节点
                 classNode=nl.item(1).getFirstChild();
             }

              cName=classNode.getNodeValue();
              //通过类名生成实例对象并将其返回
              Class c=Class.forName(cName);
                Object obj=c.newInstance();
              return obj;
            } catch(Exception e) {
                e.printStackTrace();
                return null;
            }
         }
 }

 //客户端
 public class Client {
     public static void main(String a[]) {
         Color color;
         Pen pen;

         color=(Color)XMLUtilPen.getBean("color");
         pen=(Pen)XMLUtilPen.getBean("pen");

         pen.setColor(color);
         pen.draw("鲜花");
     }
 }
jdbc中使用的设计模式(桥接模式)
JDBC是以统一方式访问数据库的API。
它提供了独立于平台的数据库访问,也就是说,有了JDBC API,我们就不必为访问Oracle数据库专门写一个程序,为访问Sybase数据库又专门写一个程序等等,只需要用JDBC API写一个程序就够了,它可以向相应数据库发送SQL调用.JDBC是Java应用程序与各种不同数据库之间进行对话的方法的机制.简单地说,它做了三件事:与数据库建立连接--发送操作数据库的语句--处理结果。
11、组合模式
示例一我们有一个类 Employee,该类被当作组合模型类。CompositePatternDemo,我们的演示类使用 Employee 类来添加部门层次结构,并打印所有员工。
步骤 1
创建 Employee 类,该类带有 Employee 对象的列表。
Employee.java
步骤 2
使用 Employee 类来创建和打印员工的层次结构。
CompositePatternDemo.java
步骤 3
执行程序,输出结果为:
Employee:[Name:John, dept : CEO, salary :30000]Employee:[Name:Robert, dept :HeadSales, salary :20000]Employee:[Name:Richard, dept :Sales, salary :10000]Employee:[Name:Rob, dept :Sales, salary :10000]Employee:[Name:Michel, dept :HeadMarketing, salary :20000]Employee:[Name:Laura, dept :Marketing, salary :10000]Employee:[Name:Bob, dept :Marketing, salary :10000]
spring中的组合模式
- CacheManager:Spring提供的缓存管理器,便于管理程序中的多个cache。
- 另外还提供了CompositeCacheManager用于组合CacheManager,即可以从多个CacheManager轮询得到相应的cache。
org.springframework.cache.support.CompositeCacheManager
/*
 * Copyright 2002-2016 the original author or authors.
 *
 * Licensed under the Apache License, Version 2.0 (the "License");
 * you may not use this file except in compliance with the License.
 * You may obtain a copy of the License at
 *
 *      https://www.apache.org/licenses/LICENSE-2.0
 *
 * Unless required by applicable law or agreed to in writing, software
 * distributed under the License is distributed on an "AS IS" BASIS,
 * WITHOUT WARRANTIES OR CONDITIONS OF ANY KIND, either express or implied.
 * See the License for the specific language governing permissions and
 * limitations under the License.
 */

package org.springframework.cache.support;

import java.util.ArrayList;
import java.util.Arrays;
import java.util.Collection;
import java.util.Collections;
import java.util.LinkedHashSet;
import java.util.List;
import java.util.Set;

import org.springframework.beans.factory.InitializingBean;
import org.springframework.cache.Cache;
import org.springframework.cache.CacheManager;
import org.springframework.lang.Nullable;

/**
 * Composite {@link CacheManager} implementation that iterates over
 * a given collection of delegate {@link CacheManager} instances.
 *
 * <p>Allows {@link NoOpCacheManager} to be automatically added to the end of
 * the list for handling cache declarations without a backing store. Otherwise,
 * any custom {@link CacheManager} may play that role of the last delegate as
 * well, lazily creating cache regions for any requested name.
 *
 * <p>Note: Regular CacheManagers that this composite manager delegates to need
 * to return {@code null} from {@link #getCache(String)} if they are unaware of
 * the specified cache name, allowing for iteration to the next delegate in line.
 * However, most {@link CacheManager} implementations fall back to lazy creation
 * of named caches once requested; check out the specific configuration details
 * for a 'static' mode with fixed cache names, if available.
 *
 * @author Costin Leau
 * @author Juergen Hoeller
 * @since 3.1
 * @see #setFallbackToNoOpCache
 * @see org.springframework.cache.concurrent.ConcurrentMapCacheManager#setCacheNames
 */
public class CompositeCacheManager implements CacheManager, InitializingBean {

    private final List<CacheManager> cacheManagers = new ArrayList<>();

    private boolean fallbackToNoOpCache = false;


    /**
     * Construct an empty CompositeCacheManager, with delegate CacheManagers to
     * be added via the {@link #setCacheManagers "cacheManagers"} property.
     */
    public CompositeCacheManager() {
    }

    /**
     * Construct a CompositeCacheManager from the given delegate CacheManagers.
     * @param cacheManagers the CacheManagers to delegate to
     */
    public CompositeCacheManager(CacheManager... cacheManagers) {
        setCacheManagers(Arrays.asList(cacheManagers));
    }


    /**
     * Specify the CacheManagers to delegate to.
     */
    public void setCacheManagers(Collection<CacheManager> cacheManagers) {
        this.cacheManagers.addAll(cacheManagers);
    }

    /**
     * Indicate whether a {@link NoOpCacheManager} should be added at the end of the delegate list.
     * In this case, any {@code getCache} requests not handled by the configured CacheManagers will
     * be automatically handled by the {@link NoOpCacheManager} (and hence never return {@code null}).
     */
    public void setFallbackToNoOpCache(boolean fallbackToNoOpCache) {
        this.fallbackToNoOpCache = fallbackToNoOpCache;
    }

    @Override
    public void afterPropertiesSet() {
        if (this.fallbackToNoOpCache) {
            this.cacheManagers.add(new NoOpCacheManager());
        }
    }


    @Override
    @Nullable
    public Cache getCache(String name) {
        for (CacheManager cacheManager : this.cacheManagers) {
            Cache cache = cacheManager.getCache(name);
            if (cache != null) {
                return cache;
            }
        }
        return null;
    }

    @Override
    public Collection<String> getCacheNames() {
        Set<String> names = new LinkedHashSet<>();
        for (CacheManager manager : this.cacheManagers) {
            names.addAll(manager.getCacheNames());
        }
        return Collections.unmodifiableSet(names);
    }

}
12、享元模式
实现
我们将创建一个 Shape 接口和实现了 Shape 接口的实体类 Circle。下一步是定义工厂类 ShapeFactory。
ShapeFactory 有一个 Circle 的 HashMap,其中键名为 Circle 对象的颜色。无论何时接收到请求,都会创建一个特定颜色的圆。ShapeFactory 检查它的 HashMap 中的 circle 对象,如果找到 Circle 对象,则返回该对象,否则将创建一个存储在 hashmap 中以备后续使用的新对象,并把该对象返回到客户端。
FlyWeightPatternDemo,我们的演示类使用 ShapeFactory 来获取 Shape 对象。它将向 ShapeFactory 传递信息(red / green / blue/ black / white),以便获取它所需对象的颜色。
步骤 1
创建一个接口。
Shape.java
public interface Shape {
   void draw();
}
步骤 2
创建实现接口的实体类。
Circle.java
public class Circle implements Shape {
   private String color;
   private int x;
   private int y;
   private int radius;

   public Circle(String color){
      this.color = color;
   }

   public void setX(int x) {
      this.x = x;
   }

   public void setY(int y) {
      this.y = y;
   }

   public void setRadius(int radius) {
      this.radius = radius;
   }

   @Override
   public void draw() {
      System.out.println("Circle: Draw() [Color : " + color
         +", x : " + x +", y :" + y +", radius :" + radius);
   }
}
步骤 3
创建一个工厂,生成基于给定信息的实体类的对象。
ShapeFactory.java
import java.util.HashMap;

public class ShapeFactory {
   private static final HashMap<String, Shape> circleMap = new HashMap<>();

   public static Shape getCircle(String color) {
      Circle circle = (Circle)circleMap.get(color);

      if(circle == null) {
         circle = new Circle(color);
         circleMap.put(color, circle);
         System.out.println("Creating circle of color : " + color);
      }
      return circle;
   }
}
步骤 4
使用该工厂,通过传递颜色信息来获取实体类的对象。
FlyweightPatternDemo.java
public class FlyweightPatternDemo {
   private static final String colors[] =
      { "Red", "Green", "Blue", "White", "Black" };
   public static void main(String[] args) {

      for(int i=0; i < 20; ++i) {
         Circle circle =
            (Circle)ShapeFactory.getCircle(getRandomColor());
         circle.setX(getRandomX());
         circle.setY(getRandomY());
         circle.setRadius(100);
         circle.draw();
      }
   }
   private static String getRandomColor() {
      return colors[(int)(Math.random()*colors.length)];
   }
   private static int getRandomX() {
      return (int)(Math.random()*100 );
   }
   private static int getRandomY() {
      return (int)(Math.random()*100);
   }
}
步骤 5
执行程序,输出结果:
Creating circle of color : Black
Circle: Draw() [Color : Black, x : 36, y :71, radius :100
Creating circle of color : Green
Circle: Draw() [Color : Green, x : 27, y :27, radius :100
Creating circle of color : White
Circle: Draw() [Color : White, x : 64, y :10, radius :100
Creating circle of color : Red
Circle: Draw() [Color : Red, x : 15, y :44, radius :100
Circle: Draw() [Color : Green, x : 19, y :10, radius :100
Circle: Draw() [Color : Green, x : 94, y :32, radius :100
Circle: Draw() [Color : White, x : 69, y :98, radius :100
Creating circle of color : Blue
Circle: Draw() [Color : Blue, x : 13, y :4, radius :100
Circle: Draw() [Color : Green, x : 21, y :21, radius :100
Circle: Draw() [Color : Blue, x : 55, y :86, radius :100
Circle: Draw() [Color : White, x : 90, y :70, radius :100
Circle: Draw() [Color : Green, x : 78, y :3, radius :100
Circle: Draw() [Color : Green, x : 64, y :89, radius :100
Circle: Draw() [Color : Blue, x : 3, y :91, radius :100
Circle: Draw() [Color : Blue, x : 62, y :82, radius :100
Circle: Draw() [Color : Green, x : 97, y :61, radius :100
Circle: Draw() [Color : Green, x : 86, y :12, radius :100
Circle: Draw() [Color : Green, x : 38, y :93, radius :100
Circle: Draw() [Color : Red, x :76, y :82, radius :100Circle:Draw()[Color:Blue, x :95, y :82, radius :100
应用实例
- String常量池
- 数据库连接池
13、策略模式
现实生活中我们到商场买东西的时候,卖场往往根据不同的客户制定不同的报价策略,比如针对新客户不打折扣,针对老客户打9折,针对VIP客户打8折...
现在我们要做一个报价管理的模块,简要点就是要针对不同的客户,提供不同的折扣报价。
package strategy.examp02;

import java.math.BigDecimal;

public class QuoteManager {

    public BigDecimal quote(BigDecimal originalPrice,String customType){
        if ("新客户".equals(customType)) {
            System.out.println("抱歉!新客户没有折扣!");
            return originalPrice;
        }else if ("老客户".equals(customType)) {
            System.out.println("恭喜你!老客户打9折!");
            originalPrice = originalPrice.multiply(new BigDecimal(0.9)).setScale(2,BigDecimal.ROUND_HALF_UP);
            return originalPrice;
        }else if("VIP客户".equals(customType)){
            System.out.println("恭喜你!VIP客户打8折!");
            originalPrice = originalPrice.multiply(new BigDecimal(0.8)).setScale(2,BigDecimal.ROUND_HALF_UP);
            return originalPrice;
        }
        //其他人员都是原价
        return originalPrice;
    }

}
 package strategy.examp02;

 import java.math.BigDecimal;

 public class QuoteManagerImprove {

     public BigDecimal quote(BigDecimal originalPrice, String customType){
         if ("新客户".equals(customType)) {
             return this.quoteNewCustomer(originalPrice);
         }else if ("老客户".equals(customType)) {
             return this.quoteOldCustomer(originalPrice);
         }else if("VIP客户".equals(customType)){
             return this.quoteVIPCustomer(originalPrice);
         }
         //其他人员都是原价
         return originalPrice;
     }

     /**
      * 对VIP客户的报价算法
      * @param originalPrice 原价
      * @return 折后价
      */
     private BigDecimal quoteVIPCustomer(BigDecimal originalPrice) {
         System.out.println("恭喜!VIP客户打8折");
         originalPrice = originalPrice.multiply(new BigDecimal(0.8)).setScale(2,BigDecimal.ROUND_HALF_UP);
         return originalPrice;
     }

     /**
      * 对老客户的报价算法
      * @param originalPrice 原价
      * @return 折后价
      */
     private BigDecimal quoteOldCustomer(BigDecimal originalPrice) {
         System.out.println("恭喜!老客户打9折");
         originalPrice = originalPrice.multiply(new BigDecimal(0.9)).setScale(2,BigDecimal.ROUND_HALF_UP);
         return originalPrice;
     }

     /**
      * 对新客户的报价算法
      * @param originalPrice 原价
      * @return 折后价
      */
     private BigDecimal quoteNewCustomer(BigDecimal originalPrice) {
         System.out.println("抱歉!新客户没有折扣!");
         return originalPrice;
     }

 }
用策略模式实现
公共报价策略接口:
package strategy.examp02;

 import java.math.BigDecimal;
 //报价策略接口
 public interface IQuoteStrategy {
     //获取折后价的价格
     BigDecimal getPrice(BigDecimal originalPrice);
}
新客户报价策略实现:
 package strategy.examp02;

 import java.math.BigDecimal;
 //新客户的报价策略实现类
 public class NewCustomerQuoteStrategy implements IQuoteStrategy {
     @Override
     public BigDecimal getPrice(BigDecimal originalPrice) {
         System.out.println("抱歉!新客户没有折扣!");
         return originalPrice;
     }
 }
老客户报价策略实现:
 package strategy.examp02;

 import java.math.BigDecimal;
 //老客户的报价策略实现
 public class OldCustomerQuoteStrategy implements IQuoteStrategy {
     @Override
     public BigDecimal getPrice(BigDecimal originalPrice) {
         System.out.println("恭喜!老客户享有9折优惠!");
         originalPrice = originalPrice.multiply(new BigDecimal(0.9)).setScale(2,BigDecimal.ROUND_HALF_UP);
         return originalPrice;
     }
 }
VIP客户报价策略实现:
package strategy.examp02;

import java.math.BigDecimal;
//VIP客户的报价策略实现
public class VIPCustomerQuoteStrategy implements IQuoteStrategy {
    @Override
    public BigDecimal getPrice(BigDecimal originalPrice) {
        System.out.println("恭喜!VIP客户享有8折优惠!");
        originalPrice = originalPrice.multiply(new BigDecimal(0.8)).setScale(2,BigDecimal.ROUND_HALF_UP);
        return originalPrice;
    }
}
报价上下文:
 package strategy.examp02;

 import java.math.BigDecimal;
 //报价上下文角色
 public class QuoteContext {
     //持有一个具体的报价策略
     private IQuoteStrategy quoteStrategy;

     //注入报价策略
     public QuoteContext(IQuoteStrategy quoteStrategy){
         this.quoteStrategy = quoteStrategy;
     }

     //回调具体报价策略的方法
     public BigDecimal getPrice(BigDecimal originalPrice){
         return quoteStrategy.getPrice(originalPrice);
     }
 }
外部客户端:
 package strategy.examp02;

 import java.math.BigDecimal;
 //外部客户端
 public class Client {
     public static void main(String[] args) {
         //1.创建老客户的报价策略
         IQuoteStrategy oldQuoteStrategy = new OldCustomerQuoteStrategy();

         //2.创建报价上下文对象,并设置具体的报价策略
         QuoteContext quoteContext = new QuoteContext(oldQuoteStrategy);

         //3.调用报价上下文的方法
         BigDecimal price = quoteContext.getPrice(new BigDecimal(100));

         System.out.println("折扣价为:" +price);
     }
 }
控制台输出:
恭喜!老客户享有9折优惠!
折扣价为:90.00
spring中源码说明策略模式(spring validation)

说明:UserValidator、HarmlessHandleValidator 分别为两个行为策略,实现不同的算法。
Class: org.springframework.validation.ValidationUtils 验证工具类
public static void invokeValidator(Validator validator, Object obj, Errors errors) {
        Assert.notNull(validator, "Validator must not be null");
        Assert.notNull(errors, "Errors object must not be null");
        if (logger.isDebugEnabled()) {
            logger.debug("Invoking validator [" + validator + "]");
        }
        if (obj != null && !validator.supports(obj.getClass())) {
            throw new IllegalArgumentException(
                    "Validator [" + validator.getClass() + "] does not support [" + obj.getClass() + "]");
        }
        validator.validate(obj, errors);
        if (logger.isDebugEnabled()) {
            if (errors.hasErrors()) {
                logger.debug("Validator found " + errors.getErrorCount() + " errors");
            }
            else {
                logger.debug("Validator found no errors");
            }
        }
    }
Interface:org.springframework.validation.Validator
public interface Validator {
    boolean supports(Class clazz);
    void validate(Object target, Errors errors);

}
Class:UserValidator
public class UserValidator implements Validator {

    @Override
    public boolean supports(Class clazz) {
        return User.class.equals(clazz);
    }

    @Override
    public void validate(Object target, Errors errors) {
        User user = (User) target;
        if (!StringUtils.hasLength(user.getUsername())) {
            errors.rejectValue("username", "", "登录编码必须填写!");
        }
        if (!StringUtils.hasLength(user.getPassword())) {
            errors.rejectValue("password", "", "登录密码必须填写!");
        }
        if (!StringUtils.hasLength(user.getName())) {
            errors.rejectValue("name", "", "用户姓名必须填写!");
        }
    }

}
Class:HarmlessHandleValidator
public class HarmlessHandleValidator implements Validator {

    @Override
    public boolean supports(Class clazz) {
        return HarmlessHandle.class.equals(clazz);
    }

    @Override
    public void validate(Object target, Errors errors) {
        HarmlessHandle harmlessHandle = (HarmlessHandle) target;
        if (!StringUtils.hasLength(harmlessHandle.getHandleNo())) {
            errors.rejectValue("handleNo", "", "编码必须填写!");
        }
        if (!StringUtils.hasLength(harmlessHandle.getHandleName())) {
            errors.rejectValue("handleName", "", "名称必须填写!");
        }
    }

}
调用各自的validate策略
ValidationUtils.invokeValidator(new UserValidator(), user, errors);
14、模板方法模式
实现
我们将创建一个定义操作的 Game 抽象类,其中,模板方法设置为 final,这样它就不会被重写。Cricket 和 Football 是扩展了 Game 的实体类,它们重写了抽象类的方法。
TemplatePatternDemo,我们的演示类使用 Game 来演示模板模式的用法。
步骤 1
创建一个抽象类,它的模板方法被设置为 final。
Game.java
public abstract class Game {
   abstract void initialize();
   abstract void startPlay();
   abstract void endPlay();

   //模板
   public final void play(){

      //初始化游戏
      initialize();

      //开始游戏
      startPlay();

      //结束游戏
      endPlay();
   }
}
步骤 2
创建扩展了上述类的实体类。
Cricket.java
public class Cricket extends Game {

   @Override
   void endPlay() {
      System.out.println("Cricket Game Finished!");
   }

   @Override
   void initialize() {
      System.out.println("Cricket Game Initialized! Start playing.");
   }

   @Override
   void startPlay() {
      System.out.println("Cricket Game Started. Enjoy the game!");
   }
}
Football.java
public class Football extends Game {

   @Override
   void endPlay() {
      System.out.println("Football Game Finished!");
   }

   @Override
   void initialize() {
      System.out.println("Football Game Initialized! Start playing.");
   }

   @Override
   void startPlay() {
      System.out.println("Football Game Started. Enjoy the game!");
   }
}
步骤 3
使用 Game 的模板方法 play() 来演示游戏的定义方式。
TemplatePatternDemo.java
public class TemplatePatternDemo {
   public static void main(String[] args) {

      Game game = new Cricket();
      game.play();
      System.out.println();
      game = new Football();
      game.play();
   }
}
步骤 4
执行程序,输出结果:
Cricket Game Initialized! Start playing.
Cricket Game Started. Enjoy the game!
Cricket Game Finished!

Football Game Initialized! Start playing.
Football Game Started. Enjoy the game!
Football Game Finished!
15、观察者模式
实现
观察者模式使用三个类 Subject、Observer 和 Client。Subject 对象带有绑定观察者到 Client 对象和从 Client 对象解绑观察者的方法。我们创建 Subject 类、Observer 抽象类和扩展了抽象类 Observer 的实体类。
ObserverPatternDemo,我们的演示类使用 Subject 和实体类对象来演示观察者模式。
步骤 1
创建 Subject 类。
Subject.java
import java.util.ArrayList;
import java.util.List;

public class Subject {

   private List<Observer> observers
      = new ArrayList<Observer>();
   private int state;

   public int getState() {
      return state;
   }

   public void setState(int state) {
      this.state = state;
      notifyAllObservers();
   }

   public void attach(Observer observer){
      observers.add(observer);
   }

   public void notifyAllObservers(){
      for (Observer observer : observers) {
         observer.update();
      }
   }
}
步骤 2
创建 Observer 类。
Observer.java
public abstract class Observer {
   protected Subject subject;
   public abstract void update();
}
步骤 3
创建实体观察者类。
BinaryObserver.java
public class BinaryObserver extends Observer{

   public BinaryObserver(Subject subject){
      this.subject = subject;
      this.subject.attach(this);
   }

   @Override
   public void update() {
      System.out.println( "Binary String: "
      + Integer.toBinaryString( subject.getState() ) );
   }
}
OctalObserver.java
public class OctalObserver extends Observer{

   public OctalObserver(Subject subject){
      this.subject = subject;
      this.subject.attach(this);
   }

   @Override
   public void update() {
     System.out.println( "Octal String: "
     + Integer.toOctalString( subject.getState() ) );
   }
}
HexaObserver.java
public class HexaObserver extends Observer{

   public HexaObserver(Subject subject){
      this.subject = subject;
      this.subject.attach(this);
   }

   @Override
   public void update() {
      System.out.println( "Hex String: "
      + Integer.toHexString( subject.getState() ).toUpperCase() );
   }
}
步骤 4
使用 Subject 和实体观察者对象。
ObserverPatternDemo.java
public class ObserverPatternDemo {
   public static void main(String[] args) {
      Subject subject = new Subject();

      new HexaObserver(subject);
      new OctalObserver(subject);
      new BinaryObserver(subject);

      System.out.println("First state change: 15");
      subject.setState(15);
      System.out.println("Second state change: 10");
      subject.setState(10);
   }
}
步骤 5
执行程序,输出结果:
First state change: 15
Hex String: F
Octal String: 17
Binary String: 1111
Second state change: 10
Hex String: A
Octal String: 12
Binary String: 1010
16、迭代器模式
实现
我们将创建一个叙述导航方法的 Iterator 接口和一个返回迭代器的 Container 接口。实现了 Container 接口的实体类将负责实现 Iterator 接口。
IteratorPatternDemo,我们的演示类使用实体类 NamesRepository 来打印 NamesRepository 中存储为集合的 Names。
步骤 1
创建接口:
Iterator.java
public interface Iterator {
   public boolean hasNext();
   public Object next();
}
Container.java
public interface Container {
   public Iterator getIterator();
}
步骤 2
创建实现了 Container 接口的实体类。该类有实现了 Iterator 接口的内部类 NameIterator。
NameRepository.java
public class NameRepository implements Container {
   public String names[] = {"Robert" , "John" ,"Julie" , "Lora"};

   @Override
   public Iterator getIterator() {
      return new NameIterator();
   }

   private class NameIterator implements Iterator {

      int index;

      @Override
      public boolean hasNext() {
         if(index < names.length){
            return true;
         }
         return false;
      }

      @Override
      public Object next() {
         if(this.hasNext()){
            return names[index++];
         }
         return null;
      }
   }
}
步骤 3
使用 NameRepository 来获取迭代器,并打印名字。
IteratorPatternDemo.java
public class IteratorPatternDemo {

   public static void main(String[] args) {
      NameRepository namesRepository = new NameRepository();

      for(Iterator iter = namesRepository.getIterator(); iter.hasNext();){
         String name = (String)iter.next();
         System.out.println("Name : " + name);
      }
   }
}
步骤 4
执行程序,输出结果:
Name : Robert
Name : John
Name : Julie
Name : Lora
JDK中集合框架List、Set、Map中的应用,比如HashMap
    final class KeySet extends AbstractSet<K> {
        public final int size()                 { return size; }
        public final void clear()               { HashMap.this.clear(); }
        public final Iterator<K> iterator()     { return new KeyIterator(); }
        public final boolean contains(Object o) { return containsKey(o); }
        public final boolean remove(Object key) {
            return removeNode(hash(key), key, null, false, true) != null;
        }
        public final Spliterator<K> spliterator() {
            return new KeySpliterator<>(HashMap.this, 0, -1, 0, 0);
        }
        public final void forEach(Consumer<? super K> action) {
            Node<K,V>[] tab;
            if (action == null)
                throw new NullPointerException();
            if (size > 0 && (tab = table) != null) {
                int mc = modCount;
                for (int i = 0; i < tab.length; ++i) {
                    for (Node<K,V> e = tab[i]; e != null; e = e.next)
                        action.accept(e.key);
                }
                if (modCount != mc)
                    throw new ConcurrentModificationException();
            }
        }
    }
    final class KeyIterator extends HashIterator
        implements Iterator<K> {
        public final K next() { return nextNode().key; }
    }
17、责任链模式
实现
我们创建抽象类 AbstractLogger,带有详细的日志记录级别。然后我们创建三种类型的记录器,都扩展了 AbstractLogger。每个记录器消息的级别是否属于自己的级别,如果是则相应地打印出来,否则将不打印并把消息传给下一个记录器。
步骤 1
创建抽象的记录器类。
AbstractLogger.java
public abstract class AbstractLogger {
   public static int INFO = 1;
   public static int DEBUG = 2;
   public static int ERROR = 3;

   protected int level;

   //责任链中的下一个元素
   protected AbstractLogger nextLogger;

   public void setNextLogger(AbstractLogger nextLogger){
      this.nextLogger = nextLogger;
   }

   public void logMessage(int level, String message){
      if(this.level <= level){
         write(message);
      }
      if(nextLogger !=null){
         nextLogger.logMessage(level, message);
      }
   }

   abstract protected void write(String message);

}
步骤 2
创建扩展了该记录器类的实体类。
ConsoleLogger.java
public class ConsoleLogger extends AbstractLogger {

   public ConsoleLogger(int level){
      this.level = level;
   }

   @Override
   protected void write(String message) {
      System.out.println("Standard Console::Logger: " + message);
   }
}
ErrorLogger.java
public class ErrorLogger extends AbstractLogger {

   public ErrorLogger(int level){
      this.level = level;
   }

   @Override
   protected void write(String message) {
      System.out.println("Error Console::Logger: " + message);
   }
}
FileLogger.java
public class FileLogger extends AbstractLogger {

   public FileLogger(int level){
      this.level = level;
   }

   @Override
   protected void write(String message) {
      System.out.println("File::Logger: " + message);
   }
}
步骤 3
创建不同类型的记录器。赋予它们不同的错误级别,并在每个记录器中设置下一个记录器。每个记录器中的下一个记录器代表的是链的一部分。
ChainPatternDemo.java
public class ChainPatternDemo {

   private static AbstractLogger getChainOfLoggers(){

      AbstractLogger errorLogger = new ErrorLogger(AbstractLogger.ERROR);
      AbstractLogger fileLogger = new FileLogger(AbstractLogger.DEBUG);
      AbstractLogger consoleLogger = new ConsoleLogger(AbstractLogger.INFO);

      errorLogger.setNextLogger(fileLogger);
      fileLogger.setNextLogger(consoleLogger);

      return errorLogger;
   }

   public static void main(String[] args) {
      AbstractLogger loggerChain = getChainOfLoggers();

      loggerChain.logMessage(AbstractLogger.INFO, "This is an information.");

      loggerChain.logMessage(AbstractLogger.DEBUG,
         "This is a debug level information.");

      loggerChain.logMessage(AbstractLogger.ERROR,
         "This is an error information.");
   }
}
步骤 4
执行程序,输出结果:
Standard Console::Logger: This is an information.
File::Logger: This is a debug level information.
Standard Console::Logger: This is a debug level information.
Error Console::Logger: This is an error information.
File::Logger: This is an error information.
Standard Console::Logger: This is an error information.
18、命令模式
实现
我们首先创建作为命令的接口 Order,然后创建作为请求的 Stock 类。实体命令类 BuyStock 和 SellStock,实现了 Order 接口,将执行实际的命令处理。创建作为调用对象的类 Broker,它接受订单并能下订单。
Broker 对象使用命令模式,基于命令的类型确定哪个对象执行哪个命令。CommandPatternDemo,我们的演示类使用 Broker 类来演示命令模式。
步骤 1
创建一个命令接口。
Order.java
public interface Order {
   void execute();
}
步骤 2
创建一个请求类。
Stock.java
public class Stock {

   private String name = "ABC";
   private int quantity = 10;

   public void buy(){
      System.out.println("Stock [ Name: "+name+",
         Quantity: " + quantity +" ] bought");
   }
   public void sell(){
      System.out.println("Stock [ Name: "+name+",
         Quantity: " + quantity +" ] sold");
   }
}
步骤 3
创建实现了 Order 接口的实体类。
BuyStock.java
public class BuyStock implements Order {
   private Stock abcStock;

   public BuyStock(Stock abcStock){
      this.abcStock = abcStock;
   }

   public void execute() {
      abcStock.buy();
   }
}
SellStock.java
public class SellStock implements Order {
   private Stock abcStock;

   public SellStock(Stock abcStock){
      this.abcStock = abcStock;
   }

   public void execute() {
      abcStock.sell();
   }
}
步骤 4
创建命令调用类。
Broker.java
import java.util.ArrayList;
import java.util.List;

public class Broker {
   private List<Order> orderList = new ArrayList<Order>();

   public void takeOrder(Order order){
      orderList.add(order);
   }

   public void placeOrders(){
      for (Order order : orderList) {
         order.execute();
      }
      orderList.clear();
   }
}
步骤 5
使用 Broker 类来接受并执行命令。
CommandPatternDemo.java
public class CommandPatternDemo {
   public static void main(String[] args) {
      Stock abcStock = new Stock();

      BuyStock buyStockOrder = new BuyStock(abcStock);
      SellStock sellStockOrder = new SellStock(abcStock);

      Broker broker = new Broker();
      broker.takeOrder(buyStockOrder);
      broker.takeOrder(sellStockOrder);

      broker.placeOrders();
   }
}
步骤 6
执行程序,输出结果:
Stock [ Name: ABC, Quantity: 10 ] bought
Stock [ Name: ABC, Quantity: 10 ] sold
19、备忘录模式
实现
备忘录模式使用三个类 Memento、Originator 和 CareTaker。Memento 包含了要被恢复的对象的状态。Originator 创建并在 Memento 对象中存储状态。Caretaker 对象负责从 Memento 中恢复对象的状态。
MementoPatternDemo,我们的演示类使用 CareTaker 和 Originator 对象来显示对象的状态恢复。
步骤 1
创建 Memento 类。
public class Memento {
   private String state;

   public Memento(String state){
      this.state = state;
   }

   public String getState(){
      return state;
   }
}
步骤 2
创建 Originator 类。
public class Originator {
   private String state;

   public void setState(String state){
      this.state = state;
   }

   public String getState(){
      return state;
   }

   public Memento saveStateToMemento(){
      return new Memento(state);
   }

   public void getStateFromMemento(Memento Memento){
      state = Memento.getState();
   }
}
步骤 3
创建 CareTaker 类。
import java.util.ArrayList;
import java.util.List;

public class CareTaker {
   private List<Memento> mementoList = new ArrayList<Memento>();

   public void add(Memento state){
      mementoList.add(state);
   }

   public Memento get(int index){
      return mementoList.get(index);
   }
}
步骤 4
使用 CareTaker 和 Originator 对象。
public class MementoPatternDemo {
   public static void main(String[] args) {
      Originator originator = new Originator();
      CareTaker careTaker = new CareTaker();
      originator.setState("State #1");
      originator.setState("State #2");
      careTaker.add(originator.saveStateToMemento());
      originator.setState("State #3");
      careTaker.add(originator.saveStateToMemento());
      originator.setState("State #4");

      System.out.println("Current State: " + originator.getState());
      originator.getStateFromMemento(careTaker.get(0));
      System.out.println("First saved State: " + originator.getState());
      originator.getStateFromMemento(careTaker.get(1));
      System.out.println("Second saved State: " + originator.getState());
   }
}
步骤 5
验证输出。
Current State: State #4
First saved State: State #2
Second saved State: State #3
Spring中的应用
引入jar包

备忘录模式在框架源码中的应用还是比较少见的,主要还是结合具体的应用场景来使用。spring中的webfolw源码StateManageableMessageContext接口,我们来看它的源码:
public interface StateManageableMessageContext extends MessageContext {

    /**
     * Create a serializable memento, or token representing a snapshot of the internal state of this message context.
     * @return the messages memento
     */
    public Serializable createMessagesMemento();

    /**
     * Set the state of this context from the memento provided. After this call, the messages in this context will match
     * what is encapsulated inside the memento. Any previous state will be overridden.
     * @param messagesMemento the messages memento
     */
    public void restoreMessages(Serializable messagesMemento);

    /**
     * Configure the message source used to resolve messages added to this context. May be set at any time to change how
     * coded messages are resolved.
     * @param messageSource the message source
     * @see MessageContext#addMessage(MessageResolver)
     */
    public void setMessageSource(MessageSource messageSource);
}
createMessagesMemento()创建一个消息备忘录。可以看一下实现类:
public class DefaultMessageContext implements StateManageableMessageContext {

    private static final Log logger = LogFactory.getLog(DefaultMessageContext.class);

    private MessageSource messageSource;

    @SuppressWarnings("serial")
    private Map<Object, List<Message>> sourceMessages = new AbstractCachingMapDecorator<Object, List<Message>>(
            new LinkedHashMap<Object, List<Message>>()) {

        protected List<Message> create(Object source) {
            return new ArrayList<Message>();
        }
    };

    /**
     * Creates a new default message context. Defaults to a message source that simply resolves default text and cannot
     * resolve localized message codes.
     */
    public DefaultMessageContext() {
        init(null);
    }

    /**
     * Creates a new default message context.
     * @param messageSource the message source to resolve messages added to this context
     */
    public DefaultMessageContext(MessageSource messageSource) {
        init(messageSource);
    }

    public MessageSource getMessageSource() {
        return messageSource;
    }

    // implementing message context

    public Message[] getAllMessages() {
        List<Message> messages = new ArrayList<Message>();
        for (List<Message> list : sourceMessages.values()) {
            messages.addAll(list);
        }
        return messages.toArray(new Message[messages.size()]);
    }

    public Message[] getMessagesBySource(Object source) {
        List<Message> messages = sourceMessages.get(source);
        return messages.toArray(new Message[messages.size()]);
    }

    public Message[] getMessagesByCriteria(MessageCriteria criteria) {
        List<Message> messages = new ArrayList<Message>();
        for (List<Message> sourceMessages : this.sourceMessages.values()) {
            for (Message message : sourceMessages) {
                if (criteria.test(message)) {
                    messages.add(message);
                }
            }
        }
        return messages.toArray(new Message[messages.size()]);
    }

    public boolean hasErrorMessages() {
        for (List<Message> sourceMessages : this.sourceMessages.values()) {
            for (Message message : sourceMessages) {
                if (message.getSeverity() == Severity.ERROR) {
                    return true;
                }
            }
        }
        return false;
    }

    public void addMessage(MessageResolver messageResolver) {
        Locale currentLocale = LocaleContextHolder.getLocale();
        if (logger.isDebugEnabled()) {
            logger.debug("Resolving message using " + messageResolver);
        }
        Message message = messageResolver.resolveMessage(messageSource, currentLocale);
        List<Message> messages = sourceMessages.get(message.getSource());
        if (logger.isDebugEnabled()) {
            logger.debug("Adding resolved message " + message);
        }
        messages.add(message);
    }

    public void clearMessages() {
        sourceMessages.clear();
    }

    // implementing state manageable message context

    public Serializable createMessagesMemento() {
        return new LinkedHashMap<Object, List<Message>>(sourceMessages);
    }

    @SuppressWarnings("unchecked")
    public void restoreMessages(Serializable messagesMemento) {
        sourceMessages.putAll((Map<Object, List<Message>>) messagesMemento);
    }

    public void setMessageSource(MessageSource messageSource) {
        if (messageSource == null) {
            messageSource = new DefaultTextFallbackMessageSource();
        }
        this.messageSource = messageSource;
    }

    // internal helpers

    private void init(MessageSource messageSource) {
        setMessageSource(messageSource);
        // create the 'null' source message list eagerly to ensure global messages are indexed first
        this.sourceMessages.get(null);
    }

    public String toString() {
        return new ToStringCreator(this).append("sourceMessages", sourceMessages).toString();
    }

    private static class DefaultTextFallbackMessageSource extends AbstractMessageSource {
        protected MessageFormat resolveCode(String code, Locale locale) {
            return null;
        }
    }
}
主要逻辑就相当于是给Message留一个备份,以备恢复之用。
20、状态模式
State : 定义一个接口以封装与 Context 的一个特定状态相关的行为。
abstract class State {
    public abstract void Handle(Context context);
}
ConcreteState : 每一个子类实现一个与 Context 的一个状态相关的行为。
class ConcreteStateA extends State {
    @Override
    public void Handle(Context context) {
        context.SetState(new ConcreteStateB());
    }
}

class ConcreteStateB extends State {
    @Override
    public void Handle(Context context) {
        context.SetState(new ConcreteStateA());
    }
}
Context : 维护一个 ConcreteState 子类的实例,这个实例定义当前的状态。
class Context {
    private State state;
    public Context(State state) {
        this.state = state;
    }

    public void SetState(State state) {
        this.state = state;
        System.out.println("当前状态:" + state.getClass().getName());
    }
    public State GetState() {
        return state;
    }

    public void Request() {
        state.Handle(this);
    }
}
测试代码
public class StatePattern {
    public static void main(String[] args) {
        Context c = new Context(new ConcreteStateA());
        c.Request();
        c.Request();
    }
}
运行结果
当前状态:ConcreteStateB
当前状态:ConcreteStateA
21、访问者模式
实现
我们将创建一个定义接受操作的 ComputerPart 接口。Keyboard、Mouse、Monitor 和 Computer 是实现了 ComputerPart 接口的实体类。我们将定义另一个接口 ComputerPartVisitor,它定义了访问者类的操作。Computer 使用实体访问者来执行相应的动作。
VisitorPatternDemo,我们的演示类使用 Computer、ComputerPartVisitor 类来演示访问者模式的用法。
步骤 1
定义一个表示元素的接口。
ComputerPart.java
public interface ComputerPart {
   public void accept(ComputerPartVisitor computerPartVisitor);
}
步骤 2
创建扩展了上述类的实体类。
Keyboard.java
public class Keyboard  implements ComputerPart {

   @Override
   public void accept(ComputerPartVisitor computerPartVisitor) {
      computerPartVisitor.visit(this);
   }
}
Monitor.java
public class Monitor  implements ComputerPart {

   @Override
   public void accept(ComputerPartVisitor computerPartVisitor) {
      computerPartVisitor.visit(this);
   }
}
Mouse.java
public class Mouse  implements ComputerPart {

   @Override
   public void accept(ComputerPartVisitor computerPartVisitor) {
      computerPartVisitor.visit(this);
   }
}
Computer.java
public class Computer implements ComputerPart {

   ComputerPart[] parts;

   public Computer(){
      parts = new ComputerPart[] {new Mouse(), new Keyboard(), new Monitor()};
   }


   @Override
   public void accept(ComputerPartVisitor computerPartVisitor) {
      for (int i = 0; i < parts.length; i++) {
         parts[i].accept(computerPartVisitor);
      }
      computerPartVisitor.visit(this);
   }
}
步骤 3
定义一个表示访问者的接口。
ComputerPartVisitor.java
public interface ComputerPartVisitor {
   public void visit(Computer computer);
   public void visit(Mouse mouse);
   public void visit(Keyboard keyboard);
   public void visit(Monitor monitor);
}
步骤 4
创建实现了上述类的实体访问者。
ComputerPartDisplayVisitor.java
public class ComputerPartDisplayVisitor implements ComputerPartVisitor {

   @Override
   public void visit(Computer computer) {
      System.out.println("Displaying Computer.");
   }

   @Override
   public void visit(Mouse mouse) {
      System.out.println("Displaying Mouse.");
   }

   @Override
   public void visit(Keyboard keyboard) {
      System.out.println("Displaying Keyboard.");
   }

   @Override
   public void visit(Monitor monitor) {
      System.out.println("Displaying Monitor.");
   }
}
步骤 5
使用 ComputerPartDisplayVisitor 来显示 Computer 的组成部分。
VisitorPatternDemo.java
public class VisitorPatternDemo {
   public static void main(String[] args) {

      ComputerPart computer = new Computer();
      computer.accept(new ComputerPartDisplayVisitor());
   }
}
步骤 6
执行程序,输出结果:
Displaying Mouse.
Displaying Keyboard.
Displaying Monitor.
Displaying Computer.
Spring中的访问者模式
Spring在beans配置中实现了访问者设计模式。为了观察,我们可以看看org.springframework.beans.factory.config.BeanDefinitionVisitor对象,该对象用于解析bean元数据并将其解析为String(例如:具有作用域或工厂方法名称的XML属性)或Object(例如:构造函数定义中的参数)。已解析的值在与分析的bean关联的BeanDefinition实例中进行判断设置。具体的源码请看BeanDefinitionVisitor的代码片段:
/**
 * Traverse the given BeanDefinition object and the MutablePropertyValues
 * and ConstructorArgumentValues contained in them.
 * @param beanDefinition the BeanDefinition object to traverse
 * @see #resolveStringValue(String)
 */
public void visitBeanDefinition(BeanDefinition beanDefinition) {
  visitParentName(beanDefinition);
  visitBeanClassName(beanDefinition);
  visitFactoryBeanName(beanDefinition);
  visitFactoryMethodName(beanDefinition);
  visitScope(beanDefinition);
  visitPropertyValues(beanDefinition.getPropertyValues());
  ConstructorArgumentValues cas = beanDefinition.
    getConstructorArgumentValues();
  visitIndexedArgumentValues(cas.
    getIndexedArgumentValues());
  visitGenericArgumentValues(cas.
    getGenericArgumentValues());
}

protected void visitParentName(BeanDefinition beanDefinition) {
  String parentName = beanDefinition.getParentName();
  if (parentName != null) {
    String resolvedName = resolveStringValue(parentName);
    if (!parentName.equals(resolvedName)) {
      beanDefinition.setParentName(resolvedName);
    }
  }
}
在这种情况下,他们只是访问方式,没有对访问者做任何补充的控制。这里访问包括分析给定BeanDefinition的参数,并将其替换为已解析对象。
22、中介者模式
实现
我们通过聊天室实例来演示中介者模式。实例中,多个用户可以向聊天室发送消息,聊天室向所有的用户显示消息。我们将创建两个类 ChatRoom 和 User。User 对象使用 ChatRoom 方法来分享他们的消息。
MediatorPatternDemo,我们的演示类使用 User 对象来显示他们之间的通信。
步骤 1
创建中介类。
ChatRoom.java
import java.util.Date;

public class ChatRoom {
   public static void showMessage(User user, String message){
      System.out.println(new Date().toString()
         + " [" + user.getName() +"] : " + message);
   }
}
步骤 2
创建 user 类。
User.java
public class User {
   private String name;

   public String getName() {
      return name;
   }

   public void setName(String name) {
      this.name = name;
   }

   public User(String name){
      this.name  = name;
   }

   public void sendMessage(String message){
      ChatRoom.showMessage(this,message);
   }
}
步骤 3
使用 User 对象来显示他们之间的通信。
MediatorPatternDemo.java
public class MediatorPatternDemo {
   public static void main(String[] args) {
      User robert = new User("Robert");
      User john = new User("John");

      robert.sendMessage("Hi! John!");
      john.sendMessage("Hello! Robert!");
   }
}
步骤 4
执行程序,输出结果:
Thu Jan 31 16:05:46 IST 2013 [Robert] : Hi! John!
Thu Jan 31 16:05:46 IST 2013 [John] : Hello! Robert!
JDK类库中的中介者模式
java.util.Timer
请看下面的例子,timer是一个中介者,它持有新创建的TimerTask的引用,timer负责执行TimerTask的定时任务。
Timer timer = new Timer();
timer.schedule(new TimerTask() {
    @Override
    public void run() {
        System.out.println("nice to meet u");
    }
}, new Date(),1000);
timer.schedule(new TimerTask() {
    @Override
    public void run() {
        System.out.println("nice to meet u too");
    }
}, new Date(),1000);
Timer协调各种TimerTask的工作,各种TimerTask维护在queue中;
public class Timer {
    private final TaskQueue queue = new TaskQueue();

    private void sched(TimerTask task, long time, long period) {
        if (time < 0)
            throw new IllegalArgumentException("Illegal execution time.");

        // Constrain value of period sufficiently to prevent numeric
        // overflow while still being effectively infinitely large.
        if (Math.abs(period) > (Long.MAX_VALUE >> 1))
            period >>= 1;

        synchronized(queue) {
            if (!thread.newTasksMayBeScheduled)
                throw new IllegalStateException("Timer already cancelled.");

            synchronized(task.lock) {
                if (task.state != TimerTask.VIRGIN)
                    throw new IllegalStateException(
                        "Task already scheduled or cancelled");
                task.nextExecutionTime = time;
                task.period = period;
                task.state = TimerTask.SCHEDULED;
            }

            queue.add(task);
            if (queue.getMin() == task)
                queue.notify();
        }
    }

}
23、解释器模式
我们将创建一个接口 Expression 和实现了 Expression 接口的实体类。定义作为上下文中主要解释器的 TerminalExpression 类。其他的类 OrExpression、AndExpression 用于创建组合式表达式。
InterpreterPatternDemo,我们的演示类使用 Expression 类创建规则和演示表达式的解析。
步骤 1
创建一个表达式接口。
Expression.java
public interface Expression {
   public boolean interpret(String context);
}
步骤 2
创建实现了上述接口的实体类。
TerminalExpression.java
public class TerminalExpression implements Expression {

   private String data;

   public TerminalExpression(String data){
      this.data = data;
   }

   @Override
   public boolean interpret(String context) {
      if(context.contains(data)){
         return true;
      }
      return false;
   }
}
OrExpression.java
public class OrExpression implements Expression {

   private Expression expr1 = null;
   private Expression expr2 = null;

   public OrExpression(Expression expr1, Expression expr2) {
      this.expr1 = expr1;
      this.expr2 = expr2;
   }

   @Override
   public boolean interpret(String context) {
      return expr1.interpret(context) || expr2.interpret(context);
   }
}
AndExpression.java
public class AndExpression implements Expression {

   private Expression expr1 = null;
   private Expression expr2 = null;

   public AndExpression(Expression expr1, Expression expr2) {
      this.expr1 = expr1;
      this.expr2 = expr2;
   }

   @Override
   public boolean interpret(String context) {
      return expr1.interpret(context) && expr2.interpret(context);
   }
}
步骤 3
InterpreterPatternDemo 使用 Expression 类来创建规则,并解析它们。
InterpreterPatternDemo.java
public class InterpreterPatternDemo {

   //规则:Robert 和 John 是男性
   public static Expression getMaleExpression(){
      Expression robert = new TerminalExpression("Robert");
      Expression john = new TerminalExpression("John");
      return new OrExpression(robert, john);
   }

   //规则:Julie 是一个已婚的女性
   public static Expression getMarriedWomanExpression(){
      Expression julie = new TerminalExpression("Julie");
      Expression married = new TerminalExpression("Married");
      return new AndExpression(julie, married);
   }

   public static void main(String[] args) {
      Expression isMale = getMaleExpression();
      Expression isMarriedWoman = getMarriedWomanExpression();

      System.out.println("John is male? " + isMale.interpret("John"));
      System.out.println("Julie is a married women? "
      + isMarriedWoman.interpret("Married Julie"));
   }
}
步骤 4
执行程序,输出结果:
John is male? true
Julie is a married women? true
解释器模式在Spring中的应用
public class SpringTest {
    public static void main(String[] args) {
        org.springframework.expression.ExpressionParser
                parser = new SpelExpressionParser();

        Expression expression = parser.parseExpression("100 * 2 + 400 * 1 + 66");

        int result = (Integer) expression.getValue();

        System.out.println(result);
    }
}
输出:
666
结束。