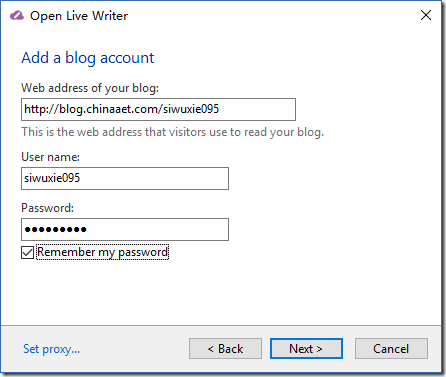
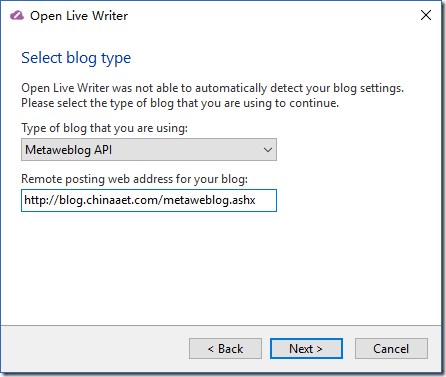
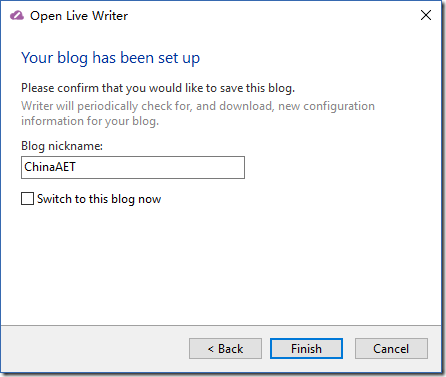
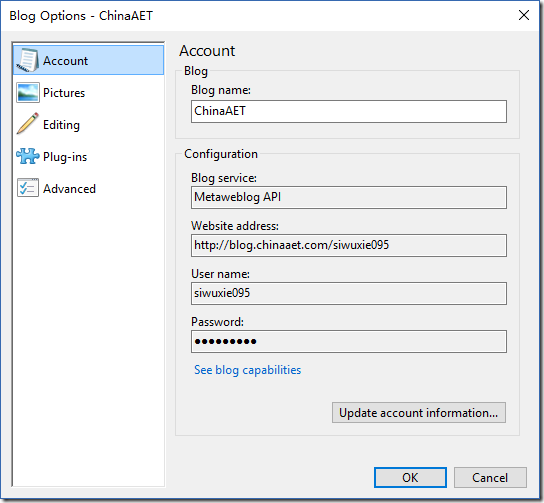
1、首先到官网下载OLW:http://openlivewriter.org/
2、选择 Other services
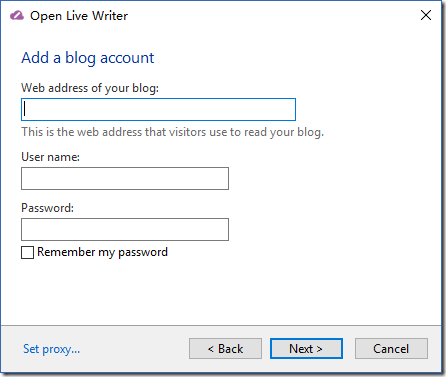
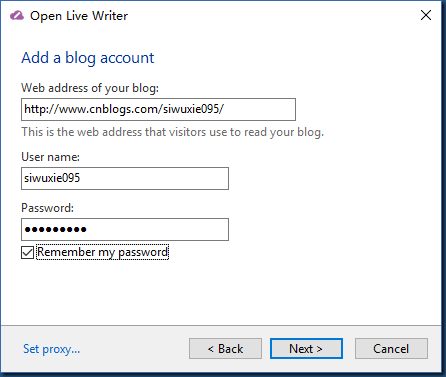
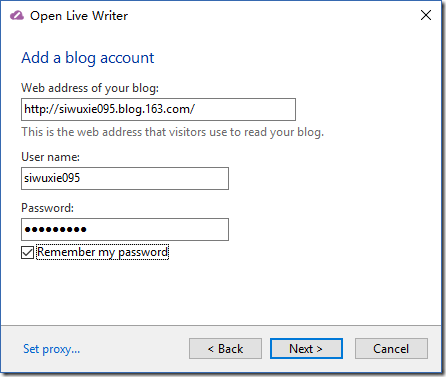
3、填写“博客地址”、“用户名”、“密码”
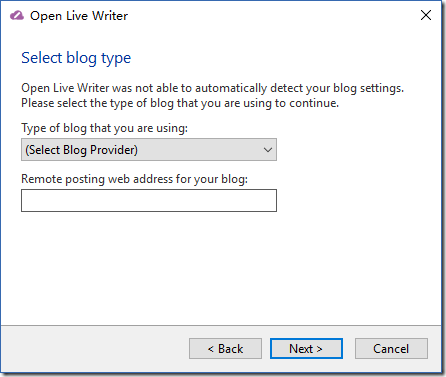
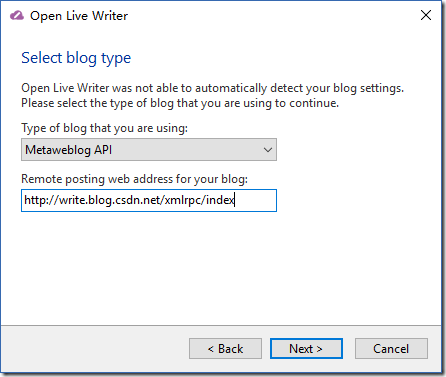
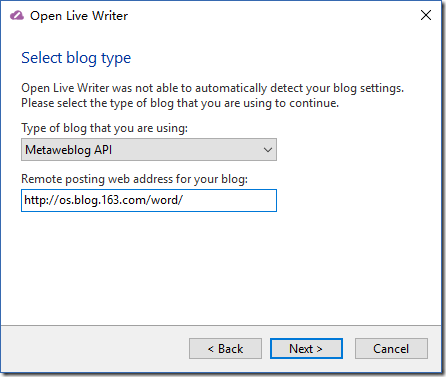
4、“选择博客提供商” 和 “远程发布博客地址”
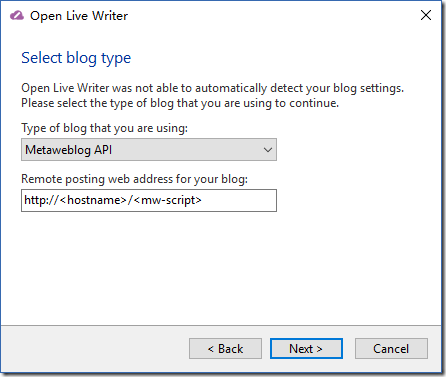
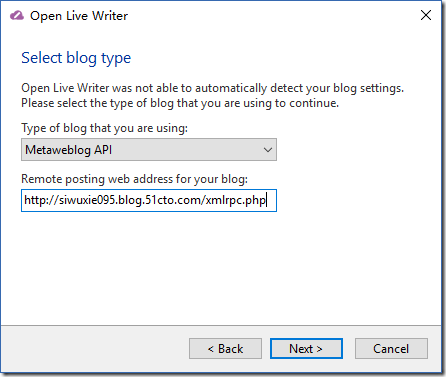
5、博客提供商 为:Metaweblog API
6、设置
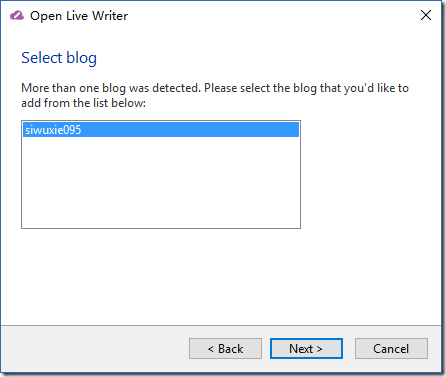
(1)选择博客
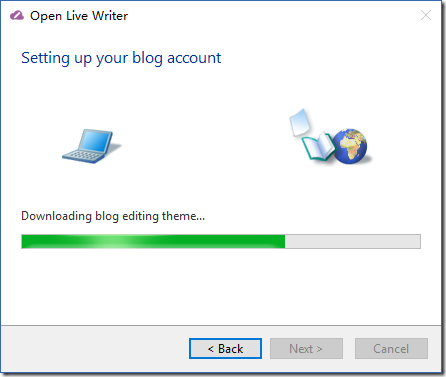
(2)注册博客帐户
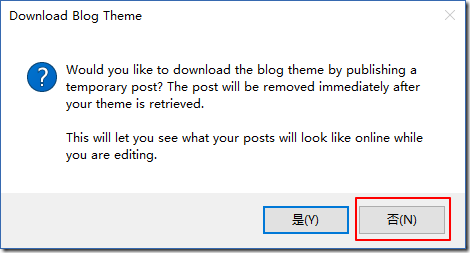
(3)下载博客主题 选 “否”
7、配置CSDN博客的连接
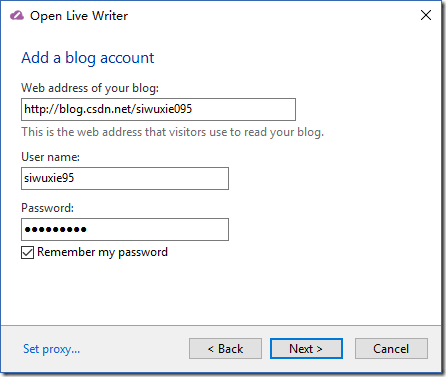
(1)开始配置
博客地址:http://blog.csdn.net/CSDN用户名
用户名:CSDN用户名
密码:CSDN登录密码
(2)远程发布博客地址:http://write.blog.csdn.net/xmlrpc/index
(3)设置博客昵称
8、配置博客园的连接
(1)开始配置
博客地址:http://www.cnblogs.com/博客园用户名/
用户名:博客园用户名
密码:博客园登录密码
(2)远程发布博客地址:http://www.cnblogs.com/博客园用户名/services/metaweblog.aspx
(似乎博客园不需要这个,跳过了这个步骤,但还是贴出来,万一哪天又要了呢)
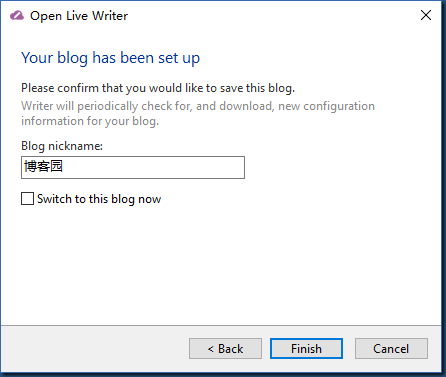
(3)设置博客昵称
(4)配置完成
9、配置网易博客的连接
(1)开始配置
博客地址:http://网易用户名.blog.163.com/
用户名:网易邮箱前缀(163邮箱才取前缀)
密码:网易登录密码
(2)远程发布博客地址:http://os.blog.163.com/word/
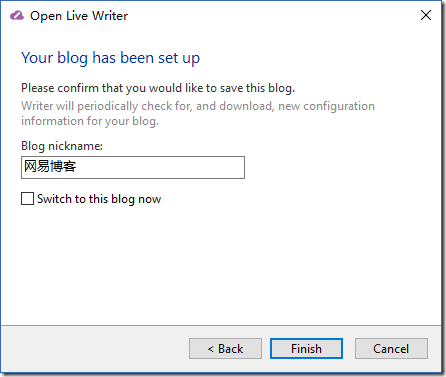
(3)设置博客昵称
(4)配置完成
10、配置新浪博客的连接:
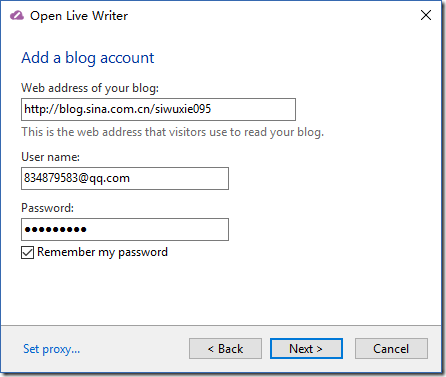
(1)开始配置
博客地址:http://blog.sina.com.cn/新浪博客用户名
用户名:新浪登录帐号
密码:新浪登录密码
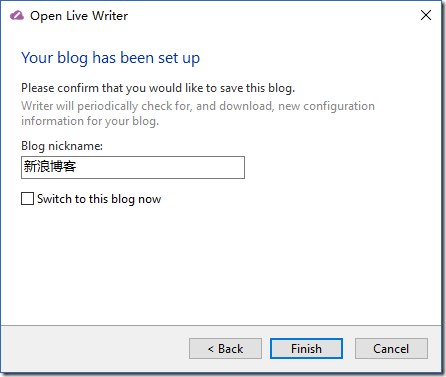
(2)远程发布博客地址:无(貌似也不需要,跳过这个步骤)
(3)设置博客昵称
(4)配置完成
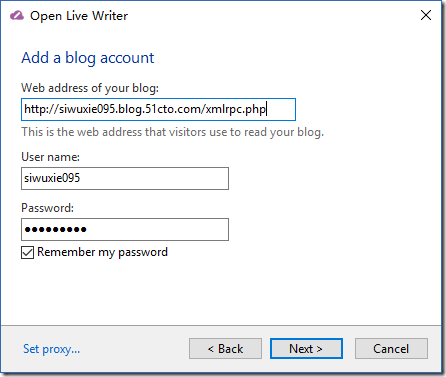
11、配置51CTO博客的连接
(1)开始配置
博客地址:http://51CTO用户名.blog.51cto.com/xmlrpc.php
用户名:51CTO用户名
密码:51CTO登录密码
(2)远程发布博客地址:http://51CTO用户名.blog.51cto.com/xmlrpc.php
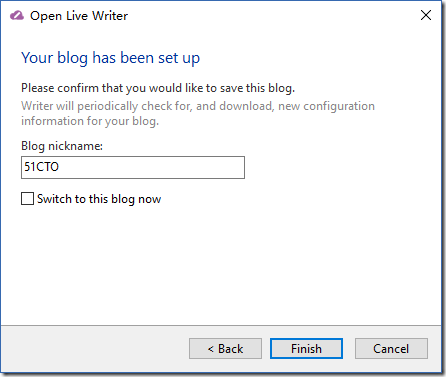
(3)设置博客昵称
(4)配置完成
12、配置ChinaAET博客的连接
(1)开始配置
博客地址:http://blog.chinaaet.com/ChinaAET用户名
用户名:ChinaAET用户名
密码:ChinaAET登录密码
(2)远程发布博客地址:http://blog.chinaaet.com/metaweblog.ashx
(3)设置博客昵称
(4)配置完成
13、综合如下:
CSDN:
博客地址:http://blog.csdn.net/CSDN用户名
用户名:CSDN用户名
密码:CSDN登录密码
远程发布博客地址:http://write.blog.csdn.net/xmlrpc/index
博客园:
博客地址:http://www.cnblogs.com/博客园用户名/
用户名:博客园用户名
密码:博客园登录密码
远程发布博客地址:无(备用:http://www.cnblogs.com/博客园用户名/services/metaweblog.aspx)
网易博客:
博客地址:http://网易用户名.blog.163.com/
用户名:网易邮箱前缀(163邮箱才取前缀)
密码:网易登录密码
远程发布博客地址:http://os.blog.163.com/word/
新浪博客:
博客地址:http://blog.sina.com.cn/新浪博客用户名
用户名:新浪登录帐号
密码:新浪登录密码
远程发布博客地址:无
51CTO博客:
博客地址:http://51CTO用户名.blog.51cto.com/xmlrpc.php
用户名:51CTO用户名
密码:51CTO登录密码
远程发布博客地址:http://51CTO用户名.blog.51cto.com/xmlrpc.php
ChinaAET博客:
博客地址:http://blog.chinaaet.com/ChinaAET用户名
用户名:ChinaAET用户名
密码:ChinaAET登录密码
远程发布博客地址:http://blog.chinaaet.com/metaweblog.ashx
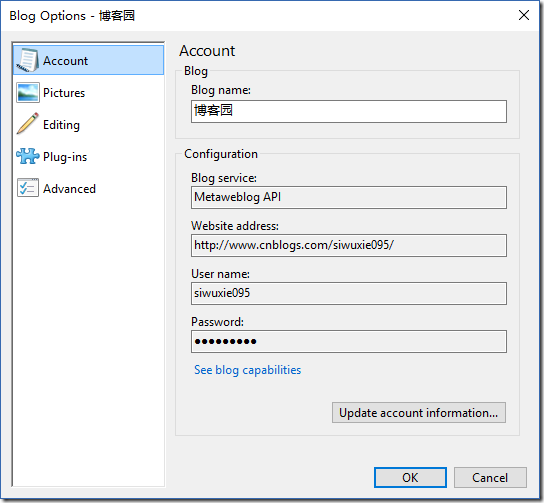
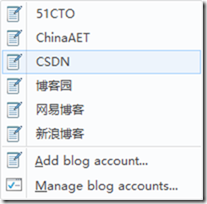
14、所有连接一览:
15、代码高亮插件:
此插件放入C:UserssiwuxAppDataLocalOpenLiveWriterapp-0.6.0.0Plugins
(这里的siwux是你电脑的用户名,若没有Plugins文件夹,就自己创建)
免积分 免下载豆 直接下载:
狡兔双窟其一:http://download.csdn.net/detail/siwuxie095/9718088
狡兔双窟其二:http://down.51cto.com/data/2271173
关于代码高亮插件:
(1):https://github.com/OpenLiveWriter/OpenLiveWriter
(2):http://www.cnblogs.com/memento/p/5995173.html
(3):http://www.cnblogs.com/zsy/p/5859928.html
Windows Live Writer推荐SyntaxHighlighter代码着色插件
博客园内置支持SyntaxHighlighter代码着色,代码着色语法:<pre class='编程语言'>代码</pre>。
需要注意的是:如何你使用SyntaxHighlighter代码着色,需要将默认编辑器改为TinyMCE。如果使用CuteEditor,CuteEditor会自动去除代码中的空格,造成代码格式破坏。
如果您使用Windows Live Writer写博客(配置步骤),通过Windows Live Writer代码着色插件,可以方便进行SyntaxHighlighter代码着色。
我们推荐的代码着色插件是:Windows Live Writer Source Code plugin for SyntaxHighlighter
官方网址:http://sourcecodeplugin.codeplex.com/
本地下载:SourceCodePlugin_version_1.1.zip
安装方法:
将WindowsLiveWriter.SourceCode.dll复制到Windows Live Writer plugin文件夹:
* 32-bit systems: C:Program FilesWindows LiveWriterPlugins
* 64-bit systems: C:Program Files (x86)Windows LiveWriterPlugins
使用方法:
安装成功之后,在Live Writer会出现“Source Code”插件,如下图:
点击该插件,粘贴需要着色的代码并选择相应的编程语言即可。
=================================================================================================================
OpenLiveWriter代码插件
1、OpenLiveWriter安装
Windows Live Writer在2012年就停止了更新,Open Live Writer(以下简称OLW)是由Windows Live WriterWriter更名而来,是由微软推出的一款能够免费使用的博客写作软件,主要为用户提供博客在线撰写和编辑功能,相比Windows Live Writer,OLW首个版本仍然缺少一些功能,不过团队已经制订了更新路线图,一些新功能会陆续推出。相信以后他将是一个写博客的好利器。
但从github源代码(https://github.com/OpenLiveWriter/OpenLiveWriter)来看,已经有9个月未更新了,而官网更是未见一个插件,“钱途”堪忧呀。
官网地址:http://openlivewriter.org/ 点击download下载:https://openlivewriter.azureedge.net/stable/Releases/OpenLiveWriterSetup.exe
默认安装到C:Users用户AppDataLocalOpenLiveWriter目录,结构如下:
标红色的是OLW的主程序:
双击OpenLiveWriter.exe即可打开OLW编辑器:
作为一个开发人员,对代码进行着色是不可缺少的,如何在OLW下实现插入代码并着色呢?
2、如何实现代码着色
前奏:从cnblogs的官网获取,在windows live writer下,可用WindowsLiveWriter.CNBlogs.CodeHighlighter进行代码着色,是有有效的,详情查看:http://www.cnblogs.com/cmt/archive/2009/11/27/1611900.html。
实验:将WindowsLiveWriter.CNBlogs.CodeHighlighter.dll插件放到C:Users用户AppDataLocalOpenLiveWriterapp-0.6.0.0Plugins目录下,启动并未有见插件
分析:通过调试OLW的源码代码调试,加载插件出现异常;通过ILSpy分析WindowsLiveWriter.CNBlogs.CodeHighlighter.dll,如下图
WindowsLiveWriter.CNBlogs.CodeHighlighter.dll引用WindowsLive.Writer.Api,与现有OLW的新接口OpenLiveWriter.Api不匹配。
解决方案一:反编译WindowsLiveWriter.CNBlogs.CodeHighlighter.dll修改引用类库,将WindowsLive.Writer.Api.dll更改为OpenLiveWriter.Api.dll,不建议使用本方法。
解决方案二:由于是从Windows Live Writer Source Code plugin for SyntaxHighlighter(http://sourcecodeplugin.codeplex.com/)进行优化而来,可以从本开源项目进行优化。
封装编译之后的dll为:OpenLiveWriter.CNBlogs.SourceCode.dll,下载地址为:OpenLiveWriter.CNBlogs.SourceCode.zip
插件安装之后:
3、代码着色项目下载
3.1 项目下载
(1)原始项目下载地址:http://sourcecodeplugin.codeplex.com/SourceControl/latest
点击“download”下载,只需按照3.2修订WindowsLiveWriter.SourceCode项目编译。
(2)修改后的项目可从github下载:
https://github.com/zsy619/OpenLiveWriter.SourceCode,下载编辑即可使用。
3.2 编译配置
(1)修改类库引用,WindowsLive.Writer.Api.dll更改为OpenLiveWriter.Api.dll(可以从OLW安装的目录下找到)
(2)修改输出地址:
OpenLiveWriter.CNBlogs.SourceCode类库输出地址:copy "$(TargetPath)" "C:UsersxxttAppDataLocalOpenLiveWriterapp-0.6.0.0Plugins"
(3)CodeForm窗体代码修订
修改Code属性:
 public string Code
        {
            get
            {
                return this._code;
            }
            set
            {
                this._code = value;
            }
        }
新增博客园的远程代码着色方法(可参考WindowsLiveWriter.CNBlogs.CodeHighlighter.dll):
 private string RemoteCodeHighlight()
        {
            string requestUriString = "http://util.cnblogs.com/CodeHighlight/LiveWriterHightlight";
            HttpWebRequest httpWebRequest = WebRequest.Create(requestUriString) as HttpWebRequest;
            httpWebRequest.Method = "POST";
            httpWebRequest.ContentType = "application/x-www-form-urlencoded";
            string value = string.Format("language={0}&code={1}", HttpUtility.UrlEncode(this.comboBrush.Text.Trim()), HttpUtility.UrlEncode(this.textCode.Text.Trim()));
            using (StreamWriter streamWriter = new StreamWriter(httpWebRequest.GetRequestStream()))
            {
                streamWriter.Write(value);
            }
            string result;
            using (WebResponse response = httpWebRequest.GetResponse())
            {
                using (StreamReader streamReader = new StreamReader(response.GetResponseStream()))
                {
                    result = streamReader.ReadToEnd();
                }
            }
            return result;
        }
修改buttonOK_Click方法:
 private void buttonOK_Click(object sender, EventArgs e)
        {
            this._configDb.Config.Brush = this.comboBrush.Text;
            this._configDb.Config.MainFormX = base.Left;
            this._configDb.Config.MainFormY = base.Top;
            this._configDb.Config.MainFormWidth = base.Width;
            this._configDb.Config.MainFormHeight = base.Height;
            this._configDb.SavePluginConfigurationData();
            try
            {
                this._code = this.RemoteCodeHighlight();
            }
            catch (Exception exception)
            {
                MessageBox.Show(exception.Message, "error", MessageBoxButtons.OK, MessageBoxIcon.Error);
                return;
            }
            base.DialogResult = DialogResult.OK;
            base.Close();
        }
3.3 使用效果
C#代码展示如上,目前CNBlogs官网http://util.cnblogs.com/CodeHighlight/LiveWriterHightlight接口还不支持go语言,有点遗憾,期待更新!
===============================================================================================================================
[Tool] Open Live Writer 插件更新
最新插件下载地址:Memento.OLW_V1.0.0.3.7z
零、历史更新记录
- 2016.11.24
1. 修正 cnblog 语法高亮中的 SQL、Perl 语法高亮异常
- 2016.11.27
1. 增加 cnblog 页签中 SQL 语法高亮的关键词链接选择;
- 2017.01.17
1. 修正Python语法高亮中单行注释颜色问题;
2. 修正Matlab语法高亮细节问题;
- 持续更新…
一、更新内容
- cnblog 页签中增加 Lua 和 Matlab 语法高亮;(SyntaxHighlight 页签中尚未添加)
- 增加折叠区域插件,见效果展示;
- 增加 bat 执行文件,直接拷贝插件所需 dll 文件到指定位置;
- 增减 OLWPlugins.css 样式文件和 OLWPlugins.js 脚本文件;
- 测试 Win10/7 32/64 位系统安装使用情况;
- 优化部分使用体验;
二、更新说明
- 应 @我要改名叫嘟嘟 和 @船长J.K 两位的需求,尝试了一下 Wilco.SyntaxHighlighter 的扩展开发,实现 Lua 和 Matlab 两种语法高亮。由于博主不擅长这两种语言,测试不一定到位,如果两位或者其他人使用过程中有何问题都可以留言反馈,博主再尽力修改完善,先在此谢过。
- 折叠区域插件,先前在文章 插入折叠区域功能 中已有开发,不过那次是针对 WLW,这次移植到 OLW 上来,并优化了部分使用体验。
- 同时,FoldRegion 插件属于自己为了方便浏览开发的,所以需要加入自定义的 css 样式和 js 脚本文件。使用该插件时需要在“博客园后台管理”->“设置”->“页首html代码”中添加这两个文件的引用,文件下载参考最后的资源下载,引用代码参考如下:
01
02
<link type="text/css" rel="stylesheet" href="http://files.cnblogs.com/files/memento/OLWPlugins.css" />
<script type="text/javascript" src="http://files.cnblogs.com/files/memento/OLWPlugins.js"></script>
- 上一篇文章许多人反应说不知道插件放到哪里,Plugins 文件夹没有找到等问题,为了方便使用,博主在压缩包里增加一个 bat 文件,DeployDLL.bat,解压缩后直接执行即可拷贝插件所需要的 dll 到指定位置了。
- 博主通过 Hyper-V 分别模拟了 Win10/7 32/64位几种不同的环境进行插件测试,均可以使用,如果有问题请留言讨论。 注意,Open Live Writer 软件本身建议基于 .NET 4.5.2 环境,详情参考 OpenLiveWriter.SDK.nuspec。
- 对了,再啰嗦一句,从网上下载下来的 dll,windows 系统有时候会默认为锁定状态,需要在属性中进行解锁后再使用。
三、效果展示
- cnblog(模拟博客园推荐使用的插入代码)
/// <summary>
/// 构造函数
/// </summary>
/// <param name="settings">插件配置</param>
/// <param name="content">文本内容</param>
public CNBlogs(Settings settings, string content)
{
    InitializeComponent();

    try
    {
        m_Settings = settings;
        m_Content = content;
        m_HtmlParser = new HtmlParser();

        chbCollapse.CheckedChanged += ChbCollapse_CheckedChanged;
        chbTAB.CheckedChanged += chbTAB_CheckedChanged;
        chbShowLineNum.CheckedChanged += ChbShowLineNum_CheckedChanged;

        Load += CNBlogs_Load;
        txtTAB.KeyPress += CommonHelper.NumberImput_KeyPress;
    }
    catch (Exception ex)
    {
        CommonHelper.ShowError(ex);
    }
}
/// <summary>
/// 构造函数
/// </summary>
/// <param name="settings">插件配置</param>
/// <param name="content">文本内容</param>
public CNBlogs(Settings settings, string content)
{
    InitializeComponent();

    try
    {
        m_Settings = settings;
        m_Content = content;
        m_HtmlParser = new HtmlParser();

        chbCollapse.CheckedChanged += ChbCollapse_CheckedChanged;
        chbTAB.CheckedChanged += chbTAB_CheckedChanged;
        chbShowLineNum.CheckedChanged += ChbShowLineNum_CheckedChanged;

        Load += CNBlogs_Load;
        txtTAB.KeyPress += CommonHelper.NumberImput_KeyPress;
    }
    catch (Exception ex)
    {
        CommonHelper.ShowError(ex);
    }
}
-- 文件名为 module.lua
-- 定义一个名为 module 的模块
module = {}

-- 定义一个常量
module.constant = "这是一个常量"

-- 定义一个函数
function module.func1()
    io.write("这是一个公有函数!
")
end

local function func2()
    print("这是一个私有函数!")
end

function module.func3()
    func2()
end

return module

Lua
 x = [0:0.01:10];
   y = sin(x);
   plot(x, y), xlabel('x'), ylabel('Sin(x)'), title('Sin(x) Graph'),
   grid on, axis equal
- SyntaxHighlighter(利用博客园已植入的 SyntaxHighlighter 高亮脚本)
(图三)SyntaxHighlighter 主界面
(图四)SyntaxHighlighter 插件详细设置
/// <summary>
/// 构造函数
/// </summary>
/// <param name="settings">插件配置</param>
/// <param name="content">文本内容</param>
public CNBlogs(Settings settings, string content)
{
    InitializeComponent();

    try
    {
        m_Settings = settings;
        m_Content = content;
        m_HtmlParser = new HtmlParser();

        chbCollapse.CheckedChanged += ChbCollapse_CheckedChanged;
        chbTAB.CheckedChanged += chbTAB_CheckedChanged;
        chbShowLineNum.CheckedChanged += ChbShowLineNum_CheckedChanged;

        Load += CNBlogs_Load;
        txtTAB.KeyPress += CommonHelper.NumberImput_KeyPress;
    }
    catch (Exception ex)
    {
        CommonHelper.ShowError(ex);
    }
}
- FoldRegion(折叠区域插件,优化浏览体验)
(图五)FoldRegion 主界面
● 标题展开
四、资源下载
- 插件下载:Memento.OLW_V1.0.0.3.7z
- 工程源码:OLW Plugin Coding
- 其他资源:
- Open Live Writer 官网
- Open Live Writer Github
- SyntaxHighlighter 下载:http://alexgorbatchev.com/SyntaxHighlighter/download/
- SyntaxHighlighter 配置:http://alexgorbatchev.com/SyntaxHighlighter/manual/configuration/
