卷积神经网络(Convolutional Neural Network, CNN)是一种前馈神经网络,它的人工神经元可以响应一部分覆盖范围内的周围单元,对于大型图像处理有出色表现。
其中 文章 详解卷积神经网络(CNN)已经对卷积神经网络进行了详细的描述,这里为了学习MXNet的库,所以对经典的神经网络进行实现~加深学习印象,并且为以后的使用打下基础。其中参考的为Gluon社区提供的学习资料~
def LeNet():
    """
    较早的卷积神经网络
    :return:
    """
    net = nn.Sequential()
    with net.name_scope():
        net.add(
            nn.Conv2D(channels=20, kernel_size=5, activation='relu'),
            nn.MaxPool2D(pool_size=2, strides=2),
            nn.Conv2D(channels=50, kernel_size=3, activation='relu'),
            nn.MaxPool2D(pool_size=2, strides=2),
            nn.Flatten(),
            nn.Dense(128, activation="relu"),
            nn.Dense(10)
        )
    return net
由于图片数据集的扩大和硬件设备的发展,更深层更复杂的神经网络模型被使用,其中代表为AlexNet,与相对较小的LeNet相比,AlexNet包含8层变换,其中有五层卷积和两层全连接隐含层,以及一个输出层。
def AlexNet():
    """
    对leNet的一个扩展,得益于数据集和硬件资源的发展
    :return:
    """
    net = nn.Sequential()
    with net.name_scope():
        net.add(
            # 第一阶段
            nn.Conv2D(channels=96, kernel_size=11, strides=4, activation='relu'),
            nn.MaxPool2D(pool_size=3, strides=2),
            # 第二阶段
            nn.Conv2D(channels=256, kernel_size=5, padding=2, activation='relu'),
            nn.MaxPool2D(pool_size=3, strides=2),
            # 第三阶段
            nn.Conv2D(channels=384, kernel_size=3, padding=1, activation='relu'),
            nn.Conv2D(channels=384, kernel_size=3, padding=1, activation='relu'),
            nn.Conv2D(channels=256, kernel_size=3, padding=1, activation='relu'),
            nn.MaxPool2D(pool_size=3, strides=2),
            # 第四阶段
            nn.Flatten(),
            nn.Dense(4096, activation="relu"),
            nn.Dropout(.5),
            # 第五阶段
            nn.Dense(4096, activation="relu"),
            nn.Dropout(.5),
            # 第六阶段
            nn.Dense(10)
        )
    return net
考虑到当网络层数非常多时,一层一层堆叠网络结构,非常麻烦,VGG使用了编程语言自带的便利,采用了函数和循环的方式,复制了网络结构里面的大量重复结构,因此可以很紧凑来构造这些网络。而第一个使用这种结构的深度网络是VGG。
def VGGNet(architecture):
    """
    通过引入了函数和循环的方式,可以快速创建任意层数的神经网络
    :return:
    """
    def vgg_block(num_convs, channals):
        """
        定义一个网络的基本结构,由若干卷积层和一个池化层构成
        VGG的一个关键是使用很多有着相对小的kernel(3×3)的卷积层然后接上一个池化层,之后再将这个模块重复多次。因此先定义一个这样的块:
        :param num_convs: 卷积层的层数
        :param channals: 通道数
        :return:
        """
        net = nn.Sequential()
        for _ in range(num_convs):
            net.add(nn.Conv2D(channels=channals, kernel_size=3, padding=1, activation='relu'))
        net.add(nn.MaxPool2D(pool_size=2, strides=2))
        return net

    def vgg_stack(architecture):
        """
        定义所有卷积层的网络结构,通过参数将定义的网络结构封装起来
        :param architecture: 指定的网络结构参数
        :return:
        """
        net = nn.Sequential()
        for (num_convs, channals) in architecture:
            net.add(vgg_block(num_convs, channals))
        return net

    # 在卷积层之后,采用了两个全连接层,然后使用输出层输出结果。
    net = nn.Sequential()
    with net.name_scope():
        net.add(
            vgg_stack(architecture),
            nn.Flatten(),
            nn.Dense(4096, activation='relu'),
            nn.Dropout(0.5),
            nn.Dense(4096, activation='relu'),
            nn.Dropout(0.5),
            nn.Dense(10)
        )
    return net
注意到卷积神经网络一般分成两块,一块主要由卷积层构成,另一块主要是全连接层。在Alexnet里我们看到如何把卷积层块和全连接层分别加深加宽从而得到深度网络。另外一个自然的想法是,我们可以串联数个卷积层块和全连接层块来构建深度网络。
不过这里的一个难题是,卷积的输入输出是4D矩阵,然而全连接是2D。同时在卷积神经网络里我们提到如果把4D矩阵转成2D做全连接,这个会导致全连接层有过多的参数。NiN提出只对通道层做全连接并且像素之间共享权重来解决上述两个问题。就是说,我们使用kernel大小是1×1的卷积。

def NiNNet():
    """
    通过串联多个卷积层和全连接层
    :return:
    """

    def mlpconv(channels, kernel_size, padding, strides=1, max_pooling=True):
        """
        通过构造一个正常的卷积层,和两个kernel=1的卷积层(功能相当于全连接层)构造
        :param channels:
        :param kernel_size:
        :param padding:
        :param strides:
        :param max_pooling:
        :return:
        """
        net = nn.Sequential()
        net.add(
            nn.Conv2D(channels=channels, kernel_size=kernel_size, strides=strides, padding=padding, activation='relu'),
            nn.Conv2D(channels=channels, kernel_size=1, padding=0, strides=1, activation='relu'),
            nn.Conv2D(channels=channels, kernel_size=1, padding=0, strides=1, activation='relu'))
        if max_pooling:
            net.add(nn.MaxPool2D(pool_size=3, strides=2))
        return net

    """
    除了使用了1×1卷积外,NiN在最后不是使用全连接,而是使用通道数为输出类别个数的mlpconv,外接一个平均池化层来将每个通道里的数值平均成一个标量。
    """
    net = nn.Sequential()
    with net.name_scope():
        net.add(
            mlpconv(96, 11, 0, strides=4),
            mlpconv(256, 5, 2),
            mlpconv(384, 3, 1),
            nn.Dropout(0.5),
            # 目标类为10类
            mlpconv(10, 3, 1, max_pooling=False),
            # 输入为 batch_size x 10 x 5 x 5, 通过AvgPool2D转成 batch_size x 10 x 1 x 1。
            # 使用全局池化可以避免估算pool_size大小
            nn.GlobalAvgPool2D(),
            # 转成 batch_size x 10
            nn.Flatten()
        )
    return net
2014年,Google使用了更加复杂的网络模型,其中包括了网络的串联和并联,如下图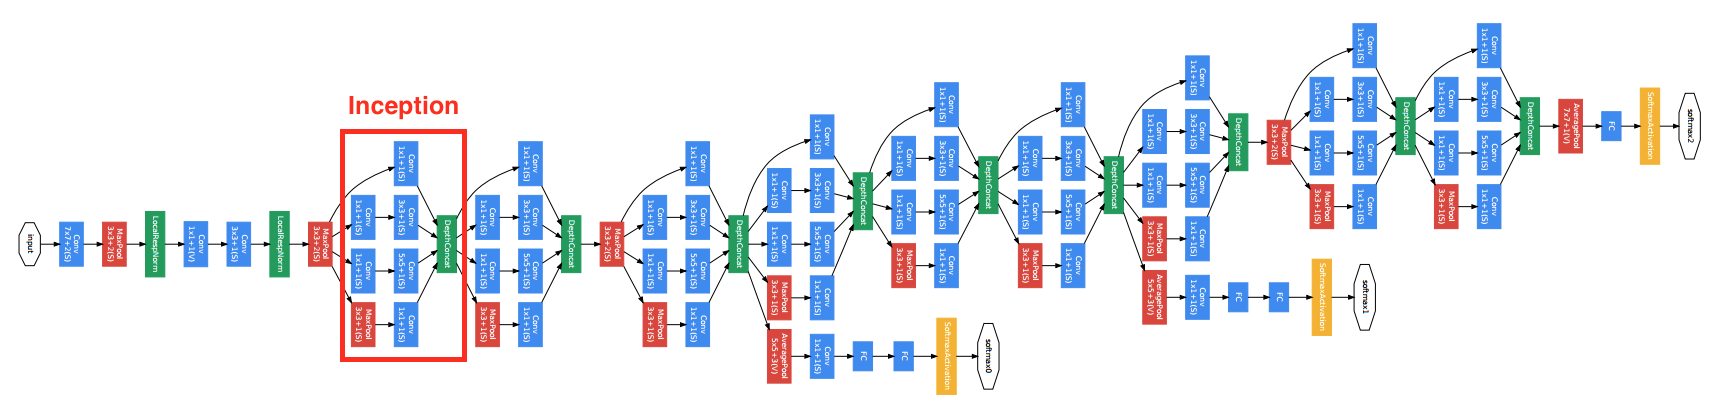
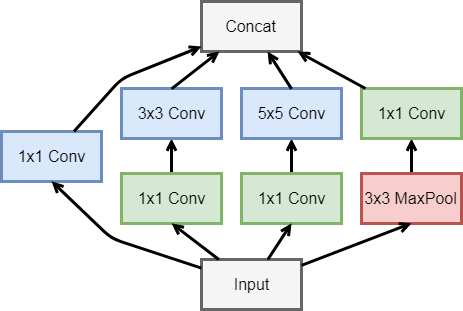
可以看到其中有多个四个并行卷积层的块。这个块一般叫做Inception,其基于Network in network的思想做了很大的改进。GoogleNet加入了更加结构化的Inception块来使得我们可以使用更大的通道,更多的层,同时控制计算量和模型大小在合理范围内。
def GoogLeNet(num_class):
    """
    GoogLeNet加入了更加结构化的Inception块来使得我们可以使用更大的通道,更多的层,同时控制计算量和模型大小在合理范围内。
    :return:
    """

    class GoogleNet(nn.Block):
        """
        通过串联Inception来构造深层网络结构
        """
        def __init__(self, num_classes, verbose=False, **kwargs):
            super(GoogleNet, self).__init__(**kwargs)
            self.verbose = verbose
            # add name_scope on the outer most Sequential
            with self.name_scope():
                # block 1
                b1 = nn.Sequential()
                b1.add(
                    nn.Conv2D(64, kernel_size=7, strides=2,
                              padding=3, activation='relu'),
                    nn.MaxPool2D(pool_size=3, strides=2)
                )
                # block 2
                b2 = nn.Sequential()
                b2.add(
                    nn.Conv2D(64, kernel_size=1),
                    nn.Conv2D(192, kernel_size=3, padding=1),
                    nn.MaxPool2D(pool_size=3, strides=2)
                )

                # block 3
                b3 = nn.Sequential()
                b3.add(
                    Inception(64, 96, 128, 16, 32, 32),
                    Inception(128, 128, 192, 32, 96, 64),
                    nn.MaxPool2D(pool_size=3, strides=2)
                )

                # block 4
                b4 = nn.Sequential()
                b4.add(
                    Inception(192, 96, 208, 16, 48, 64),
                    Inception(160, 112, 224, 24, 64, 64),
                    Inception(128, 128, 256, 24, 64, 64),
                    Inception(112, 144, 288, 32, 64, 64),
                    Inception(256, 160, 320, 32, 128, 128),
                    nn.MaxPool2D(pool_size=3, strides=2)
                )

                # block 5
                b5 = nn.Sequential()
                b5.add(
                    Inception(256, 160, 320, 32, 128, 128),
                    Inception(384, 192, 384, 48, 128, 128),
                    nn.AvgPool2D(pool_size=2)
                )
                # block 6
                b6 = nn.Sequential()
                b6.add(
                    nn.Flatten(),
                    nn.Dense(num_classes)
                )
                # chain blocks together
                self.net = nn.Sequential()
                self.net.add(b1, b2, b3, b4, b5, b6)

        def forward(self, x):
            out = x
            for i, b in enumerate(self.net):
                out = b(out)
                if self.verbose:
                    print('Block %d output: %s' % (i + 1, out.shape))
            return out

    class Inception(nn.Block):
        """
        网络结构的并联单元
        """
        def __init__(self, n1_1, n2_1, n2_3, n3_1, n3_5, n4_1, **kwargs):
            super(Inception, self).__init__(**kwargs)

            # path1
            self.p1_convs_1 = nn.Conv2D(n1_1, kernel_size=1, activation='relu')
            # path2
            self.p2_convs_1 = nn.Conv2D(n2_1, kernel_size=1, activation='relu')
            # path2
            self.p2_convs_3 = nn.Conv2D(n2_3, kernel_size=1, activation='relu')
            # path3
            self.p3_convs_1 = nn.Conv2D(n3_1, kernel_size=1, activation='relu')
            self.p3_convs_5 = nn.Conv2D(n3_5, kernel_size=1, activation='relu')
            # path4
            self.p4_pool_3 = nn.MaxPool2D(pool_size=3, padding=1, strides=1)
            self.p4_convs_1 = nn.Conv2D(n4_1, kernel_size=1, activation='relu')

        def forward(self, x):
            p1 = self.p1_convs_1(x)
            p2 = self.p2_convs_3(self.p2_convs_1(x))
            p3 = self.p3_convs_5(self.p3_convs_1(x))
            p4 = self.p4_convs_1(self.p4_pool_3(x))
            return nd.concat(p1, p2, p3, p4, dim=1)

    net = GoogleNet(num_class)
    return net
6. ResNet:
ResNet有效的解决了深度卷积神经网络难训练的问题。这是因为在误差反传的过程中,梯度通常变得越来越小,从而权重的更新量也变小。这个导致远离损失函数的层训练缓慢,随着层数的增加这个现象更加明显。之前有两种常用方案来尝试解决这个问题:
- 按层训练。先训练靠近数据的层,然后慢慢的增加后面的层。但效果不是特别好,而且比较麻烦。
- 使用更宽的层(增加输出通道)而不是更深来增加模型复杂度。但更宽的模型经常不如更深的效果好。
ResNet通过增加跨层的连接来解决梯度逐层回传时变小的问题。虽然这个想法之前就提出过了,但ResNet真正的把效果做好了。

最底下那层的输入不仅仅是输出给了中间层,而且其与中间层结果相加进入最上层。这样在梯度反传时,最上层梯度可以直接跳过中间层传到最下层,从而避免最下层梯度过小情况。
为什么叫做残差网络呢?我们可以将上面示意图里的结构拆成两个网络的和,一个一层,一个两层,最下面层是共享的。

在训练过程中,左边的网络因为更简单所以更容易训练。这个小网络没有拟合到的部分,或者说残差,则被右边的网络抓取住。所以直观上来说,即使加深网络,跨层连接仍然可以使得底层网络可以充分的训练,从而不会让训练更难。
ResNet沿用了VGG的那种全用3×33×3卷积,但在卷积和池化层之间加入了批量归一层来加速训练。每次跨层连接跨过两层卷积。这里我们定义一个这样的残差块(Residual块)。注意到如果输入的通道数和输出不一样时(same_shape=False),我们使用一个额外的1×1卷积来做通道变化,同时使用strides=2来把长宽减半。
def ResNet(num_classes):
    """
    深度残差网络,通过增加跨层的连接来解决梯度逐层回传时变小的问题。虽然这个想法之前就提出过了,但ResNet真正的把效果做好了。
    :return:
    """

    class Residual(nn.Block):
        """
        构造扩层连接,ResNet沿用了VGG的那种全用3×3卷积,但在卷积和池化层之间加入了批量归一层来加速训练。
        每次跨层连接跨过两层卷积。这里我们定义一个这样的残差块。注意到如果输入的通道数和输出不一样时(same_shape=False),
        我们使用一个额外的1×1卷积来做通道变化,同时使用strides=2来把长宽减半。
        """
        def __init__(self, channels, same_shape=True, **kwargs):
            super(Residual, self).__init__(**kwargs)
            self.same_shape = same_shape
            strides = 1 if same_shape else 2
            self.conv1 = nn.Conv2D(channels, kernel_size=3, padding=1, strides=strides)
            self.bn1 = nn.BatchNorm()
            self.conv2 = nn.Conv2D(channels, kernel_size=3, padding=1)
            self.bn2 = nn.BatchNorm()
            if not same_shape:
                self.conv3 = nn.Conv2D(channels, kernel_size=1, strides=strides)

        def forward(self, x):
            out = nd.relu(self.bn1(self.conv1(x)))
            out = self.bn2(self.conv2(out))
            if not self.same_shape:
                x = self.conv3(x)
            return nd.relu(out + x)

    class ResNet(nn.Block):
        """
        类似GoogLeNet主体是由Inception块串联而成,ResNet的主体部分串联多个Residual块。
        另外注意到一点是,这里我们没用池化层来减小数据长宽,而是通过有通道变化的Residual块里面的使用strides=2的卷积层。
        """
        def __init__(self, num_classes, verbose=False, **kwargs):
            super(ResNet, self).__init__(**kwargs)
            self.verbose = verbose
            # add name_scope on the outermost Sequential
            with self.name_scope():
                # block 1
                b1 = nn.Conv2D(64, kernel_size=7, strides=2)
                # block 2
                b2 = nn.Sequential()
                b2.add(
                    nn.MaxPool2D(pool_size=3, strides=2),
                    Residual(64),
                    Residual(64)
                )
                # block 3
                b3 = nn.Sequential()
                b3.add(
                    Residual(128, same_shape=False),
                    Residual(128)
                )
                # block 4
                b4 = nn.Sequential()
                b4.add(
                    Residual(256, same_shape=False),
                    Residual(256)
                )
                # block 5
                b5 = nn.Sequential()
                b5.add(
                    Residual(512, same_shape=False),
                    Residual(512)
                )
                # block 6
                b6 = nn.Sequential()
                b6.add(
                    nn.AvgPool2D(pool_size=3),
                    nn.Dense(num_classes)
                )
                # chain all blocks together
                self.net = nn.Sequential()
                self.net.add(b1, b2, b3, b4, b5, b6)

        def forward(self, x):
            out = x
            for i, b in enumerate(self.net):
                out = b(out)
                if self.verbose:
                    print('Block %d output: %s' % (i + 1, out.shape))
            return out
    net = ResNet(num_classes)
    return net
我们使用测试用例来对经典卷积神经网络进行测试
def do_exp():
    # 初始化
    ctx = utils.try_gpu()

    # 获取数据
    # batch_size = 256
    train_data, test_data = utils.load_data_fashion_mnist(batch_size=64, resize=224)

    # net = LeNet()
    # net = AlexNet()

    # architecture = ((2, 64), (2, 128), (2, 256), (2, 512), (2, 512))
    # net = VGGNet(architecture)

    # net = NiNNet()
    # net = GoogLeNet(10)
    net = ResNet(10)
    net.initialize(ctx=ctx, init=init.Xavier())
    print('initialize weight on', ctx)

    # 训练
    loss = gluon.loss.SoftmaxCrossEntropyLoss()
    trainer = gluon.Trainer(net.collect_params(), 'sgd', {'learning_rate': 0.01})
    utils.train(train_data, test_data, net, loss, trainer, ctx, num_epochs=1)


if __name__ == '__main__':
    do_exp()
使用到的其他函数还有:


class DataLoader(object):
    """similiar to gluon.data.DataLoader, but might be faster.

    The main difference this data loader tries to read more exmaples each
    time. But the limits are 1) all examples in dataset have the same shape, 2)
    data transfomer needs to process multiple examples at each time
    """
    def __init__(self, dataset, batch_size, shuffle, transform=None):
        self.dataset = dataset
        self.batch_size = batch_size
        self.shuffle = shuffle
        self.transform = transform

    def __iter__(self):
        data = self.dataset[:]
        X = data[0]
        y = nd.array(data[1])
        n = X.shape[0]
        # 顺序打乱
        if self.shuffle:
            idx = np.arange(n)
            np.random.shuffle(idx)
            X = nd.array(X.asnumpy()[idx])
            y = nd.array(y.asnumpy()[idx])

        for i in range(n//self.batch_size):
            if self.transform is not None:
                yield self.transform(X[i*self.batch_size:(i+1)*self.batch_size],
                                     y[i*self.batch_size:(i+1)*self.batch_size])
            else:
                yield (X[i*self.batch_size:(i+1)*self.batch_size],
                       y[i*self.batch_size:(i+1)*self.batch_size])

    def __len__(self):
        return len(self.dataset)//self.batch_size


def load_data_fashion_mnist(batch_size, resize=None, root="~/.mxnet/datasets/fashion-mnist"):
    """download the fashion mnist dataest and then load into memory"""
    def transform_mnist(data, label):
        # Transform a batch of examples.
        if resize:
            n = data.shape[0]
            new_data = nd.zeros((n, resize, resize, data.shape[3]))
            for i in range(n):
                new_data[i] = image.imresize(data[i], resize, resize)
            data = new_data
        # change data from batch x height x width x channel to batch x channel x height x width
        return nd.transpose(data.astype('float32'), (0,3,1,2))/255, label.astype('float32')

    mnist_train = gluon.data.vision.FashionMNIST(root=root, train=True, transform=None)
    mnist_test = gluon.data.vision.FashionMNIST(root=root, train=False, transform=None)
    # Transform later to avoid memory explosion.
    train_data = DataLoader(mnist_train, batch_size, shuffle=True, transform=transform_mnist)
    test_data = DataLoader(mnist_test, batch_size, shuffle=False, transform=transform_mnist)
    return train_data, test_data


def try_gpu():
    """If GPU is available, return mx.gpu(0); else return mx.cpu()"""
    try:
        ctx = mx.gpu()
        _ = nd.array([0], ctx=ctx)
    except:
        ctx = mx.cpu()
    return ctx

def _get_batch(batch, ctx):
    """return data and label on ctx"""
    if isinstance(batch, mx.io.DataBatch):
        data = batch.data[0]
        label = batch.label[0]
    else:
        data, label = batch
    return (gluon.utils.split_and_load(data, ctx),
            gluon.utils.split_and_load(label, ctx),
            data.shape[0])

def train(train_data, test_data, net, loss, trainer, ctx, num_epochs, print_batches=None):
    """Train a network"""
    print("Start training on ", ctx)
    if isinstance(ctx, mx.Context):
        ctx = [ctx]
    for epoch in range(num_epochs):
        train_loss, train_acc, n, m = 0.0, 0.0, 0.0, 0.0
        if isinstance(train_data, mx.io.MXDataIter):
            train_data.reset()
        start = time()
        for i, batch in enumerate(train_data):
            data, label, batch_size = _get_batch(batch, ctx)
            losses = []
            with autograd.record():
                outputs = [net(X) for X in data]
                losses = [loss(yhat, y) for yhat, y in zip(outputs, label)]
            for l in losses:
                l.backward()
            train_acc += sum([(yhat.argmax(axis=1)==y).sum().asscalar()
                              for yhat, y in zip(outputs, label)])
            train_loss += sum([l.sum().asscalar() for l in losses])
            trainer.step(batch_size)
            n += batch_size
            m += sum([y.size for y in label])
            if print_batches and (i+1) % print_batches == 0:
                print("Batch %d. Loss: %f, Train acc %f" % (
                    n, train_loss/n, train_acc/m
                ))

        test_acc = evaluate_accuracy(test_data, net, ctx)
        print("Epoch %d. Loss: %.3f, Train acc %.2f, Test acc %.2f, Time %.1f sec" % (
            epoch, train_loss/n, train_acc/m, test_acc, time() - start
        ))