kubedns
DNS Policy
http://blog.fleeto.us/translation/configuring-private-dns-zones-and-upstream-nameservers-kubernetes
Kubernetes 目前在 Pod 定义中支持两个 DNS 策略:Default和ClusterFirst,dnsPolicy缺省为ClusterFirst:
如果dnsPolicy设置为Default,那么域名解析配置会从 Pod 所在节点继承而来。注意,本文所述功能在dnsPolicy设置为Default时无效。
如果dnsPolicy设置为ClusterFirst,DNS 查询会被发送到 kube-dns 服务。kube-dns 服务负责相应以集群域名为后缀(例如.cluster.local)的查询。其他的域名查询(例如 www.kubernetes.io )会被转发给来自节点定义的上级域名服务器。
https://kubernetes.io/docs/concepts/services-networking/dns-pod-service/#dns-policy
By default, DNS policy for a pod is ‘ClusterFirst’. So pods running with hostNetwork cannot resolve DNS names. To have DNS options set along with hostNetwork, you should specify DNS policy explicitly to ‘ClusterFirstWithHostNet’. Update the busybox.yaml as following:
apiVersion: v1
kind: Pod
metadata:
  name: busybox
  namespace: default
spec:
  containers:
  - image: busybox
    command:
      - sleep
      - "3600"
    imagePullPolicy: IfNotPresent
    name: busybox
  restartPolicy: Always
  hostNetwork: true
  dnsPolicy: ClusterFirstWithHostNet
组件架构看这个就够了
http://cizixs.com/2017/04/11/kubernetes-intro-kube-dns
设置细节看这个就够了
http://blog.fleeto.us/translation/configuring-private-dns-zones-and-upstream-nameservers-kubernetes
busybox你的忠实实验伴侣
命令看这里: https://kubernetes.io/docs/concepts/services-networking/dns-pod-service/#dns-policy
- 架构图:
应该是这样
老版本

新版本
参考:
http://cizixs.com/2017/04/11/kubernetes-intro-kube-dns
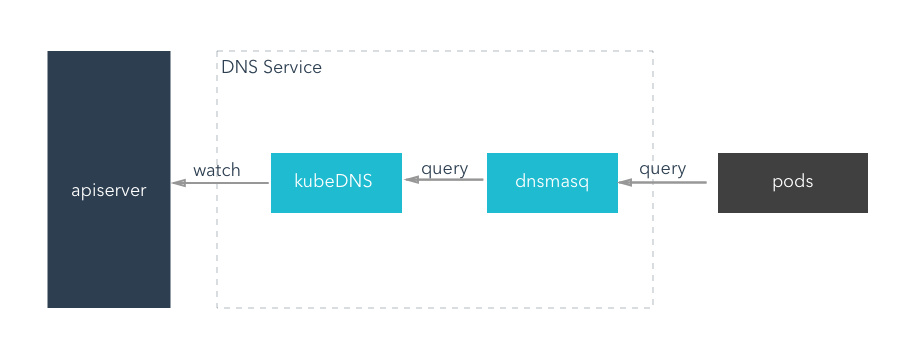
- kubedns架构有3个容器组成:
gcr.io/google_containers/k8s-dns-dnsmasq-nanny-amd64:1.14.1
gcr.io/google_containers/k8s-dns-kube-dns-amd64:1.14.1
gcr.io/google_containers/k8s-dns-sidecar-amd64:1.14.1
运行的Kubernetes DNS pod包含3个容器——kubedns、dnsmasq和一个叫做healthz的健康检查容器。kubedns进程监视Kubernetes master上Service和Endpoint的改变,并在内存中维护lookup 结构用于服务DNS请求。dnsmasq容器增加DNS缓存,从而提升性能。healthz容器提供一个单点的健康检查Endpoint,检查dnsmasq和kubedns的健康程度。
DNS pod以服务的形式暴露出来,它拥有一个静态IP。一旦被创建,kubelet就使用--cluster-dns=10.0.0.10标识,将DNS配置信息传递给每个容器。
DNS名称也需要域。本地域是可以配置的,在kubelet中,使用--cluster-domain=
Kubernetes集群的DNS服务(基于SkyDNS库)支持forward lookup(A recoreds),service lookup(SRV records)和反向IP地址查找(PTR recoreds)。
- 前后版本对比: https://segmentfault.com/a/1190000007342180
- 存在的问题: 创建k8的dns的时候没看到dns的yml里配置有api的地址,不知道kube-dns组件是如何去找api的,但是通过
kubectl exec -it -n kube-system kube-dns-1446441763-14hdh -c kubedns env可以看到KUBERNETES_SERVICE_HOST一些环境变量KUBERNETES_SERVICE_HOST=10.233.0.1,但是环境变量是怎么注入进去的呢? 这个是个问题,没看到yml里有环境变量.
后来我查阅了下:
- 是docker link的一些机制.
https://docs.docker.com/compose/link-env-deprecated/
Compose uses Docker links to expose services’ containers to one another. Each linked container injects a set of environment variables, each of which begins with the uppercase name of the container.
To see what environment variables are available to a service, run docker-compose run SERVICE env.
name_PORT
Full URL, e.g. DB_PORT=tcp://172.17.0.5:5432

name_PORT_num_protocol
Full URL, e.g. DB_PORT_5432_TCP=tcp://172.17.0.5:5432

name_PORT_num_protocol_ADDR
Container’s IP address, e.g. DB_PORT_5432_TCP_ADDR=172.17.0.5

name_PORT_num_protocol_PORT
Exposed port number, e.g. DB_PORT_5432_TCP_PORT=5432

name_PORT_num_protocol_PROTO
Protocol (tcp or udp), e.g. DB_PORT_5432_TCP_PROTO=tcp

name_NAME
Fully qualified container name, e.g. DB_1_NAME=/myapp_web_1/myapp_db_1
k8s里说的比较清楚:
https://kubernetes.io/docs/concepts/services-networking/service/
Environment variables
When a Pod is run on a Node, the kubelet adds a set of environment variables for each active Service. It supports both Docker links compatible variables (see makeLinkVariables) and simpler {SVCNAME}_SERVICE_HOST and {SVCNAME}_SERVICE_PORT variables, where the Service name is upper-cased and dashes are converted to underscores.
For example, the Service "redis-master" which exposes TCP port 6379 and has been allocated cluster IP address 10.0.0.11 produces the following environment variables:
REDIS_MASTER_SERVICE_HOST=10.0.0.11
REDIS_MASTER_SERVICE_PORT=6379
REDIS_MASTER_PORT=tcp://10.0.0.11:6379
REDIS_MASTER_PORT_6379_TCP=tcp://10.0.0.11:6379
REDIS_MASTER_PORT_6379_TCP_PROTO=tcp
REDIS_MASTER_PORT_6379_TCP_PORT=6379
REDIS_MASTER_PORT_6379_TCP_ADDR=10.0.0.11
-
测了下,一个ns里有多个svc时候,新建一个pod,会注册所有svc到这个pod.
-
执行kubenernetes看执行过程
kubectl -v 9 get pods
Force Deletion
Force deletions do not wait for confirmation from the kubelet that the Pod has been terminated. Irrespective of whether a force deletion is successful in killing a Pod, it will immediately free up the name from the apiserver. This would let the StatefulSet controller create a replacement Pod with that same identity; this can lead to the duplication of a still-running Pod, and if said Pod can still communicate with the other members of the StatefulSet, will violate the at most one semantics that StatefulSet is designed to guarantee.
When you force delete a StatefulSet pod, you are asserting that the Pod in question will never again make contact with other Pods in the StatefulSet and its name can be safely freed up for a replacement to be created.
If you want to delete a Pod forcibly using kubectl version >= 1.5, do the following:
kubectl delete pods <pod> --grace-period=0 --force
If you’re using any version of kubectl <= 1.4, you should omit the --force option and use:
kubectl delete pods <pod> --grace-period=0
Always perform force deletion of StatefulSet Pods carefully and with complete knowledge of the risks involved.
What’s next