大家,好久不见,博客又好半年没更了(怎一个懒字了得)。话不多说,今天来浅谈一下vue的生命周期。童鞋们肯定都知道: beforeCreate, created, beforeMount, mounted, beforeUpdate, updated, beforeDestory, destoryed。这些生命周期钩子都是依次执行,无论你写与否。但是具体了解每一步都做了什么事么,其实我也没有很太清楚, 下面就让我们来一起学习下。
1. 先让我们来初始化个文件
<!DOCTYPE html >
<html>
	<head>
		<mate charset="utf-8" />
		<title>Vue Lifecycle</title>
		<script type="text/javascript" src="https://cdn.bootcss.com/vue/2.6.10/vue.js"></script>
	</head>
	<body>
		<div id="app">
			<header>{{title}}</header>
			<div class="container">
				<aside></aside>
				<main>{{msg}}</main>
			</div>
			<footer>{{title}}</footer>
		</div>
	</body>
	<script type="text/javascript">
		var vue = new Vue({
			el: '#app',

			data: {
				title: 'this is the title',
				footer: 'this is the footer',
				msg: 'hello world'
			},
beforeCreate() {
console.group('*******beforeCreate********')
console.log(this.$el, JSON.stringify(this.$options), this.$data)
console.groupEnd()
},
created() {
console.group('*******created********')
console.log(this.$el, JSON.stringify(this.$options), this.$data)
console.groupEnd()
},
beforeMount() {
console.group('*******beforeMount********')
console.log(this.$el, JSON.stringify(this.$options), this.$data)
console.groupEnd()
},
mounted() {
console.group('*******Mounted********')
console.log(this.$el, JSON.stringify(this.$options), this.$data)
console.groupEnd()
}
		})

	</script>
</html>
先看 console.group 函数,是在控制台新建分组,内容都会被缩进,方便我们查看.
其次为什么我要用 JSON.stringify 来打印, 是因为引用类型访问的是内存地址,引用类型的属性在修改后的值 和 修改前在控制台看到一样的结果,这样就无法区分引用类型的变化,所以我们用JSON.stringify 转化为 string类型来比较。
2. 我们先来 写出它的 beforeCreate 和 created 函数,并打印出来 el, option, data的属性

我们通过对比,可以知道
beforeCreate 之前:初始化Vue事件,并添加钩子函数和添加属性, $el未定义,$data也未绑定
从beforeCreate -> created: $data属性进行双向绑定, 但此时 $el 还是未定
3: 再来比较一下created和beforeMount

通过对比,发现 $el 已经存在, 但是 当鼠标移动到 控制台打印的div元素上,页面并没有显示,说明此时还只是存在内存中(即虚拟dom)。
当我们 new Vue 实例时, 不填写 el 属性时, 运行结果我们发现生命周期函数,只执行到了created。此时我们在页面添加如下代码,
        setTimeout(function() {
            vue.$mount()
        }, 2000)
打印发现,beforeMount 和 mounted函数 2s后才打印出来,但是控制台报了个错,在beforeMount之前,[Vue warn]: Failed to mount component: template or render function not defined.
再在new Vue 中添加 template: '<h2>这是个test模版</h2>', render: function(createElement) {return createElement('p', '这是p标签')},
发现渲染结果 优先级: render > template > outer html
这一阶段 首先判断el选项,如果没有el选项就停止生命周期,直到手动重新执行挂在方法,才会继续向下; 如果有el选项,就继续向下编译。再判断是否有 template 属性, 如果有将template 编译进render函数, 如果没有则将el元素以及子元素作为模版。 如果有new Vue对象时 有render 函数, 创建html
4. 下面我们看下 beforeMount 和 mounted

通过我们在控制台观察,他们的数据似乎是一样的,但是 beforeMount 中的el元素指向的是内存中的虚拟dom, 而mounted里的el 指向的是真是dom,
所以这一阶段是真实dom替换虚拟dom,并赋值
5 beforeUpdate 和 updated
html的main标签中添加 <input type="text" v-model="msg">, js 添加两个钩子函数
            beforeUpdate() {
                console.group('*******beforeUpdate********')
                console.log(this.$el.innerHTML, JSON.stringify(this.$options), this.msg)
                console.groupEnd()
            },
            updated() {
                console.group('*******updated********')
                console.log(this.$el.innerHTML, JSON.stringify(this.$options), this.msg)
                console.groupEnd()
            }
执行结果如下:
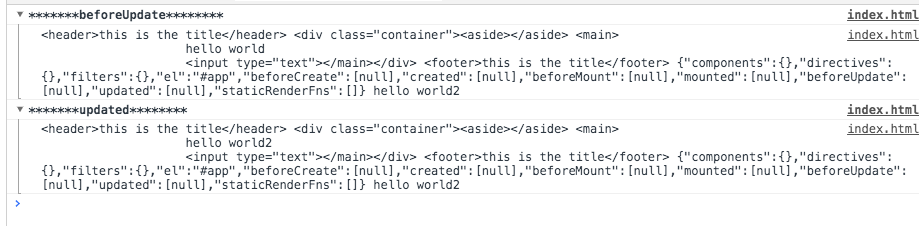
我们观察看到, beforeUpdate 中 $el 和 msg 都是更改之前的值, updated 是新值
6. beforeDestory 和 destoryed
同理, beforeDestory 在实例销毁前调用,实例仍然可以用,
destoryed 实例销毁,回归尘土。