一、本地实验环境准备
- 服务器虚拟机准备
| IP | CPU | 内存 | hostname |
|---|---|---|---|
| 192.168.222.129 | >=2c | >=2G | master |
| 192.168.222.130 | >=2c | >=2G | node1 |
| 192.168.222.131 | >=2c | >=2G | node2 |
本实验我这里用的虚拟机是vmware workstation创建的,我的机器配置较低,所以master给了4G 4C,node每个给了4G 4C,大家根据自己的资源情况,按照上面给的建议最低值创建即可。
注意:hostname不能有大写字母,比如Master这样的。
1. 软件版本
   系统:CentOS7.5.1804
   Kubernetes:1.15.3
   docker-ce版本:19.03.1
2. 环境初始化操作
2.1 配置hostname
   ## 192.168.222.129
   hostnamectl set-hostname master
   ##  192.168.222.130
   hostnamectl set-hostname node1
   ## 192.168.222.131
   hostnamectl set-hostname node2
2.2 配置三台虚拟机的/etc/hosts
   echo "192.168.222.129 master" >> /etc/hosts
   echo "192.168.222.130 node1" >> /etc/hosts
   echo "192.168.222.131 node2" >> /etc/hosts
2.3 安装必要软件以及升级所有软件,关闭防火墙、selinux、swap
yum -y install vim-enhanced wget curl net-tools conntrack-tools bind-utils socat ipvsadm ipset
yum -y update


## 停防火墙
systemctl stop firewalld systemctl disable firewalld

## 关闭Selinux
sed -i 's#SELINUX=enforcing#SELINUX=disabled#g'  /etc/sysconfig/selinux
sed -i 's#SELINUX=enforcing#SELINUX=disabled#g'  /etc/selinux/config

## 关闭不必要服务
systemctl disable auditd
systemctl disable postfix
systemctl disable irqbalance
systemctl disable remote-fs
systemctl disable tuned
systemctl disable rhel-configure
systemctl disable firewalld

## 安装kernel-lt(kernel 4.4.178)

rpm --import https://www.elrepo.org/RPM-GPG-KEY-elrepo.org
yum -y install https://www.elrepo.org/elrepo-release-7.0-3.el7.elrepo.noarch.rpm
yum --enablerepo=elrepo-kernel install kernel-lt -y

grub2-set-default 0
grub2-mkconfig -o /etc/grub2.cfg

## 优化内核

cat >>/etc/sysctl.conf <<EOF
net.ipv4.ip_forward = 1
vm.swappiness = 0
net.bridge.bridge-nf-call-ip6tables = 1
net.bridge.bridge-nf-call-iptables = 1
net.ipv4.tcp_max_syn_backlog = 65536
net.core.netdev_max_backlog =  32768
net.core.somaxconn = 32768
net.core.wmem_default = 8388608
net.core.rmem_default = 8388608
net.core.rmem_max = 16777216
net.core.wmem_max = 16777216
net.ipv4.tcp_timestamps = 0
net.ipv4.tcp_synack_retries = 2
net.ipv4.tcp_syn_retries = 2
net.ipv4.tcp_tw_recycle = 1
net.ipv4.tcp_tw_reuse = 1
net.ipv4.tcp_mem = 94500000 915000000 927000000
net.ipv4.tcp_max_orphans = 3276800
net.ipv4.ip_local_port_range = 1024  65535
EOF

sysctl -p

## 修改文件打开数

cat >>/etc/security/limits.conf <<EOF
* soft memlock unlimited
* hard memlock unlimited
* soft nofile 65535
* hard nofile 65535
* soft nproc 65535
* hard nproc 65535
EOF

## 系统关闭使用交换内存

echo "swapoff -a">>/etc/rc.local
chmod +x /etc/rc.local
swapoff -a


## 注释掉/etc/fstab的swap行
# /dev/mapper/centos-swap swap                    swap    defaults        0 0

## 创建k8s.conf
vim /etc/sysctl.d/k8s.conf
## 写入如下配置
net.bridge.bridge-nf-call-ip6tables = 1
net.bridge.bridge-nf-call-iptables = 1


## 加载br_netfilter
modprobe br_netfilter

sysctl -p /etc/sysctl.d/k8s.conf
3. 配置CentOS YUM源
   ## 配置国内tencent yum源地址、epel源地址、Kubernetes源地址
   mkdir -p /etc/yum.repo.d/repo.bak
   mv /etc/yum.repo.d/*.repo /etc/yum.repo.d/repo.bak
   wget -O /etc/yum.repos.d/CentOS-Base.repo http://mirrors.cloud.tencent.com/repo/centos7_base.repo
   wget -O /etc/yum.repos.d/epel.repo http://mirrors.cloud.tencent.com/repo/epel-7.repo
配置国内Kubernetes源地址
vim /etc/yum.repos.d/kubernetes.repo
[kubernetes]
name=Kubernetes Repo
baseurl=https://mirrors.aliyun.com/kubernetes/yum/repos/kubernetes-el7-x86_64/
gpgcheck=0
gpgkey=https://mirrors.aliyun.com/kubernetes/yum/doc/yum-key.gpg
enabled=1
yum clean all && yum makecache
4. 安装一些依赖软件包
yum install -y conntrack ipvsadm ipset jq sysstat curl iptables libseccomp bash-completion yum-utils device-mapper-persistent-data lvm2 net-tools conntrack-tools vim libtool-ltdl
5. 时间同步配置
yum install chrony –y systemctl enable chronyd.service && systemctl start chronyd.service && systemctl status chronyd.service chronyc sources
运行date命令看下系统时间,过一会儿时间就会同步。如果同步失败检查是不是因为公司内部网导致无法同步时间
6. 以上操作后,全部重启一下。
7. 安装docker
## 配置docker yum 源
cd /etc/yum.repos.d && wget https://mirrors.aliyun.com/docker-ce/linux/centos/docker-ce.repo

## 查看docker-ce的可用资源
yum list docker-ce.x86_64 --showduplicates | sort -r
会显示如下的docker-ce信息
Repository cr is listed more than once in the configuration
Repository fasttrack is listed more than once in the configuration
已加载插件:fastestmirror, langpacks
已安装的软件包
可安装的软件包
Loading mirror speeds from cached hostfile
 * elrepo: mirrors.tuna.tsinghua.edu.cn
docker-ce.x86_64            3:19.03.1-3.el7                    docker-ce-stable
docker-ce.x86_64            3:19.03.1-3.el7                    @docker-ce-stable
docker-ce.x86_64            3:19.03.0-3.el7                    docker-ce-stable
docker-ce.x86_64            3:18.09.8-3.el7                    docker-ce-stable
docker-ce.x86_64            3:18.09.7-3.el7                    docker-ce-stable
docker-ce.x86_64            3:18.09.6-3.el7                    docker-ce-stable
docker-ce.x86_64            3:18.09.5-3.el7                    docker-ce-stable
docker-ce.x86_64            3:18.09.4-3.el7                    docker-ce-stable
docker-ce.x86_64            3:18.09.3-3.el7                    docker-ce-stable
docker-ce.x86_64            3:18.09.2-3.el7                    docker-ce-stable
docker-ce.x86_64            3:18.09.1-3.el7                    docker-ce-stable
docker-ce.x86_64            3:18.09.0-3.el7                    docker-ce-stable
docker-ce.x86_64            18.06.3.ce-3.el7                   docker-ce-stable
docker-ce.x86_64            18.06.2.ce-3.el7                   docker-ce-stable
docker-ce.x86_64            18.06.1.ce-3.el7                   docker-ce-stable
docker-ce.x86_64            18.06.0.ce-3.el7                   docker-ce-stable
docker-ce.x86_64            18.03.1.ce-1.el7.centos            docker-ce-stable
docker-ce.x86_64            18.03.0.ce-1.el7.centos            docker-ce-stable
docker-ce.x86_64            17.12.1.ce-1.el7.centos            docker-ce-stable
docker-ce.x86_64            17.12.0.ce-1.el7.centos            docker-ce-stable
docker-ce.x86_64            17.09.1.ce-1.el7.centos            docker-ce-stable
docker-ce.x86_64            17.09.0.ce-1.el7.centos            docker-ce-stable
docker-ce.x86_64            17.06.2.ce-1.el7.centos            docker-ce-stable
docker-ce.x86_64            17.06.1.ce-1.el7.centos            docker-ce-stable
docker-ce.x86_64            17.06.0.ce-1.el7.centos            docker-ce-stable
docker-ce.x86_64            17.03.3.ce-1.el7                   docker-ce-stable
docker-ce.x86_64            17.03.2.ce-1.el7.centos            docker-ce-stable
docker-ce.x86_64            17.03.1.ce-1.el7.centos            docker-ce-stable
docker-ce.x86_64            17.03.0.ce-1.el7.centos            docker-ce-stable
选择你想要得版本,我使用了最新版本
yum -y install docker-ce
配置镜像加速器和docker数据存放路径
vim /etc/docker/daemon.json
写入如下配置
{
	"registry-mirrors": ["https://q2hy3fzi.mirror.aliyuncs.com"],
    "graph": "/tol/docker-data" ,
    "exec-opts":["native.cgroupdriver=systemd"]
}
设置自启动
systemctl enable docker && systemctl start docker
8. 安装 kubeadm、kubelet、kubectl K8S_VERSION=v1.15.3
 cat <<EOF > /etc/yum.repos.d/kubernetes.repo
[kubernetes]
name=Kubernetes
baseurl=http://mirrors.aliyun.com/kubernetes/yum/repos/kubernetes-el7-x86_64
enabled=1
gpgcheck=0
repo_gpgcheck=0
gpgkey=http://mirrors.aliyun.com/kubernetes/yum/doc/yum-key.gpg
        http://mirrors.aliyun.com/kubernetes/yum/doc/rpm-package-key.gpg
EOF

 yum install -y  kubeadm kubelet  kubectl

 kubelet --version //v1.15.3
kubelet启动设置
vim /etc/sysconfig/kubelet
写入如下配置
KUBELET_EXTRA_ARGS="--fail-swap-on=false"
再重启
systemctl daemon-reload
9. master节点设置(192.168.222.129)
下载相关镜像
#!/bin/bash
# master 节点 shell
K8S_VERSION=v1.15.3
ETCD_VERSION=3.3.10
DNS_VERSION=1.3.1
PAUSE_VERSION=3.1
FLANNEL_VERSION=v0.11.0-amd64
DASHBOARD_VERSION=v1.10.1

// 下载镜像
docker pull registry.cn-hangzhou.aliyuncs.com/google_containers/kube-apiserver:$K8S_VERSION
docker pull registry.cn-hangzhou.aliyuncs.com/google_containers/kube-controller-manager:$K8S_VERSION
docker pull registry.cn-hangzhou.aliyuncs.com/google_containers/kube-scheduler:$K8S_VERSION
docker pull registry.cn-hangzhou.aliyuncs.com/google_containers/kube-proxy:$K8S_VERSION
docker pull registry.cn-hangzhou.aliyuncs.com/google_containers/pause:$PAUSE_VERSION
docker pull registry.cn-hangzhou.aliyuncs.com/google_containers/etcd:$ETCD_VERSION
docker pull registry.cn-hangzhou.aliyuncs.com/google_containers/coredns:$DNS_VERSION
docker pull jmgao1983/flannel:$FLANNEL_VERSION
docker pull siriuszg/kubernetes-dashboard-amd64:$DASHBOARD_VERSION

# 修改tag
docker tag registry.cn-hangzhou.aliyuncs.com/google_containers/kube-apiserver:$K8S_VERSION           k8s.gcr.io/kube-apiserver:$K8S_VERSION
docker tag registry.cn-hangzhou.aliyuncs.com/google_containers/kube-controller-manager:$K8S_VERSION  k8s.gcr.io/kube-controller-manager:$K8S_VERSION
docker tag registry.cn-hangzhou.aliyuncs.com/google_containers/kube-scheduler:$K8S_VERSION           k8s.gcr.io/kube-scheduler:$K8S_VERSION
docker tag registry.cn-hangzhou.aliyuncs.com/google_containers/kube-proxy:$K8S_VERSION               k8s.gcr.io/kube-proxy:$K8S_VERSION
docker tag registry.cn-hangzhou.aliyuncs.com/google_containers/pause:$PAUSE_VERSION                  k8s.gcr.io/pause:$PAUSE_VERSION
docker tag registry.cn-hangzhou.aliyuncs.com/google_containers/etcd:$ETCD_VERSION                    k8s.gcr.io/etcd:$ETCD_VERSION
docker tag registry.cn-hangzhou.aliyuncs.com/google_containers/coredns:$DNS_VERSION  			     k8s.gcr.io/coredns:$DNS_VERSION
docker tag jmgao1983/flannel:$FLANNEL_VERSION                              							 quay.io/coreos/flannel:$FLANNEL_VERSION
docker tag siriuszg/kubernetes-dashboard-amd64:$DASHBOARD_VERSION                                    k8s.gcr.io/kubernetes-dashboard-amd64:$DASHBOARD_VERSION

#删除冗余的images
docker rmi registry.cn-hangzhou.aliyuncs.com/google_containers/kube-apiserver:$K8S_VERSION
docker rmi registry.cn-hangzhou.aliyuncs.com/google_containers/kube-controller-manager:$K8S_VERSION
docker rmi registry.cn-hangzhou.aliyuncs.com/google_containers/kube-scheduler:$K8S_VERSION
docker rmi registry.cn-hangzhou.aliyuncs.com/google_containers/kube-proxy:$K8S_VERSION
docker rmi registry.cn-hangzhou.aliyuncs.com/google_containers/pause:$PAUSE_VERSION
docker rmi registry.cn-hangzhou.aliyuncs.com/google_containers/etcd:$ETCD_VERSION
docker rmi registry.cn-hangzhou.aliyuncs.com/google_containers/coredns:$DNS_VERSION
docker rmi jmgao1983/flannel:$FLANNEL_VERSION
docker rmi siriuszg/kubernetes-dashboard-amd64:$DASHBOARD_VERSION
集群安装初始化(192.168.222.129)
## 初始化命令
 kubeadm init --kubernetes-version=v1.15.3 --pod-network-cidr=10.244.0.0/16 --ignore-preflight-errors=Swap
这时候出现如下信息表明安装成功
Your Kubernetes master has initialized successfully!

To start using your cluster, you need to run the following as a regular user:

  mkdir -p $HOME/.kube
  sudo cp -i /etc/kubernetes/admin.conf $HOME/.kube/config
  sudo chown $(id -u):$(id -g) $HOME/.kube/config

You should now deploy a pod network to the cluster.
Run "kubectl apply -f [podnetwork].yaml" with one of the options listed at:
  https://kubernetes.io/docs/concepts/cluster-administration/addons/

You can now join any number of machines by running the following on each node
as root:

kubeadm join 192.168.222.129:6443 --token 981it6.k4kqs2i73e1bfd1p
    --discovery-token-ca-cert-hash sha256:5cc5c1c2ace7b720a178840c951b2a05c679d26b8d6a1cfc81aa7e006e6a6ef9
按照上面的提示执行推荐操作
  mkdir -p $HOME/.kube
  sudo cp -i /etc/kubernetes/admin.conf $HOME/.kube/config
  sudo chown $(id -u):$(id -g) $HOME/.kube/config
查看集群健康状况
kubectl get cs
集群安装过程中遇到问题,重置操作,如需执行此操作,所有节点都需要执行(报错时使用,不报错不用)
kubeadm reset
安装网络插件
kube-flannel.yml 文件需要自己下载上传
kubectl apply -f ./kube-flannel.yml
查看集群中的组件运行状态
kubectl get pods --all-namespaces
10. node节点设置(192.168.222.130和192.168.222.131子节点配置)
下载镜像
#!/bin/bash
# node 节点 shell
K8S_VERSION=v1.15.3
ETCD_VERSION=3.3.10
DNS_VERSION=1.3.1
PAUSE_VERSION=3.1
FLANNEL_VERSION=v0.11.0-amd64
DASHBOARD_VERSION=v1.10.1

## node 安装插件
docker pull registry.cn-hangzhou.aliyuncs.com/google_containers/kube-proxy:$K8S_VERSION
docker pull registry.cn-hangzhou.aliyuncs.com/google_containers/pause:$PAUSE_VERSION
docker pull jmgao1983/flannel:v0.11.0-amd64
docker pull siriuszg/kubernetes-dashboard-amd64:$DASHBOARD_VERSION


docker tag registry.cn-hangzhou.aliyuncs.com/google_containers/kube-proxy:$K8S_VERSION  k8s.gcr.io/kube-proxy:$K8S_VERSION
docker tag registry.cn-hangzhou.aliyuncs.com/google_containers/pause:$PAUSE_VERSION     k8s.gcr.io/pause:$PAUSE_VERSION
docker tag jmgao1983/flannel:$FLANNEL_VERSION                                           quay.io/coreos/flannel:$FLANNEL_VERSION
docker tag siriuszg/kubernetes-dashboard-amd64:$DASHBOARD_VERSION                       k8s.gcr.io/kubernetes-dashboard-amd64:$DASHBOARD_VERSION


docker rmi jmgao1983/flannel:$FLANNEL_VERSION
docker rmi registry.cn-hangzhou.aliyuncs.com/google_containers/pause:$PAUSE_VERSION
docker rmi registry.cn-hangzhou.aliyuncs.com/google_containers/kube-proxy:$K8S_VERSION
docker rmi siriuszg/kubernetes-dashboard-amd64:$DASHBOARD_VERSION
加入节点
这里的信息在主节点初始化完成后会出现,按照自己初始化完后的信息操作,这里仅供参考
 kubeadm join 192.168.222.129:6443 --token 9ump71.6fnndushlwn87fnf
    --discovery-token-ca-cert-hash sha256:addb0cd073a460331fe4cadd1f02c69e9b1bdad4e62188fae788ff65e0a8fb11 --ignore-preflight-errors=Swap
出现下面的信息表明子节点加入主节点成功,可以使用该命令 kubectl get nodes查看
This node has joined the cluster:
* Certificate signing request was sent to master and a response
  was received.
* The Kubelet was informed of the new secure connection details.

Run 'kubectl get nodes' on the master to see this node join the cluster.
如果执行上述命令报The connection to the server localhost:8080 was refused - did you specify the right host or port?
操作如下
1. 将主节点中的【/etc/kubernetes/admin.conf】文件拷贝到从节点相同目录下
2. echo "export KUBECONFIG=/etc/kubernetes/admin.conf" >> ~/.bash_profile
3. source ~/.bash_profile
11. 安装 dashboard组件(我是在主节点上操作的)
配置dashboard
kubectl create -f https://raw.githubusercontent.com/kubernetes/dashboard/v2.0.0-beta1/aio/deploy/recommended.yaml
集群配置,生成浏览器证书(这些证书在后面浏览器打开dashboard时需要导入)
# 生成client-certificate-data
grep 'client-certificate-data' ~/.kube/config | head -n 1 | awk '{print $2}' | base64 -d >> kubecfg.crt

# 生成client-key-data
grep 'client-key-data' ~/.kube/config | head -n 1 | awk '{print $2}' | base64 -d >> kubecfg.key

# 生成p12
openssl pkcs12 -export -clcerts -inkey kubecfg.key -in kubecfg.crt -out kubecfg.p12 -name "kubernetes-client"

# 导入证书后浏览器重启
创建admin-user账号,并放在kube-system名称空间下
vim admin-user.yaml
写入如下配置
apiVersion: v1
kind: ServiceAccount
metadata:
  name: admin-user
  namespace: kube-system
使用该命令加载配置
kubectl create -f admin-user.yaml
绑定角色
vim admin-user-role-binding.yaml
写入如下配置
apiVersion: rbac.authorization.k8s.io/v1beta1
kind: ClusterRoleBinding
metadata:
  name: admin-user
roleRef:
  apiGroup: rbac.authorization.k8s.io
  kind: ClusterRole
  name: cluster-admin
subjects:
- kind: ServiceAccount
  name: admin-user
  namespace: kube-system
使用该命令加载配置
kubectl create -f admin-user-role-binding.yaml
登录dashboard
在浏览器中访问如下url
https://127.0.0.1:6443/api/v1/namespaces/kubernetes-dashboard/services/https:kubernetes-dashboard:/proxy/
在打开的页面中选择token方式,获取token的方式如下
kubectl -n kube-system describe secret $(kubectl -n kube-system get secret | grep admin-user | awk '{print $1}')
12. 集成Heapster
Heapster是容器集群监控和性能分析工具
执行命令
kubectl create -f http://mirror.faasx.com/kubernetes/heapster/deploy/kube-config/influxdb/influxdb.yaml
kubectl create -f http://mirror.faasx.com/kubernetes/heapster/deploy/kube-config/influxdb/grafana.yaml
kubectl create -f http://mirror.faasx.com/kubernetes/heapster/deploy/kube-config/influxdb/heapster.yaml
kubectl create -f http://mirror.faasx.com/kubernetes/heapster/deploy/kube-config/rbac/heapster-rbac.yaml
当pod的状态全都变成了running,则能够使用。
补充
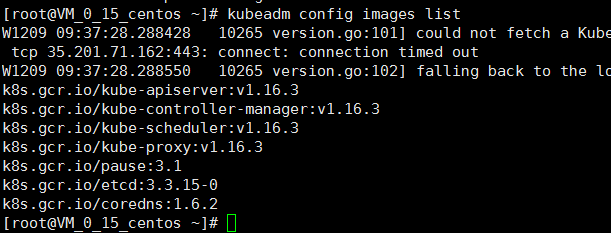
初始化获取要下载的镜像列表
使用kubeadm来搭建Kubernetes,那么就需要下载得到Kubernetes运行的对应基础镜像,比如:kube- proxy、kube-apiserver、kube-controller-manager等等 。那么有什么方法可以得知要下载哪些镜像 呢?从kubeadm v1.11+版本开始,增加了一个kubeadm config print-default 命令,可以让我们方便 的将kubeadm的默认配置输出到文件中,这个文件里就包含了搭建K8S对应版本需要的基础配置环境。另 外,我们也可以执行 kubeadm config images list 命令查看依赖需要安装的镜像列表。
kubeadm config images list
网络除了使用flannel也可以使用calico具体参考Quickstart for Calico on Kubernetes