限流与降级
限流 blockHandler
降级 fallback
降级需要运行时出现异常才会触发,而限流一旦触发,你连运行的机会都没有,当然就不会降级。
也就是说,两者如果同时触发,那么一定是限流触发(降级连机会都没有)。
Sentiel
官网
https://github.com/alibaba/Sentinel
中文:https://github.com/alibaba/Sentinel/wiki/介绍
是什么

一句话解释就是我们之前讲过的hystrix
去哪下

能干嘛

怎么玩
官方文档:https://spring-cloud-alibaba-group.github.io/github-pages/greenwich/spring-cloud-alibaba.html#_spring_cloud_alibaba_sentinel
服务中的各种问题
- 服务雪崩
- 服务降级
- 服务熔断
- 服务限流
安装Sentiel控制台
sentinel组件由两部分构成
- 后台:核心库第ava客户端)不依赖任何框架/库,能够运行于所有Java运行时环境,同时对 Dubbo /Spring Cloud 等框架也有较好的支持。
- 前台8080:控制台(Dashboard)基于Spring Boot开发,打包后可以直接运行,不需要额外的Tomcat等应用容器。
控制台安装步骤
- 下载
- https://github.com/alibaba/Sentinel/releases下载
- 到本地sentinel-dashboard-1.7.0.jar
-
前提
- java8环境OK
- 8080端口不能被占用
-
运行命令
java -jar sentinel-dashboard-1.7.0.jar -
访问sentinel管理界面
- http://localhost:8080
- 登录账号密码均为sentinel
-
成功访问

后台cloudalibaba-sentinel-service8401配置
pom文件
<dependencies>
    <!-- SpringCloud ailibaba nacos-->
    <dependency>
        <groupId>com.alibaba.cloud</groupId>
        <artifactId>spring-cloud-starter-alibaba-nacos-discovery</artifactId>
    </dependency>
    <!-- SpringCloud ailibaba sentinel-datasource-nacos 持久化需要用到-->
    <dependency>
        <groupId>com.alibaba.csp</groupId>
        <artifactId>sentinel-datasource-nacos</artifactId>
    </dependency>
    <!-- SpringCloud ailibaba sentinel-->
    <dependency>
        <groupId>com.alibaba.cloud</groupId>
        <artifactId>spring-cloud-starter-alibaba-sentinel</artifactId>
    </dependency>
    <dependency>
        <groupId>org.springframework.cloud</groupId>
        <artifactId>spring-cloud-starter-openfeign</artifactId>
    </dependency>
    <dependency>
        <groupId>org.springframework.boot</groupId>
        <artifactId>spring-boot-starter-web</artifactId>
    </dependency>
    <!--监控-->
    <dependency>
        <groupId>org.springframework.boot</groupId>
        <artifactId>spring-boot-starter-actuator</artifactId>
    </dependency>
    <!--热部署-->
    <dependency>
        <groupId>org.springframework.boot</groupId>
        <artifactId>spring-boot-devtools</artifactId>
        <scope>runtime</scope>
        <optional>true</optional>
    </dependency>
    <dependency>
        <groupId>org.projectlombok</groupId>
        <artifactId>lombok</artifactId>
        <optional>true</optional>
    </dependency>
    <dependency>
        <groupId>org.springframework.boot</groupId>
        <artifactId>spring-boot-starter-test</artifactId>
        <scope>test</scope>
    </dependency>
</dependencies>
YML
server:
  port: 8401

spring:
  application:
    name: cloudalibaba-sentinal-service
  cloud:
    nacos:
      discovery:
        #Nacos服务注册中心地址
        server-addr: localhost:8848
    sentinel:
      transport:
        #配置Sentin dashboard地址
        dashboard: localhost:8080
        port: 8719    # 默认8719端口,假如被占用了会自动从8719端口+1进行扫描,直到找到未被占用的端口

management:
  endpoints:
    web:
      exposure:
        include: '*'
主启动
@EnableDiscoveryClient
@SpringBootApplication
public class MainApp8401 {

    public static void main(String[] args) {
        SpringApplication.run(MainApp8401.class,args);
    }
}
业务类FlowLimitController
public class FlowLimitController {

    @GetMapping("/testA")
    public String testA() {
        return "----testA";
    }

    @GetMapping("/testB")
    public String testB() {
        return "----testB";
    }
}
测试
-
启动nacos
-
启动Sentinel8080
java -jar sentinel-dashboard-1.7.0.jar -
启动微服务8401
-
启动8401微服务后台查看sentinel控制台
空空如也,啥也没有
Sentinel采用懒加载说明
- 执行一次访问
http://localhost:8401/testA
http://localhost:8401/testB
- 查看效果

流控规则
基本介绍

进一步解释说明
- 资源名:唯一名称,默认请求路径
- 针对来源: Sentine可以针对调用者进行限流, 填写微服务名,默认default (不区分来源)
- 阈值类型/单机阈值:
- QPS (每秒钟的请求数量) :当调用该api的QPS达到阈值的时候,进行限流
- 线程数:当调用该api的线程数达到阈值的时候,进行限流
- 是否集群:不需要集群
- 流控模式:
- 直接: api达到限流条件时,直接限流
- 关联:当关联的资源达到阈值时,就限流自己
- 链路:只记录指定链路上的流量(指定资源从入口资源进来的流量,如果达到阈值,就进行限流) [api级
别的针对来源]
- 流控效果:
- 快速失败:直接失败,抛异常
- Warm Up:根据codeFactor (冷加载因子,默认3)的值,从阈值/codeFactor, 经过预热时长,才达到设
置的QPS阈值 - 排队等待:匀速排队,让请求以匀速的速度通过,阈值类型必须设置为QPS,否则无效
流控模式
直接(默认)

测试

- 快速点击访问http://localhost:8401/testA
- 结果:Blocked by Sentinel(flow limiting)
- 思考???
直接调用默认报错信息,技术方面ok,but,是否应该有我们自己的后续处理
类似有个fallback的兜底方法
关联

- 当关联的资源达到阈值时,就限流自己
- 当与A关联的资源B达到阈值后,就限流自己
- B惹事,A挂了
- 应用场景:比如支付时达到阈值,可以从源头上比如购买界面,进行限流类比:下流洪灾,上流关水
测试
-
配置A

-
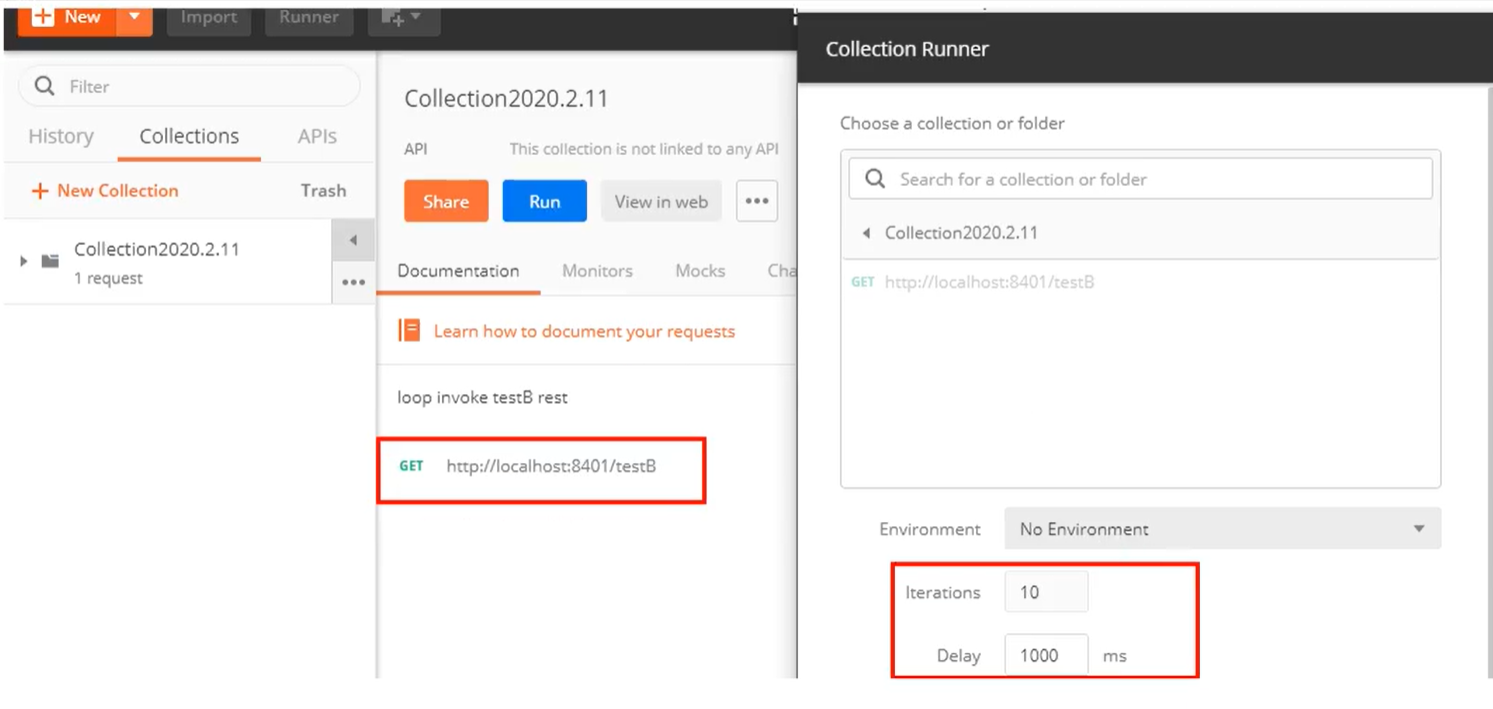
postman模拟并发密集访问testB

-
访问B成功

-
postman里新建多线程集合组

-
将访问地址添加进新线程组

-
RUN

大批量线程高并发访问B,导致A失效了
运行后发现testA挂了
- 点击访问A
- 结果:Blocked by Sentinel(flow limiting)
链路
- 多个请求调用同一个微服务
- 家庭作业试试
流控效果
直接->快速失败(默认的流控处理)
- 直接失败,抛出异常
Blocked by Sentinel(flow limiting) - 源码
com.alibaba.csp.sentinel.slots.block.controller.DefaultController
预热
说明
公式:阈值除以coldFactor(默认值为3),经过预热时长后才会达到阈值
官网
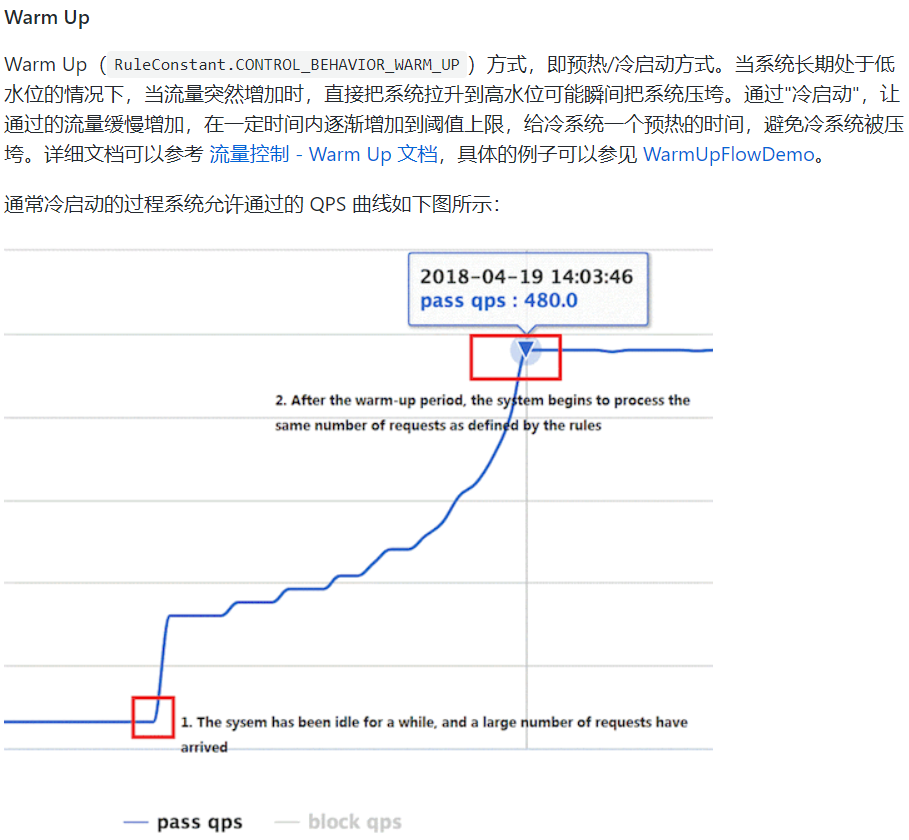
- 默认coldFactor为3,即请求QPS从threshold/3开始,经预热时长逐渐升至设定的QPS阈值
- 限流 冷启动
https://github.com/alibaba/Sentinel/wiki/%E9%99%90%E6%B5%81—%E5%86%B7%E5%90%AF%E5%8A%A8
源码
com.alibaba.csp.sentinel.slots.block.flow.controller.WarmUpController
WarmUp配置
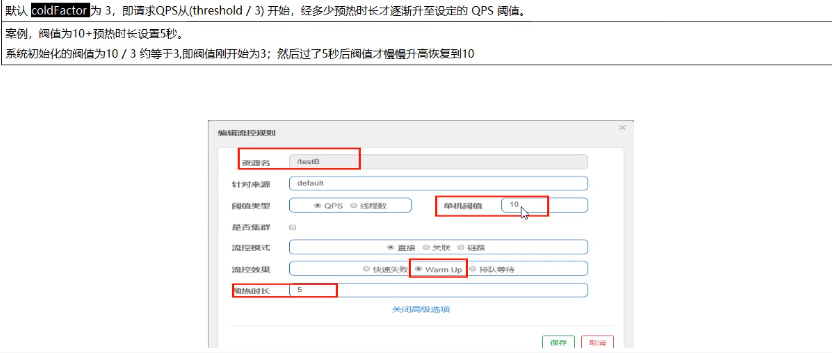
多次点击http://localhost:8401/testB
刚开始不行,后续慢慢OK
应用场景
如:秒杀系统在开启的瞬间,会有很多流量上来,很有可能把系统打死,颍热方式就是把为了保护系统,可慢慢的把流量放进来,慢慢的把阀值增长到设置的阀值。
排队等待
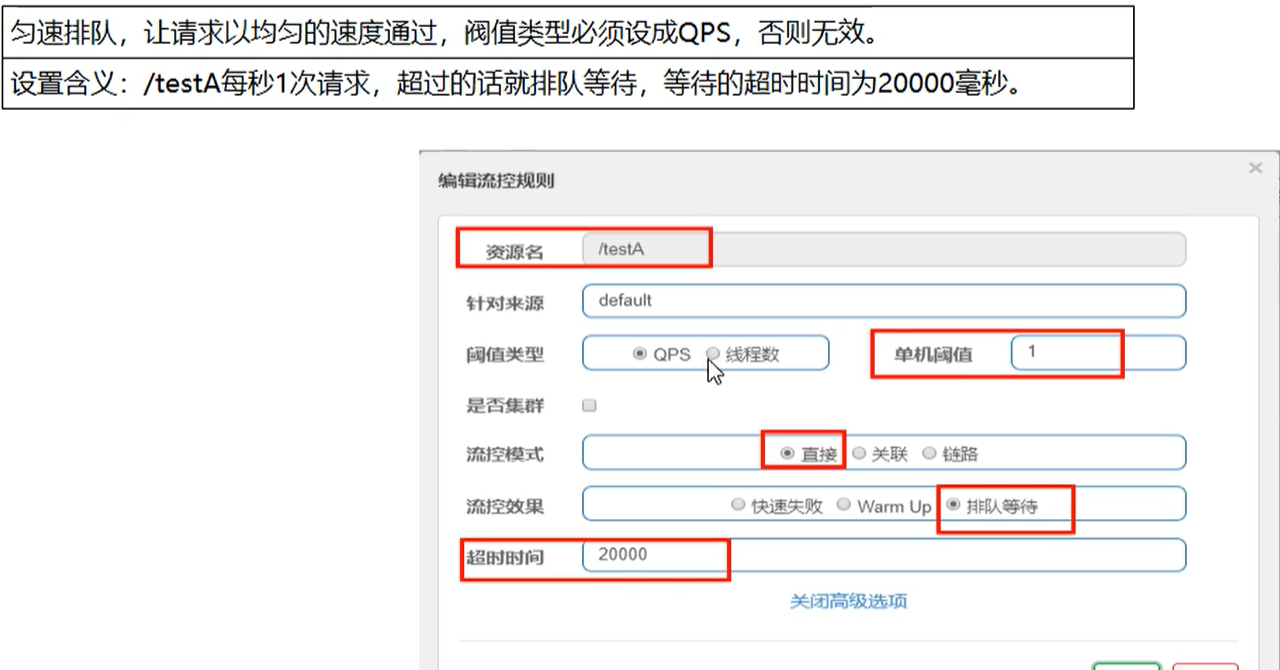
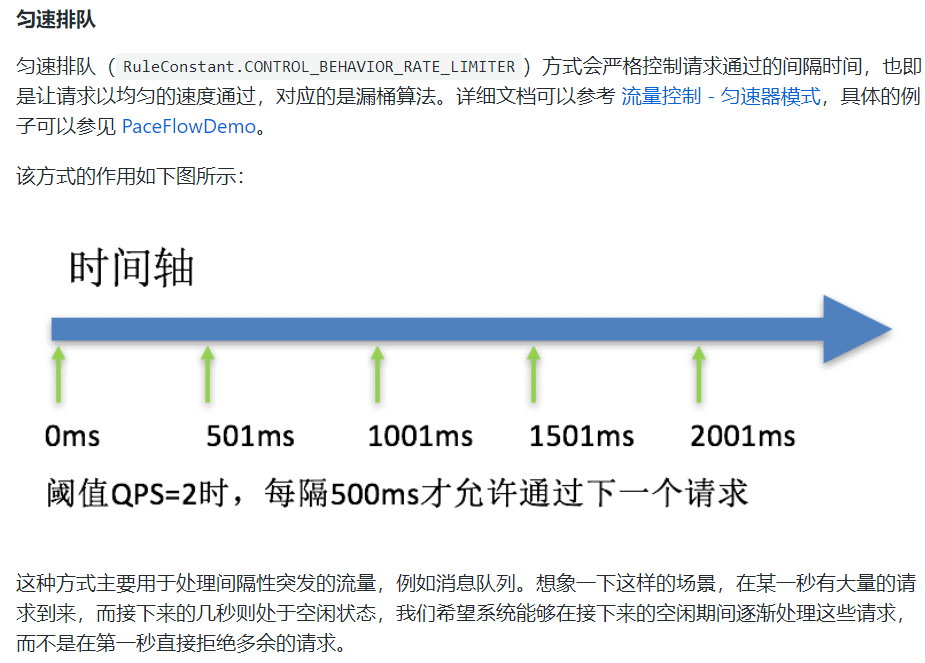
匀速排队,阈值必须设置为QPS
官网
源码
com.ailibaba.csp.sentinel.slots.block.controller.RateLimiterController
测试
