欢迎关注个人公众号摸鱼范式

本期将讲解UVM环境运行以及他的树状结构。主要参考资料为
白皮书: http://bbs.eetop.cn/thread-320165-1-1.html
红宝书: http://rockeric.com/
上期推送中,我们讲解了整体环境的构成,以及他们之间的关系。那么当仿真开始时,整个环境又将如何建立起来呢,组件按照什么顺序进行组件实例化,如何将组件之间的通讯构建起来,以及在运行时我们需要做什么呢?
树状结构
整体的验证环境由许多的组件实现,作为环境组件,UVM提供了uvm_component,所有下图中的测试组件都继承于uvm_component,只有uvm_component能够作为组件构建起整个环境。
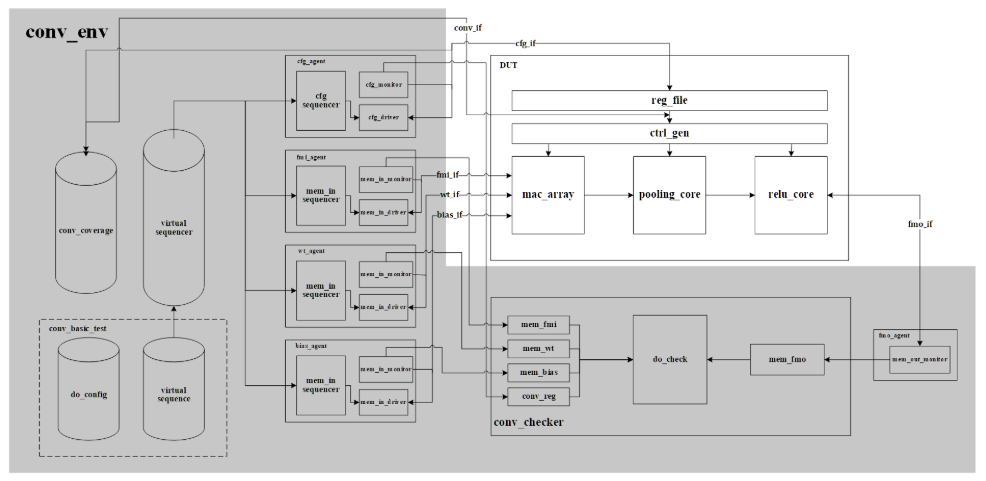
上图中可以看到框图一层套一层,实际上就是UVM环境的树状结构的体现。下图是一个典型的测试环境的树状结构图。结合上下两图,uvm_top是一个全局变量,它是uvm_root的一个实例(而且也是唯一的一个实例 ,它的实现方式非常巧妙),而uvm_root 派生自uvm_component,所以uvm_top本质上是一个uvm_component,它是树的根。uvm_test_top的parent是uvm_top,而uvm_top的 parent则是null。
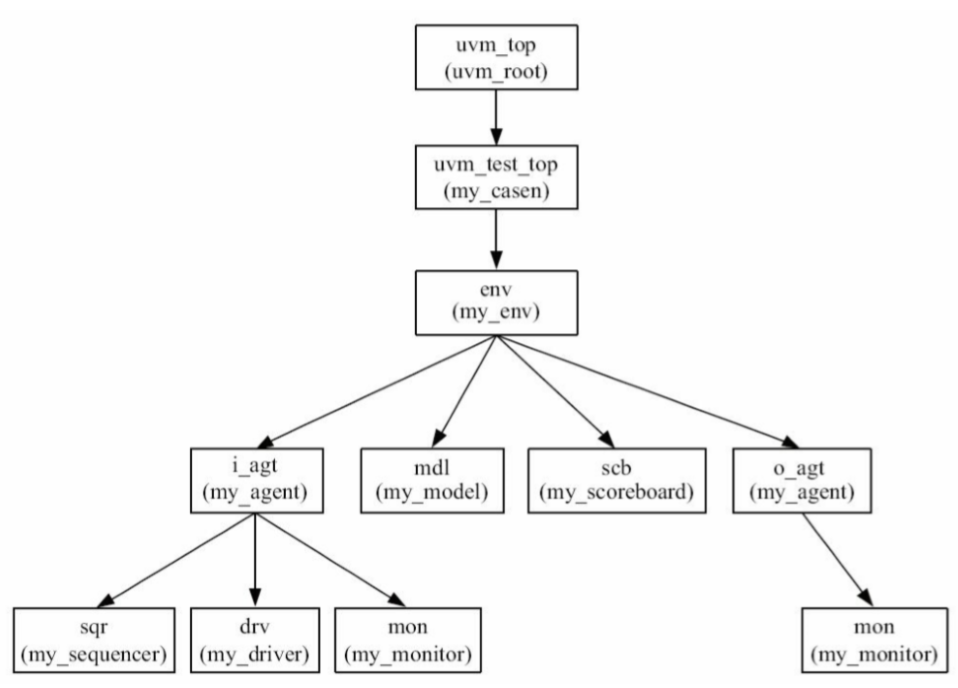
这里我们要注意区分,uvm平台中的parent和我们在oop中所说的父类是不同的概念,这里指的是节点,而非类的继承关系,上图的箭头就像是钩子,从上至下一个钩住一个。通常我们不会接触到uvm_root这个类,他是一个全局变量,构建环境我们需要构建uvm_test_top及其以下的组件。
而具体每个组件的作用,可以参照上一期的推送。
运行机制
仿真的进程分为几个基本阶段,例化组件,连接组件,仿真运行和报告阶段。但实际上UVM在运行时提供了更加细致的阶段划分,将不同的任务划分到对应的阶段中。UVM称这种机制为phase机制,一共包括九个phase。

仿真开始后,phase将从上至下,依次自动运行。phase 的引入在很大程度上解决了代码顺序杂乱可能会引发的问题。它本质上是通过把代码顺序强制固定来实现这个目的的,如 build_phase 的代码一定在connect_phase之前执行 ,而 connect_phase的代码一定在 end_of_elaboration_phase之前执行等等。遵循 UVM 的这种代码顺序划分原则,可以在很大程度上减少验证平台开发者的工作量,让其从一部分杂乱的工作中解脱出来。
- function phase:不消耗仿真时间,而其也可分成两大类:
- 继承自uvm_bottomup_phase, 在UVM component树中,自下而上的执行, 如connect_phase
- 继承自uvm_topdown_phase, 在UVM component树中,自上而下执行, 如build_phase
- task phase:消耗仿真时间的,也称动态运行(run-time)phase.
在初学UVM进行验证过程中,只需要关注其中几个phase即可。将组件的例化在build_phase实现,组件连接在connect_phase实现,测试的过程在run_phase中实现。就像下面cfg_monitor的代码一样,分步骤完成环境的构建。
  class cfg_monitor extends uvm_monitor;
    local virtual cfg_intf intf;
    uvm_blocking_put_port #(cfg_item) mon_bp_port;

    `uvm_component_utils(cfg_monitor)

    function new(string name="cfg_monitor", uvm_component parent);
    endfunction

    function void set_interface(virtual cfg_intf intf);
    endfunction

    task run_phase(uvm_phase phase);
    endtask

    task mon_trans();
    endtask
  endclass: cfg_monitor
从前面的图中可以看到,run_phase和旁边十二个小的phase是并行的,UVM为仿真提供了非常细致的阶段划分,即十二个小phase,但是只使用run_phase也可以完成仿真。
工厂机制
在讲解我们在build_phase所需,要完成的任务前,我们需要了解UVM中一个非常重要的机制-工厂机制。这并非是UVM独创的机制,而时在设计模式中一种常用的机制。简而言之,就是我们在编写每个类时,都是在绘制图纸,当我们完成图纸以后,将图纸递交到工厂。仿真运行时,我们就能通过工厂,使用图纸的名字,创建出不同的类。
绘制图纸的过程就是在编写类的代码,而提交图纸这个过程,体现在代码中就是通过UVM的宏进行注册,告诉工厂图纸的名字。宏uvm_component_utils将cfg_agent注册到工厂,而在构造函数中,可以同时指定对象的默认名字。
注意new方法的参数中,string是我们在创建组件时所需要传递的内容,一定要与句柄的名字一直,否则在后续其他步骤中会出现意想不到的错误。而第二个参数parent就是前面所提到的树状结构的钩子,父节点。
class cfg_agent extends uvm_agent;
    `uvm_component_utils(cfg_agent)

    function new(string name = "cfg_agent", uvm_component parent);
        super.new(name, parent);
    endfunction
endclass:cfg_agent
build_phase的内容
通过工厂机制我们可以很轻松地完成组件对象的实例化,下面就是一个示例。
class cfg_agent extends uvm_agent;
    function void build_phase(uvm_phase phase);
      super.build_phase(phase);
      driver = cfg_driver::type_id::create("driver", this);
      monitor = cfg_monitor::type_id::create("monitor", this);
      sequencer = cfg_sequencer::type_id::create("sequencer", this);
    endfunction
endclass:cfg_agent
使用component_name::type_id::create()就能通过工厂实例化对象,create是uvm_component的一个静态函数,会返回组件的句柄,第一个参数就是我们new中的string,建议与句柄名保持一致,第二个参数通常使用this,表示创建的组件是在当前的组件的子节点上,从而构建树状结构。
有了创建组件的方法,我们就能通过build_phase实现组件的构建。我们知道,整个环境是一个树状结构,那么检索树状结构就有两个方向,自顶向下和自底向上。我们观察create的参数,发现需要传递父节点的句柄,那么很显然,build_phase是自顶向下的。从下面的代码就能看到,在build_phase中,我们需要完成与本节点相连的子节点的创建,这样一层一层的勾起组件,从根到最末端,所有的build_phase完成以后再进入下一个phase。
class conv_base_test extends uvm_test;
    function void build_phase(uvm_phase phase);
      super.build_phase(phase);
      this.env = conv_env::type_id::create("env", this);
    endfunction
endclass: conv_base_test

class conv_env extends uvm_env;
    function void build_phase(uvm_phase phase);
      super.build_phase(phase);
      this.chker    = conv_checker::type_id::create("chker", this);
      this.cfg_agt  = cfg_agent::type_id::create("cfg_agt", this);
      this.fmi_agt  = mem_in_agent::type_id::create("fmi_agt", this);
      this.wt_agt   = mem_in_agent::type_id::create("wt_agt", this);
      this.bias_agt = mem_in_agent::type_id::create("bias_agt", this);
      this.fmo_agt  = mem_out_agent::type_id::create("fmo_agt", this);
      this.cvrg     = conv_coverage::type_id::create("cvrg", this);
      this.virt_sqr = conv_virtual_sequencer::type_id::create("virt_sqr", this);
    endfunction
 endclass: conv_env

class cfg_agent extends uvm_agent;
    function void build_phase(uvm_phase phase);
      super.build_phase(phase);
      driver = cfg_driver::type_id::create("driver", this);
      monitor = cfg_monitor::type_id::create("monitor", this);
      sequencer = cfg_sequencer::type_id::create("sequencer", this);
    endfunction
endclass:cfg_agent
本期总结
- UVM的组件是树状连接的,环境中的parent和oop的父类是不一样的
- UVM的运行划分成多个phase,每个phase负责不同的任务,run_phase与旁边的十二个phase是并行的。整体运行从上至下顺序运行。只有run_phase和并行的phase是task,其他都是funtion。
- 使用宏在工厂中注册,然后就能够通过create静态方法实现组件实例化
- 在build_phase中顺序创建字节点的组件,从而构建整个环境