安全是每个项目开发中都需要考虑的,比如权限控制,安全认证,防止漏洞攻击等。
比较常见的安全框架有:Apache的shiro、Spring Security等等,相信用shiro的用户群体更多,而security功能更多一些。
那么我们就来看看Spring自己的Security是如何使用的。关于shiro后边一定会有其他文章补充的~。
Spring Security环境搭建
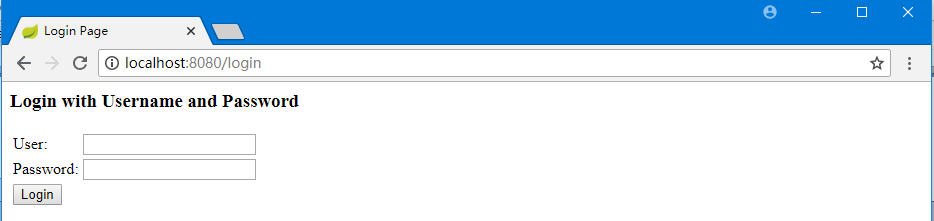
1)、首先我们要有一个可以用来做测试的页面,不然做了权限控制也不知道有没有效果,那么我下边简单的列一个登陆页。不会写的童鞋可以直接拿去用:


<!DOCTYPE html>
<html xmlns:th="http://www.thymeleaf.org">
<head>
    <meta http-equiv="Content-Type" content="text/html; charset=UTF-8">
    <title>Insert title here</title>
</head>
<body>
<h1 align="center">欢迎光临瓦尔哈拉-众神管理系统</h1>
<h2 align="center">凡人,如果想查看众神系统 <a th:href="@{/login}">请登记</a></h2>
<hr>

<h3>巨人族</h3>
<ul>
    <li><a th:href="@{/level1/1}">伊米尔</a></li>
    <li><a th:href="@{/level1/2}">蒂阿兹</a></li>
    <li><a th:href="@{/level1/3}">斯卡娣</a></li>
</ul>

<h3>其他神祗</h3>
<ul>
    <li><a th:href="@{/level2/1}">女神格欧费茵</a></li>
    <li><a th:href="@{/level2/2}">瓦利</a></li>
    <li><a th:href="@{/level2/3}">林德</a></li>
</ul>

<h3>主神</h3>
<ul>
    <li><a th:href="@{/level3/1}">奥丁</a></li>
    <li><a th:href="@{/level3/2}">弗丽嘉</a></li>
    <li><a th:href="@{/level3/3}">索尔</a></li>
</ul>

</body>
</html>
<!DOCTYPE html>
<html xmlns:th="http://www.thymeleaf.org">
<head>
<meta charset="UTF-8">
<title>Insert title here</title>
</head>
<body>
    <h1 align="center">欢迎登陆瓦尔哈拉-众神管理系统</h1>
    <hr>
    <div align="center">
        <form action="" method="post">
            用户名:<input name=""/><br>
            口令:<input name=""><br/>
            <input type="submit" value="登陆">
        </form>
    </div>
</body>
</html>
level-1
<!DOCTYPE html>
<html xmlns:th="http://www.thymeleaf.org">
<head>
    <meta http-equiv="Content-Type" content="text/html; charset=UTF-8">
    <title>Insert title here</title>
</head>
<body>
<a th:href="@{/}">返回</a>
<h1>伊米尔</h1>
<p>远古洪荒时代,太虚混沌世界的中间有一条宽大无底的的金伽侬裂缝,冷、热气,火焰、冰块、烟雾和蒸汽相互作用在裂缝边缘形成了壅堵化成了巨人伊米尔。
    伊米尔的后代奥丁、维利和威长大后杀死了伊米尔,用他的躯体形成了世界:血化成湖泊海洋;肉化为土地;骨头化为山;牙齿化为岩石;
    脑髓化为云;头盖骨化为天空;眉毛化为一道栅栏。</p>
</body>
</html>
<!DOCTYPE html>
<html xmlns:th="http://www.thymeleaf.org">
<head>
    <meta http-equiv="Content-Type" content="text/html; charset=UTF-8">
    <title>Insert title here</title>
</head>
<body>
<a th:href="@{/}">返回</a>
<h1>蒂阿兹</h1>
<p>巨人斯卡娣的父亲。蒂阿兹绑架了掌管永葆青春的金苹果女神伊敦恩。因为这是洛基私约伊敦恩外出闯的祸,众神祗便勒令洛基前去搭救。
    洛基借用弗丽嘉的羽衣变成一只小鹰,潜入巨人蒂阿兹的城堡,将伊敦恩变成一枚核桃,衔在嘴里飞向阿斯加尔德。
    不料被斯卡娣发现,蒂阿兹闻讯变成一只隼鹰追赶上来。在即将追上之际,提尔点燃火把,将隼鹰烧死,巨人蒂阿兹便损命。</p>
</body>
</html>
<!DOCTYPE html>
<html xmlns:th="http://www.thymeleaf.org">
<head>
    <meta http-equiv="Content-Type" content="text/html; charset=UTF-8">
    <title>Insert title here</title>
</head>
<body>
<a th:href="@{/}">返回</a>
<h1>斯卡娣</h1>
<p>蒂阿兹之女、瓦尼尔部落主神尼奥尔德之妻。
    父亲蒂阿兹被众神设计杀害后,斯卡娣向主神奥丁要求血案赔偿,奥丁无奈允诺她可以在众神祗中物色一位丈夫,
    斯卡娣看中了光明神巴德尔,奥丁自然不愿,遂略施手腕把斯卡娣嫁给了年老貌丑的海神尼奥尔德。
    斯卡娣嫁给尼奥尔德不久随即离婚。</p>
</body>
</html>
level2/3的自己根据level-1里边的类直接复制粘贴吧,基本都一样的,把名字和内容改掉区分一下就行了,页面的架构如下,放进resource-templates里边,这个都知道吧~

好,我们通过启动主程序,来访问一下我们的页面~(别忘了controller,不然你启动也访问不到页面),访问:localhost:8080
import org.springframework.stereotype.Controller;
import org.springframework.web.bind.annotation.GetMapping;
import org.springframework.web.bind.annotation.PathVariable;

@Controller
public class ValhallaController {
    private final String PREFIX = "pages/";

    /**
     * 欢迎页
     *
     * @return
     */
    @GetMapping("/")
    public String index() {
        return "welcome";
    }

    /**
     * 登陆页
     *
     * @return
     */
    @GetMapping("/userlogin")
    public String loginPage() {
        return PREFIX + "login";
    }


    /**
     * level1页面映射
     *
     * @param path
     * @return
     */
    @GetMapping("/level1/{path}")
    public String level1(@PathVariable("path") String path) {
        return PREFIX + "level1/" + path;
    }

    /**
     * level2页面映射
     *
     * @param path
     * @return
     */
    @GetMapping("/level2/{path}")
    public String level2(@PathVariable("path") String path) {
        return PREFIX + "level2/" + path;
    }

    /**
     * level3页面映射
     *
     * @param path
     * @return
     */
    @GetMapping("/level3/{path}")
    public String level3(@PathVariable("path") String path) {
        return PREFIX + "level3/" + path;
    }


}

看来访问的还是比较成功的。
关于登录的“认证”和“授权”
1)、引入Spring Security模块
  <dependency>
    <groupId>org.springframework.boot</groupId>
    <artifactId>spring-boot-starter-security</artifactId>
  </dependency>
2)、配置,这里就需要使用一些注解了 @EnableWebSecurity
我们先这样,将我们需要授权的规则页和对应的用户等级进行匹配。然后访问一下页面看看,比如我们点击上图中巨人族的 伊米尔(你会发现,它提示我们403,访问拒绝)
@EnableWebSecurity
public class MySercurityConfig extends WebSecurityConfigurerAdapter {

    @Override
    protected void configure(HttpSecurity http) throws Exception {
        // super.configure(http);
        // 定制请求授权的规则
        http.authorizeRequests().antMatchers("/").permitAll()
                .antMatchers("/level1/**").hasRole("VIP1")
                .antMatchers("/level2/**").hasRole("VIP2")
                .antMatchers("/level3/**").hasRole("VIP3");
    }
}

这是因为我们还没有登录访问,作为游客,肯定是不匹配我们上边写的规则的,所以接下来,先解决非等级的一个跳转
加入如下的这段代码,让它为我们自动配置,只要不符合等级规则,就跳转到/login的登录页(同样点击伊米尔再看)
        // 开启自动配置的登录功能,
        http.formLogin();
3)、认证的规则设定
讲我们拥有的用户信息对应匹配规则,然后使用这些账户登录试一下~(这里为了简单说明,我用的是内存保存,当然,可以使用“auth.jdbc.....”来进行数据库的链接使用)
    // 自定义认证规则
    @Override
    protected void configure(AuthenticationManagerBuilder auth) throws Exception {
//        super.configure(auth);
        auth.inMemoryAuthentication().withUser("human").password("123456").roles("VIP1")
                            .and()
                            .withUser("angle").password("123456").roles("VIP1", "VIP2")
                             .and()
                            .withUser("god").password("123456").roles("VIP1", "VIP2", "VIP3");
    }
当我们再次访问,并且用上边匹配的用户登录的时候却发现这样一个问题,说我们的密码id是空(There is no PasswordEncoder mapped for the id "null"),这是由于spring security5.0+的版本,多一个密码存储格式官方指定的格式是:“{id}.....”,这个id就是加密方式,id可以是bcrypt、sha256等,后面跟着的是加密后的密码。官方推荐的事bcrypt的加密方式。如下:(如果你使用的jdbc的方式,那么在存储的时候就已经以这种方式存储了,只需要在密码上写入就好了)
    // 自定义认证规则
    @Override
    protected void configure(AuthenticationManagerBuilder auth) throws Exception {
//        super.configure(auth);
        auth.inMemoryAuthentication().passwordEncoder(new BCryptPasswordEncoder())
                .withUser("human").password(new BCryptPasswordEncoder().encode("123456")).roles("VIP1")
                .and()
                .withUser("angle").password(new BCryptPasswordEncoder().encode("123456")).roles("VIP1", "VIP2")
                .and()
                .withUser("god").password(new BCryptPasswordEncoder().encode("123456")).roles("VIP1", "VIP2", "VIP3");
    }
我们再次登录就正常了。

3)、注销功能
我们有了用户的登录,当然是需要一个注销,也就是退出登录的功能,这个功能就比较简单了,只需要在上边的代码中加入一段如下的戏份就可以实现了。
1.在welcome.html中加入注销按钮的相关信息;
2.在MySecurity的configure中加入注销方法;
<!-- 把这段代码放到你想要的位置,比如登录前边 -->
<form th:action="@{/logout}" method="post">
    <input type="submit" value="注销">
</form>
  .....
  // 开启自动配置的登录功能,
  http.formLogin();
  // 开启自动配置的注销功能,如果注销成功返回“/”页
  http.logout().logoutSuccessUrl("/");
4)、优化页面的展示
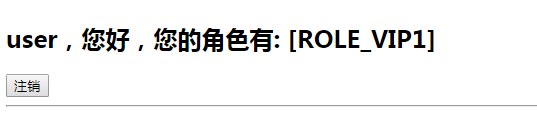
让不同用户看到首页展示不同,没有登录的呢,就看不到具体内容。
1.在pom里边引入springsecurity4;
2.在html中改造一下,引入springsecurity4(加两个div做判断是否授权-sec:authorize),如果没有认证(!isAuthenticated())就展示游客请登录,如果认证了就展示角色信息;读取角色信息(sec:authentication);
<dependency>
    <groupId>org.thymeleaf.extras</groupId>
    <artifactId>thymeleaf-extras-springsecurity4</artifactId>
</dependency>
<body>
<h1 align="center">欢迎光临瓦尔哈拉-众神管理系统</h1>
<div sec:authorize="!isAuthenticated()">
    <h2 align="center">凡人,如果想查看众神系统 <a th:href="@{/login}">请登录</a></h2>
</div>
<div sec:authorize="isAuthenticated()">
    <h2><span sec:authentication="name"></span>,您好,您的角色有:
        <span sec:authentication="principal.authorities"></span></h2>
    <form th:action="@{/logout}" method="post">
        <input type="submit" value="注销"/>
    </form>
</div>

<hr>

<div sec:authorize="hasRole('VIP1')">
    <h3>巨人族</h3>
    <ul>
        <li><a th:href="@{/level1/1}">依米尔</a></li>
        <li><a th:href="@{/level1/2}">蒂阿兹</a></li>
        <li><a th:href="@{/level1/3}">斯卡蒂</a></li>
    </ul>
</div>

<div sec:authorize="hasRole('VIP2')">
    <h3>其他...</h3>
...
</div>

<div sec:authorize="hasRole('VIP3')">
    <h3>...</h3>
...

</div>
再次访问页面,就会看到差别了:(截图是登录成功的)
5)、完善功能。(绿色加粗部分就是新添的代码)
1.【MySecurityConfig】登录一般都会有“记住我”这个功能,所以要加入remember me;
2.【config+login】登录请求变为login,并进入到我们自己的登录页,并将用户名和密码做关联;
3.【welcome.html】优化,将登录请求变成userlogin请求;
                .antMatchers("/level3/**").hasRole("VIP3");
        http.formLogin().usernameParameter("user").passwordParameter("pwd").loginPage("/userlogin");
        http.rememberMe().rememberMeParameter("remember");
        http.logout().logoutSuccessUrl("/");
<div align="center">
    <form th:action="@{/userlogin}" method="post">
        用户名:<input name="user"/><br>
        密码:<input name="pwd"><br/>
        <input type="checkbox" name="remember">记住我<br/>
        <input type="submit" value="登陆">
    </form>
</div>
<div sec:authorize="!isAuthenticated()">
    <h2 align="center">凡人,如果想查看众神系统 <a th:href="@{/userlogin}">请登录</a></h2>
</div>
以上,我们来访问一下看看自己的登录系统吧~