一.springmvc-mybatis整合思路
1..整合dao层
1.整合mybatis和spring,把mapper接口交给spring容器来管理,由于mapper接口可能存在多个的现象,使用mapper的扫描的方式在容器中注册
2..整合service层
2.spring管理service接口,如果需要事务,还可以在spring中实现事务控制
3..整合web层
3.springmvc是spring的一个模块,无需整合
二.需求
三.数据库环境
1.创建数据库
2.设计表
3.建表
三.java环境
1.jdk版本
2.开发环境
3.框架技术
四.导包
》数据库驱动包
》数据库连接池包
》mybatis核心包及依赖包
》spring的包
》log4j,junit,jstl等
五.建包
》cn.itheima.ssm.pojo
》cn.itheima.ssm.mapper
》cn.itheima.ssm.service
》cn.itheima.ssm.controller
六.创建实体类
可以手动创建或者使用mybastis的逆向工厂技术,把mapper接口和mapper配置,pojo类等生成(得保证接口和配置文件在同一目录且命名相同)
七.开发dao
1.创建db.properties存储数据库参数
2.log4j.xml也可以准备
3.mybatis的主配置文件sqlMapConfig.xml
>根据具体需求,配置全局settings
>配置pojo包的别名
>读取mapper.xml文件等(省略,交给spring来扫描包下的配置)
<?xml version="1.0" encoding="UTF-8"?>
<!DOCTYPE configuration
PUBLIC "-//mybatis.org//DTD Config 3.0//EN"
"http://mybatis/dtd/mybatis-3-config.dtd">

<configuration>
    <!-- 设置settins全局配置 -->

    <!-- 取个别名 -->
    <typeAliases>
        <typeAlias type="cn.itheima.ssm.pojo"/>
    </typeAliases>


    <!-- mapper.xml的读取交给spring扫描 -->
</configuration>
4.applicationContext-dao.xml(每层都有一个applicationContext的配置文件,到时全部加载到spring容器)
》扫描数据库配置文件db.properties
》配置数据库连接池
》配置session工厂
》配置mapper扫描器
<?xml version="1.0" encoding="UTF-8"?>
<beans xmlns:xsi="http://www.w3.org/2001/XMLSchema-instance"
    xmlns="http://www.springframework.org/schema/beans"
    xmlns:context="http://www.springframework.org/schema/context"
    xmlns:aop="http://www.springframework.org/schema/aop"
    xmlns:tx="http://www.springframework.org/schema/tx"
    xmlns:mvc="http://www.springframework.org/schema/mvc"
    xmlns:util="http://www.springframework.org/schema/util"
    xsi:schemaLocation="http://www.springframework.org/schema/mvc http://www.springframework.org/schema/mvc/spring-mvc-4.1.xsd
        http://www.springframework.org/schema/beans http://www.springframework.org/schema/beans/spring-beans-4.2.xsd
        http://www.springframework.org/schema/context http://www.springframework.org/schema/context/spring-context-4.2.xsd
        http://www.springframework.org/schema/aop http://www.springframework.org/schema/aop/spring-aop-4.2.xsd
        http://www.springframework.org/schema/tx http://www.springframework.org/schema/tx/spring-tx-4.2.xsd
        http://www.springframework.org/schema/util http://www.springframework.org/schema/util/spring-util-4.1.xsd">

<!-- 扫描数据库配置文件 -->
<context:property-placeholder location="db.properties"/>

<!-- 配置连接池 -->
    <bean name="dataSource" class="org.apache.commons.dbcp.BasicDataSource"></bean>

<!-- 配置sqlmapSessionFactocy -->
    <bean name="sqlSessionFactory" class="org.mybatis.spring.SqlSessionFactoryBean">
        <!-- 依赖连接池 -->
        <property name="dataSource" ref="dataSource"></property>

        <!-- mybatis的sqlMapConfig.xml的位置 -->
        <property name="configLoaction" value="classpath:mybatis/sqlMapConfig.xml"></property>
    </bean>
<!-- 配置mapper扫描器 -->
    <bean class="org.mybatis.spring.mapper.MapperScannerConfigurer">
        <!-- 扫描包路径 -->
        <property name="basePackage" value="cn.itheima.ssm.mapper"></property>
        <!-- 工厂 -->
        <property name="sqlSessionFactoryBeanName" value="sqlSessionFactory"></property>
    </bean>
</beans>
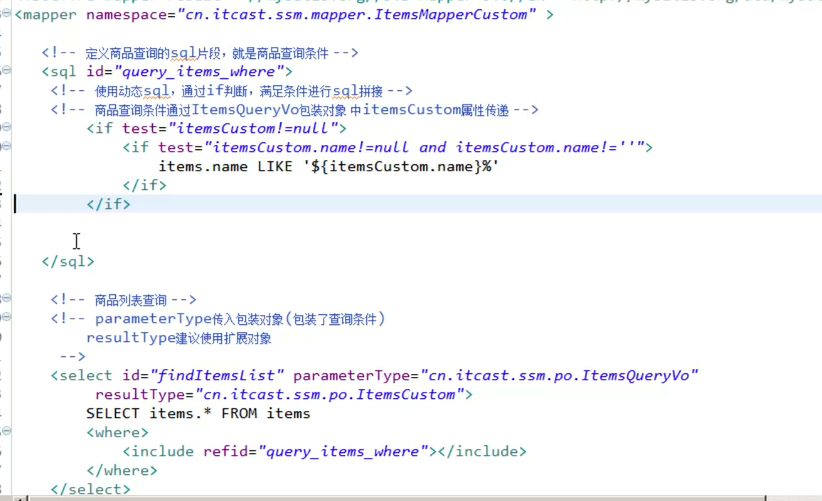
5.如果逆向工程生成的接口方法以及配置不符合自己的要求,也可以自己手动写接口和配置mappper
》如果查询条件比较综合,可能涉及到多个pojo作为查询条件对象,我们会创建一个pojo包装类(属性含有pojo对象),一般在mapper.xml的parameterType值为pojo的包装类
》为了以后更好的系统拓展性,比如说以后想在customer表中在添加一个字段,则对应的pojo类改的话是非常不好的,所以我们拓展的方式是“继承”,继承pojo类,在新的拓展类中添加所需要的字段
》parameterType和resultType在使用pojo对象进行传参或映射时,pojo尽量使用拓展类
》如果查询的条件是变化大的,通常采用动态sql的方式,即在sql标签中加if标签进行判断,哪个查询条件有值条件加哪个,没有则不加!
八.开发service
1.创建service接口和实现类
2.创建applicationContext-service.xml和applicationContext-transaction.xml把service接口和控制业务的配置分开
<?xml version="1.0" encoding="UTF-8"?>
<beans xmlns:xsi="http://www.w3.org/2001/XMLSchema-instance"
    xmlns="http://www.springframework.org/schema/beans"
    xmlns:context="http://www.springframework.org/schema/context"
    xmlns:aop="http://www.springframework.org/schema/aop"
    xmlns:tx="http://www.springframework.org/schema/tx"
    xmlns:mvc="http://www.springframework.org/schema/mvc"
    xmlns:util="http://www.springframework.org/schema/util"
    xsi:schemaLocation="http://www.springframework.org/schema/mvc http://www.springframework.org/schema/mvc/spring-mvc-4.1.xsd
        http://www.springframework.org/schema/beans http://www.springframework.org/schema/beans/spring-beans-4.2.xsd
        http://www.springframework.org/schema/context http://www.springframework.org/schema/context/spring-context-4.2.xsd
        http://www.springframework.org/schema/aop http://www.springframework.org/schema/aop/spring-aop-4.2.xsd
        http://www.springframework.org/schema/tx http://www.springframework.org/schema/tx/spring-tx-4.2.xsd
        http://www.springframework.org/schema/util http://www.springframework.org/schema/util/spring-util-4.1.xsd">

    <bean name="customerService" class="cn.itheima.ssm.service.impl.CustomerServiceImpl"></bean>


</beans>
<?xml version="1.0" encoding="UTF-8"?>
<beans xmlns:xsi="http://www.w3.org/2001/XMLSchema-instance"
    xmlns="http://www.springframework.org/schema/beans"
    xmlns:context="http://www.springframework.org/schema/context"
    xmlns:aop="http://www.springframework.org/schema/aop"
    xmlns:tx="http://www.springframework.org/schema/tx"
    xmlns:mvc="http://www.springframework.org/schema/mvc"
    xmlns:util="http://www.springframework.org/schema/util"
    xsi:schemaLocation="http://www.springframework.org/schema/mvc http://www.springframework.org/schema/mvc/spring-mvc-4.1.xsd
        http://www.springframework.org/schema/beans http://www.springframework.org/schema/beans/spring-beans-4.2.xsd
        http://www.springframework.org/schema/context http://www.springframework.org/schema/context/spring-context-4.2.xsd
        http://www.springframework.org/schema/aop http://www.springframework.org/schema/aop/spring-aop-4.2.xsd
        http://www.springframework.org/schema/tx http://www.springframework.org/schema/tx/spring-tx-4.2.xsd
        http://www.springframework.org/schema/util http://www.springframework.org/schema/util/spring-util-4.1.xsd">

<!-- 核心事务管理器
    mybatis操作数据库事务控制,spring使用jdbc的事务控制类
-->
    <bean name="transactionManager" class="org.springframework.jdbc.datasource.DataSourceTransactionManager">
        <!-- 依赖连接池,在Hibernate中依赖session工厂 -->
        <property name="dataSource" ref="dataSource"></property>
    </bean>

<!-- 目标对象,已在application-service中配置 -->

<!-- 事务通知 -->
<tx:advice id="txAdvice" transaction-manager="transactionManager">
<!-- 配置方法的事务属性 -->
    <tx:attributes>
        <tx:method name="add*" isolation="REPEATABLE_READ" propagation="REQUIRED" read-only="false"/>
        <tx:method name="delete*" isolation="REPEATABLE_READ" propagation="REQUIRED" read-only="false"/>
        <tx:method name="update*" isolation="REPEATABLE_READ" propagation="REQUIRED" read-only="false"/>
        <tx:method name="get*" isolation="REPEATABLE_READ" propagation="REQUIRED" read-only="true"/>
        <tx:method name="*" isolation="REPEATABLE_READ" propagation="REQUIRED" read-only="false"/>
    </tx:attributes>
</tx:advice>

<!-- aop配置:通知植入到目标对象(切入点) -->
<aop:config>
    <aop:advisor advice-ref="txAdvice" pointcut="execution(* cn.itheima.ssm.service.*.*(..))"/>
</aop:config>

</beans>
上面是类级别采用xml配置注入,而属性级别是注解来注入!
九.开发controller
1.创建handler持久类
@Controller
public class CustomerHandler {

    @Resource(name = "customerService")
    private CustomerService customerService;

    @RequestMapping("/getCustList")
    public ModelAndView getCustList(){

        List<Customer> list = customerService.getCustList(null);

        ModelAndView mav = new ModelAndView();

        mav.addObject("list",list);

        mav.setViewName("/index.jsp");

        return mav;
    }
}
2.创建springmvc.xml;springmvc.xml也是相当spring小容器,跟之前的appicationContext.xml都是一样的,不过它的加载由前端控制器来完成,而其他applcaitonContext-*的配置由特定监听器来加载到spring容器
<?xml version="1.0" encoding="UTF-8"?>
<beans xmlns:xsi="http://www.w3.org/2001/XMLSchema-instance"
    xmlns="http://www.springframework.org/schema/beans"
    xmlns:context="http://www.springframework.org/schema/context"
    xmlns:aop="http://www.springframework.org/schema/aop"
    xmlns:tx="http://www.springframework.org/schema/tx"
    xmlns:mvc="http://www.springframework.org/schema/mvc"
    xmlns:util="http://www.springframework.org/schema/util"
    xsi:schemaLocation="http://www.springframework.org/schema/mvc http://www.springframework.org/schema/mvc/spring-mvc-4.1.xsd
        http://www.springframework.org/schema/beans http://www.springframework.org/schema/beans/spring-beans-4.2.xsd
        http://www.springframework.org/schema/context http://www.springframework.org/schema/context/spring-context-4.2.xsd
        http://www.springframework.org/schema/aop http://www.springframework.org/schema/aop/spring-aop-4.2.xsd
        http://www.springframework.org/schema/tx http://www.springframework.org/schema/tx/spring-tx-4.2.xsd
        http://www.springframework.org/schema/util http://www.springframework.org/schema/util/spring-util-4.1.xsd">

    <!-- 扫描包中的的注解 -->
    <context:component-scan base-package="cn.itheima.ssm.controller"></context:component-scan>

    <!-- 支持controller注解的驱动 -->
    <mvc:annotation-driven/>

    <!-- 配置视图解析器 -->
    <!-- 解析jsp路径,默认使用jstl进行解析,classpath得有jstl的包 -->
    <bean class="org.springframework.web.servlet.view.InternalResourceViewResolver"></bean>

</beans>
3.配置前端控制器,加载springmvc.xml
4.配置加载spring容器的监听器,加载application-service,dao,transaction的配置文件
<?xml version="1.0" encoding="UTF-8"?>
<web-app xmlns:xsi="http://www.w3.org/2001/XMLSchema-instance"
    xmlns="http://java.sun.com/xml/ns/javaee"
    xsi:schemaLocation="http://java.sun.com/xml/ns/javaee http://java.sun.com/xml/ns/javaee/web-app_3_0.xsd"
    id="WebApp_ID" version="3.0">
    <display-name>springmvc-mybatis</display-name>
    <welcome-file-list>
        <welcome-file>index.html</welcome-file>
        <welcome-file>index.htm</welcome-file>
        <welcome-file>index.jsp</welcome-file>
        <welcome-file>default.html</welcome-file>
        <welcome-file>default.htm</welcome-file>
        <welcome-file>default.jsp</welcome-file>
    </welcome-file-list>

<!-- 配置前端控制器 -->
    <servlet>
        <servlet-name>springmvc</servlet-name>
        <servlet-class> org.springframework.web.servlet.DispatcherServlet</servlet-class>
        <!-- 指定springmvc.xml的位置 -->
        <init-param>
            <param-name>conetextConfigLoaction</param-name>
            <param-value>classspath:spring/springmvc.xml</param-value>
        </init-param>
    </servlet>

    <servlet-mapping>
        <servlet-name>springmvc</servlet-name>
        <url-pattern>/</url-pattern>
    </servlet-mapping>

<!-- 配置加载spring容器的监听器 -->
<listener>
    <listener-class>org.springframework.web.context.ContextLoaderListener</listener-class>
</listener>

<!-- 指定配置文件的位置 -->
<context-param>
    <param-name>conetextConfigLoaction</param-name>
    <param-value>/WBE-INF/classes/spring/application-*.xml</param-value>
</context-param>

</web-app>
十.开发jsp