关于移动应用为什么用PhoneGap和jQuery Mobile本文不再赘述,有兴趣的童鞋可以自行问“度娘”,有很多这方面的文章。本文主要介绍PhoneGap&jQuery Mobile移动应用开发环境的具体配置。
PhoneGap是一个基于HTML(5)、CSS(3)、Javascript创建跨平台移动应用的开发框架(称之为平台可能更合适些)。从Adobe收购了PhoneGap之后,就有了一个新的名字Cordova,目前已经到了3.0的版本,本文中所使用的是2.9的版本。
jQuery Mobile是jQuery在移动设备上的版本,不仅提供了jQuery的核心库,还提供了一套比较完整的移动UI框架。
要搭建PhoneGap&jQuery Mobile移动应用开发环境(For Android),需要有以下资源:
- jdk6;
- Android SDK;
- Eclipse;
- Eclipse ADT Plugin;
- PhoneGap资源包;
- jQuery Mobile资源包。
至于如何安装jdk、Android SDK、Eclipse、Eclipse Plugin的如何安装本文同样,不再赘述,请配置好相关环境之后,创建一个Android Application Project,至于如何创建同样不再赘述,因为本文的重点是说明如何将PhoneGap和jQuery整合到Android Application Project中去,下面将一步一步说明如何整合。Android示例项目名称为:HelloWorld(为啥叫这个名字,我想程序员都懂的)。
- 将D:phonegap-2.9.0libandroid下的cordova-2.9.0.jar复制到D:androidwsHelloWorldlibs下,同时需要把cordova-2.9.0.jar加到Build Path中。
- 在Android项目中创建路径:D:androidwsHelloWorldassetswww。
- 将cordova.js复制到D:androidwsHelloWorldassetswwwjs。
- 将D:phonegap-2.9.0libandroidxml整个文件夹复制到D:androidwsHelloWorld es。
- 修改主Activity类,把Activity继承的父类修改为DroidGap,onCreate方法的权限修饰符改为public(默认为protected,不改编译出错),将onCreate方法中的setContentView替换成super.loadUrl("启动的主页面地址"),删除onCreateOptionsMenu方法。修改后的主Activity类如下所示:
package com.example.helloworld;

import org.apache.cordova.DroidGap;

import android.os.Bundle;

public class MainActivity extends DroidGap {

    @Override
    public void onCreate(Bundle savedInstanceState) {
        super.onCreate(savedInstanceState);
        super.loadUrl("file:///android_asset/www/index.html");
    }
}
6. 修改AndroidMenifest.xml文件,修改后的文件示例如下:
<?xml version="1.0" encoding="utf-8"?>
<manifest xmlns:android="http://schemas.android.com/apk/res/android"
    package="com.example.helloworld"
    android:versionCode="1"
    android:versionName="1.0" >

    <!-- 增加Cordova的屏幕支持 -->
    <supports-screens
        android:largeScreens="true"
        android:normalScreens="true"
        android:smallScreens="true"
        android:xlargeScreens="true"
        android:resizeable="true"
        android:anyDensity="true"
    />

    <!-- 增加Cordova插件支持 -->
    <uses-permission android:name="android.permission.CAMERA" />
    <uses-permission android:name="android.permission.VIBRATE" />
    <uses-permission android:name="android.permission.ACCESS_COARSE_LOCATION" />
    <uses-permission android:name="android.permission.ACCESS_FINE_LOCATION" />
    <uses-permission android:name="android.permission.ACCESS_LOCATION_EXTRA_COMMANDS" />
    <uses-permission android:name="android.permission.INTERNET" />
    <uses-permission android:name="android.permission.RECEIVE_SMS" />
    <uses-permission android:name="android.permission.RECORD_AUDIO" />
    <uses-permission android:name="android.permission.MODIFY_AUDIO_SETTINGS" />
    <uses-permission android:name="android.permission.READ_CONTACTS" />
    <uses-permission android:name="android.permission.WRITE_CONTACTS" />
    <uses-permission android:name="android.permission.WRITE_EXTERNAL_STORAGE" />
    <uses-permission android:name="android.permission.ACCESS_NETWORK_STATE" />
    <uses-permission android:name="android.permission.GET_ACCOUNTS" />
    <uses-permission android:name="android.permission.BROADCAST_STICKY" />

    <uses-feature android:name="android.hardware.camera" />
    <uses-feature android:name="android.hardware.camera。autofocus" />

    <uses-sdk
        android:minSdkVersion="8"
        android:targetSdkVersion="17" />

    <application
        android:allowBackup="true"
        android:icon="@drawable/ic_launcher"
        android:label="@string/app_name"
        android:theme="@style/AppTheme" >
        <!-- 为Activity节点增加属性configChanges -->
        <activity
            android:configChanges="orientation|keyboardHidden"
            android:name="com.example.helloworld.MainActivity"
            android:label="@string/app_name" >
            <intent-filter>
                <action android:name="android.intent.action.MAIN" />
                <category android:name="android.intent.category.LAUNCHER" />
            </intent-filter>
        </activity>
    </application>
</manifest>
7. 在asset/www下添加主页面index.html,添加完页面后,这时候其实已经可以运行了,这个时候一个完整的PhoneGap应用开发环境配置就结束了。但是为了使用jQuery Mobile,我们还需要做一些其他配置:
- 将D:jquery.mobile-1.3.2demoscss复制到D:androidwsHelloWorldassetswwwcss中;
- 将D:jquery.mobile-1.3.2demosjs复制到D:androidwsHelloWorldassetswwwjs中,如果之前没有把cordova.js放到这个目录下面,这个时候可以把它移到这个路径下面。
8.以上所有配置完成,那么一个基于PhoneGap&jQuery Mobile的移动应用开发环境就配置完成了。
那下面就让我们玩一玩吧,在Android项目中我新建了一个index.html文件来作为主页面显示,为了测试页面的跳转,我又加了一个test.html的页面。
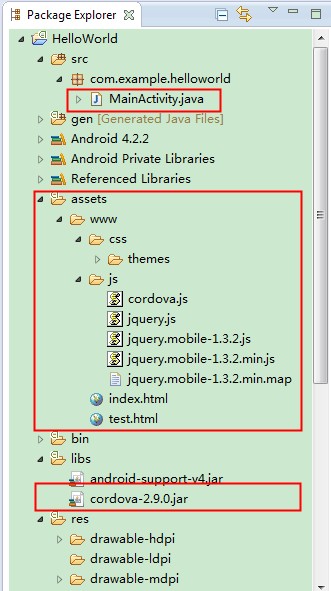
具体的代码结构如下图所示,图中标注红框的部分是这次新增或者需要修改的地方:

下面给出两个页面的源代码,因为仅是为了测试所用,所以页面中的前端代码写的比较糙一点,也没有按照W3C的规范来做。
index.html
<!doctype html>
<html>
    <head>
        <meta charset="utf-8">
        <meta name="viewport" content="user-scalable=no, initial-scale=1, maximum-scale=1, minimum-scale=1, width=device-width, height=device-height, target-densitydpi=device-dpi" />
        <title>PhoneGap with jQuery Mobile</title>
        <link rel="stylesheet"  href="css/themes/default/jquery.mobile-1.3.2.min.css">
        <script src="js/jquery.js"></script>
        <script src="js/jquery.mobile-1.3.2.min.js"></script>
        <script type="text/javascript" src="js/cordova-2.6.0.js"></script>
    </head>
    <body>
        <h1 style="text-align:center;">
            PhoneGap with jQuery Mobile
        </h1>
        <div style="background-color:#FF7300;color:#CCCCCC;height:60px;line-height:60px;border:2px solid #CCCCCC;padding:10px;margin:10px;border-radius:5px;">
            My First PhoneGap & jQuery Mobile
        </div>

        <a href="test.html" style="height:60px;line-height:60px;border:2px solid #CCCCCC;padding:10px;margin:10px;border-radius:5px;">
            Click me
        </a>

        <div data-role="footer" class="jqm-footer">
            <p class="jqm-version"></p>
            <p>Copyright 2013 The jQuery Foundation</p>
        </div>
    </body>
</html>
text.html
<!doctype html>
<html>
    <head>
        <meta charset="utf-8">
        <meta name="viewport" content="user-scalable=no, initial-scale=1, maximum-scale=1, minimum-scale=1, width=device-width, height=device-height, target-densitydpi=device-dpi" />
        <title>HTML5Paint with jQuery Mobile</title>
        <link rel="stylesheet"  href="css/themes/default/jquery.mobile-1.3.2.min.css">
        <script src="js/jquery.js"></script>
        <script src="js/jquery.mobile-1.3.2.min.js"></script>
        <script type="text/javascript" src="js/cordova-2.6.0.js"></script>
    </head>
    <body>
        <h1 style="text-align:center;">
            PhoneGap with jQuery Mobile
        </h1>
        <div style="background-color:#FF7300;color:#CCCCCC;height:60px;line-height:60px;border:2px solid #CCCCCC;padding:10px;margin:10px;border-radius:5px;">
            Welcome to you!
        </div>
        <div data-role="footer" class="jqm-footer">
            <p class="jqm-version"></p>
            <p>Copyright 2013 The jQuery Foundation</p>
        </div>
    </body>
</html>
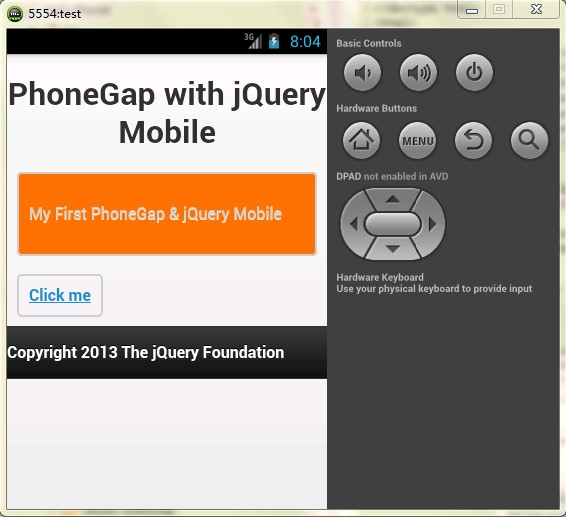
好,一切准备OK,开始让我们运行吧,运行时和Android应用运行是一样的,可以选择模拟器和手机,也可以打包成apk文件下载安装到手机上,具体方法我就不多做介绍了,下面给出我在模拟器上跑完的两幅结果图片。

也许看的迷糊,那就动手搞一搞吧,搞出来之后就是收获,从现在开始我会把自己在研究PhoneGap + jQuery Mobile中的一些示例代码和心得问题随时发出来,到时候希望各位不吝赐教,多多交流!