一、数据扩增
接下来将介绍常用的6类数据扩增方式,包括裁剪、平移、改变亮度、加入噪声、旋转角度以及镜像。
1、裁剪(需要改变bbox):裁剪后的图片需要包含所有的框,否则会对图像的原始标注造成破坏。


def _crop_img_bboxes(self,img,bboxes):
       '''
       裁剪后图片要包含所有的框
       输入:
           img:图像array
           bboxes:该图像包含的所有boundingboxes,一个list,每个元素为[x_min,y_min,x_max,y_max]
                   要确保是数值
       输出:
           crop_img:裁剪后的图像array
           crop_bboxes:裁剪后的boundingbox的坐标,list
       '''
       #------------------ 裁剪图像 ------------------
       w = img.shape[1]
       h = img.shape[0]

       x_min = w
       x_max = 0
       y_min = h
       y_max = 0
       for bbox in bboxes:
           x_min = min(x_min, bbox[0])
           y_min = min(y_min, bbox[1])
           x_max = max(x_max, bbox[2])
           y_max = max(y_max, bbox[3])
           name = bbox[4]

       # 包含所有目标框的最小框到各个边的距离
       d_to_left = x_min
       d_to_right = w - x_max
       d_to_top = y_min
       d_to_bottom = h - y_max

       # 随机扩展这个最小范围
       crop_x_min = int(x_min - random.uniform(0, d_to_left))
       crop_y_min = int(y_min - random.uniform(0, d_to_top))
       crop_x_max = int(x_max + random.uniform(0, d_to_right))
       crop_y_max = int(y_max + random.uniform(0, d_to_bottom))

       # 确保不出界
       crop_x_min = max(0, crop_x_min)
       crop_y_min = max(0, crop_y_min)
       crop_x_max = min(w, crop_x_max)
       crop_y_max = min(h, crop_y_max)

       crop_img = img[crop_y_min:crop_y_max, crop_x_min:crop_x_max]

       #------------------ 裁剪bounding boxes ------------------
       crop_bboxes = list()
       for bbox in bboxes:
           crop_bboxes.append([bbox[0]-crop_x_min, bbox[1]-crop_y_min,
                              bbox[2]-crop_x_min, bbox[3]-crop_y_min,name])

       return crop_img, crop_bboxes
2、平移(需要改变bbox):平移后的图片需要包含所有的框,否则会对图像的原始标注造成破坏。
def _shift_pic_bboxes(self, img, bboxes):
        '''
        平移后需要包含所有的框
        参考资料:https://blog.csdn.net/sty945/article/details/79387054
        输入:
            img:图像array
            bboxes:该图像包含的所有boundingboxes,一个list,每个元素为[x_min,y_min,x_max,y_max]
                    要确保是数值
        输出:
            shift_img:平移后的图像array
            shift_bboxes:平移后的boundingbox的坐标,list
        '''
        #------------------ 平移图像 ------------------
        w = img.shape[1]
        h = img.shape[0]

        x_min = w
        x_max = 0
        y_min = h
        y_max = 0
        for bbox in bboxes:
            x_min = min(x_min, bbox[0])
            y_min = min(y_min, bbox[1])
            x_max = max(x_max, bbox[2])
            y_max = max(x_max, bbox[3])
            name = bbox[4]

        # 包含所有目标框的最小框到各个边的距离,即每个方向的最大移动距离
        d_to_left = x_min
        d_to_right = w - x_max
        d_to_top = y_min
        d_to_bottom = h - y_max

        #在矩阵第一行中表示的是[1,0,x],其中x表示图像将向左或向右移动的距离,如果x是正值,则表示向右移动,如果是负值的话,则表示向左移动。
        #在矩阵第二行表示的是[0,1,y],其中y表示图像将向上或向下移动的距离,如果y是正值的话,则向下移动,如果是负值的话,则向上移动。
        x = random.uniform(-(d_to_left/3), d_to_right/3)
        y = random.uniform(-(d_to_top/3), d_to_bottom/3)
        M = np.float32([[1, 0, x], [0, 1, y]])

        # 仿射变换
        shift_img = cv2.warpAffine(img, M, (img.shape[1], img.shape[0])) #第一个参数表示我们希望进行变换的图片,第二个参数是我们的平移矩阵,第三个希望展示的结果图片的大小

        #------------------ 平移boundingbox ------------------
        shift_bboxes = list()
        for bbox in bboxes:
            shift_bboxes.append([bbox[0]+x, bbox[1]+y, bbox[2]+x, bbox[3]+y, name])

        return shift_img, shift_bboxes
3、改变亮度:改变亮度比较简单,不需要处理bounding boxes
def _changeLight(self,img):
        '''
        adjust_gamma(image, gamma=1, gain=1)函数:
        gamma>1时,输出图像变暗,小于1时,输出图像变亮
        输入:
            img:图像array
        输出:
            img:改变亮度后的图像array
        '''
        flag = random.uniform(0.5, 1.5) ##flag>1为调暗,小于1为调亮
        return exposure.adjust_gamma(img, flag)
4、加入噪声:加入噪声也比较简单,不需要处理bounding boxes
def _addNoise(self,img):
    '''
    输入:
        img:图像array
    输出:
        img:加入噪声后的图像array,由于输出的像素是在[0,1]之间,所以得乘以255
    '''
    return random_noise(img, mode='gaussian', clip=True) * 255
5、旋转:旋转后的图片需要包含所有的框,否则会对图像的原始标注造成破坏。需要注意的是,旋转时图像的一些边角可能会被切除掉,需要避免这种情况。
def _rotate_img_bboxes(self, img, bboxes, angle=5, scale=1.):
       '''
       参考:https://blog.csdn.net/saltriver/article/details/79680189
             https://www.ctolib.com/topics-44419.html
       关于仿射变换:https://www.zhihu.com/question/20666664
       输入:
           img:图像array,(h,w,c)
           bboxes:该图像包含的所有boundingboxs,一个list,每个元素为[x_min, y_min, x_max, y_max],要确保是数值
           angle:旋转角度
           scale:默认1
       输出:
           rot_img:旋转后的图像array
           rot_bboxes:旋转后的boundingbox坐标list
       '''
       #---------------------- 旋转图像 ----------------------
       w = img.shape[1]
       h = img.shape[0]
       # 角度变弧度
       rangle = np.deg2rad(angle)
       # 计算新图像的宽度和高度,分别为最高点和最低点的垂直距离
       nw = (abs(np.sin(rangle)*h) + abs(np.cos(rangle)*w))*scale
       nh = (abs(np.cos(rangle)*h) + abs(np.sin(rangle)*w))*scale
       # 获取图像绕着某一点的旋转矩阵
       # getRotationMatrix2D(Point2f center, double angle, double scale)
                           # Point2f center:表示旋转的中心点
                           # double angle:表示旋转的角度
                           # double scale:图像缩放因子
                           #参考:https://cloud.tencent.com/developer/article/1425373
       rot_mat = cv2.getRotationMatrix2D((nw*0.5, nh*0.5), angle, scale) # 返回 2x3 矩阵
       # 新中心点与旧中心点之间的位置
       rot_move = np.dot(rot_mat,np.array([(nw-w)*0.5, (nh-h)*0.5,0]))
       # the move only affects the translation, so update the translation
       # part of the transform
       rot_mat[0,2] += rot_move[0]
       rot_mat[1,2] += rot_move[1]
       # 仿射变换
       rot_img = cv2.warpAffine(img, rot_mat, (int(math.ceil(nw)), int(math.ceil(nh))), flags=cv2.INTER_LANCZOS4) # ceil向上取整

       #---------------------- 矫正boundingbox ----------------------
       # rot_mat是最终的旋转矩阵
       # 获取原始bbox的四个中点,然后将这四个点转换到旋转后的坐标系下
       rot_bboxes = list()
       for bbox in bboxes:
           x_min = bbox[0]
           y_min = bbox[1]
           x_max = bbox[2]
           y_max = bbox[3]
           name = bbox[4]
           point1 = np.dot(rot_mat, np.array([(x_min+x_max)/2, y_min,1]))
           point2 = np.dot(rot_mat, np.array([x_max, (y_min+y_max)/2, 1]))
           point3 = np.dot(rot_mat, np.array([(x_min+x_max)/2, y_max, 1]))
           point4 = np.dot(rot_mat, np.array([x_min, (y_min+y_max)/2, 1]))

           # 合并np.array
           concat = np.vstack((point1, point2,point3,point4)) # 在竖直方向上堆叠
           # 改变array类型
           concat = concat.astype(np.int32)
           # 得到旋转后的坐标
           rx, ry, rw, rh = cv2.boundingRect(concat)
           rx_min = rx
           ry_min = ry
           rx_max = rx+rw
           ry_max = ry+rh
           # 加入list中
           rot_bboxes.append([rx_min, ry_min, rx_max, ry_max,name])

       return rot_img, rot_bboxes
6、镜像:旋转后的图片需要包含所有的框,否则会对图像的原始标注造成破坏。这里只介绍两种镜像方式:水平翻转和垂直翻转
# 镜像
def _flip_pic_bboxes(self, img, bboxes):
    '''
    参考:https://blog.csdn.net/jningwei/article/details/78753607
    镜像后的图片要包含所有的框
    输入:
        img:图像array
        bboxes:该图像包含的所有boundingboxs,一个list,每个元素为[x_min, y_min, x_max, y_max],要确保是数值
    输出:
        flip_img:镜像后的图像array
        flip_bboxes:镜像后的bounding box的坐标list
    '''
    # ---------------------- 镜像图像 ----------------------
    import copy
    flip_img = copy.deepcopy(img)
    if random.random() < 0.5:
        horizon = True
    else:
        horizon = False
    h, w, _ = img.shape
    if horizon:  # 水平翻转
        flip_img = cv2.flip(flip_img, -1)
    else:
        flip_img = cv2.flip(flip_img, 0)
    # ---------------------- 矫正boundingbox ----------------------
    flip_bboxes = list()
    for bbox in bboxes:
        x_min = bbox[0]
        y_min = bbox[1]
        x_max = bbox[2]
        y_max = bbox[3]
        name = bbox[4]
        if horizon:
            flip_bboxes.append([w-x_max, y_min, w-x_min, y_max, name])
        else:
            flip_bboxes.append([x_min, h-y_max, x_max, h-y_min, name])

    return flip_img, flip_bboxes
参考:https://www.cnblogs.com/lky-learning/p/11653861.html
二、early stopping
早停法是一种被广泛使用的方法,在很多案例上都比正则化的方法要好。是在训练中计算模型在验证集上的表现,当模型在验证集上的表现开始下降的时候,停止训练,这样就能避免继续训练导致过拟合的问题。其主要步骤如下:
- 将原始的训练数据集划分成训练集和验证集
- 只在训练集上进行训练,并每隔一个周期计算模型在验证集上的误差
- 当模型在验证集上(权重的更新低于某个阈值;预测的错误率低于某个阈值;达到一定的迭代次数),则停止训练
- 使用上一次迭代结果中的参数作为模型的最终参数
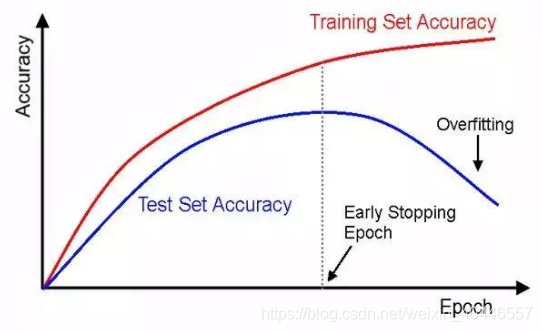 如图之后的某个epoch,模型的验证误差逐渐上升,模型出现过拟合,所以需要提前停止训练,早停法主要是训练时间和泛化错误之间的权衡。不同的停止标准也是给我们带来不同的效果。
代码如下:
#使用Early Stopping训练模型
def train_model(model, batch_size, patience, n_epochs):

    # 在模型训练时跟踪训练损失
    train_losses = []
    # 在模型训练时跟踪验证损失
    valid_losses = []
    # 跟踪模型训练时每个历元的平均训练损失
    avg_train_losses = []
    # to track the average validation loss per epoch as the model trains
    avg_valid_losses = []

    # initialize the early_stopping object
    early_stopping = EarlyStopping(patience=patience, verbose=True)

    for epoch in range(1, n_epochs + 1):

        ###################
        # train the model #
        ###################
        model.train() # prep model for training
        for batch, (data, target) in enumerate(train_loader, 1):
            # clear the gradients of all optimized variables
            optimizer.zero_grad()
            # forward pass: compute predicted outputs by passing inputs to the model
            output = model(data)
            # calculate the loss
            loss = criterion(output, target)
            # backward pass: compute gradient of the loss with respect to model parameters
            loss.backward()
            # perform a single optimization step (parameter update)
            optimizer.step()
            # record training loss
            train_losses.append(loss.item())

        ######################
        # validate the model #
        ######################
        model.eval() # prep model for evaluation
        for data, target in valid_loader:
            # forward pass: compute predicted outputs by passing inputs to the model
            output = model(data)
            # calculate the loss
            loss = criterion(output, target)
            # record validation loss
            valid_losses.append(loss.item())

        # print training/validation statistics
        # calculate average loss over an epoch
        train_loss = np.average(train_losses)
        valid_loss = np.average(valid_losses)
        avg_train_losses.append(train_loss)
        avg_valid_losses.append(valid_loss)

        epoch_len = len(str(n_epochs))

        print_msg = (f'[{epoch:>{epoch_len}}/{n_epochs:>{epoch_len}}] ' +
                     f'train_loss: {train_loss:.5f} ' +
                     f'valid_loss: {valid_loss:.5f}')

        print(print_msg)

        # clear lists to track next epoch
        train_losses = []
        valid_losses = []

        # early_stopping needs the validation loss to check if it has decresed,
        # and if it has, it will make a checkpoint of the current model
        early_stopping(valid_loss, model)

        if early_stopping.early_stop:
            print("Early stopping")
            break

    # load the last checkpoint with the best model
    model.load_state_dict(torch.load('checkpoint.pt'))

    return  model, avg_train_losses, avg_valid_losses
参考:https://blog.csdn.net/weixin_40446557/article/details/103387629