一、安装ipvs
sudo apt-get install ipvsadm
二、安装keepalived
sudo apt-get install keepalived
三、创建keepalived.conf文件
sudo gedit /etc/keepalived/keepalived.conf
四、配置keepalived.conf
说明:VIP: 192.168.2.68
real_server: 192.168.2.66(MASTER), 192.168.2.67(BACKUP)
# Global Configuration
global_defs {
    lvs_id  director1
}

# VRRP Configuration
vrrp_instance LVS {       #定义虚拟路由,LVS 为虚拟路由的标示符,自己定义名称
    state MASTER              #备份服务器上将MASTER改为BACKUP
    interface eth0
    virtual_router_id 51    #虚拟路由的ID,而且这个ID也是虚拟MAC最后一段的来源,这个ID号一般不能大于255,且这个ID一定不能有冲突
    priority 150         #初始优先级
    advert_int 1         #通告的个数
    authentication {      #认证机制
        auth_type PASS     #认证类型
        auth_pass 123456    #密码,应该为随机的字符串
    }

    virtual_ipaddress {    #虚拟地址,即VIP
        192.168.2.68
     #(如果有多个VIP,继续换行填写.)
    }

    # Virtual Server Configuration - for WWW service
    virtual_server 192.168.2.68 80 {
        delay_loop 1                       #(每隔1秒查询realserver状态)
        lb_algo rr                         #(lvs 算法)
        lb_kind DR                         #(Direct Route)
        persistence_timeout 60             #(同一IP的连接60秒内被分配到同一台realserver)
        protocol TCP                       #(用TCP协议检查realserver状态)

        # Real Server 1 configuration
        real_server 192.168.2.67 8080 {
            weight 1                       #权重
            TCP_CHECK {
                connection_timeout 10      #(10秒无响应超时)
                nb_get_retry 3
                delay_before_retry 3
            }
        }

        # Real Server 2 configuration
        real_server 192.168.2.66 8080 {
            weight 1
            TCP_CHECK {
                connection_timeout 10
                nb_get_retry 3
                delay_before_retry 3
            }
        }
    }
}
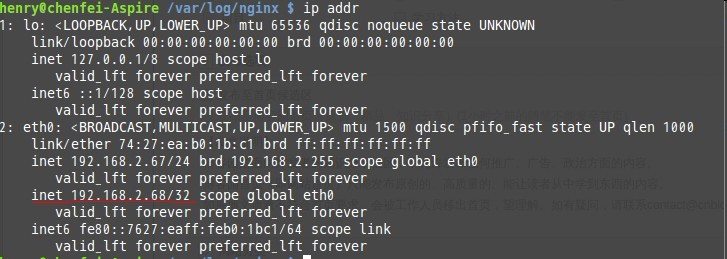
1.配置vrrp ip为68(启动keepalived之后可使用ip addr可查看)
2.配置real_server 此处是67和66的一个集群
五、启动并查看keepalived
#service keepalived start
查看 keepalived状态
#  ps -ef | grep keepalived
root      4783     1  0 09:49 ?        00:00:00 keepalived -D
root      4784  4783  0 09:49 ?        00:00:01 keepalived -D
root      5191  4896  0 13:43 pts/2    00:00:00 grep keepalived
如果未能启动,请使用sudo启动或者检查配置文件

# tail -f /var/log/syslog
Feb 21 14:18:48 localhost Keepalived_vrrp: Registering gratutious ARP shared channel
Feb 21 14:18:48 localhost Keepalived_vrrp: Opening file '/etc/keepalived/keepalived.conf'.
Feb 21 14:18:48 localhost Keepalived_vrrp: Configuration is using : 35706 Bytes
Feb 21 14:18:48 localhost Keepalived_vrrp: Using LinkWatch kernel netlink reflector...
Feb 21 14:18:49 localhost Keepalived_vrrp: VRRP sockpool: [ifindex(2), proto(112), fd(9,10)]
Feb 21 14:18:50 localhost Keepalived_vrrp: VRRP_Instance(VI_1) Transition to MASTER STATE
Feb 21 14:18:51 localhost Keepalived_vrrp: VRRP_Instance(VI_1) Entering MASTER STATE
Feb 21 14:18:51 localhost Keepalived_vrrp: VRRP_Instance(VI_1) setting protocol VIPs.
Feb 21 14:18:51 localhost Keepalived_vrrp: VRRP_Instance(VI_1) Sending gratuitous ARPs on eth0 for 192.168.2.68
Feb 21 14:18:51 localhost avahi-daemon[2549]: Registering new address record for 192.168.2.68 on eth0.

可以看到VIP已经在主服务器上开启
到此lvs+keepalived就已经完成了,接下来就是nginx.
Append: 使用Keepalived管理nginx
! Configuration File for keepalived

global_defs {
#   notification_email {
#        henryhe@starhubdev.com
#   }
#   notification_email_from happy@starhubdev.com
#   smtp_server 127.0.0.1
#   smtp_connect_timeout 30
    router_id LVS_DEVEL
}

vrrp_script chk_nginx {
   script "/etc/keepalived/check_nginx.sh"
   interval 1
   weight 2
}

vrrp_instance VI_1 {
    state BACKUP
    interface eno1
    virtual_router_id 51
    priority 200
    advert_int 1
    authentication {
        auth_type PASS
        auth_pass starhub
    }
    virtual_ipaddress {
        172.31.34.92
    }
    track_script {
        chk_nginx
   }
}


#virtual_server 172.31.34.92 3306 {
#    delay_loop 6
#    lb_algo rr
#    lb_kind DR
#    nat_mask 255.255.255.248
#    persistence_timeout 50
#    protocol TCP
#    sorry_server 172.31.34.94 3306
#    real_server 172.31.34.93 3306 {
#        weight 3
#        notify_down /usr/local/bin/keepalived_notify.sh
#        TCP_CHECK {
#            connect_timeout 10
#            nb_get_retry 3
#            delay_before_retry 3
#            connect_port 3306
#        }
#    }
}
check_nginx.sh
!/bin/bash
status=$(ps -C nginx --no-heading|wc -l)
if [ "${status}" = "0" ]; then
        /bin/systemctl start  nginx.service #redhat7
        /etc/init.d/nginx start  #centos
        status2=$(ps -C nginx --no-heading|wc -l)
        if [ "${status2}" = "0"  ]; then
             /bin/systemctl stop  keepalived.service #redhat7
             /etc/init.d/keepalived start  #centos
        fi
fi