1、引入依赖(Maven项目):
当然在引入依赖之前我们需要先创建一个被Maven管理的Web Project,创建方式我就不多说了。创建成功之后在SpringMVC框架的基础之上再添加如下两个依赖就行了:

 <dependency>
            <groupId>commons-fileupload</groupId>
            <artifactId>commons-fileupload</artifactId>
            <version>1.3.2</version>
        </dependency>
        <dependency>
            <groupId>commons-io</groupId>
            <artifactId>commons-io</artifactId>
            <version>2.5</version>
 </dependency>
两个依赖库,一个用来解决文件上传,一个简化IO操作。
2.1、创建文件上传页面
这个是一个简单的jsp页面,我在resources文件夹中创建views文件夹,在views文件夹中创建index.jsp文件。
<%@ page contentType="text/html;charset=UTF-8" language="java" %>
<html>
<head>
    <title>文件上传</title>
</head>
<body>
<form action="<%=request.getContextPath()%>/user/fileupload" method="post" enctype="multipart/form-data">
    <input type="file" name="file" />
    <input type="submit" value="上传" />
</form>
</body>
</html>
这个页面很简单,没啥好说的,注意action是upload就行了。
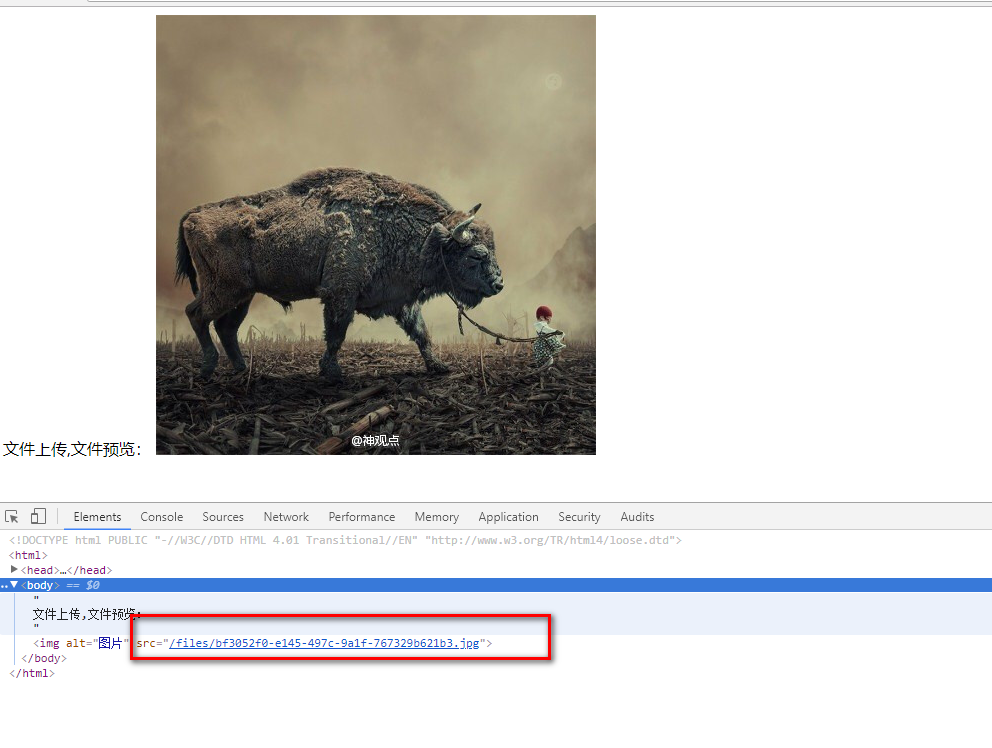
2.2创建上传成功预览页面:
<body>
文件上传,文件预览:
<img alt="图片" src="${file}">
</body>
3、SpringMVC-servlet.xml配置:
<!-- 文件上传配置 -->
<bean id="multipartResolver" class="org.springframework.web.multipart.commons.CommonsMultipartResolver">
<!--
defaultEncoding:请求的编码格式必须和用户JSP的编码一致,以便正确读取表单中的内容。
uploadTempDir:文件上传过程中的临时目录,上传完成后,临时文件会自动删除
maxUploadSize:设置文件上传大小上限(单位为字节)-1为无限制
-->
<property name="defaultEncoding" value="UTF-8" />
<property name="maxUploadSize" value="102400000" />
<!-- uploadTempDir可以不做设置,有默认的路径,上传完毕会临时文件会自动被清理掉 -->
<property name="uploadTempDir" value="/upload/"></property>
</bean>
4、编写Controller
package org.sprigmvc.pag;
import java.io.File;
import java.io.IOException;
import java.util.Collection;
import java.util.Iterator;
import java.util.UUID;
import javax.servlet.http.HttpSession;
import org.sprigmvc.dao.UserDao;
import org.sprigmvc.exception.MyException;
import org.sprigmvc.pojo.User;
import org.springframework.beans.factory.annotation.Autowired;
import org.springframework.stereotype.Controller;
import org.springframework.ui.Model;
import org.springframework.web.bind.annotation.ExceptionHandler;
import org.springframework.web.bind.annotation.PathVariable;
import org.springframework.web.bind.annotation.RequestBody;
import org.springframework.web.bind.annotation.RequestMapping;
import org.springframework.web.bind.annotation.ResponseBody;
import org.springframework.web.multipart.MultipartFile;
import org.springframework.web.multipart.support.MultipartFilter;
import org.springframework.web.servlet.ModelAndView;
@SuppressWarnings("all")
@Controller
@RequestMapping("/user/")
public class UserList {
// 文件上传
@RequestMapping("fileupload")
private String fileUpload(MultipartFile file,Model model) throws IllegalStateException, IOException {
System.out.println("fileUpload");
String filepath="G:\FileUpload";
File files=new File(filepath);
//是否存在目录,不存在则创建
if(files.exists()==false) {
files.mkdirs();
System.out.println("创建成功");
}
//获取源文件名称
String fileName=file.getOriginalFilename();
/**
* fileName.lastIndexOf(".")为获取后缀名
* UUID.randomUUID()为获取唯一标识,保证文件的唯一性
* */
String fileFinishName=UUID.randomUUID()+
fileName.substring(fileName.lastIndexOf("."), fileName.length());
System.out.println("fileFinishName-->"+fileFinishName);
//上传文件到指定目录下
files=new File(filepath+files.separator+fileFinishName);
System.out.println("fileFinishName-->"+filepath+files.separator+fileFinishName);
file.transferTo(files);
//带回页面预览
model.addAttribute("file", "/files/"+fileFinishName);
return "/user/success";
}
}
5、创建Controller时返回的:"/files/"+fileFinishName ,是一个虚拟目录,需要手动配置Tomcat的配置文件,我们这里直接用eclipse打开:
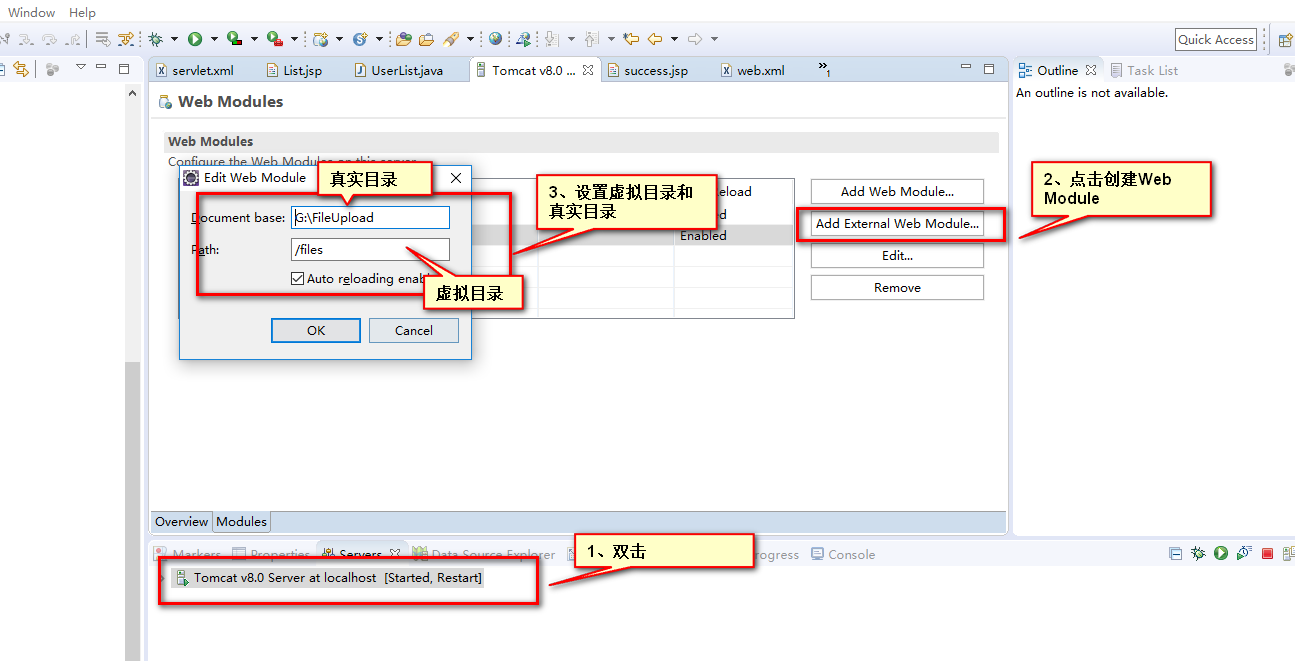
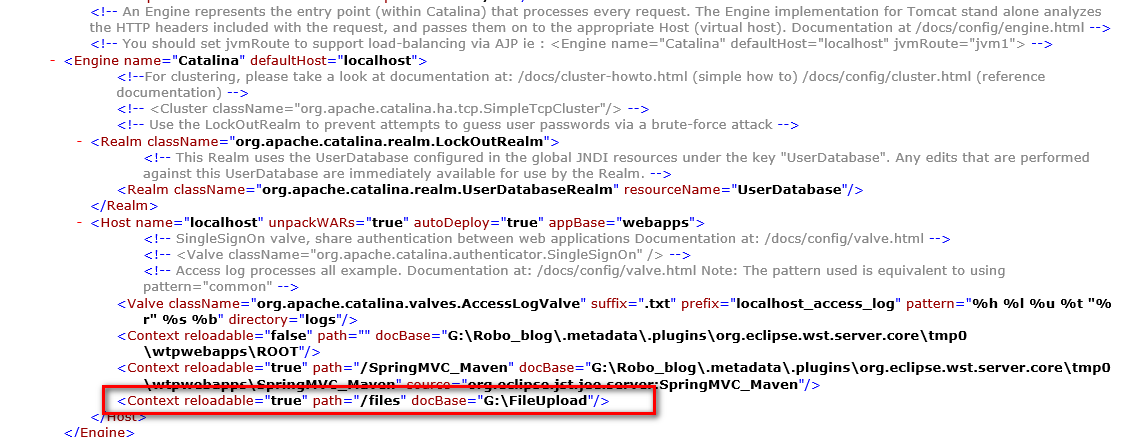
Tomcat配置信息如下(/conf/server.xml):
最后的效果:
总结:
1、引入依赖
2、创建文件上传页面和预览页面
3、配置SpringMNC
4、编写Controller
5、设置Tomcat虚拟目录