常用模块
目录:
1、collections模块
2、时间模块
3、random模块
4、os模块
5、sys模块
6、序列化模块
(1)认识模块
定义:一个模块就是一个包含了python定义和声明的文件,文件名就是模块名字加上.py的后缀。
模块的分类:
1 使用python编写的代码
2 已被编译为共享库或DLL的C或C++扩展
3 包好了一组模块的包
4 使用C编写并链接到python解释器的内置模块
一、collection模块
1.namedtuple: 生成可以使用名字来访问元素内容的tuple
2.deque: 双端队列,可以快速的从另外一侧追加和推出对象
3.Counter: 计数器,主要用来计数
4.OrderedDict: 有序字典
5.defaultdict: 带有默认值的字典
(1)namedtuple的用法


from collections import namedtuple
Point=namedtuple('Point',['x','y'])
p=Point(1,2)
print(p.x)
(2)deque的用法
from collections import deque
q = deque(['a', 'b', 'c'])
q.append('x')
q.appendleft('y')
print(q)
deque(['y', 'a', 'b', 'c', 'x'】
(3)OrderDict的用法
from collections import OrderedDict
d = dict([('a', 1), ('b', 2), ('c', 3)])
d # dict的Key是无序的
{'a': 1, 'c': 3, 'b': 2}
 od = OrderedDict([('a', 1), ('b', 2), ('c', 3)])
 od # OrderedDict的Key是有序的
OrderedDict([('a', 1), ('b', 2), ('c', 3)])
(4)defaultdict的用法
from collections import defaultdict

values = [11, 22, 33,44,55,66,77,88,99,90]

my_dict = defaultdict(list)

for value in  values:
    if value>66:
        my_dict['k1'].append(value)
    else:
        my_dict['k2'].append(value
(5)Counter的用法
c = Counter('abcdeabcdabcaba')
print c
输出:Counter({'a': 5, 'b': 4, 'c': 3, 'd': 2, 'e': 1})
二、时间模块
1、表示时间的三种方式
(1)时间戳(timestamp) :通常来说,时间戳表示的是从1970年1月1日00:00:00开始按秒计算的偏移量。我们运行“type(time.time())”,返回的是float类型。
(2)格式化的时间字符串(Format String): ‘1999-12-06’
(3)元组(struct_time) :struct_time元组共有9个元素共九个元素:(年,月,日,时,分,秒,一年中第几周,一年中第几天等)
| 索引(Index) | 属性(Attribute) | 值(Values) |
|---|---|---|
| 0 | tm_year(年) | 比如2011 |
| 1 | tm_mon(月) | 1 - 12 |
| 2 | tm_mday(日) | 1 - 31 |
| 3 | tm_hour(时) | 0 - 23 |
| 4 | tm_min(分) | 0 - 59 |
| 5 | tm_sec(秒) | 0 - 61 |
| 6 | tm_wday(weekday) | 0 - 6(0表示周日) |
| 7 | tm_yday(一年中的第几天) | 1 - 366 |
| 8 | tm_isdst(是否是夏令时) | 默认为-1 |
时间模块
#导入时间模块
>>>import time

#时间戳
>>>time.time()
1500875844.800804

#时间字符串
>>>time.strftime("%Y-%m-%d %X")
'2017-07-24 13:54:37'
>>>time.strftime("%Y-%m-%d %H-%M-%S")
'2017-07-24 13-55-04'

#时间元组:localtime将一个时间戳转换为当前时区的struct_time
time.localtime()
time.struct_time(tm_year=2017, tm_mon=7, tm_mday=24,
          tm_hour=13, tm_min=59, tm_sec=37,
                 tm_wday=0, tm_yday=205, tm_isdst=0)
小结:时间戳是计算机能够识别的时间;时间字符串是人能够看懂的时间;元组则是用来操作时间的。
几种格式之间的转换
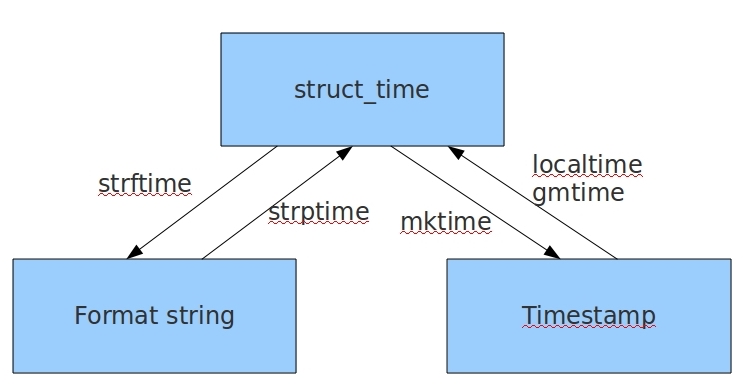
转化实例:
时间戳-->结构化时间
#time.gmtime(时间戳)    #UTC时间,与英国伦敦当地时间一致
#time.localtime(时间戳) #当地时间。例如我们现在在北京执行这个方法:与UTC时间相差8小时,UTC时间+8小时 = 北京时间
>>>time.gmtime(1500000000)
time.struct_time(tm_year=2017, tm_mon=7, tm_mday=14, tm_hour=2, tm_min=40, tm_sec=0, tm_wday=4, tm_yday=195, tm_isdst=0)
>>>time.localtime(1500000000)
time.struct_time(tm_year=2017, tm_mon=7, tm_mday=14, tm_hour=10, tm_min=40, tm_sec=0, tm_wday=4, tm_yday=195, tm_isdst=0)

#结构化时间-->时间戳
#time.mktime(结构化时间)
>>>time_tuple = time.localtime(1500000000)
>>>time.mktime(time_tuple)
1500000000.0
#结构化时间-->字符串时间
#time.strftime("格式定义","结构化时间")  结构化时间参数若不传,则现实当前时间
>>>time.strftime("%Y-%m-%d %X")
'2017-07-24 14:55:36'
>>>time.strftime("%Y-%m-%d",time.localtime(1500000000))
'2017-07-14'

#字符串时间-->结构化时间
#time.strptime(时间字符串,字符串对应格式)
>>>time.strptime("2017-03-16","%Y-%m-%d")
time.struct_time(tm_year=2017, tm_mon=3, tm_mday=16, tm_hour=0, tm_min=0, tm_sec=0, tm_wday=3, tm_yday=75, tm_isdst=-1)
>>>time.strptime("07/24/2017","%m/%d/%Y")
time.struct_time(tm_year=2017, tm_mon=7, tm_mday=24, tm_hour=0, tm_min=0, tm_sec=0, tm_wday=0, tm_yday=205, tm_isdst=-1)
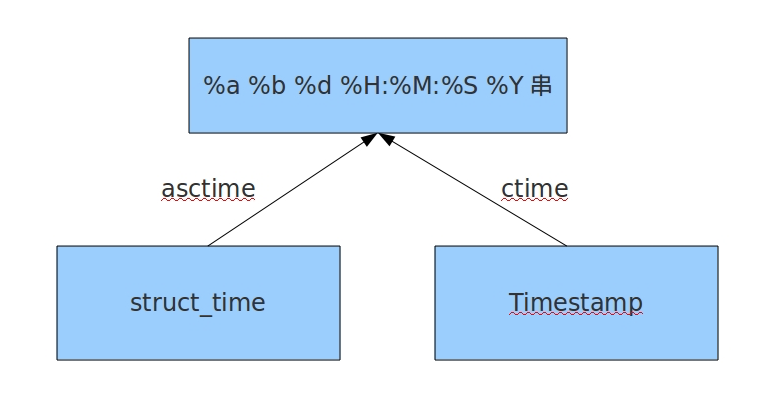
asctime与ctime的用法
结构化时间 --> %a %b %d %H:%M:%S %Y串
#time.asctime(结构化时间) 如果不传参数,直接返回当前时间的格式化串
>>>time.asctime(time.localtime(1500000000))
'Fri Jul 14 10:40:00 2017'
>>>time.asctime()
'Mon Jul 24 15:18:33 2017'

#%a %d %d %H:%M:%S %Y串 --> 结构化时间
#time.ctime(时间戳)  如果不传参数,直接返回当前时间的格式化串
>>>time.ctime()
'Mon Jul 24 15:19:07 2017'
>>>time.ctime(1500000000)
'Fri Jul 14 10:40:00 2017'
三、random模块
>>> import random
#随机小数
>>> random.random()      # 大于0且小于1之间的小数
0.7664338663654585
>>> random.uniform(1,3) #大于1小于3的小数
1.6270147180533838

#随机整数
>>> random.randint(1,5)  # 大于等于1且小于等于5之间的整数
>>> random.randrange(1,10,2) # 大于等于1且小于10之间的奇数


#随机选择一个返回
>>> random.choice([1,'23',[4,5]])  # #1或者23或者[4,5]
#随机选择多个返回,返回的个数为函数的第二个参数
>>> random.sample([1,'23',[4,5]],2) # #列表元素任意2个组合
[[4, 5], '23']


#打乱列表顺序
>>> item=[1,3,5,7,9]
>>> random.shuffle(item) # 打乱次序
>>> item
[5, 1, 3, 7, 9]
>>> random.shuffle(item)
>>> item
[5, 9, 7, 1, 3]

复制代码
例子:生成验证码
def yan():
    new_num=list(map(str,range(10)))
    alph=[chr(i) for i in range(65,91)]
    new_num.extend(alph)
    ret=[random.choice(new_num) for i in range(4)]
    return ''.join(ret)
print(yan())
四、os模块
定义:os模块是与操作系统交互的一个接口
os.getcwd() 获取当前工作目录,即当前python脚本工作的目录路径
os.chdir("dirname")  改变当前脚本工作目录;相当于shell下cd
os.curdir  返回当前目录: ('.')
os.pardir  获取当前目录的父目录字符串名:('..')
os.makedirs('dirname1/dirname2')    可生成多层递归目录
os.removedirs('dirname1')    若目录为空,则删除,并递归到上一级目录,如若也为空,则删除,依此类推
os.mkdir('dirname')    生成单级目录;相当于shell中mkdir dirname
os.rmdir('dirname')    删除单级空目录,若目录不为空则无法删除,报错;相当于shell中rmdir dirname
os.listdir('dirname')    列出指定目录下的所有文件和子目录,包括隐藏文件,并以列表方式打印
os.remove()  删除一个文件
os.rename("oldname","newname")  重命名文件/目录
os.stat('path/filename')  获取文件/目录信息
os.sep    输出操作系统特定的路径分隔符,win下为"\",Linux下为"/"
os.linesep    输出当前平台使用的行终止符,win下为"
",Linux下为"
"
os.pathsep    输出用于分割文件路径的字符串 win下为;,Linux下为:
os.name    输出字符串指示当前使用平台。win->'nt'; Linux->'posix'
os.system("bash command")  运行shell命令,直接显示
os.popen("bash command)  运行shell命令,获取执行结果
os.environ  获取系统环境变量


os.path
os.path.abspath(path) 返回path规范化的绝对路径 os.path.split(path) 将path分割成目录和文件名二元组返回 os.path.dirname(path) 返回path的目录。其实就是os.path.split(path)的第一个元素 os.path.basename(path) 返回path最后的文件名。如何path以/或结尾,那么就会返回空值。
                        即os.path.split(path)的第二个元素
os.path.exists(path)  如果path存在,返回True;如果path不存在,返回False
os.path.isabs(path)  如果path是绝对路径,返回True
os.path.isfile(path)  如果path是一个存在的文件,返回True。否则返回False
os.path.isdir(path)  如果path是一个存在的目录,则返回True。否则返回False
os.path.join(path1[, path2[, ...]])  将多个路径组合后返回,第一个绝对路径之前的参数将被忽略
os.path.getatime(path)  返回path所指向的文件或者目录的最后访问时间
os.path.getmtime(path)  返回path所指向的文件或者目录的最后修改时间
os.path.getsize(path) 返回path的
五、sys模块
sys模块是与python解释器交互的一个接口
sys.argv           命令行参数List,第一个元素是程序本身路径
sys.exit(n)        退出程序,正常退出时exit(0)
sys.version        获取Python解释程序的版本信息
sys.maxint         最大的Int值
sys.path           返回模块的搜索路径,初始化时使用PYTHONPATH环境变量的值
sys.platform       返回操作系统平台名
六、序列化模块
定义:将原本的字典、列表内容转换成一个字符串的过程。
序列化的目的:
1、以某种形式储存使自定义对象持久化
2、将对象从一个地方传递到另一个地方
3、使程序更具维护性
(1)json模块的四个功能 dumps、dump、loads、load
import json
dic = {'k1':'v1','k2':'v2','k3':'v3'}
str_dic = json.dumps(dic)  #序列化:将一个字典转换成一个字符串
print(type(str_dic),str_dic)  #<class 'str'> {"k3": "v3", "k1": "v1", "k2": "v2"}
#注意,json转换完的字符串类型的字典中的字符串是由""表示的

dic2 = json.loads(str_dic)  #反序列化:将一个字符串格式的字典转换成一个字典
#注意,要用json的loads功能处理的字符串类型的字典中的字符串必须由""表示
print(type(dic2),dic2)  #<class 'dict'> {'k1': 'v1', 'k2': 'v2', 'k3': 'v3'}


list_dic = [1,['a','b','c'],3,{'k1':'v1','k2':'v2'}]
str_dic = json.dumps(list_dic) #也可以处理嵌套的数据类型
print(type(str_dic),str_dic) #<class 'str'> [1, ["a", "b", "c"], 3, {"k1": "v1", "k2": "v2"}]
list_dic2 = json.loads(str_dic)
print(type(list_dic2),list_dic2) #<class 'list'> [1, ['a', 'b', 'c'], 3, {'k1': 'v1', 'k2': 'v2'}]
import json
f = open('json_file','w')
dic = {'k1':'v1','k2':'v2','k3':'v3'}
json.dump(dic,f)  #dump方法接收一个文件句柄,直接将字典转换成json字符串写入文件
f.close()

f = open('json_file')
dic2 = json.load(f)  #load方法接收一个文件句柄,直接将文件中的json字符串转换成数据结构返回
f.close()
print(type(dic2),dic2
pickle模块
用于python特有的类型和python数据类型间进行转换,可以把python中任意数据类型序列化
import pickle
dic = {'k1':'v1','k2':'v2','k3':'v3'}
str_dic = pickle.dumps(dic)
print(str_dic)  #一串二进制内容

dic2 = pickle.loads(str_dic)
print(dic2)    #字典

import time
struct_time  = time.localtime(1000000000)
print(struct_time)
f = open('pickle_file','wb')
pickle.dump(struct_time,f)
f.close()

f = open('pickle_file','rb')
struct_time2 = pickle.load(f)
print(struct_time.tm_year
shelve
shelve也是python提供给我们的序列化工具,比pickle用起来更简单一些。
shelve只提供给我们一个open方法,是用key来访问的,使用起来和字典类似。
import shelve
f = shelve.open('shelve_file')
f['key'] = {'int':10, 'float':9.5, 'string':'Sample data'}  #直接对文件句柄操作,就可以存入数据
f.close()

import shelve
f1 = shelve.open('shelve_file')
existing = f1['key']  #取出数据的时候也只需要直接用key获取即可,但是如果key不存在会报错
f1.close()
print(existing)
这个模块有个限制,它不支持多个应用同一时间往同一个DB进行写操作。所以当我们知道我们的应用如果只进行读操作,我们可以让shelve通过只读方式打开DB
import shelve
f = shelve.open('shelve_file', flag='r')
existing = f['key']
f.close()
print(existing
由于shelve在默认情况下是不会记录待持久化对象的任何修改的,所以我们在shelve.open()时候需要修改默认参数,否则对象的修改不会保存。
import shelve
f1 = shelve.open('shelve_file')
print(f1['key'])
f1['key']['new_value'] = 'this was not here before'
f1.close()

f2 = shelve.open('shelve_file', writeback=True)
print(f2['key'])
f2['key']['new_value'] = 'this was not here before'
f2.close()
差不多了!!!