
源码测试示例:
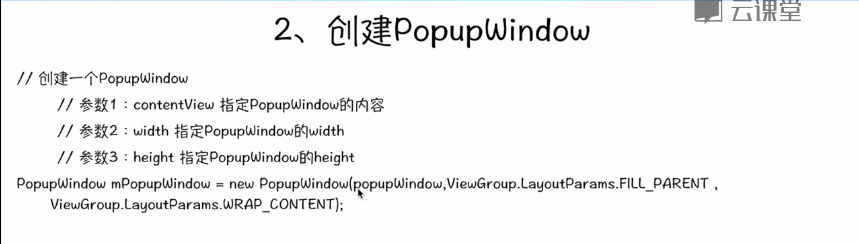
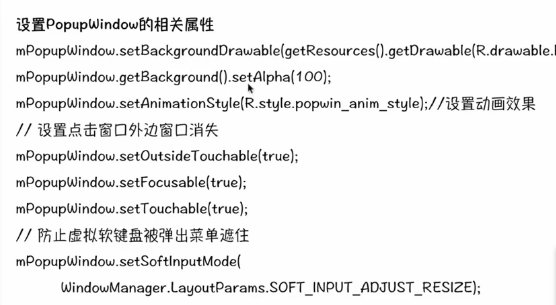
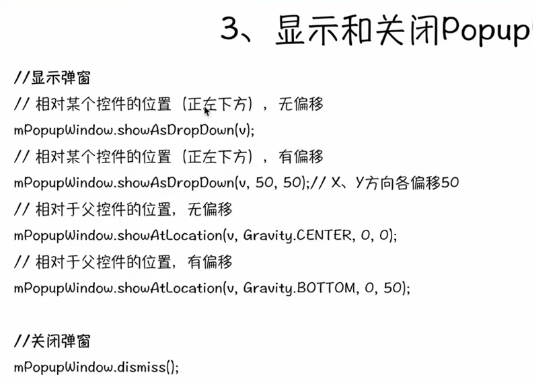
package com.example.popupwindown;

import android.os.Bundle;
import android.app.Activity;
import android.view.Gravity;
import android.view.Menu;
import android.view.View;
import android.view.View.OnClickListener;
import android.view.ViewGroup.LayoutParams;
import android.view.WindowManager;
import android.widget.Button;
import android.widget.PopupWindow;
import android.widget.TextView;
import android.widget.Toast;

public class MainActivity extends Activity {

    @Override
    protected void onCreate(Bundle savedInstanceState) {
        super.onCreate(savedInstanceState);
        setContentView(R.layout.activity_main);
    }
    public void showWindow(View v){
        View view=getLayoutInflater().inflate(R.layout.pop, null);
        Button button = (Button) view.findViewById(R.id.operate);
        final TextView textview=(TextView) view.findViewById(R.id.textView1);
        button.setOnClickListener(new OnClickListener() {

            @Override
            public void onClick(View v) {
                /*Toast.makeText(MainActivity.this, "button is pressed",
                        Toast.LENGTH_SHORT).show();*/
                textview.setText("变了");
            }
        });

        PopupWindow pop=new PopupWindow(view, LayoutParams.MATCH_PARENT,LayoutParams.WRAP_CONTENT);
        pop.setBackgroundDrawable(getResources().getDrawable(android.R.drawable.btn_default));
        pop.setAnimationStyle(android.R.style.Animation_Translucent);
        pop.getBackground().setAlpha(100);
        pop.setTouchable(true);//如果需要按钮单击事件,必须有
        pop.setOutsideTouchable(true);
        pop.setFocusable(true);
        pop.setSoftInputMode(WindowManager.LayoutParams.SOFT_INPUT_ADJUST_RESIZE);
        pop.showAtLocation(v,Gravity.CENTER, 0,0);

    }


    @Override
    public boolean onCreateOptionsMenu(Menu menu) {
        // Inflate the menu; this adds items to the action bar if it is present.
        getMenuInflater().inflate(R.menu.main, menu);
        return true;
    }

}
MainActivity.xml布局文件:
<RelativeLayout xmlns:android="http://schemas.android.com/apk/res/android"
    xmlns:tools="http://schemas.android.com/tools"
    android:layout_width="match_parent"
    android:layout_height="match_parent"
    android:paddingBottom="@dimen/activity_vertical_margin"
    android:paddingLeft="@dimen/activity_horizontal_margin"
    android:paddingRight="@dimen/activity_horizontal_margin"
    android:paddingTop="@dimen/activity_vertical_margin"
    tools:context=".MainActivity" >

    <Button
        android:id="@+id/button1"
        android:layout_width="wrap_content"
        android:layout_height="wrap_content"
        android:layout_alignParentLeft="true"
        android:layout_alignParentTop="true"
        android:layout_marginLeft="43dp"
        android:layout_marginTop="23dp"
        android:text="弹出窗口"
        android:onClick="showWindow" />

</RelativeLayout>
还需要一个pop.xml文件,用它来显示弹出窗口的布局:
<?xml version="1.0" encoding="utf-8"?>
<LinearLayout xmlns:android="http://schemas.android.com/apk/res/android"
    android:layout_width="match_parent"
    android:layout_height="match_parent"
    android:orientation="vertical" >

    <TextView
        android:id="@+id/textView1"
        android:layout_width="wrap_content"
        android:layout_height="wrap_content"
        android:text="TextView" />

    <Button
        android:id="@+id/operate"
        android:layout_width="wrap_content"
        android:layout_height="wrap_content"
        android:text="操作" />

</LinearLayout>
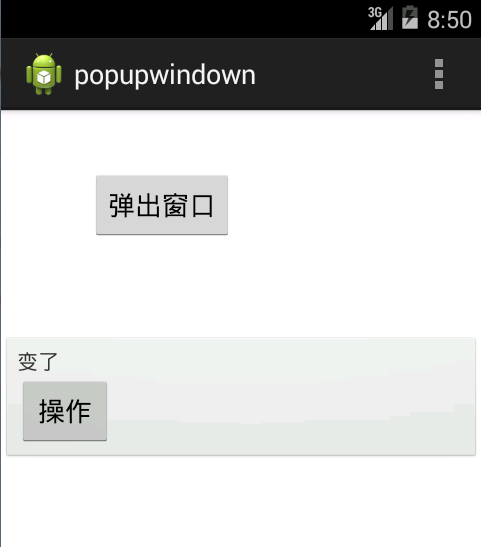
运行结果: