1,要求:监听一个tcp,udp端口41414将数据打印在控制台

# example.conf: A single-node Flume configuration

# Name the components on this agent
a1.sources = r1
a1.sinks = k1
a1.channels = c1

# Describe/configure the source
a1.sources.r1.type = netcat
a1.sources.r1.bind = 0.0.0.0
a1.sources.r1.port = 41414

# Describe the sink
a1.sinks.k1.type = logger

# Use a channel which buffers events in memory
a1.channels.c1.type = memory
a1.channels.c1.capacity = 1000
a1.channels.c1.transactionCapacity = 100

# Bind the source and sink to the channel
a1.sources.r1.channels = c1
a1.sinks.k1.channel = c1
启动命令:
bin/flume-ng agent --conf conf/ --conf-file conf/one.conf --name a1 -Dflume.root.logger=INFO,console &
Telnet:
root@Ubuntu-1:~# telnet 0.0.0.0 41414
Trying 0.0.0.0...
Connected to 0.0.0.0.
Escape character is '^]'.
huxing
OK
结果:

2,要求:将A机器的日志文件access.log传输到机器B上,并打印到控制台上

这里我假设A机器是131,B机器是132,则 需要将配置文件写在132上,然后正常启动132,而131中只需要启动avro_client,通过avro序列化将文件打到132中。
132中的配置文件内容:
# example.conf: A single-node Flume configuration

# Name the components on this agent
a1.sources = r1
a1.sinks = k1
a1.channels = c1

# Describe/configure the source
a1.sources.r1.type = avro
a1.sources.r1.bind = 0.0.0.0
a1.sources.r1.port = 44444

# Describe the sink
a1.sinks.k1.type = logger

# Use a channel which buffers events in memory
a1.channels.c1.type = memory
a1.channels.c1.capacity = 1000
a1.channels.c1.transactionCapacity = 100

# Bind the source and sink to the channel
a1.sources.r1.channels = c1
a1.sinks.k1.channel = c1
启动132的flume:
bin/flume-ng agent --conf conf/ --conf-file conf/two.conf --name a1 -Dflume.root.logger=INFO,console &
启动131的avro_client:
bin/flume-ng avro-client --host 192.168.22.132 --port 44444 --filename logs/avro.log
查看132控制台:

成功
3,监听一个日志文件access.log,如果有日志追加及时的将数据打印在控制台上,如果是大文件呢?堆?
conf内容:
# example.conf: A single-node Flume configuration

# Name the components on this agent
a1.sources = r1
a1.sinks = k1
a1.channels = c1

# Describe/configure the source
a1.sources.r1.type = exec
a1.sources.r1.command = tail -F /opt/logs/access.log

# Describe the sink
a1.sinks.k1.type = logger

# Use a channel which buffers events in memory
a1.channels.c1.type = memory
a1.channels.c1.capacity = 10000000
a1.channels.c1.transactionCapacity = 1000000

# Bind the source and sink to the channel
a1.sources.r1.channels = c1
a1.sinks.k1.channel = c1
启动命令:
bin/flume-ng agent --conf conf/ --conf-file conf/three.conf --name a1 -Dflume.root.logger=INFO,console &
打文件到控制台:
root@Ubuntu-1:/usr/local/apache-flume/logs# cat hu.log >> avro.log

成功
----------------------------------------------------------------------------------
如果是个很大文件的话怎么办呢?
--将这个文件 中的
中的 的注释消掉。
4,A,B机器中的access.log汇总到C机器上然后统一收集到hdfs上分天存储。
在132,135中写入four_avro_sink.conf文件:
# example.conf: A single-node Flume configuration

# Name the components on this agent
a1.sources = r1
a1.sinks = k1
a1.channels = c1

# Describe/configure the source
a1.sources.r1.type = exec
a1.sources.r1.command = tail -F /usr/local/apache-flume/logs/avro.log

# Describe the sink
a1.sinks.k1.type = avro
a1.sinks.k1.hostname = 192.168.22.131
a1.sinks.k1.port = 41414

# Use a channel which buffers events in memory
a1.channels.c1.type = memory
a1.channels.c1.capacity = 1000
a1.channels.c1.transactionCapacity = 100

# Bind the source and sink to the channel
a1.sources.r1.channels = c1
a1.sinks.k1.channel = c1
就是将以exec形式持续的输出最新的数据到sink,再以avro的方式将文件序列化的方式传到131的sink上
启动flume:
root@Ubuntu-135:/usr/local/apache-flume# bin/flume-ng agent --conf conf/ --conf-file conf/four_avro_sink.conf --name a1 -Dflume.root.logger=INFO,console &
在131中写入four.conf文件:
#定义agent名, source、channel、sink的名称
access.sources = r1
access.channels = c1
access.sinks = k1

#具体定义source
access.sources.r1.type = avro
access.sources.r1.bind = 0.0.0.0
access.sources.r1.port = 41414


#具体定义channel
access.channels.c1.type = memory
access.channels.c1.capacity = 1000
access.channels.c1.transactionCapacity = 100


#定义拦截器,为消息添加时间戳
access.sources.r1.interceptors = i1
access.sources.r1.interceptors.i1.type = org.apache.flume.interceptor.TimestampInterceptor$Builder


#具体定义sink
access.sinks.k1.type = hdfs
access.sinks.k1.hdfs.path = hdfs://Ubuntu-1:9000/%Y%m%d
access.sinks.k1.hdfs.filePrefix = events-
access.sinks.k1.hdfs.fileType = DataStream
#access.sinks.k1.hdfs.fileType = CompressedStream
#access.sinks.k1.hdfs.codeC = gzip
#不按照条数生成文件
access.sinks.k1.hdfs.rollCount = 0
#HDFS上的文件达到64M时生成一个文件
access.sinks.k1.hdfs.rollSize = 67108864
access.sinks.k1.hdfs.rollInterval = 0

#组装source、channel、sink
access.sources.r1.channels = c1
access.sinks.k1.channel = c1
启动Hadoop:
root@Ubuntu-1:/usr/local/hadoop-2.6.0# sbin/start-dfs.sh
启动flume:
root@Ubuntu-1:/usr/local/apache-flume# bin/flume-ng agent --conf conf/ --conf-file conf/four.conf --name access -Dflume.root.logger=INFO,console &

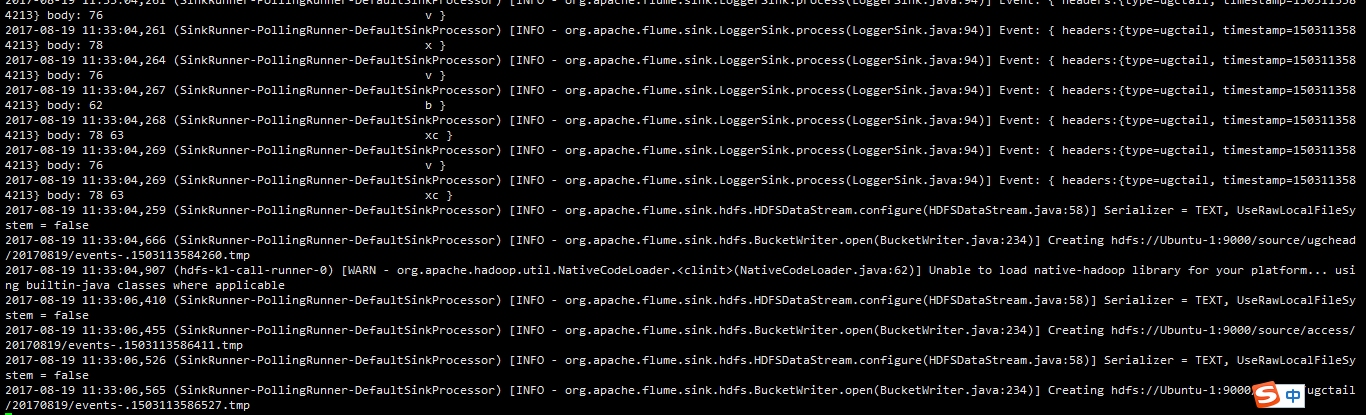
5,A,B,机器中的access.log ugcheader.log ugctail.log汇总到C机器上。然后统一收集到HDFS的不同目录上
改成
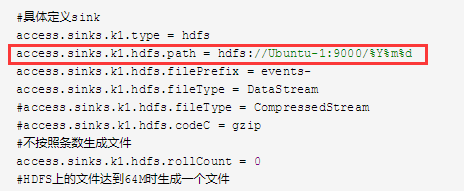
access.sinks.k1.hdfs.path = hdfs://Ubuntu-1:9000/%{type}/%Y%m%d
另132中的配置文件:
# example.conf: A single-node Flume configuration

# Name the components on this agent
a1.sources = r1 r2 r3
a1.sinks = k1
a1.channels = c1

# Describe/configure the source
a1.sources.r1.type = exec
a1.sources.r1.command = tail -F /usr/local/apache-flume/logs/avro.log
a1.sources.r1.interceptors = i1
a1.sources.r1.interceptors.i1.type = static
a1.sources.r1.interceptors.i1.key = type
a1.sources.r1.interceptors.i1.value = access

a1.sources.r2.type = exec
a1.sources.r2.command = tail -F /usr/local/apache-flume/logs/flume.log
a1.sources.r2.interceptors = i2
a1.sources.r2.interceptors.i2.type = static
a1.sources.r2.interceptors.i2.key = type
a1.sources.r2.interceptors.i2.value = ugchead

a1.sources.r3.type = exec
a1.sources.r3.command = tail -F /usr/local/apache-flume/logs/hu.log
a1.sources.r3.interceptors = i3
a1.sources.r3.interceptors.i3.type = static
a1.sources.r3.interceptors.i3.key = type
a1.sources.r3.interceptors.i3.value = ugctail


# Describe the sink
a1.sinks.k1.type = avro
a1.sinks.k1.hostname = 192.168.22.131
a1.sinks.k1.port = 41414

#a1.sinks.k1.type = logger

# Use a channel which buffers events in memory
a1.channels.c1.type = memory
a1.channels.c1.capacity = 1000
a1.channels.c1.transactionCapacity = 100

# Bind the source and sink to the channel
a1.sources.r1.channels = c1
a1.sources.r2.channels = c1
a1.sources.r3.channels = c1
a1.sinks.k1.channel = c1

6,access.log收集后指定多个目的地【同时,打印到控制台、输出到HDFS】
131中:
#定义agent名, source、channel、sink的名称
access.sources = r1
access.channels = c1 c2
access.sinks = k1 k2

#具体定义source
access.sources.r1.type = avro
access.sources.r1.bind = 0.0.0.0
access.sources.r1.port = 41414


#具体定义channel
access.channels.c1.type = memory
access.channels.c1.capacity = 1000
access.channels.c1.transactionCapacity = 100

access.channels.c2.type = memory
access.channels.c2.capacity = 1000
access.channels.c2.transactionCapacity = 100


access.sinks.k2.type = logger           !!!!重点是这里的k2!!!!!

#定义拦截器,为消息添加时间戳
access.sources.r1.interceptors = i1
access.sources.r1.interceptors.i1.type = org.apache.flume.interceptor.TimestampInterceptor$Builder


#具体定义sink
access.sinks.k1.type = hdfs
access.sinks.k1.hdfs.path = hdfs://Ubuntu-1:9000/source/%{type}/%Y%m%d
access.sinks.k1.hdfs.filePrefix = events-
access.sinks.k1.hdfs.fileType = DataStream
#access.sinks.k1.hdfs.fileType = CompressedStream
#access.sinks.k1.hdfs.codeC = gzip
#不按照条数生成文件
access.sinks.k1.hdfs.rollCount = 0
#HDFS上的文件达到64M时生成一个文件
access.sinks.k1.hdfs.rollSize = 67108864
access.sinks.k1.hdfs.rollInterval = 0

#组装source、channel、sink

access.sources.r1.channels = c1 c2
access.sinks.k1.channel = c1
access.sinks.k2.channel = c2
132中还是之前第5题中的配置
7,在程序里打印日志到flume根据不同的业务指定不同的目的地【控制台、avro】,查看日志的log4j日志的header
pom文件:
<project xmlns="http://maven.apache.org/POM/4.0.0" xmlns:xsi="http://www.w3.org/2001/XMLSchema-instance"
  xsi:schemaLocation="http://maven.apache.org/POM/4.0.0 http://maven.apache.org/xsd/maven-4.0.0.xsd">
  <modelVersion>4.0.0</modelVersion>

  <groupId>cn.hx</groupId>
  <artifactId>FlumeSource</artifactId>
  <version>1.0-SNAPSHOT</version>
  <packaging>jar</packaging>

  <name>FlumeSource</name>
  <url>http://maven.apache.org</url>

  <properties>
    <project.build.sourceEncoding>UTF-8</project.build.sourceEncoding>
    <maven.compiler.source>1.8</maven.compiler.source>
    <maven.compiler.target>1.8</maven.compiler.target>
  </properties>

  <build>
    <pluginManagement>
      <plugins>
        <plugin>
          <groupId>org.apache.maven.plugins</groupId>
          <artifactId>maven-jar-plugin</artifactId>
          <configuration>

            <archive>
              <manifest>
                <mainClass>cn.hx.test</mainClass>
                <addClasspath>true</addClasspath>
                <classpathPrefix>lib/</classpathPrefix>
              </manifest>

            </archive>
            <classesDirectory>
            </classesDirectory>
          </configuration>
        </plugin>
      </plugins>
    </pluginManagement>
  </build>

  <dependencies>
    <dependency>
      <groupId>junit</groupId>
      <artifactId>junit</artifactId>
      <version>3.8.1</version>
      <scope>test</scope>
    </dependency>
    <dependency>
      <groupId>org.apache.hadoop</groupId>
      <artifactId>hadoop-common</artifactId>
      <version>2.6.0</version>
    </dependency>
    <dependency>
      <groupId>org.apache.hadoop</groupId>
      <artifactId>hadoop-client</artifactId>
      <version>2.6.0</version>
    </dependency>
    <dependency>
      <groupId>org.apache.hadoop</groupId>
      <artifactId>hadoop-hdfs</artifactId>
      <version>2.6.0</version>
    </dependency>
    <dependency>
      <groupId>log4j</groupId>
      <artifactId>log4j</artifactId>
      <version>1.2.17</version>
    </dependency>
    <dependency>
      <groupId>log4j</groupId>
      <artifactId>log4j</artifactId>
      <version>1.2.17</version>
    </dependency>
  </dependencies>
</project>
loj4j文件:
##<!-- ========================== 自定义输出格式说明================================ -->
##<!-- %p 输出优先级,即DEBUG,INFO,WARN,ERROR,FATAL -->
##<!-- %r 输出自应用启动到输出该log信息耗费的毫秒数 -->
##<!-- %c 输出所属的类目,通常就是所在类的全名 -->
##<!-- %t 输出产生该日志事件的线程名 -->
##<!-- %n 输出一个回车换行符,Windows平台为“/r/n”,Unix平台为“/n” -->
##<!-- %d 输出日志时间点的日期或时间,默认格式为ISO8601,也可以在其后指定格式,比如:%d{yyy MMM dd ##HH:mm:ss,SSS},输出类似:2002年10月18日 22:10:28,921 -->
##<!-- %l 输出日志事件的发生位置,包括类目名、发生的线程,以及在代码中的行数。举例:Testlog4.main(TestLog4.java:10) -->
##<!-- ========================================================================== -->

### set log levels ###

#默认logger
#INFO是指级别不小于INFO的日志才会使用stdoutappender。ERROR、WARN、INFO
log4j.rootLogger=INFO,stdout1

#自定义logger

#log4j.logger.accessLogger=INFO,flume
#log4j.logger.ugcLogger=INFO,flume

log4j.logger.std1Logger=INFO,stdout1,
log4j.logger.std2Logger=INFO,stdout2


log4j.logger.access=INFO,flume

log4j.logger.ugchead=INFO,flume
log4j.logger.ugctail=INFO,flume

#某个包的level的appender
#log4j.logger.com.zenith.flume = INFO,flume


### flume ###
log4j.appender.flume=org.apache.flume.clients.log4jappender.Log4jAppender
log4j.appender.flume.layout=org.apache.log4j.PatternLayout
log4j.appender.flume.layout.ConversionPattern=%d{yyyy-MM-dd HH:mm:ss} %c{1} [%p] %m%n
log4j.appender.flume.Hostname=192.168.22.131
log4j.appender.flume.Port=41414
log4j.appender.flume.UnsafeMode = true


### stdout ###
log4j.appender.stdout1=org.apache.log4j.ConsoleAppender
log4j.appender.stdout1.Threshold=DEBUG
log4j.appender.stdout1.Target=System.out
log4j.appender.stdout1.layout=org.apache.log4j.PatternLayout
log4j.appender.stdout1.layout.ConversionPattern=%d{yyyy-MM-dd HH:mm:ss} %c{1} [%p] %m%n


### stdout ###
log4j.appender.stdout2=org.apache.log4j.ConsoleAppender
log4j.appender.stdout2.Threshold=DEBUG
log4j.appender.stdout2.Target=System.out
log4j.appender.stdout2.layout=org.apache.log4j.PatternLayout
log4j.appender.stdout2.layout.ConversionPattern=%d{yyyy-MM-dd hh:mm:ss} %c{1} [%p] %m%n

### access ###
log4j.appender.access=org.apache.log4j.DailyRollingFileAppender
log4j.appender.access.Threshold=INFO
log4j.appender.access.File=/usr/local/apache-flume/logs/avro.log
log4j.appender.access.Append=true
log4j.appender.access.DatePattern='.'yyyy-MM-dd
log4j.appender.access.layout=org.apache.log4j.PatternLayout
log4j.appender.access.layout.ConversionPattern=%m%n


### ugchead ###
log4j.appender.ugchead=org.apache.log4j.DailyRollingFileAppender
log4j.appender.ugchead.Threshold=INFO
log4j.appender.ugchead.File=/usr/local/apache-flume/logs/flume.log
log4j.appender.ugchead.Append=true
log4j.appender.ugchead.DatePattern='.'yyyy-MM-dd
log4j.appender.ugchead.layout=org.apache.log4j.PatternLayout
log4j.appender.ugchead.layout.ConversionPattern=%m%n


### ugctail ###
log4j.appender.ugctail=org.apache.log4j.DailyRollingFileAppender
log4j.appender.ugctail.Threshold=INFO
log4j.appender.ugctail.File=/usr/local/apache-flume/logs/hu.log
log4j.appender.ugctail.Append=true
log4j.appender.ugctail.DatePattern='.'yyyy-MM-dd
log4j.appender.ugctail.layout=org.apache.log4j.PatternLayout
log4j.appender.ugctail.layout.ConversionPattern=%m%n
程序:
package cn.hx;

import org.apache.log4j.BasicConfigurator;
import org.apache.log4j.Logger;

/**
 * Created by hushiwei on 2017/8/20.
 */
public class test {
    protected static final Logger loggeaccess = Logger.getLogger("access");

    protected static final Logger loggerugc = Logger.getLogger("ugchead");

    public static void main(String[] args) throws Exception {
        BasicConfigurator.configure();

        while (true) {
            loggeaccess.info("this is acccess log");
            loggerugc.info("ugc");
            //KafkaUtil util=new KafkaUtil();
            //util.initProducer();
            //util.produceData("crxy","time",String.valueOf(new Date().getTime()));
            Thread.sleep(1000);
        }
    }
}
在131中执行:
root@Ubuntu-1:/usr/local/apache-flume# bin/flume-ng agent --conf conf/ --conf-file conf/avro_source.conf --name agent1 -Dflume.root.logger=INFO,console &
avro.source文件是上面某道题中的文件
打jar包后到131中执行
可是报错,没有解决:
Exception in thread "main" java.lang.NoClassDefFoundError: org/apache/log4j/Logger
Caused by:java.lang.ClassNotFoundException:org.apache.log4j.Logger

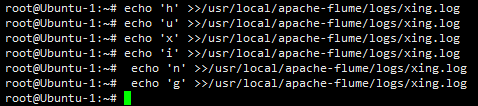
8,A机器的access.log日志采集后打印到B、C做负载均衡,打印到控制台上,load_balance
132和135中:
conf文件用avro_source.conf
启动:
root@Ubuntu-2:/usr/local/apache-flume# bin/flume-ng agent --conf conf/ --conf-file conf/avro_source.conf --name agent1 -Dflume.root.logger=INFO,console &
131中:
# Name the components on this agent
a1.sources = r1
a1.sinks = k1 k2
a1.channels = c1

# Describe/configure the source
a1.sources.r1.type = exec
a1.sources.r1.channels=c1
a1.sources.r1.command=tail -F /usr/local/apache-flume/logs/xing.log

#define sinkgroups
a1.sinkgroups=g1
a1.sinkgroups.g1.sinks=k1 k2
a1.sinkgroups.g1.processor.type=load_balance
a1.sinkgroups.g1.processor.backoff=true
a1.sinkgroups.g1.processor.selector=round_robin

#define the sink 1
a1.sinks.k1.type=avro
a1.sinks.k1.hostname=192.168.22.132
a1.sinks.k1.port=41414

#define the sink 2
a1.sinks.k2.type=avro
a1.sinks.k2.hostname=192.168.22.135
a1.sinks.k2.port=41414


# Use a channel which buffers events in memory
a1.channels.c1.type = memory
a1.channels.c1.capacity = 1000
a1.channels.c1.transactionCapacity = 100

# Bind the source and sink to the channel
a1.sources.r1.channels = c1
a1.sinks.k1.channel = c1
a1.sinks.k2.channel=c1
启动
root@Ubuntu-1:/usr/local/apache-flume# bin/flume-ng agent --conf conf/ --conf-file conf/eight.conf --name a1 -Dflume.root.logger=INFO,console &
在131中:
在132中:

在135中:

9,A机器的access.log日志采集后打印到B、C做故障转移,打印到控制台上,failover
132和135中起avro_source的conf文件
131中启:
# Name the components on this agent
a1.sources = r1
a1.sinks = k1 k2
a1.channels = c1

# Describe/configure the source
a1.sources.r1.type = exec
a1.sources.r1.channels=c1
a1.sources.r1.command=tail -F /usr/local/apache-flume/logs/xing.log

#define sinkgroups
a1.sinkgroups=g1
a1.sinkgroups.g1.sinks=k1 k2
a1.sinkgroups.g1.processor.type=failover
a1.sinkgroups.g1.processor.priority.k1=10
a1.sinkgroups.g1.processor.priority.k2=5
a1.sinkgroups.g1.processor.maxpenalty=10000

#define the sink 1
a1.sinks.k1.type=avro
a1.sinks.k1.hostname=192.168.22.132
a1.sinks.k1.port=41414

#define the sink 2
a1.sinks.k2.type=avro
a1.sinks.k2.hostname=192.168.22.135
a1.sinks.k2.port=41414


# Use a channel which buffers events in memory
a1.channels.c1.type = memory
a1.channels.c1.capacity = 1000
a1.channels.c1.transactionCapacity = 100

# Bind the source and sink to the channel
a1.sources.r1.channels = c1
a1.sinks.k1.channel = c1
a1.sinks.k2.channel=c1
启131
root@Ubuntu-1:/usr/local/apache-flume# bin/flume-ng agent --conf conf/ --conf-file conf/nine.conf --name a1 -Dflume.root.logger=INFO,console &
查看:
关闭132中的flume之后

132宕机之后 可以看到数据直接转到135中了:
