第一步:在 Linux 上安装 Zookeeper
Zookeeper 作为 Dubbo 服务的注册中心, Dubbo 原先基于数据库的注册中心,没采用 Zookeeper , Zookeeper 一个分布式的服务框架,是树型的目录服务 的数据存储,能做到集群管理数据 ,这里能很好的作为 Dubbo 服务的注册中心, Dubbo 能与 Zookeeper 做到集群部署,当提供者出现断电等异常停机时, Zookeeper 注册中心能自动删除提供者信息,当提供者重启时,能自动恢复注册数据,以及订阅请求。我们先在 linux 上安装 Zookeeper ,我们安装最简单的单点,集群比较麻烦。
先需要安装JdK,从Oracle的Java网站下载,安装很简单,就不再详述。
单机模式
单机安装非常简单,只要获取到 Zookeeper 的压缩包并解压到某个目录如:C:zookeeper-3.4.5下,Zookeeper 的启动脚本在 bin 目录下,Windows 下的启动脚本是 zkServer.cmd。
在你执行启动脚本之前,还有几个基本的配置项需要配置一下,Zookeeper 的配置文件在 conf 目录下,这个目录下有 zoo_sample.cfg 和 log4j.properties,你需要做的就是将 zoo_sample.cfg 改名为 zoo.cfg,因为 Zookeeper 在启动时会找这个文件作为默认配置文件。下面详细介绍一下,这个配置文件中各个配置项的意义。


<span style="font-size:18px;"># The number of milliseconds of each tick
 2 tickTime=2000
 3 # The number of ticks that the initial
 4 # synchronization phase can take
 5 initLimit=10
 6 # The number of ticks that can pass between
 7 # sending a request and getting an acknowledgement
 8 syncLimit=5
 9 # the directory where the snapshot is stored.
10 # do not use /tmp for storage, /tmp here is just
11 # example sakes.
12 dataDir=C:\zookeeper-3.4.5\data
13 dataLogDir=C:\zookeeper-3.4.5\log
14 # the port at which the clients will connect
15 clientPort=2181
16 #
17 # Be sure to read the maintenance section of the
18 # administrator guide before turning on autopurge.
19 #
20 # http://zookeeper.apache.org/doc/current/zookeeperAdmin.html#sc_maintenance
21 #
22 # The number of snapshots to retain in dataDir
23 #autopurge.snapRetainCount=3
24 # Purge task interval in hours
25 # Set to "0" to disable auto purge feature
26 #autopurge.purgeInterval=1</span>
tickTime:这个时间是作为 Zookeeper 服务器之间或客户端与服务器之间维持心跳的时间间隔,也就是每个 tickTime 时间就会发送一个心跳。
dataDir:顾名思义就是 Zookeeper 保存数据的目录,默认情况下,Zookeeper 将写数据的日志文件也保存在这个目录里。
dataLogDir:顾名思义就是 Zookeeper 保存日志文件的目录
clientPort:这个端口就是客户端连接 Zookeeper 服务器的端口,Zookeeper 会监听这个端口,接受客户端的访问请求。
当这些配置项配置好后,你现在就可以启动 Zookeeper 了,启动后要检查 Zookeeper 是否已经在服务,可以通过 netstat – ano 命令查看是否有你配置的
clientPort 端口号在监听服务。
第二步:配置dubbo-admin 的管理页面,方便我们管理页面
(1)下载 dubbo-admin-2.4.1.war 包,在 windows 的 tomcat 部署,先把 dubbo-admin-2.4.1 放在 tomcat 的 webapps/ROOT 下,然后进行解压
(2)然后到 webapps/ROOT/WEB-INF 下,有一个 dubbo.properties 文件,里面指向Zookeeper ,使用的是Zookeeper 的注册中心,如图所示:
1 <span style="font-size:18px;">dubbo.registry.address=zookeeper://127.0.0.1:2181
2 dubbo.admin.root.password=root
3 dubbo.admin.guest.password=guest</span>
(3)然后启动 tomcat 服务,用户名和密码: root,并访问服务,显示登陆页面,说明dubbo-admin部署成功, 如图所示:

第三步:SpringMVC与 Dubbo 的整合,这边使用的 Maven 的管理项目
第一: 我们先开发服务注册的
就是提供服务,项目结构如图所示:

(1)test-maven-api项目加入了一个服务接口,代码如下:
 public interface TestRegistryService {
    public String hello(String name);
     public Person getPerson(String name);
 }
包括类似的,接口(interface)和依赖类(如上面Person)都是放到了业务支持包(support)里
上面项目 test-maven-api新建时就选择module ,然后被其他服务根据依赖引用
这其实也是分布式服务拆分为dubbo服务的思路
(2)test-maven-console在pom .xml 加入 Dubbo 和Zookeeper的 jar 包、引用 test-maven-api 的 jar 包(业务支持包),代码如下:
<span style="font-size:18px;"><dependency>
 2           <groupId>cn.test</groupId>
 3           <artifactId>test-maven-api</artifactId>
 4           <version>0.0.1-SNAPSHOT</version>
 5       </dependency>
 6     <dependency>
 7         <groupId>com.alibaba</groupId>
 8         <artifactId>dubbo</artifactId>
 9         <version>2.5.3</version>
10       </dependency>
11        <dependency>
12         <groupId>org.apache.zookeeper</groupId>
13             <artifactId>zookeeper</artifactId>
14             <version>3.4.6</version>
15       </dependency>
16     <dependency>
17           <groupId>com.github.sgroschupf</groupId>
18          <artifactId>zkclient</artifactId>
19          <version>0.1</version>
20 </dependency></span>
(3)test-maven-console实现具体的服务,代码如下:
接口实现类
1 @Service("testRegistryService")
2 public class TestRegistryServiceImpl implements TestRegistryService {
3     public String hello(String name) {
4         return "hello"+name;
5     }
6 }
(4)我们服务已经实现好了,这时要暴露服务,代码如下:
配置dubbo.xml文件
<?xml version="1.0" encoding="UTF-8"?>
 <beans xmlns="http://www.springframework.org/schema/beans"
       xmlns:xsi="http://www.w3.org/2001/XMLSchema-instance"
       xmlns:jee="http://www.springframework.org/schema/jee"
      xmlns:tx="http://www.springframework.org/schema/tx"
      <span style="color:#cc0000;">xmlns:dubbo="http://code.alibabatech.com/schema/dubbo"</span>
      xmlns:context="http://www.springframework.org/schema/context"
      xsi:schemaLocation="http://www.springframework.org/schema/beans http://www.springframework.org/schema/beans/spring-beans-3.1.xsd
      http://www.springframework.org/schema/tx http://www.springframework.org/schema/tx/spring-tx-3.1.xsd
     http://www.springframework.org/schema/jee http://www.springframework.org/schema/jee/spring-jee-3.1.xsd
     <span style="color:#990000;">http://code.alibabatech.com/schema/dubbo http://code.alibabatech.com/schema/dubbo/dubbo.xsd</span>
     http://www.springframework.org/schema/context http://www.springframework.org/schema/context/spring-context-3.1.xsd"
     default-lazy-init="false" >
    <!-- 提供方应用名称信息,这个相当于起一个名字,我们dubbo管理页面比较清晰是哪个应用暴露出来的 -->
    <dubbo:application name="dubbo_provider"></dubbo:application>

    <!-- 使用zookeeper注册中心暴露服务地址 -->
    <dubbo:registry address="zookeeper://127.0.0.1:2181" check="false" subscribe="false" register=""></dubbo:registry>

    <!-- 协议 -->
    <dubbo:protocol id = "di" name = "dubbo" port = 20880>

    <!-- 一些全局配置提前配好,其他服务提供者就不用配了,服务调用者也可以复用 -->
    <dubbo:provider timeout = "3000">

   <!-- 要暴露的服务接口 -->
   <dubbo:service interface="cn.test.dubbo.registry.service.TestRegistryService" ref="testRegistryService" />

   <!-- spring扫描包的路径  此处不用配置  因为上面bean式通过注解方式已经申明-->
   <context:component-scan  base-package = "com.enjoy">

   <!-- 服务类申明为bean 给spring管理此处不用配置  因为上面bean式通过注解方式已经申明-->
   <bean id = "testRegistryService" class = "cn.test.dubbo.registry.service.TestRegistryServiceImpl "> </beans>
一些标签说明:
dubbo:registry 标签一些属性的说明:
1 ) register 是否向此注册中心注册服务,如果设为 false ,将只订阅,不注册 。
2 ) check 注册中心不存在时,是否报错。
3 ) subscribe 是否向此注册中心订阅服务,如果设为 false ,将只注册,不订阅 。
4 ) timeout 注册中心请求超时时间 ( 毫秒 ) 。
5 ) address 可以 Zookeeper 集群配置 ,地址可以多个以逗号隔开等。
dubbo:protocol
name是个枚举值,表示协议,包括 dubbo/rmi/rest/http等
dubbo:provider
提供方的缺省值,当ProtocolConfig和ServiceConfig某属性没有配置时,采用此缺省值,可选。一般用于全局配置
dubbo:service
服务配置,用于暴露一个服务,定义服务的元信息
1 ) interface服务接口的路径
2 ) ref引用对应的实现类的 Bean 的 ID
3 ) registry向指定注册中心注册,在多个注册中心时使用,值为 <dubbo:registry> 的 id 属性,多个注册中心 ID 用逗号分隔,如果不想将该服务注册到任何 registry ,可将值设为 N/A
4 ) register 默认true ,该协议的服务是否注册到注册中心。
(5)启动项目,
启动类中
ClasspathxmlApplicationContext context = new ClasspathxmlApplicationContext("classPath:dubbo.xml");
context .start();
然后我们在 Dubbo 管理页面上显示,已经暴露的服务,但显示还没有消费者,因为我们还没实现消费者服务,如图所示:
第二:我们再开发服务消费者来调用服务,
我们再新建一个新的消费者项目:
引入依赖
 1 <span style="font-size:18px;"><dependency>
 2           <groupId>cn.test</groupId>
 3           <artifactId>test-maven-api</artifactId>
 4           <version>0.0.1-SNAPSHOT</version>
 5       </dependency>
 6     <dependency>
 7         <groupId>com.alibaba</groupId>
 8         <artifactId>dubbo</artifactId>
 9         <version>2.5.3</version>
10       </dependency>
11        <dependency>
12         <groupId>org.apache.zookeeper</groupId>
13             <artifactId>zookeeper</artifactId>
14             <version>3.4.6</version>
15       </dependency>
16     <dependency>
17           <groupId>com.github.sgroschupf</groupId>
18          <artifactId>zkclient</artifactId>
19          <version>0.1</version>
20 </dependency></span>
(2)test-maven-consumer-console项目的具体实现,代码如下:
 1 @Controller
 2 public class IndexController {
 3
 4     @Autowired
 5     private TestRegistryService testRegistryService;
 6
 7     @RequestMapping("/hello")
 8     public String index(Model model){
 9          String name=testRegistryService.hello("zz");
10          System.out.println("xx=="+name);
11         return "";
12     }
13
14 }
dubbo.xml 配置文件
1 <?xml version="1.0" encoding="UTF-8"?>
 2 <beans xmlns="http://www.springframework.org/schema/beans"
 3      xmlns:xsi="http://www.w3.org/2001/XMLSchema-instance"
 4      xmlns:jee="http://www.springframework.org/schema/jee"
 5     xmlns:tx="http://www.springframework.org/schema/tx"
 6     <span style="background-color: rgb(255, 255, 255);"><span style="color:#990000;">xmlns:dubbo="http://code.alibabatech.com/schema/dubbo"</span></span>
 7     xmlns:context="http://www.springframework.org/schema/context"
 8     xsi:schemaLocation="http://www.springframework.org/schema/beans http://www.springframework.org/schema/beans/spring-beans-3.1.xsd
 9     http://www.springframework.org/schema/tx http://www.springframework.org/schema/tx/spring-tx-3.1.xsd
10     http://www.springframework.org/schema/jee http://www.springframework.org/schema/jee/spring-jee-3.1.xsd
11     <span style="color:#990000;">http://code.alibabatech.com/schema/dubbo http://code.alibabatech.com/schema/dubbo/dubbo.xsd</span>
12     http://www.springframework.org/schema/context http://www.springframework.org/schema/context/spring-context-3.1.xsd"
13     default-lazy-init="false" >
14
15    <dubbo:application name="dubbo_consumer"></dubbo:application>
16    <!-- 使用zookeeper注册中心暴露服务地址 -->
17    <dubbo:registry address="zookeeper://192.168.74.129:2181" check="false"></dubbo:registry>
18      <!-- 要引用的服务 -->
19    <dubbo:reference interface="cn.test.dubbo.registry.service.TestRegistryService" id="testRegistryService">
      </dubbo:reference>
20 </beans>
dubbo:reference 的一些属性的说明:
1) id 对应容器中bean的ID
2 ) interface调用的服务接口
3) check 启动时检查提供者是否存在, true 报错, false 忽略
4 ) registry 从指定注册中心注册获取服务列表,在多个注册中心时使用,值为 <dubbo:registry> 的 id 属性,多个注册中心 ID 用逗号分隔
5 ) loadbalance 负载均衡策略,可选值: random(按服务提供者配置的权重weight),roundrobin(轮询),leastactive(最少活跃数,慢的机器收到的请求少)
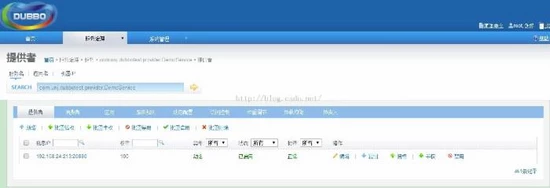
(4)项目启动, Dubbo 管理页面,能看到消费者,如图所示:

(5)然后访问消费者项目, Controller 层能像调用本地一样调用服务的具体实现(见上面IndexController类 ),调用结果如图所示:

总结:
经过一系列的操作之后,我们感觉,的确很简单,dubbo给我们封装了很多操作,让我们不需要过多考虑具体的实现细节,配置化生成咱们的应用,这样的思想,现在在IT行业正在盛行!