上一次完成nginx+tomcat组合搭配,今天我们就说说,这几个软件在项目中充当的角色:
要想完成这几个软件的组合,我们必须知道和熟悉应用这个框架,
一:
Nginx:在项目中大多数作为反向代理服务器。其目的处理http静态页面。和分发请求给tomcat。是目前处理大量请求的解决方案。
tomcat:作为处理动态页面的服务器。由Ngxin 均衡分给的请求来处理、
redis:在这个里redis 处理两个重要的功能:第一,nginx分发请求给tomcat。如何保持session的同步。就是利用redis的缓存机制。第二;redis作为mysql 的缓存数据库
mysql:数据库。来保存数据的
mybatis:是项目与数据库mysql连接的重要框架,其中封装jdbc。
springMVC:这是项目的灵魂,所有的请求均有springmvc来处理。了解这个之前必须去看看spring。
因此。如何你已经把这几个软件研究的 不要,不要的,那么你已经可以去应聘java高级工程师了 。
像他们所说的,什么高并发,高请求,大数据存储,等等。如果你还知道,23种设计模式。java已经不再话下了。
今天的目的:就是玩转各种组合的项目搭配,让大家了解,目前互联网开发的模式。当然前提你已经在互联网或金融公司工作过。不然你不可能接触这些东西的。当今目前项目的主要组合就是利用配置文件,xml文件。
其中xml文件组合的分类组合:
组合一:
1.spring+springmvc 配置 ,这是所有项目的基础配置文件。是项目的核心文件。我们称为springmvc.xml文件
下载:spring 包
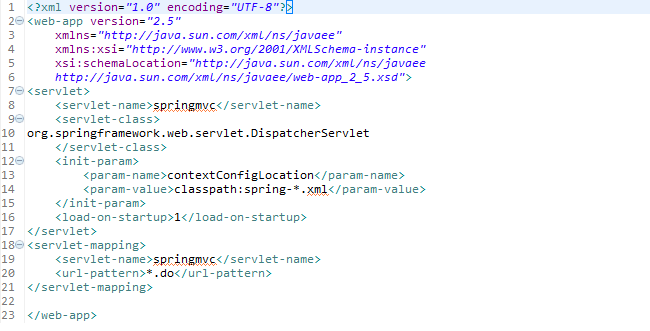
首先在web.xml配置
<servlet>
    <servlet-name>spring</servlet-name>
    <servlet-class>
        org.springframework.web.servlet.DispatcherServlet
    </servlet-class>
    <load-on-startup>1</load-on-startup>
</servlet>
2、设置 spring url 拦截:

<servlet-mapping>
    <servlet-name>spring</servlet-name>
    <url-pattern>*.do</url-pattern>
</servlet-mapping>
3、配置字符编码过滤器

<filter>
    <filter-name>encodingFilter</filter-name>
    <filter-class>org.springframework.web.filter.CharacterEncodingFilter</filter-class>
    <init-param>
        <param-name>encoding</param-name>
        <param-value>UTF-8</param-value>
    </init-param>
    <init-param>
        <param-name>forceEncoding</param-name>
        <param-value>true</param-value>
    </init-param>
</filter>

<filter-mapping>
    <filter-name>encodingFilter</filter-name>
    <url-pattern>*.do</url-pattern>
</filter-mapping>
Spring-servlet.xml 配置
1、页面架构(从文档、手册上复制)

<?xml version="1.0"encoding="UTF-8"?>
<beans xmlns="http://www.springframework.org/schema/beans"
       xmlns:xsi="http://www.w3.org/2001/XMLSchema-instance"
     xsi:schemaLocation="http://www.springframework.org/schema/beans
       http://www.springframework.org/schema/beans/spring-beans-2.5.xsd">
</beans>

2、页面目录配置。

<bean class="org.springframework.web.servlet.view.InternalResourceViewResolver">
    <property name="prefix" value="/WEB-INF/jsp" />
    <property name="suffix" value=".jsp" />
</bean>

配置视图解析器, 指定控制器页面转向的目录及文件后缀。

3、url 映射配置。

<bean id="urlMapping" class="org.springframework.web.servlet.handler.SimpleUrlHandlerMapping">
    <property name="mappings">
        <props>
            <prop key="/index.do">IndexAction</prop>
        </props>
    </property>
</bean>

SimpleUrlHandlerMapping 提供了最简单的 URL 映射,通过 Properties 将 URL 和 Controller 对应起来 。
一个 .do 映射一个控制器。

4、控制器配置

<bean id="IndexAction" class="com.myweb.IndexAction">
    <property name="view">
        <value>index</value>
    </property>
</bean>

在 bean 中配置有属性(包括 bean 格式的属性)时,bean 对应的 java 文件内必须要定义一个与 property 的 name 名字一样的属性值,并且需要有这个属性值的 getter 和 setter 方法。
组合二:
2.spring+mybatis 或springmvc+mybatis 配置。这是连接数据的配置文件,我们称spring-mybatis.xml
一、spring mvc

Spring框架(框架即:编程注解+xml配置的方式)MVC是Spring框架的一大特征,Spring框架有三大特征(IOC(依赖注入),AOP(面向切面),MVC(建模M-视图V-控制器C)。框架一般用于团队开发,使用分层的方式使每个人完成不同的模块,然后再组合在一起,使完成项目。

以下是Spring mvc具有的能加速开发的功能列表:

Spring mvc中提供了一个DispatchServlet,无需额外开发
Spring mvc中使用基于xml的配置文件,可以编辑,而无需重新编译应用程序
Spring mvc实例化控制器,并根据用户输入来构造Bean。
Spring mvc可以自动绑定用户输入,并正确的转换数据类型。例如,Spring mvc能自动解析字符串,并设置float或decimal类型的属性.
Spring mvc可以校验用户输入,若校验不通过,则重定向回输入表单。输入校验是可选的,支持编程方式以及声明。关于这一点,Spring mvc内置了常见的校验器
Spring mvc是Spring框架的一部分,可以利用Spring提供的其他能力。
Spring mvc支持国际化和本地化。支持根据用户区域显示多国语言
Spring mvc支持多种视图技术。最常见的JSP技术以及其他技术包括Velocity和FreeMarker.
配置spring-mvc.xml
<?xml version="1.0" encoding="UTF-8"?>
<beans xmlns="http://www.springframework.org/schema/beans"
    xmlns:xsi="http://www.w3.org/2001/XMLSchema-instance"
    xmlns:context="http://www.springframework.org/schema/context"
    xmlns:jdbc="http://www.springframework.org/schema/jdbc"
    xmlns:jee="http://www.springframework.org/schema/jee"
    xmlns:tx="http://www.springframework.org/schema/tx"
    xmlns:aop="http://www.springframework.org/schema/aop"
    xmlns:mvc="http://www.springframework.org/schema/mvc"
    xmlns:util="http://www.springframework.org/schema/util"
    xmlns:jpa="http://www.springframework.org/schema/data/jpa"
    xsi:schemaLocation="
        http://www.springframework.org/schema/beans http://www.springframework.org/schema/beans/spring-beans-3.2.xsd
        http://www.springframework.org/schema/context http://www.springframework.org/schema/context/spring-context-3.2.xsd
        http://www.springframework.org/schema/jdbc http://www.springframework.org/schema/jdbc/spring-jdbc-3.2.xsd
        http://www.springframework.org/schema/jee http://www.springframework.org/schema/jee/spring-jee-3.2.xsd
        http://www.springframework.org/schema/tx http://www.springframework.org/schema/tx/spring-tx-3.2.xsd
        http://www.springframework.org/schema/data/jpa http://www.springframework.org/schema/data/jpa/spring-jpa-1.3.xsd
        http://www.springframework.org/schema/aop http://www.springframework.org/schema/aop/spring-aop-3.2.xsd
        http://www.springframework.org/schema/mvc http://www.springframework.org/schema/mvc/spring-mvc-3.2.xsd
        http://www.springframework.org/schema/util http://www.springframework.org/schema/util/spring-util-3.2.xsd">
<!-- HandlerMapping -->
<mvc:annotation-driven/>
开启spring mvc注解扫描,如果不基于注解:   该类需要继承  CommandController   或者 其他很多 参见  spring帮助.我用的是基于注解的,这样比较方便
<!-- 扫描Controller,Service -->
<context:component-scan
    base-package="com.包名"/>
开启组件扫描,请确保所有的控制器都在基本包下,并且不要制定一个太宽泛的基本包
</beans>
3.部署web.xml
DispatcherServlet作为Spring mvc框架中的一级控制器(前端控制器),是浏览器发送请求的入口

该Servlet的全称是org.springframework.web.servlet.DispatcherServlet.

要使用这个Servlet,需要把他配置在部署描述符(web.xml),应用servlet和servlet-mapping元素如下:
classpath*:的出现是为了从多个jar文件中加载相同的文件.
classpath:只能加载找到的第一个文件
二、MyBatis的配置和使用
Spring与MyBatis结合,主要是由Spring管理数据库访问组件Dao,数据库访问组件主要是基于MyBatis实现,在Spring环境中使用MyBatis实现数据库访问组件过程是:首先需要引入一个Spring和MyBatis整合的开发包 mybatis-spring-1.2.2.jar。在Spring配置中定义SqlSessionFactoryBean,等价于SqlSessionFactory放入Spring容器管理。(不需要开发者利用手工创建SqlSessionFactory对象,需要开发者定义式注入连接信息和SQL定义的XML信息)在Spring配置中定义MapperFactoryBean,可以根据指定的Mapper接口生成一个Mapper实现类接口。需引入引入开发包:spring ioc,spring aop,dbcp,mybatis,驱动,mybatis-spring.jar。添加Spring框架的配置文件主要有applicationContext.xml,根据user表编写实体类User,编写UserMapper.xml(定义SQL语句),并且编写UserMapper接口(与UserMapper.xml映射),在applicationContext.xml中配置组件SqlSessionFactoryBean,Mapper FactoryBean。最后测试MapperFactoryBean生成的UserMapperDao实例。
MyBatis的两个特点:
1.MyBatis采用SQL与Entity映射,对JDBC封装程度较轻
2.MyBatis自己写SQL,更具有灵活性
配置MyBatis
(1)导入jar包
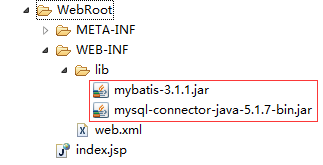
(3)添加MyBatis.xml配置文件

<?xml version="1.0" encoding="UTF-8"?>
<beans xmlns="http://www.springframework.org/schema/beans"
xmlns:xsi="http://www.w3.org/2001/XMLSchema-instance"
xmlns:context="http://www.springframework.org/schema/context"
xmlns:jdbc="http://www.springframework.org/schema/jdbc"
xmlns:jee="http://www.springframework.org/schema/jee"
xmlns:tx="http://www.springframework.org/schema/tx"
xmlns:aop="http://www.springframework.org/schema/aop"
xmlns:mvc="http://www.springframework.org/schema/mvc"
xmlns:util="http://www.springframework.org/schema/util"
xmlns:jpa="http://www.springframework.org/schema/data/jpa"
xsi:schemaLocation="
http://www.springframework.org/schema/beans http://www.springframework.org/schema/beans/spring-beans-3.2.xsd
http://www.springframework.org/schema/context http://www.springframework.org/schema/context/spring-context-3.2.xsd
http://www.springframework.org/schema/jdbc http://www.springframework.org/schema/jdbc/spring-jdbc-3.2.xsd
http://www.springframework.org/schema/jee http://www.springframework.org/schema/jee/spring-jee-3.2.xsd
http://www.springframework.org/schema/tx http://www.springframework.org/schema/tx/spring-tx-3.2.xsd
http://www.springframework.org/schema/data/jpa http://www.springframework.org/schema/data/jpa/spring-jpa-1.3.xsd
http://www.springframework.org/schema/aop http://www.springframework.org/schema/aop/spring-aop-3.2.xsd
http://www.springframework.org/schema/mvc http://www.springframework.org/schema/mvc/spring-mvc-3.2.xsd
http://www.springframework.org/schema/util http://www.springframework.org/schema/util/spring-util-3.2.xsd">
<bean id="dbcp"
class="org.apache.commons.dbcp.BasicDataSource">
<property name="username" value="****">
</property>
<property name="password" value="***">
</property>
<property name="driverClassName"
value="com.mysql.jdbc.Driver">
</property>
<property name="url"
value="jdbc:mysql:///cloud_note">
</property>
<!-- <property name="url" value="jdbc:mysql://localhost:3306/cloud_note?useUnicode=true&characterEncoding=utf-8"></property> -->
</bean>
<bean id="ssf"
class="org.mybatis.spring.SqlSessionFactoryBean">
<property name="dataSource" ref="dbcp">
</property>
<property name="mapperLocations"
value="classpath:com/niuniu/sql/*.xml">
</property>
</bean>
<bean id="mapperscanner"
class="org.mybatis.spring.mapper.MapperScannerConfigurer">
<property name="sqlSessionFactory" ref="ssf">
</property>
<property name="basePackage"
value="com.niuniu.dao">
</property>
</bean>
</beans>
组合三:
3.spring+springMVC+redis配置,这是spring集成redis的配置,我们称spring-redis.xml
application.properties:
# redis setting
redis.host=127.0.0.1
redis.port=6379
redis.pass=hzj123456
redis.maxIdle=20
redis.maxTotal=500
redis.maxWaitMillis=1000
redis.testOnBorrow=true
redis-config.xml:
<?xml version="1.0" encoding="UTF-8"?>
<beans xmlns="http://www.springframework.org/schema/beans"
    xmlns:p="http://www.springframework.org/schema/p"
    xmlns:xsi="http://www.w3.org/2001/XMLSchema-instance"
    xmlns:context="http://www.springframework.org/schema/context"
    xmlns:jee="http://www.springframework.org/schema/jee" xmlns:tx="http://www.springframework.org/schema/tx"
    xmlns:aop="http://www.springframework.org/schema/aop"
    xsi:schemaLocation="
     http://www.springframework.org/schema/context http://www.springframework.org/schema/context/spring-context-4.0.xsd
     http://www.springframework.org/schema/beans http://www.springframework.org/schema/beans/spring-beans-4.0.xsd">

     <!-- redis的配置 -->
     <bean id="poolConfig" class="redis.clients.jedis.JedisPoolConfig">
         <property name="maxIdle" value="${redis.maxIdle}"/>
         <property name="maxTotal" value="${redis.maxTotal}"/>
         <property name="maxWaitMillis" value="${redis.maxWaitMillis}"/>
         <property name="testOnBorrow" value="${redis.testOnBorrow}"/>
     </bean>
     <bean id="connectionFactory" class="org.springframework.data.redis.connection.jedis.JedisConnectionFactory"
          p:host-name="${redis.host}"
          p:port="${redis.port}"
          p:password="${redis.pass}"
          p:pool-config-ref="poolConfig"/>

     <bean id="redisTemplate" class="org.springframework.data.redis.core.StringRedisTemplate"
        p:connection-factory-ref="connectionFactory"/>

</beans>
组合四:
4.Nginx+tomcat的配置文件。这是负载均衡的重要文件。我们只需要在。nginx.conf文件配置就行。
#user  nobody;
worker_processes  1;

#error_log  logs/error.log;
#error_log  logs/error.log  notice;
#error_log  logs/error.log  info;

#pid        logs/nginx.pid;


events {
    worker_connections  1024;
}


http {
    include       mime.types;
    default_type  application/octet-stream;

    #log_format  main  '$remote_addr - $remote_user [$time_local] "$request" '
    #                  '$status $body_bytes_sent "$http_referer" '
    #                  '"$http_user_agent" "$http_x_forwarded_for"';

    #access_log  logs/access.log  main;

    sendfile        on;
    #tcp_nopush     on;

    #keepalive_timeout  0;
    keepalive_timeout  65;

    #gzip  on;
    upstream huojg{
    server 127.0.0.1:8082;
    server 127.0.0.1:8083;

    }

    server {
        listen       8080;
        server_name  localhost;

        #charset koi8-r;

        #access_log  logs/host.access.log  main;

        location / {
            root   html;
            index  index.html index.htm;
        #配置方向代理地址
        proxy_pass http://huojg;
        }

        #error_page  404              /404.html;

        # redirect server error pages to the static page /50x.html
        #
        error_page   500 502 503 504  /50x.html;
        location = /50x.html {
            root   html;
        }

        # proxy the PHP scripts to Apache listening on 127.0.0.1:80
        #
        #location ~ .php$ {
        #    proxy_pass   http://127.0.0.1;
        #}

        # pass the PHP scripts to FastCGI server listening on 127.0.0.1:9000
        #
        #location ~ .php$ {
        #    root           html;
        #    fastcgi_pass   127.0.0.1:9000;
        #    fastcgi_index  index.php;
        #    fastcgi_param  SCRIPT_FILENAME  /scripts$fastcgi_script_name;
        #    include        fastcgi_params;
        #}

        # deny access to .htaccess files, if Apache's document root
        # concurs with nginx's one
        #
        #location ~ /.ht {
        #    deny  all;
        #}
    }


    # another virtual host using mix of IP-, name-, and port-based configuration
    #
    #server {
    #    listen       8000;
    #    listen       somename:8080;
    #    server_name  somename  alias  another.alias;

    #    location / {
    #        root   html;
    #        index  index.html index.htm;
    #    }
    #}


    # HTTPS server
    #
    #server {
    #    listen       443 ssl;
    #    server_name  localhost;

    #    ssl_certificate      cert.pem;
    #    ssl_certificate_key  cert.key;

    #    ssl_session_cache    shared:SSL:1m;
    #    ssl_session_timeout  5m;

    #    ssl_ciphers  HIGH:!aNULL:!MD5;
    #    ssl_prefer_server_ciphers  on;

    #    location / {
    #        root   html;
    #        index  index.html index.htm;
    #    }
    #}

}
组合五:
5.springmvc+mybatis+redis ,这是整个项目的联合搭配使用,是我们这次配置的核心。
2、pom.xml中加入Maven依赖
<!-- spring-redis实现 -->
<dependency>
    <groupId>org.springframework.data</groupId>
    <artifactId>spring-data-redis</artifactId>
    <version>1.6.2.RELEASE</version>
</dependency>
<!-- redis客户端jar -->
<dependency>
    <groupId>redis.clients</groupId>
    <artifactId>jedis</artifactId>
    <version>2.8.0</version>
</dependency>
<!-- Ehcache实现,用于参考 -->
<dependency>
    <groupId>org.mybatis</groupId>
    <artifactId>mybatis-ehcache</artifactId>
    <version>1.0.0</version>
</dependency>
3、引入applicationContext.xml中引入redis配置

<!-- 引入数据库配置文件 -->
<bean id="propertyConfigurer"    class="org.springframework.beans.factory.config.PropertyPlaceholderConfigurer">
    <property name="locations">
        <list>
            <value>classpath:jdbc.properties</value>
            <value>classpath:redis.properties</value>
        </list>
    </property>
</bean>
<!-- redis数据源 -->
<bean id="poolConfig" class="redis.clients.jedis.JedisPoolConfig">
    <property name="maxIdle" value="${redis.maxIdle}" />
    <property name="maxTotal" value="${redis.maxActive}" />
    <property name="maxWaitMillis" value="${redis.maxWait}" />
    <property name="testOnBorrow" value="${redis.testOnBorrow}" />
</bean>
<!-- Spring-redis连接池管理工厂 -->
<bean id="jedisConnectionFactory" class="org.springframework.data.redis.connection.jedis.JedisConnectionFactory"
    p:host-name="${redis.host}" p:port="${redis.port}" p:password="${redis.pass}"  p:pool-config-ref="poolConfig"/>
<!-- 使用中间类解决RedisCache.jedisConnectionFactory的静态注入,从而使MyBatis实现第三方缓存 -->
<bean id="redisCacheTransfer" class="com.strive.cms.cache.RedisCacheTransfer">
    <property name="jedisConnectionFactory" ref="jedisConnectionFactory"/>
</bean>
6、配置文件redis.properties

# Redis settings
redis.host=192.168.25.132
redis.port=6379
redis.pass=

redis.maxIdle=300
redis.maxActive=600
redis.maxWait=1000
redis.testOnBorrow=true

7、mapper中加入MyBatis二级缓存

<mapper namespace="com.strive.cms.dao.site.CatalogMapper" >
  <cache type="com.strive.cms.cache.RedisCache"/>
  .....
</mapper>
8、Mybatis全局配置

<?xml version="1.0" encoding="UTF-8" ?>
<!DOCTYPE configuration
        PUBLIC "-//mybatis.org//DTD Config 3.0//EN"
        "http://mybatis.org/dtd/mybatis-3-config.dtd">
<configuration>
    <!-- 配置mybatis的缓存,延迟加载等等一系列属性 -->
    <settings>

        <!-- 全局映射器启用缓存 -->
        <setting name="cacheEnabled" value="true"/>

        <!-- 查询时,关闭关联对象即时加载以提高性能 -->
        <setting name="lazyLoadingEnabled" value="false"/>

        <!-- 对于未知的SQL查询,允许返回不同的结果集以达到通用的效果 -->
        <setting name="multipleResultSetsEnabled" value="true"/>

        <!-- 允许使用列标签代替列名 -->
        <setting name="useColumnLabel" value="true"/>

        <!-- 不允许使用自定义的主键值(比如由程序生成的UUID 32位编码作为键值),数据表的PK生成策略将被覆盖 -->
        <setting name="useGeneratedKeys" value="false"/>

        <!-- 给予被嵌套的resultMap以字段-属性的映射支持 FULL,PARTIAL -->
        <setting name="autoMappingBehavior" value="PARTIAL"/>

        <!-- 对于批量更新操作缓存SQL以提高性能 BATCH,SIMPLE -->
        <!-- <setting name="defaultExecutorType" value="BATCH" /> -->

        <!-- 数据库超过25000秒仍未响应则超时 -->
        <!-- <setting name="defaultStatementTimeout" value="25000" /> -->

        <!-- Allows using RowBounds on nested statements -->
        <setting name="safeRowBoundsEnabled" value="false"/>

        <!-- Enables automatic mapping from classic database column names A_COLUMN to camel case classic Java property names aColumn. -->
        <setting name="mapUnderscoreToCamelCase" value="true"/>

        <!-- MyBatis uses local cache to prevent circular references and speed up repeated nested queries. By default (SESSION) all queries executed during a session are cached. If localCacheScope=STATEMENT
            local session will be used just for statement execution, no data will be shared between two different calls to the same SqlSession. -->
        <setting name="localCacheScope" value="SESSION"/>

        <!-- Specifies the JDBC type for null values when no specific JDBC type was provided for the parameter. Some drivers require specifying the column JDBC type but others work with generic values
            like NULL, VARCHAR or OTHER. -->
        <setting name="jdbcTypeForNull" value="OTHER"/>

        <!-- Specifies which Object's methods trigger a lazy load -->
        <setting name="lazyLoadTriggerMethods" value="equals,clone,hashCode,toString"/>

        <!-- 设置关联对象加载的形态,此处为按需加载字段(加载字段由SQL指 定),不会加载关联表的所有字段,以提高性能 -->
        <setting name="aggressiveLazyLoading" value="true"/>

    </settings>

</configuration>
互联网公司大多数的数据库是mysql和mybatis搭配在这里作为基础,就不说了。也就是说所有的项目几乎跟数据库相关的就是这两个搭配、其核心就是springmvc为框架。