一、Git安装及配置
1.1、系统环境准备
#系统版本
[root@git ~]# cat /etc/redhat-release
CentOS Linux release 7.5.1804 (Core)

#内核版本
[root@git ~]# uname -r
3.10.0-862.el7.x86_64

#关闭selinux
[root@git ~]# getenforce
Disabled

#关闭防火墙
[root@git ~]# systemctl stop firewalld
#查看iptables是否关闭
[root@git ~]# iptables-save
1.2、git安装
#系统自带git(如果没有,yum install git -y)
[root@git ~]# yum install git -y
[root@git ~]# git --version
git version 1.8.3.1
1.3、git配置
[root@git ~]# git config
usage: git config [options]
Config file location
    --global              use global config file		#使用全局配置文件
    --system              use system config file		#使用系统配置文件
    --local               use repository config file	        #使用库配置文件
-f, --file <file>     use given config file			#使用给定的配置文件

#配置git邮箱及用户:
[root@git ~]# git config --global user.name "hujinzhong"	        #配置用户
[root@git ~]# git config --global user.email "hujinzhong@qq.com"	#配置用户邮箱
[root@git ~]# git config --global color.ui true			        #配置语法高亮
[root@git ~]# git config --list						#查看配置的相关信息
user.name=hujinzhong
user.email=hujinzhong@qq.com
color.ui=true

#此时配置完后,会在本地生成一个隐藏的配置文件:.gitconfig	#配置的用户及邮箱的相关信息
[root@git ~]# ll -a
dr-xr-x---.  2 root root  169 Feb 27 18:17 .
dr-xr-xr-x. 17 root root  224 Dec 10 13:27 ..
-rw-r--r--   1 root root   72 Feb 27 18:17 .gitconfig
[root@git ~]# cat .gitconfig
[user]
	name = hujinzhong
	email = hujinzhong@qq.com
[color]
	ui = true
1.4、git 初始化
[root@git ~]# mkdir git_data
[root@git ~]# cd git_data/

#初始化目录
[root@git git_data]# git init
Initialized empty Git repository in /root/git_data/.git/

#初始化目录后会在本地生成一个隐藏的目录.git
[root@git git_data]# ll -a
total 0
drwxr-xr-x  3 root root  18 Feb 27 18:22 .
dr-xr-x---. 3 root root 185 Feb 27 18:22 ..
drwxr-xr-x  7 root root 119 Feb 27 18:22 .git
[root@git git_data]# tree .git/
.git/
├── branches								#分支目录
├── config								#定义项目特有的配置选项
├── description							#描述信息
├── HEAD									#指针,指示当前的分支
├── hooks								#钩子文件目录
│   ├── applypatch-msg.sample
│   ├── commit-msg.sample
│   ├── post-update.sample
│   ├── pre-applypatch.sample
│   ├── pre-commit.sample
│   ├── prepare-commit-msg.sample
│   ├── pre-push.sample
│   ├── pre-rebase.sample
│   └── update.sample
├── info								#包含一个全局排除文件(exclude文件)
│   └── exclude
├── objects							#存放所有的数据内容
│   ├── info
│   └── pack
└── refs								#存放指向数据(分支)的提交对象的指针及标签
    ├── heads
    └── tags

9 directories, 13 files
//index 		#保存暂存区信息,在执行git init的时候,这个文件还没有
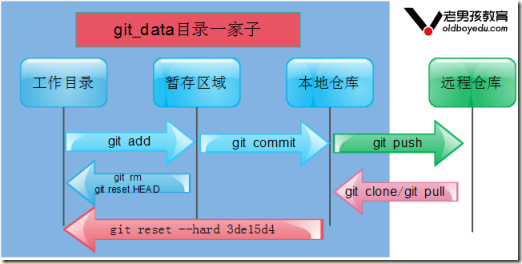
1.5、git相关原理
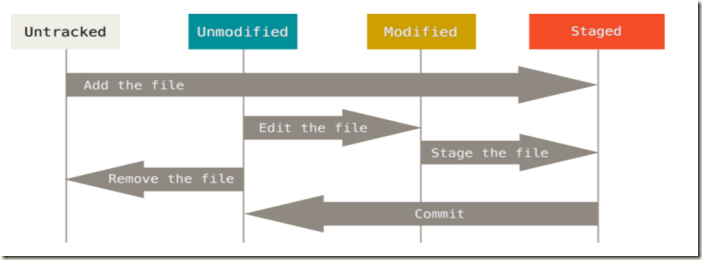
1.6、git状态
二、Git常用命令
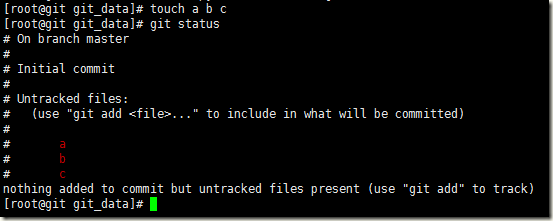
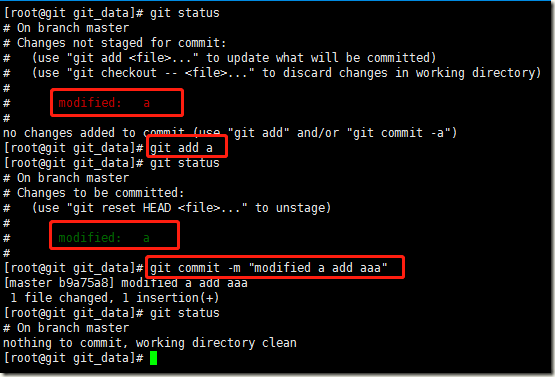
2.1、git status 查看当前状态
在工作目录创建新文件并查看状态:
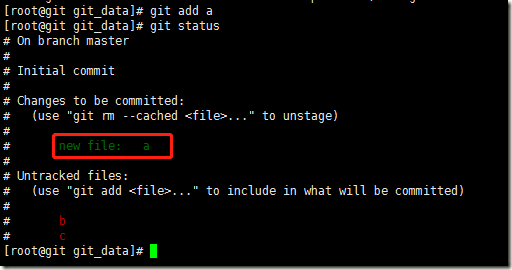
2.2、git add 文件添加到暂存区
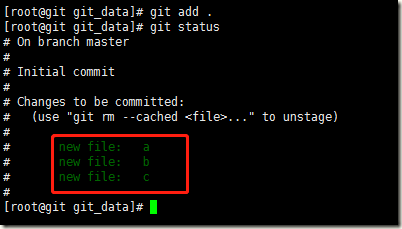
使用git add .或git add *添加工作目录中所有的文件:
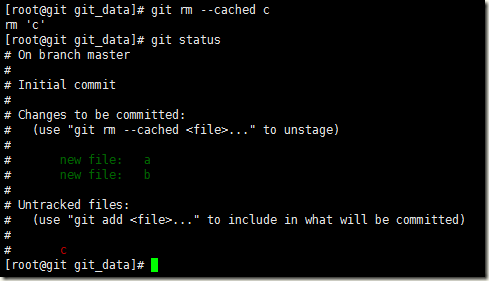
2.3、git rm --cached file 暂存区删除文件
2.4、文件删除
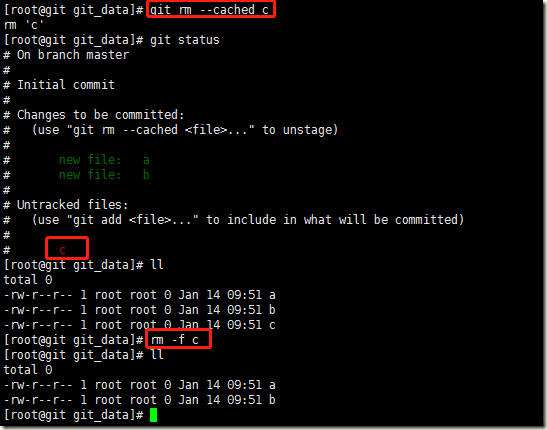
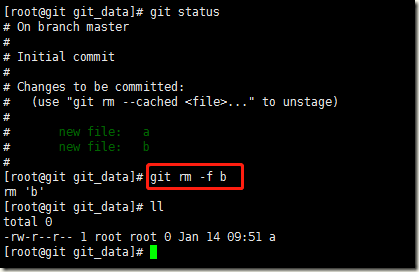
删除文件有两种方式:
方式一:先从暂存区撤回到工作目录,然后直接删除
方式二:直接从暂存区及工作目录一起删除文件
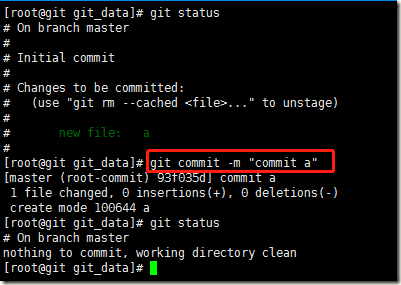
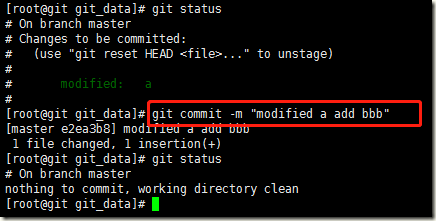
2.5、git commit 文件提交至本地仓库
2.6、修改文件名称
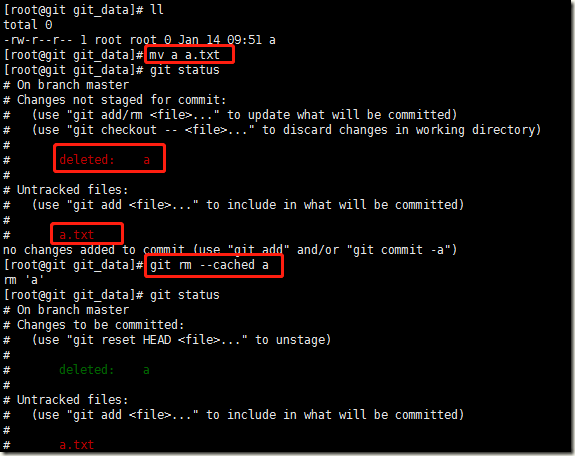
方式一:直接使用mv命令
方法步骤:
1.将暂存区的源文件删除 git rm --cached file
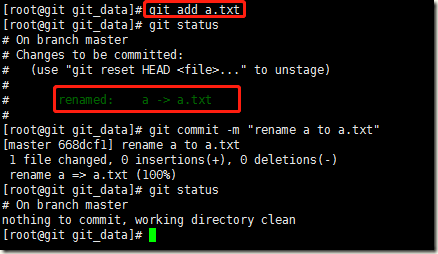
2.添加改名后的文件到暂存区 git add file
3.git commit提交
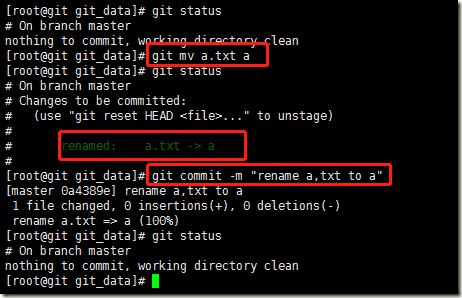
方式二:使用git mv命令
方法步骤:
1.git mv a.txt a #直接重命名
2.git commit #再次提交
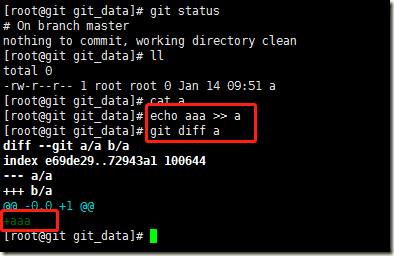
2.7、git diff 比较文件不同
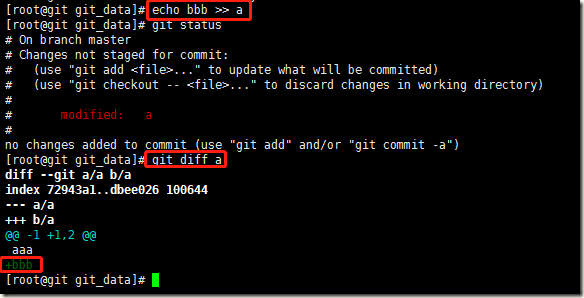
git diff file #比较的是工作目录与暂存区的文件内容不同
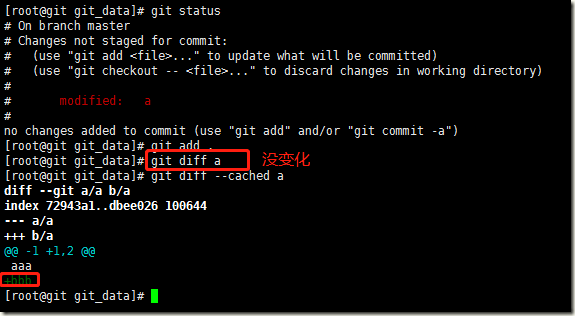
git diff --cached a #比较的是暂存区与本地仓库文件内容的不同
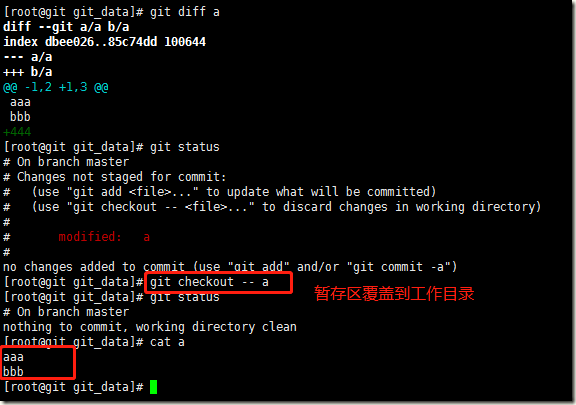
当再次修改文件的内容,本地工作目录与暂存区文件内容会不一样:
如果提交到暂存区,则暂存区的与本地仓库的文件内容会不一样,而本地目录与暂存区的文件内容是一样的:
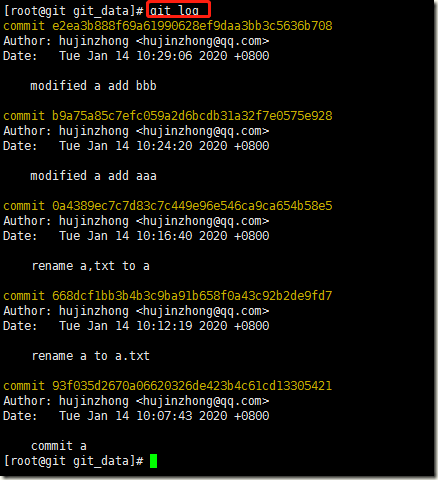
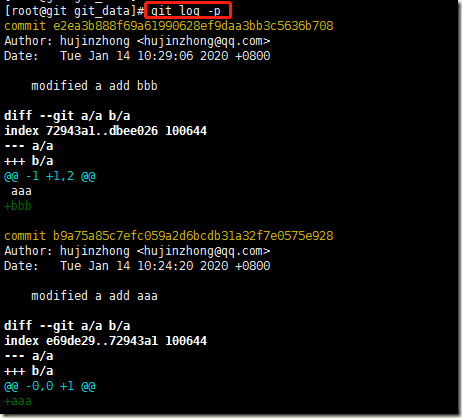
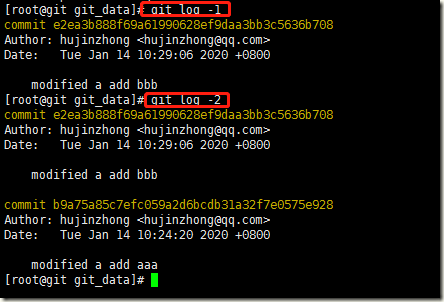
2.8、git log 日志信息
1)查看历史提交操作
2)单行显示commit信息
3)单行显示信息并显示指针
4)显示具体内容的变化
5)显示一条内容
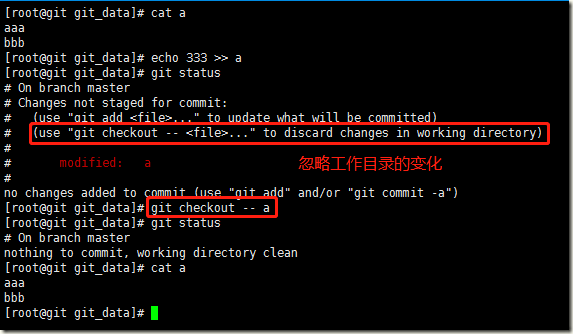
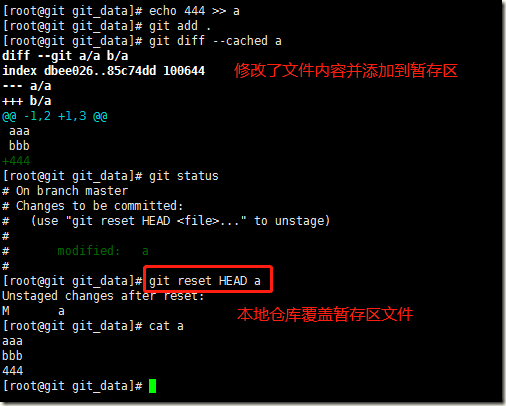
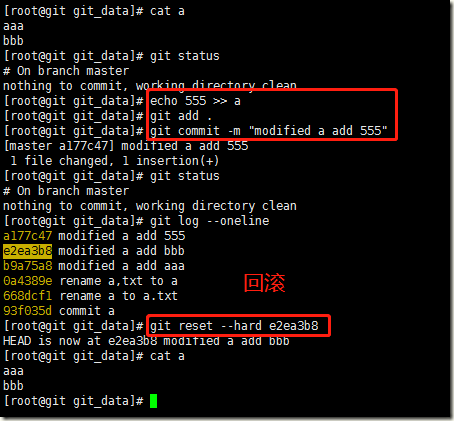
2.9、git数据恢复
1)只更改了当前的工作目录,可以从暂存区恢复到工作目录
2)修改了本地目录同时提交到了暂存区,本地仓库先恢复到暂存区,然后从暂存区撤回到工作目录
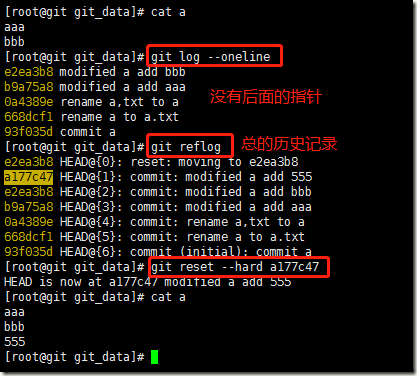
3)修改工作目录后,提交到了暂存区及本地仓库,使用指针恢复
4)前滚,恢复到有555的数据
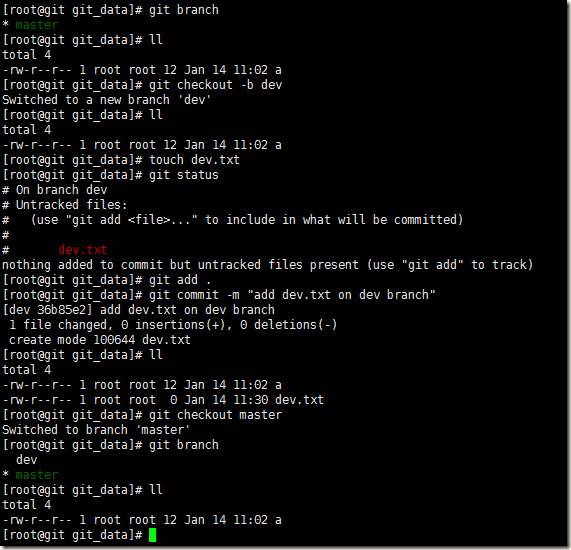
2.10、git 分支
分支即是平行空间,假设你在为某个手机系统研发拍照功能,代码已经完成了80%,但如果将这不完整的代码直接提交到git仓库中,又有可能影响到其他人的工作,此时我们便可以在该软件的项目之上创建一个名叫”拍照功能”的分支,这种分支只会属于你自己,而其他人看不到,等代码编写完成后再与原来的项目主分支合并下即可,这样即能保证代码不丢失,又不影响其他人的工作。
1)查看指针指向的分支
方式一:
方式二:
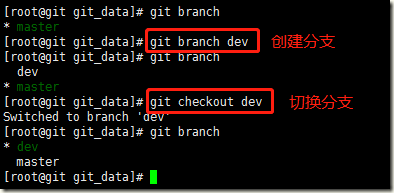
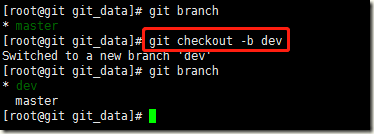
2)新建分支,并切换分支
方式一:先创建分支,然后切换分支
方式二:新建分支并直接切换分支
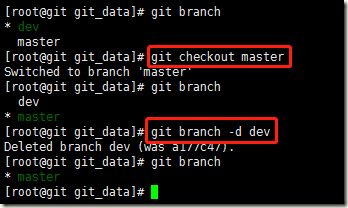
3)删除分支
注意:先切换到master分支后才可以删除其他分支
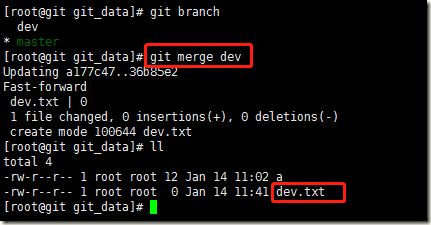
4)合并分支
当创建新的分支后,新的分支会携带一份master的源文件,当在新的分支上创建文件后,master上没有这个文件的,这样保证了master线上环境的正确环境
当dev分支修改确定没问题后,要将dev分支上的代码合并到master主分支上,先切换到主分支上
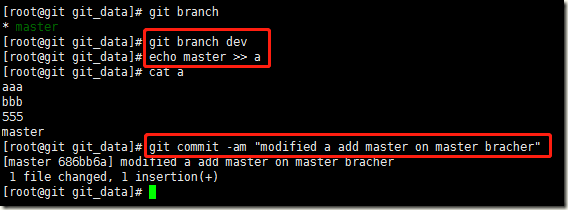
5)冲突合并
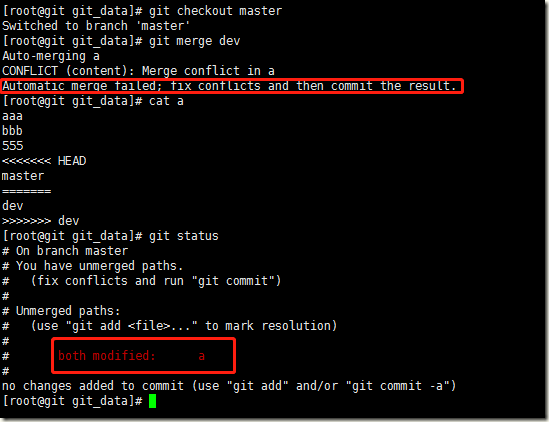
当存在多个人同时修改某一个文件,并同时提交的话,就存在合并冲突的问题,此时要手动修改文件,保留正确的部分
a、创建dev分支,在主分支上修改文件并提交
b、切换到dev分支修改该文件
c、切换到master分支,此时merge会产生冲突
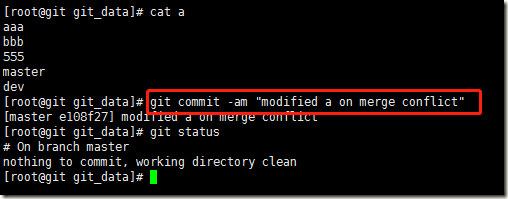
解决方法:手动修改文件,删除产生的特殊符号,保留正确的部分,然后提交
2.11、git tag 标签使用
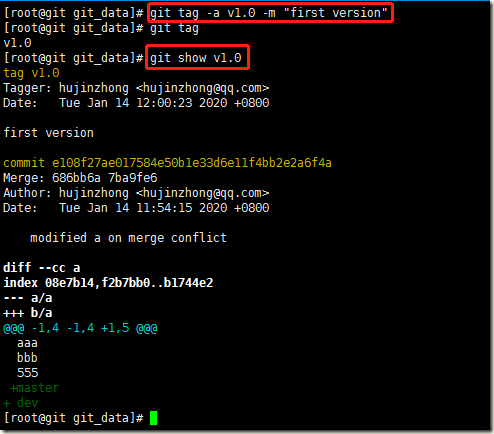
给某一次commit后的结果打标签,回退可以指定标签
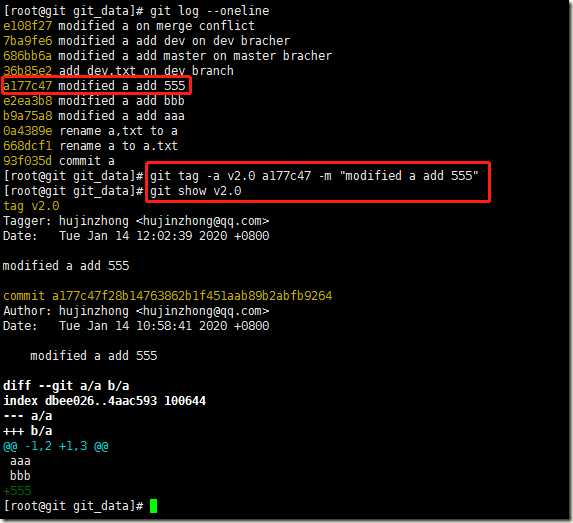
给历史的某一次提交打标签:
根据标签回退到某一版本下:
删除标签:
三、Git命令总结
git config	#git全局配置(用户,邮箱)
git init	#git目录初始化
git status	#查看工作目录状态
git add file  #添加文件到暂存区域
git commit -m "注释信息" 	#提交暂存区域的内容到本地仓库
git commit -am "注释信息" 	#如果你已经提交过本地仓库,在进行修改文件后直接用这一条命名就OK不用git add
git rm --cached a.txt  #从暂存区删除文件,撤回文件到工作目录
git reset HEAD b.txt   #本地仓库覆盖暂存区文件
git rm ‐‐cached c  #从仓库里删除文件 必须得重新提交 commit   针对已提交到本地仓库的内容
git rm -f d.txt		#同时删除工作目录和暂存区的内容
git checkout -- b.txt      #从暂存区恢复到工作目录 针对暂存区的文件进行恢复(可以是没有提交到仓库的数据)
git mv c.txt test.txt 	#git 重命名  进行commit提交
git diff 			#比对当前目录和暂存区
git diff --cached		#比对的暂存区和本地仓库的不同
git log --oneline		#显示历史提交的内容
git log -p 			#显示文件具体的改动内容
git log -p -1			#显示最近1次具体内容的改动
git reset --hard dc55cd3   #回滚代码
git reflog			#查看所有的历史提交记录
git branch 			#查看分支
git branch dev		#创建dev分支
git checkout dev		#切换分支到dev
git checkout -b dev		#创建并切换到分支dev
git branch -d dev	       #在master主干分支上删除dev分支
git merge dev			#在master分支上合并dev分支(跳出信息直接保存即可或者添加注释内容)
git tag -a v1.0 -m "注释信息" 	#为当前版本打标签
git tag -a v2.0 哈希值 -m "注释信息" 	#针对某次历史的提交打标签
git show v1.0   	#查看版本信息
git reset --hard v1.0   #针对标签进行回滚
git tag -d v1.0 	   #删除标签
git remote add origin 仓库的地址   #添加远程仓库名称为origin
git push -u origin master          @推送master的代码到远程仓库origin
git pull		#拉取最新的代码到本地仓库
四、github使用
4.1、github介绍
一个Git版本库的托管服务,是目前全球最大的软件仓库
官网网址:https://github.com/
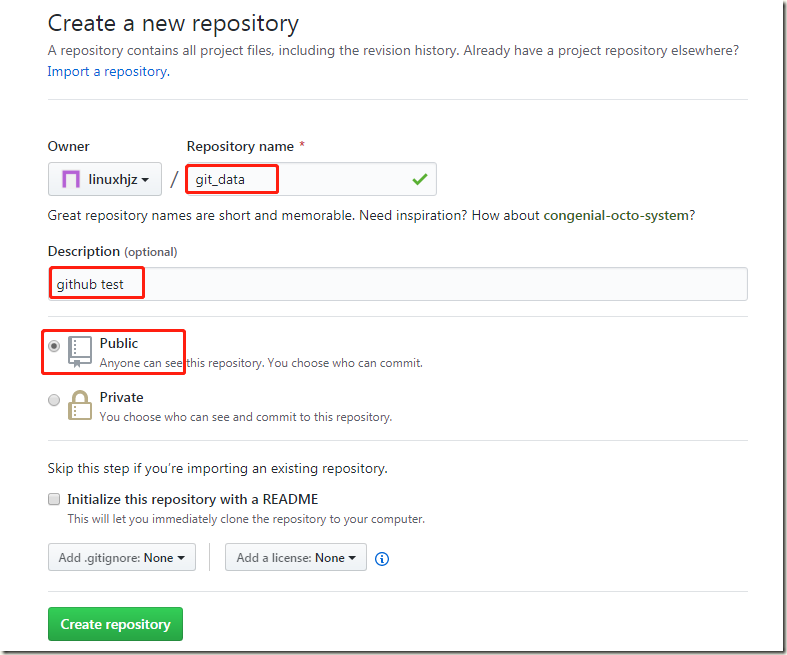
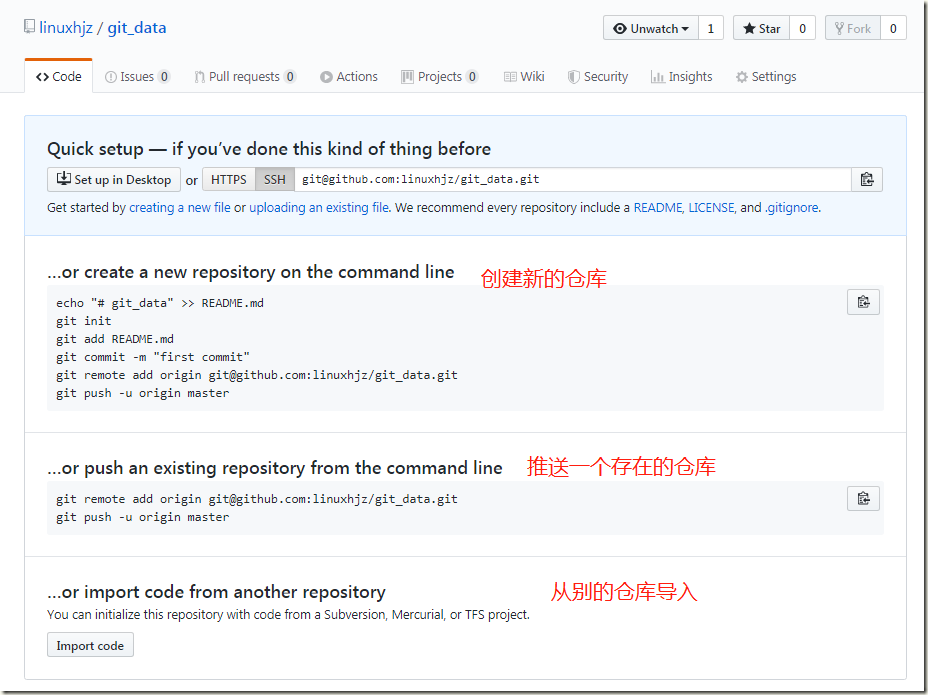
4.2、创建项目仓库
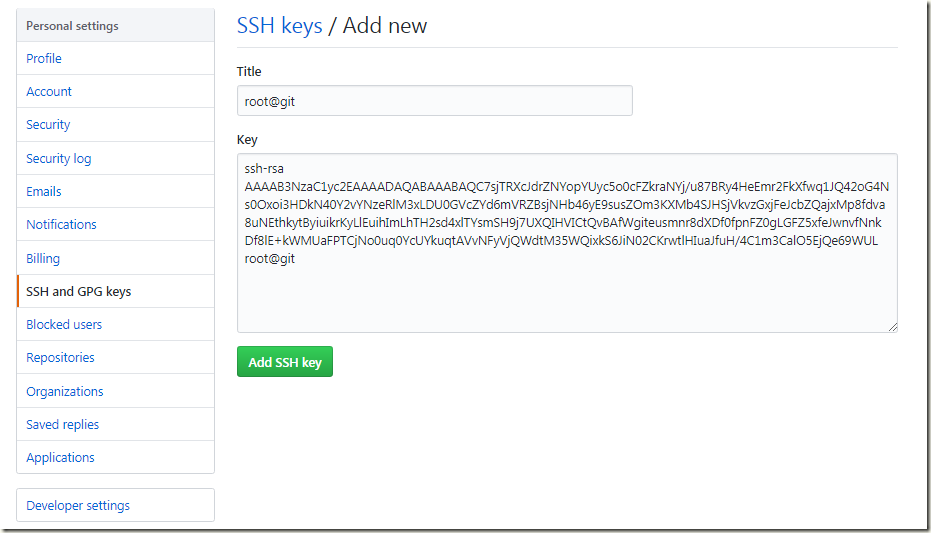
4.3、免密码设置
#生成ssh-key
[root@git ~]# ssh-keygen -t rsa
Generating public/private rsa key pair.
Enter file in which to save the key (/root/.ssh/id_rsa):
Created directory '/root/.ssh'.
Enter passphrase (empty for no passphrase):
Enter same passphrase again:
Your identification has been saved in /root/.ssh/id_rsa.
Your public key has been saved in /root/.ssh/id_rsa.pub.
The key fingerprint is:
SHA256:ITz0kmVgm8sLSE6vPcJJJ4E3Fj7fpw223PGgrIi54ig root@git
The key's randomart image is:
+---[RSA 2048]----+
|  .   +.o        |
| o . + B         |
|. X   O o        |
| * B o = .       |
|  = = * S        |
| o * = X +       |
|  = o B o .      |
|Eo o o           |
|Oo. .            |
+----[SHA256]-----+
[root@git ~]# cat .ssh/id_rsa.pub
ssh-rsa AAAAB3NzaC1yc2EAAAADAQABAAABAQC7sjTRXcJdrZNYopYUyc5o0cFZkraNYj/u87BRy4HeEmr2FkXfwq1JQ42oG4Ns0Oxoi3HDkN40Y2vYNzeRlM3xLDU0GVcZYd6mVRZBsjNHb46yE9susZOm3KXMb4SJHSjVkvzGxjFeJcbZQajxMp8fdva8uNEthkytByiuikrKyLlEuihImLhTH2sd4xlTYsmSH9j7UXQIHVICtQvBAfWgiteusmnr8dXDf0fpnFZ0gLGFZ5xfeJwnvfNnkDf8lE+kWMUaFPTCjNo0uq0YcUYkuqtAVvNFyVjQWdtM35WQixkS6JiN02CKrwtlHIuaJfuH/4C1m3CalO5EjQe69WUL root@git
将公钥放置到github上:
4.4、添加远程仓库
[root@git ~]# cd git_data/
[root@git git_data]# git remote add origin git@github.com:linuxhjz/git_data.git
[root@git git_data]# git remote
origin
[root@git git_data]# git push -u origin master
The authenticity of host 'github.com (13.250.177.223)' can't be established.
RSA key fingerprint is SHA256:nThbg6kXUpJWGl7E1IGOCspRomTxdCARLviKw6E5SY8.
RSA key fingerprint is MD5:16:27:ac:a5:76:28:2d:36:63:1b:56:4d:eb:df:a6:48.
Are you sure you want to continue connecting (yes/no)? yes
Warning: Permanently added 'github.com,13.250.177.223' (RSA) to the list of known hosts.
Counting objects: 26, done.
Compressing objects: 100% (14/14), done.
Writing objects: 100% (26/26), 2.10 KiB | 0 bytes/s, done.
Total 26 (delta 1), reused 0 (delta 0)
remote: Resolving deltas: 100% (1/1), done.
To git@github.com:linuxhjz/git_data.git
 * [new branch]      master -> master
Branch master set up to track remote branch master from origin.
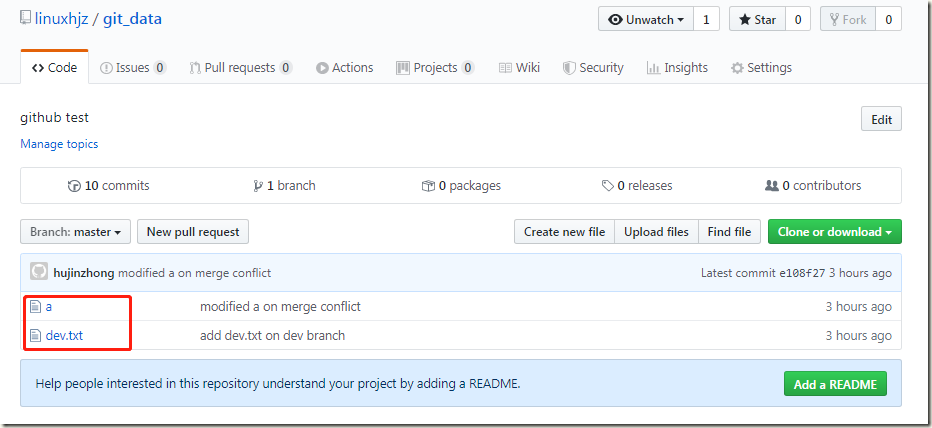
4.5、推送代码至github
[root@git git_data]# touch abc
[root@git git_data]# git add .
[root@git git_data]# git commit -m "add file abc"
[master 4cd4f94] add file abc
 1 file changed, 0 insertions(+), 0 deletions(-)
 create mode 100644 abc
[root@git git_data]# git push -u origin master
Counting objects: 3, done.
Compressing objects: 100% (2/2), done.
Writing objects: 100% (2/2), 258 bytes | 0 bytes/s, done.
Total 2 (delta 0), reused 0 (delta 0)
To git@github.com:linuxhjz/git_data.git
   1d591b3..4cd4f94  master -> master
Branch master set up to track remote branch master from origin.
4.6、拉取最新代码至本地
[root@git ~]# cd /mnt/
[root@git mnt]# git clone git@github.com:linuxhjz/git_data.git
Cloning into 'git_data'...
remote: Enumerating objects: 33, done.
remote: Counting objects: 100% (33/33), done.
remote: Compressing objects: 100% (19/19), done.
remote: Total 33 (delta 3), reused 32 (delta 2), pack-reused 0
Receiving objects: 100% (33/33), done.
Resolving deltas: 100% (3/3), done.
[root@git mnt]# ls
git_data
[root@git mnt]# cd git_data/
[root@git git_data]# ls
a  abc  dev.txt
