一、Harbor介绍
Harbor是由VMware公司开源的企业级的Docker Registry管理项目,Harbor主要提供Dcoker Registry管理UI,提供的功能包括:基于角色访问的控制权限管理(RBAC)、AD/LDAP集成、日志审核、管理界面、自我注册、镜像复制和中文支持等。Harbor的目标是帮助用户迅速搭建一个企业级的Docker registry服务。它以Docker公司开源的registry为基础,额外提供了如下功能:
1)基于角色的访问控制(Role Based Access Control)
2)基于策略的镜像复制(Policy based image replication)
3)镜像的漏洞扫描(Vulnerability Scanning)
4)AD/LDAP集成(LDAP/AD support)
5)镜像的删除和空间清理(Image deletion & garbage collection)
6)友好的管理UI(Graphical user portal)
7)审计日志(Audit logging)
8)RESTful API
9)部署简单(Easy deployment)
Harbor的所有组件都在Dcoker中部署,所以Harbor可使用Docker Compose快速部署。需要特别注意:由于Harbor是基于Docker Registry V2版本,所以docker必须大于等于1.10.0版本,docker-compose必须要大于1.6.0版本!
二、Harbor仓库结构
Harbor的每个组件都是以Docker容器的形式构建的,可以使用Docker Compose来进行部署。如果环境中使用了kubernetes,Harbor也提供了kubernetes的配置文件。Harbor大概需要以下几个容器组成:
- ui(Harbor的核心服务)
- log(运行着rsyslog的容器,进行日志收集)
- mysql(由官方mysql镜像构成的数据库容器)
- Nginx(使用Nginx做反向代理)
- registry(官方的Docker registry)
- adminserver(Harbor的配置数据管理器)
- jobservice(Harbor的任务管理服务)
- redis(用于存储session)
Harbor是一个用于存储和分发Docker镜像的企业级Registry服务器:


2.1、harbor依赖组件
1)Nginx(Proxy代理层):Nginx前端代理,主要用于分发前端页面ui访问和镜像上传和下载流量; Harbor的registry,UI,token等服务,通过一个前置的反向代理统一接收浏览器、Docker客户端的请求,并将请求转发给后端不同的服务
2)Registry v2:镜像仓库,负责存储镜像文件; Docker官方镜像仓库, 负责储存Docker镜像,并处理docker push/pull命令。由于我们要对用户进行访问控制,即不同用户对Docker image有不同的读写权限,Registry会指向一个token服务,强制用户的每次docker pull/push请求都要携带一个合法的token, Registry会通过公钥对token进行解密验证
3)Database(MySQL或Postgresql):为core services提供数据库服务,负责储存用户权限、审计日志、Docker image分组信息等数据
4)Core services(Admin Server):这是Harbor的核心功能,主要提供以下服务:
- UI:提供图形化界面,帮助用户管理registry上的镜像(image), 并对用户进行授权
- webhook:为了及时获取registry 上image状态变化的情况, 在Registry上配置webhook,把状态变化传递给UI模块
- Auth服务:负责根据用户权限给每个docker push/pull命令签发token. Docker 客户端向Regiøstry服务发起的请求,如果不包含token,会被重定向到这里,获得token后再重新向Registry进行请求
- API: 提供Harbor,RESTful API
5)Replication Job Service:提供多个 Harbor 实例之间的镜像同步功能
6)Log collector:为了帮助监控Harbor运行,负责收集其他组件的log,供日后进行分析
2.2、harbor组件数据流向
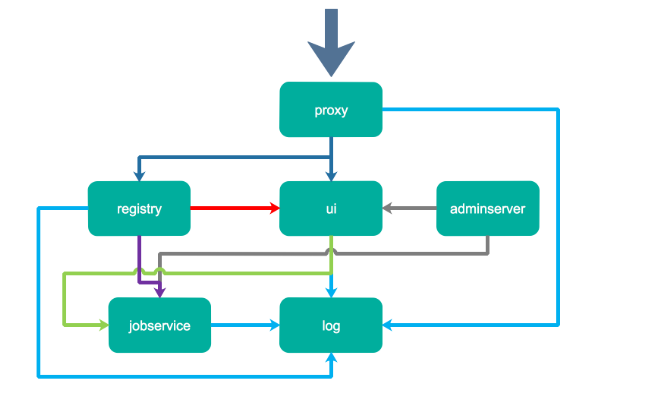
1)proxy,它是一个nginx前端代理,主要是分发前端页面ui访问和镜像上传和下载流量,上图中通过深蓝色先标识;
2)ui提供了一个web管理页面,当然还包括了一个前端页面和后端API,底层使用mysql数据库;
3)registry是镜像仓库,负责存储镜像文件,当镜像上传完毕后通过hook通知ui创建repository,上图通过红色线标识,当然registry的token认证也是通过ui组件完成;
4)adminserver是系统的配置管理中心附带检查存储用量,ui和jobserver启动时候回需要加载adminserver的配置,通过灰色线标识;
5)jobsevice是负责镜像复制工作的,他和registry通信,从一个registry pull镜像然后push到另一个registry,并记录job_log,上图通过紫色线标识;
6)log是日志汇总组件,通过docker的log-driver把日志汇总到一起,通过浅蓝色线条标识。
三、Harbor仓库部署
3.1、注意事项
官方提供2种部署Harbor的方式:
1)在线安装: 从Docker Hub下载Harbor的镜像来安装, 由于Docker Hub比较慢, 建议Docker配置好加速器。
2)离线安装: 这种方式应对与部署主机没联网的情况使用。需要提前下载离线安装包: harbor-offline-installer-.tgz 到本地
在线部署方式:非常慢
1)下载Harbor最新的在线安装包
2)配置Harbor (harbor.yml)
3)运行install.sh来安装和启动Harbor
4)Harbor的日志路径:/var/log/harbor
推荐系统配置:

参考文档:
github:https://github.com/goharbor/harbor
安装手册:https://github.com/goharbor/harbor/blob/master/docs/installation_guide.md
用户手册:https://github.com/goharbor/harbor/blob/master/docs/user_guide.md
3.2、部署记录
3.2.1、环境准备
Harbor以容器的形式进行部署, 因此可以被部署到任何支持Docker的Linux发行版, 要使用Harbor,需要安装docker和docker-compose编排工具,并且具备如下环境:
Python2.7+
Docker Engine 1.10+
Docker Compose 1.6.0+
#====================================================================================================
[root@docker02 ~]# cat /etc/redhat-release
CentOS Linux release 7.4.1708 (Core)

[root@docker02 ~]# setenforce 0
setenforce: SELinux is disabled
[root@docker02 ~]# cat /etc/sysconfig/selinux
....
SELINUX=disabled

[root@docker02 ~]# systemctl stop firewalld
[root@docker02 ~]# systemctl disable firewalld
[root@docker02 ~]# firewall-cmd --state
not running

[root@docker02 ~]# python --version
Python 2.7.5
3.2.2、安装docker
#更新yum包
[root@docker02 ~]# yum update

#卸载旧版本 Docker
[root@docker02 ~]# yum remove docker docker-common docker-selinux docker-engine -y

#安装相关软件包
[root@docker02 ~]# yum install -y yum-utils device-mapper-persistent-data lvm2

#添加docker源
[root@docker02 ~]# yum-config-manager --add-repo http://mirrors.aliyun.com/docker-ce/linux/centos/docker-ce.repo

#安装docker
[root@docker02 ~]# yum -y install docker-ce

#启动docker
[root@docker02 ~]# systemctl start docker
[root@docker02 ~]# systemctl enable docker
[root@docker02 ~]# docker version
Client: Docker Engine - Community
 Version:           19.03.2
 API version:       1.40
 Go version:        go1.12.8
 Git commit:        6a30dfc
 Built:             Thu Aug 29 05:28:55 2019
 OS/Arch:           linux/amd64
 Experimental:      false

Server: Docker Engine - Community
 Engine:
  Version:          19.03.2
  API version:      1.40 (minimum version 1.12)
  Go version:       go1.12.8
  Git commit:       6a30dfc
  Built:            Thu Aug 29 05:27:34 2019
  OS/Arch:          linux/amd64
  Experimental:     false
 containerd:
  Version:          1.2.6
  GitCommit:        894b81a4b802e4eb2a91d1ce216b8817763c29fb
 runc:
  Version:          1.0.0-rc8
  GitCommit:        425e105d5a03fabd737a126ad93d62a9eeede87f
 docker-init:
  Version:          0.18.0
  GitCommit:        fec3683
3.2.3、安装docker compose
#下载docker-compose
[root@docker02 ~]# curl -L https://github.com/docker/compose/releases/download/1.18.0/docker-compose-`uname -s`-`uname -m` -o /usr/local/bin/docker-compose

#授权
[root@docker02 ~]# chmod +x /usr/local/bin/docker-compose

#查看版本
[root@docker02 ~]# docker-compose version
docker-compose version 1.18.0, build 8dd22a9
docker-py version: 2.6.1
CPython version: 2.7.13
OpenSSL version: OpenSSL 1.0.1t  3 May 2016
3.2.4、离线方式安装harbor
在线安装可能由于官网源的网络波动导致安装失败
#上传下载的离线软件包并解压
[root@docker02 ~]# ll
-rw-r--r--  1 root root 634887088 Nov 26 15:54 harbor-offline-installer-v1.9.2.tgz
[root@docker02 ~]# tar xf harbor-offline-installer-v1.9.2.tgz
[root@docker02 ~]# ls
anaconda-ks.cfg  harbor  harbor-offline-installer-v1.9.2.tgz
[root@docker02 ~]# cd harbor/
[root@docker02 harbor]# ll
total 623288
-rw-r--r-- 1 root root 638214056 Nov  1 11:14 harbor.v1.9.2.tar.gz
-rw-r--r-- 1 root root      5805 Nov  1 11:13 harbor.yml
-rwxr-xr-x 1 root root      5088 Nov  1 11:13 install.sh
-rw-r--r-- 1 root root     11347 Nov  1 11:13 LICENSE
-rwxr-xr-x 1 root root      1748 Nov  1 11:13 prepare

#配置harbor
[root@docker02 harbor]# cat harbor.yml |grep -v "#"|grep -v "^$"
hostname: 192.168.11.11  #修改成Harbao部署机自身的ip地址或域名
http:
  port: 80
harbor_admin_password: Harbor12345   #harbor初始管理员密码为Harbor12345
database:
  password: root123    #数据库密码
  max_idle_conns: 50
  max_open_conns: 100
data_volume: /data
clair:
  updaters_interval: 12
jobservice:
  max_job_workers: 10
notification:
  webhook_job_max_retry: 10
chart:
  absolute_url: disabled
log:
  level: info
  local:
    rotate_count: 50
    rotate_size: 200M
    location: /var/log/harbor
_version: 1.9.0
proxy:
  http_proxy:
  https_proxy:
  no_proxy: 127.0.0.1,localhost,.local,.internal,log,db,redis,nginx,core,portal,postgresql,jobservice,registry,registryctl,clair
  components:
    - core
    - jobservice
    - clair

#启动harbor
[root@docker02 harbor]# ./install.sh
.....
✔ ----Harbor has been installed and started successfully.----

Now you should be able to visit the admin portal at http://192.168.11.11.
For more details, please visit https://github.com/goharbor/harbor .

#harbor依赖的镜像及服务
[root@docker02 harbor]# docker images
REPOSITORY                      TAG                             IMAGE ID            CREATED             SIZE
goharbor/chartmuseum-photon     v0.9.0-v1.9.2                   06f0bb43a123        3 weeks ago         131MB
goharbor/harbor-migrator        v1.9.2                          a528c9365e9d        3 weeks ago         362MB
goharbor/redis-photon           v1.9.2                          dbf0b2ba3ccc        3 weeks ago         111MB
goharbor/clair-photon           v2.0.9-v1.9.2                   855bcccf4d1d        3 weeks ago         170MB
goharbor/notary-server-photon   v0.6.1-v1.9.2                   076042839d04        3 weeks ago         146MB
goharbor/notary-signer-photon   v0.6.1-v1.9.2                   ae5de28b0d3a        3 weeks ago         143MB
goharbor/harbor-registryctl     v1.9.2                          b4f9cc0f6e98        3 weeks ago         103MB
goharbor/registry-photon        v2.7.1-patch-2819-2553-v1.9.2   4fd11a82000a        3 weeks ago         85.7MB
goharbor/nginx-photon           v1.9.2                          0eb06c2b4af1        3 weeks ago         44MB
goharbor/harbor-log             v1.9.2                          3c266e682cab        3 weeks ago         82.3MB
goharbor/harbor-jobservice      v1.9.2                          aae981aa960e        3 weeks ago         141MB
goharbor/harbor-core            v1.9.2                          2d58b99977a9        3 weeks ago         155MB
goharbor/harbor-portal          v1.9.2                          322ed40c51af        3 weeks ago         51.4MB
goharbor/harbor-db              v1.9.2                          e57ec1388124        3 weeks ago         148MB
goharbor/prepare                v1.9.2                          727d3c1e7145        3 weeks ago         149MB
[root@docker02 harbor]# docker ps -a
CONTAINER ID        IMAGE                                                    COMMAND                  CREATED             STATUS                   PORTS                       NAMES
2cd7fc998738        goharbor/harbor-jobservice:v1.9.2                        "/harbor/harbor_jobs…"   2 minutes ago       Up 2 minutes (healthy)                               harbor-jobservice
65ca02e1eece        goharbor/nginx-photon:v1.9.2                             "nginx -g 'daemon of…"   2 minutes ago       Up 2 minutes (healthy)   0.0.0.0:80->8080/tcp        nginx
24e15b7b539b        goharbor/harbor-core:v1.9.2                              "/harbor/harbor_core"    2 minutes ago       Up 2 minutes (healthy)                               harbor-core
732a715294bc        goharbor/registry-photon:v2.7.1-patch-2819-2553-v1.9.2   "/entrypoint.sh /etc…"   2 minutes ago       Up 2 minutes (healthy)   5000/tcp                    registry
555ce48276ad        goharbor/harbor-db:v1.9.2                                "/docker-entrypoint.…"   2 minutes ago       Up 2 minutes (healthy)   5432/tcp                    harbor-db
1250e01e294a        goharbor/redis-photon:v1.9.2                             "redis-server /etc/r…"   2 minutes ago       Up 2 minutes (healthy)   6379/tcp                    redis
9f7aff4047cd        goharbor/harbor-registryctl:v1.9.2                       "/harbor/start.sh"       2 minutes ago       Up 2 minutes (healthy)                               registryctl
c709e6f85352        goharbor/harbor-portal:v1.9.2                            "nginx -g 'daemon of…"   2 minutes ago       Up 2 minutes (healthy)   8080/tcp                    harbor-portal
bcf8e66ca857        goharbor/harbor-log:v1.9.2                               "/bin/sh -c /usr/loc…"   2 minutes ago       Up 2 minutes (healthy)   127.0.0.1:1514->10514/tcp   harbor-log
通过浏览器访问harbor:http://192.168.11.11/ admin Harbor12345

四、项目测试
4.1、web端新建项目
新建一个名称为的项目,设置不公开。注意:当项目设为公开后,任何人都有此项目下镜像的读权限。命令行用户不需要“docker login”就可以拉取此项目下的镜像


4.2、提交本地镜像至仓库
#报错
[root@docker01 ~]# docker login 192.168.11.11
Username: admin
Password:
Error response from daemon: Get https://192.168.11.11/v2/: dial tcp 192.168.11.11:443: connect: connection refused

#解决方法
[root@docker01 ~]# vim /etc/docker/daemon.json
{
  "registry-mirrors": ["https://registry.docker-cn.com"],
  "insecure-registries": ["192.168.11.11"]   #添加
}
[root@docker01 ~]# systemctl restart docker

#再次登录
[root@docker01 ~]# docker login 192.168.11.11
Username: admin
Password:
WARNING! Your password will be stored unencrypted in /root/.docker/config.json.
Configure a credential helper to remove this warning. See
https://docs.docker.com/engine/reference/commandline/login/#credentials-store
Login Succeeded

#给镜像打标签
[root@docker01 ~]# docker tag nginx:alpine 192.168.11.11/app/nginx:alpine
[root@docker01 ~]# docker images
REPOSITORY                TAG                 IMAGE ID            CREATED             SIZE
192.168.11.11/app/nginx   alpine              a624d888d69f        6 days ago          21.5MB
nginx                     alpine              a624d888d69f        6 days ago          21.5MB
[root@docker01 ~]# docker push 192.168.11.11/app/nginx:alpine
登录web harbor查看:


五、Harbor服务相关说明
5.1、harbor日志路径
日志路径可以在harbor.yml自行配置
[root@docker02 ~]# ls /var/log/harbor/
core.log  jobservice.log  portal.log  postgresql.log  proxy.log  redis.log  registryctl.log  registry.log
5.2、harbor启停命令
在使用./install.sh命令后,会在harbor目录下生成docker-compose.yml文件
#停止harbor
[root@docker02 ~]# cd harbor/   #需要进入harbor目录
[root@docker02 harbor]# docker-compose down -v
Stopping harbor-jobservice ... done
Stopping nginx             ... done
Stopping harbor-core       ... done
Stopping registry          ... done
Stopping harbor-db         ... done
Stopping redis             ... done
Stopping registryctl       ... done
Stopping harbor-portal     ... done
Stopping harbor-log        ... done
Removing harbor-jobservice ... done
Removing nginx             ... done
Removing harbor-core       ... done
Removing registry          ... done
Removing harbor-db         ... done
Removing redis             ... done
Removing registryctl       ... done
Removing harbor-portal     ... done
Removing harbor-log        ... done
Removing network harbor_harbor

#启动harbor
[root@docker02 harbor]# docker-compose up -d
Creating network "harbor_harbor" with the default driver
Creating registry ... done
Creating harbor-core ... done

Creating nginx ... done
Creating redis ...
Creating harbor-db ...
Creating registryctl ...
Creating harbor-portal ...
Creating registry ...
Creating harbor-core ...
Creating harbor-jobservice ...
Creating nginx ...
docker-compose相关命令:
docker-compose up -d          # 后台启动,如果容器不存在根据镜像自动创建
docker-compose down -v        # 停止容器并删除容器
docker-compose start          # 启动容器,容器不存在就无法启动,不会自动创建镜像
docker-compose stop           # 停止容器

需要注意:
其实上面是停止docker-compose.yml中定义的所有容器,默认情况下docker-compose就是操作同目录下的docker-compose.yml文件。
如果使用其他yml文件,可以使用-f自己指定。
5.3、测试修改端口
#停止harbor
[root@docker02 harbor]# docker-compose down -v

#修改harbor配置文件,比如这里修改harbor的web登录端口,由80端口修改为8080端口
[root@docker02 harbor]# vim harbor.yml
....
http:
  # port for http, default is 80. If https enabled, this port will redirect to https port
  port: 8080

#将harbor修改的配置更新到 docker-compose.yml 文件
[root@docker02 harbor]# ./prepare
prepare base dir is set to /root/harbor
Clearing the configuration file: /config/log/logrotate.conf
Clearing the configuration file: /config/log/rsyslog_docker.conf
Clearing the configuration file: /config/nginx/nginx.conf
Clearing the configuration file: /config/core/env
Clearing the configuration file: /config/core/app.conf
Clearing the configuration file: /config/registry/config.yml
Clearing the configuration file: /config/registry/root.crt
Clearing the configuration file: /config/registryctl/env
Clearing the configuration file: /config/registryctl/config.yml
Clearing the configuration file: /config/db/env
Clearing the configuration file: /config/jobservice/env
Clearing the configuration file: /config/jobservice/config.yml
Generated configuration file: /config/log/logrotate.conf
Generated configuration file: /config/log/rsyslog_docker.conf
Generated configuration file: /config/nginx/nginx.conf
Generated configuration file: /config/core/env
Generated configuration file: /config/core/app.conf
Generated configuration file: /config/registry/config.yml
Generated configuration file: /config/registryctl/env
Generated configuration file: /config/db/env
Generated configuration file: /config/jobservice/env
Generated configuration file: /config/jobservice/config.yml
loaded secret from file: /secret/keys/secretkey
Generated configuration file: /compose_location/docker-compose.yml
Clean up the input dir

#防止容器进程没有权限读取生成的配置
[root@docker02 harbor]# chmod -R 777 common

#再次启动 harbor
[root@docker02 harbor]# docker-compose up -d
[root@docker02 harbor]# docker-compose ps
      Name                     Command               State             Ports
--------------------------------------------------------------------------------------
harbor-core         /harbor/harbor_core              Up
harbor-db           /docker-entrypoint.sh            Up      5432/tcp
harbor-jobservice   /harbor/harbor_jobservice  ...   Up
harbor-log          /bin/sh -c /usr/local/bin/ ...   Up      127.0.0.1:1514->10514/tcp
harbor-portal       nginx -g daemon off;             Up      8080/tcp
nginx               nginx -g daemon off;             Up      0.0.0.0:8080->8080/tcp
redis               redis-server /etc/redis.conf     Up      6379/tcp
registry            /entrypoint.sh /etc/regist ...   Up      5000/tcp
registryctl         /harbor/start.sh                 Up

#浏览器访问
http://192.168.11.11:8080/
六、Harbor启用https证书
harbor默认安装后采用的是http方式,后面使用的时候可能会发现很多不方面。因为Docker客户端登录harbor进行镜像推送或拉取时默认是https方式!所以http方式下,需要在每一台harbor客户端机器上都要设置"insecure-registries", 感觉很麻烦!所以最好还是将harbor默认的http方式改为https方式!另外,从安全角度考虑,容器的仓库在生产环境中往往也是需要被设定为https的方式,而harbor将这些证书的创建和设定都进行了简单的集成,下面来看一下在harbor下如何使用https的方式
6.1、准备工作
#创建证书之前,为了方面验证,需要将前面在客户端机器上/etc/docker/daemon.json文件里添加"insecure-registries"配置删除
[root@docker01 ~]# vim /etc/docker/daemon.json
{}
[root@docker01 ~]# rm -rf /root/.docker
[root@docker01 ~]# systemctl restart docker

#将harbor部署机自身的/etc/docker/daemon.json文件里添加"insecure-registries"配置也删除
[root@docker02 ~]# vim /etc/docker/daemon.json
{
  "registry-mirrors": ["https://registry.docker-cn.com"]
}
[root@docker02 ~]# rm -rf /root/.docker
[root@docker02 ~]# systemctl restart docker

#重启harbor
[root@docker02 ~]# cd harbor/
[root@docker02 harbor]# docker-compose down -v
[root@docker02 harbor]# docker-compose up –d
6.2、创建证书
1)创建CA
[root@docker02 harbor]# pwd
/root/harbor
[root@docker02 harbor]# mkdir ssl
[root@docker02 harbor]# cd ssl/
[root@docker02 ssl]# pwd
/root/harbor/ssl
[root@docker02 ssl]# openssl req  -newkey rsa:4096 -nodes -sha256 -keyout ca.key -x509 -days 365 -out ca.crt
Generating a 4096 bit RSA private key
................................................................++
............................................................................++
writing new private key to 'ca.key'
-----
You are about to be asked to enter information that will be incorporated
into your certificate request.
What you are about to enter is what is called a Distinguished Name or a DN.
There are quite a few fields but you can leave some blank
For some fields there will be a default value,
If you enter '.', the field will be left blank.
-----
Country Name (2 letter code) [XX]:CN
State or Province Name (full name) []:beijing
Locality Name (eg, city) [Default City]:beijing
Organization Name (eg, company) [Default Company Ltd]:DevOps
Organizational Unit Name (eg, section) []:Tec
Common Name (eg, your name or your server's hostname) []:192.168.11.11
Email Address []:352972405@qq.com
[root@docker02 ssl]# ls
ca.crt  ca.key
2)创建证书请求文件csr
[root@docker02 ssl]# openssl req -newkey rsa:4096 -nodes -sha256 -keyout 192.168.11.11.key  -out 192.168.11.11.csr
Generating a 4096 bit RSA private key
...........................++
............................................................................................................................................................................................................................................................................................++
writing new private key to '192.168.11.11.key'
-----
You are about to be asked to enter information that will be incorporated
into your certificate request.
What you are about to enter is what is called a Distinguished Name or a DN.
There are quite a few fields but you can leave some blank
For some fields there will be a default value,
If you enter '.', the field will be left blank.
-----
Country Name (2 letter code) [XX]:CN
State or Province Name (full name) []:beijing
Locality Name (eg, city) [Default City]:beijing
Organization Name (eg, company) [Default Company Ltd]:DevOps
Organizational Unit Name (eg, section) []:Tec
Common Name (eg, your name or your server's hostname) []:192.168.11.11
Email Address []:352972405@qq.com

Please enter the following 'extra' attributes
to be sent with your certificate request
A challenge password []:123456
An optional company name []:DevOps
[root@docker02 ssl]# ls
192.168.11.11.csr  192.168.11.11.key  ca.crt  ca.key
3)创建证书
[root@docker02 ssl]# echo subjectAltName = IP:192.168.11.11 > extfile.cnf
[root@docker02 ssl]# openssl x509 -req -days 365 -in 192.168.11.11.csr -CA ca.crt -CAkey ca.key -CAcreateserial -extfile extfile.cnf -out 192.168.11.11.crt
Signature ok
subject=/C=CN/ST=beijing/L=beijing/O=DevOps/OU=Tec/CN=192.168.11.11/emailAddress=352972405@qq.com
Getting CA Private Key
[root@docker02 ssl]# ls
192.168.11.11.crt  192.168.11.11.csr  192.168.11.11.key  ca.crt  ca.key  ca.srl  extfile.cnf
4)设定证书:查看证书所在路径, 后面将harbor.yaml文件中的路径也同样设定
[root@docker02 ssl]# pwd
/root/harbor/ssl
[root@docker02 ssl]# ll
total 28
-rw-r--r-- 1 root root 2025 Nov 26 17:58 192.168.11.11.crt
-rw-r--r-- 1 root root 1805 Nov 26 17:56 192.168.11.11.csr
-rw-r--r-- 1 root root 3272 Nov 26 17:56 192.168.11.11.key
-rw-r--r-- 1 root root 2106 Nov 26 17:54 ca.crt
-rw-r--r-- 1 root root 3272 Nov 26 17:54 ca.key
-rw-r--r-- 1 root root   17 Nov 26 17:58 ca.srl
-rw-r--r-- 1 root root   34 Nov 26 17:57 extfile.cnf
6.3、修改harbor配置
1)修改harbor.yaml文件
#停止harbor
[root@docker02 harbor]# pwd
/root/harbor
[root@docker02 harbor]# docker-compose down -v
[root@docker02 harbor]# docker-compose ps
Name   Command   State   Ports
------------------------------

#修改harbor.yml
[root@docker02 harbor]# vim harbor.yml
.....
# http related config
#http:
  # port for http, default is 80. If https enabled, this port will redirect to https port
  #port: 80

# https related config
https:
#   # https port for harbor, default is 443
  port: 443
#   # The path of cert and key files for nginx
  certificate: /root/harbor/ssl/192.168.11.11.crt
  private_key: /root/harbor/ssl/192.168.11.11.key
.....

#执行prepare脚本,将harbor修改的配置更新到 docker-compose.yml 文件
[root@docker02 harbor]# ./prepare

#查看一下docker-compose.yml文件,发现已经将新配置的443端口的https信息更新到docker-compose.yml文件里了
#如下80端口和443端口都配置了,所以harbor访问时是http强转到https的
[root@docker02 harbor]# cat docker-compose.yml |grep 443 -C3
    dns_search: .
    ports:
      - 80:8080
      - 443:8443
    depends_on:
      - registry
      - core

#重启docker-compose
[root@docker02 harbor]# docker-compose up –d
6.4、测试登录
1)测试登录
#在harbor部署机本机确认login登陆 (使用80端口或443端口都可以,自动跳转的)
[root@docker02 harbor]# docker login -u admin -p Harbor12345 192.168.11.11
WARNING! Using --password via the CLI is insecure. Use --password-stdin.
Error response from daemon: Get https://192.168.11.11/v2/: x509: certificate signed by unknown authority

[root@docker02 harbor]# docker login -u admin -p Harbor12345 192.168.11.11:443
WARNING! Using --password via the CLI is insecure. Use --password-stdin.
Error response from daemon: Get https://192.168.11.11:443/v2/: x509: certificate signed by unknown authority

#---------------------------------------------------------------------------------
#报错解决:此种情况多发生在自签名的证书,报错含义是签发证书机构未经认证,无法识别
#解决方法:
[root@docker02 harbor]# chmod 644 /etc/pki/ca-trust/extracted/pem/tls-ca-bundle.pem
[root@docker02 harbor]# cat /root/harbor/ssl/192.168.11.11.crt >> /etc/pki/tls/certs/ca-bundle.crt
[root@docker02 harbor]# chmod 444 /etc/pki/ca-trust/extracted/pem/tls-ca-bundle.pem

#由于证书是docker的daemon需要用到的,所以需要重启docker服务,进而也要重启docker-compose
[root@docker02 harbor]# systemctl restart docker
[root@docker02 harbor]# docker-compose down -v
[root@docker02 harbor]# docker-compose up -d

#再次尝试在harbor本机登陆
[root@docker02 harbor]# docker login -u admin -p Harbor12345 192.168.11.11
WARNING! Using --password via the CLI is insecure. Use --password-stdin.
WARNING! Your password will be stored unencrypted in /root/.docker/config.json.
Configure a credential helper to remove this warning. See
https://docs.docker.com/engine/reference/commandline/login/#credentials-store
Login Succeeded

#登陆的权限信息保存到/root/.docker/config.json 文件里了,只要这个文件不删除,下次就可以不需要输入用户名和密码直接登陆了
[root@docker02 harbor]# cat /root/.docker/config.json
{
	"auths": {
		"192.168.11.11": {
			"auth": "YWRtaW46SGFyYm9yMTIzNDU="
		}
	},
	"HttpHeaders": {
		"User-Agent": "Docker-Client/19.03.2 (linux)"
	}
}

[root@docker02 harbor]# docker login 192.168.11.11
Authenticating with existing credentials...
WARNING! Your password will be stored unencrypted in /root/.docker/config.json.
Configure a credential helper to remove this warning. See
https://docs.docker.com/engine/reference/commandline/login/#credentials-store

Login Succeeded

[root@docker02 harbor]# docker login 192.168.11.11:443
Username: admin
Password:
WARNING! Your password will be stored unencrypted in /root/.docker/config.json.
Configure a credential helper to remove this warning. See
https://docs.docker.com/engine/reference/commandline/login/#credentials-store

Login Succeeded
2)远程客户端测试登录
首先很重要的一步,这一步极其关键!一定不要忘记操作!!
需要将harbor服务端生成的CA证书拷贝到每个远程客户机的"/etc/docker/certs.d/harbor服务器的域名或ip/" 目录下
[root@docker01 ~]# mkdir -p /etc/docker/certs.d/192.168.11.11/

#将CA证书拷贝过来
[root@docker01 ~]# scp root@192.168.11.11:/root/harbor/ssl/* /etc/docker/certs.d/192.168.11.11/
[root@docker01 ~]# cd /etc/docker/certs.d/192.168.11.11/
[root@docker01 192.168.11.11]# ls
192.168.11.11.crt  192.168.11.11.csr  192.168.11.11.key  ca.crt  ca.key  ca.srl  extfile.cnf

#进行同样的授权操作
[root@docker01 192.168.11.11]# chmod 644 /etc/pki/ca-trust/extracted/pem/tls-ca-bundle.pem
[root@docker01 192.168.11.11]# cat /etc/docker/certs.d/192.168.11.11/192.168.11.11.crt >> /etc/pki/tls/certs/ca-bundle.crt
[root@docker01 192.168.11.11]# chmod 444 /etc/pki/ca-trust/extracted/pem/tls-ca-bundle.pem

#重启docker服务
[root@docker01 192.168.11.11]# systemctl restart docker

#登录测试
[root@docker01 192.168.11.11]# docker login -u admin -p Harbor12345 192.168.11.11:443
Login Succeeded
[root@docker01 192.168.11.11]# cat /root/.docker/config.json
{
	"auths": {
		"192.168.11.11:443": {
			"auth": "YWRtaW46SGFyYm9yMTIzNDU="
		}
	},
	"HttpHeaders": {
		"User-Agent": "Docker-Client/19.03.2 (linux)"
	}
}

#使用443端口登陆harbor仓库是正常的,如果此时使用80端口登陆,则出现如下报错
[root@docker01 192.168.11.11]# docker login -u admin -p Harbor12345 192.168.11.11
WARNING! Using --password via the CLI is insecure. Use --password-stdin.
Error response from daemon: Missing client certificate 192.168.11.11.cert for key 192.168.11.11.key

#所以在客户端就使用443端口来登陆harbor仓库了
注意:远程客户端如果需要push或pull镜像,需如下操作:
#报错
[root@docker01 ~]# docker pull 192.168.11.11/app/nginx:alpine
Error response from daemon: Missing client certificate 192.168.11.11.cert for key 192.168.11.11.key

#正确:需要加端口号
[root@docker01 certs.d]# docker pull 192.168.11.11:443/app/nginx:alpine
alpine: Pulling from app/nginx
89d9c30c1d48: Pull complete
24f1c4f0b2f4: Pull complete
Digest: sha256:2993f9c9a619cde706ae0e34a1a91eb9cf5225182b6b76eb637392d2ce816538
Status: Downloaded newer image for 192.168.11.11:443/app/nginx:alpine
192.168.11.11:443/app/nginx:alpine

#客户端push镜像
[root@docker01 certs.d]# docker images
REPOSITORY          TAG                 IMAGE ID            CREATED             SIZE
centos              6.9                 2199b8eb8390        8 months ago        195MB
registry            latest              f32a97de94e1        8 months ago        25.8MB
[root@docker01 certs.d]# docker tag centos:6.9 192.168.11.11:443/app/centos:6.9  #需要加端口
[root@docker01 certs.d]# docker images
REPOSITORY                     TAG                 IMAGE ID            CREATED             SIZE
192.168.11.11:443/app/centos   6.9                 2199b8eb8390        8 months ago        195MB
centos                         6.9                 2199b8eb8390        8 months ago        195MB
registry                       latest              f32a97de94e1        8 months ago        25.8MB
[root@docker01 certs.d]# docker push 192.168.11.11:443/app/centos:6.9
The push refers to repository [192.168.11.11:443/app/centos]
aaa5621d7c01: Pushed
6.9: digest: sha256:7e172600dff1903f186061ce5f5295664ec9942ca120e4e5b427ddf01bb2b35b size: 529
