一、修改当前nginx静态资源服务器,绑定到本地
1. 修改nginx.conf配置,绑定本地及8080端口
![]()
2. 如果改了IP和端口,要先停止服务器然后再启动
nginx -s stop
./nginx
3.重启nginx后,再访问http://192.168.2.141/就失败了
二、搭建openResty环境作为缓存服务器
1. 进入官网http://openresty.org/,点击左侧下载,往下拉页面,找到适合版本进行下载
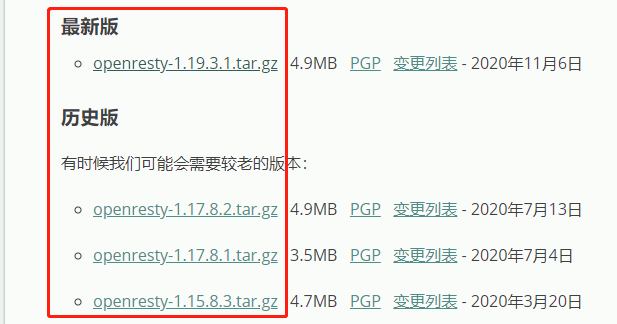
wget https://openresty.org/download/openresty-1.19.3.1.tar.gz
tar -zxvf openresty-1.19.3.1.tar.gz
2. 解压后,进入openresty目录进行编译安装,注意,如果没有默认加载lua编译环境,需要configure时要添加luajit模块(--with-luajit),支持lua语言环境
./configure --prefix=/root/openresty
gmake
gmake install
3. 进入openresty安装包bin目录下,启动openresty
./openresty
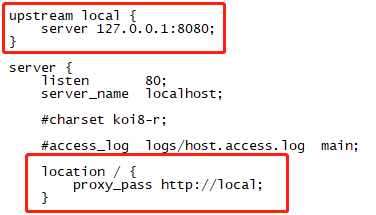
4. 在openresty安装目录下编辑nginx/conf/nginx.conf文件,主要是在http模块下通过指令upstream设置上游服务器,可以命名为local;在location模块下设置proxy_pass实现代理。配置如下
5. 重启openresty
bin/openresty -s reload
6. 再访问http://192.168.2.141/就可以看到之前页面了
7. 上游服务和浏览器之间多了代理服务器,那么如果上游服务想获取浏览器中某些配置,就需要对代理服务器,也就是openresty进行如下配置
location / {
     proxy_pass http://local;
     proxy_set_header Host $host;
     proxy_set_header X-Real-IP $remote_addr;
     proxy_set_header X-Forwarded-For $proxy_add_x_forwarded_for;
 }
8. 给反向代理服务器设置缓存
- 在http模块下定义缓存,设置缓存文件位置、缓存级别、共享缓存名称及缓存大小等
proxy_cache_path /root/openresty/cache levels=1:2 keys_zone=orcache:10m max_size=10g inactive=60m use_temp_path=off;
- 在location模块中使用定义的共享缓存,设置proxy_cache指定要使用的共享缓存,设置proxy_cache_key指定缓存Key生成方式,proxy_cache_valid设置起作用的状态码及缓存时间
location / {
            proxy_pass http://local;
            proxy_set_header Host $host;
            proxy_set_header X-Real-IP $remote_addr;
            proxy_set_header X-Forwarded-For $proxy_add_x_forwarded_for;
            proxy_cache orcache;
            proxy_cache_key $host$uri$is_args$args;
            proxy_cache_valid 200 304 302 1d;
        }
- 浏览几个菜单后,关闭上游服务器(nginx/sbin/nginx -s stop),即nginx静态资源服务器。再访问那几个菜单依然可以访问到,因为已经缓存了。