删除接口,弹出模态框询问,回调函数写在一个函数里
productDelete=(productInfo)=>{
        Modal.confirm({
            title:"删除产品",
            content:`您确认要删除产品 "${productInfo.name}" 吗?`,
            centered:true,
            okText:"确定",
            cancelText:"取消",
            onOk:async()=>{
                let data=await api.productDeleteApi({
                    id:productInfo.id,
                })
                if(data.code===0){
                    this.onChangePage();
                    message.success(`产品 "${productInfo.name}" 删除成功!`)
                }else{
                    message.error(api.stateCode[data.code])
                }
            }
        })
    }
获取json里(指定)数据的方法(看图)
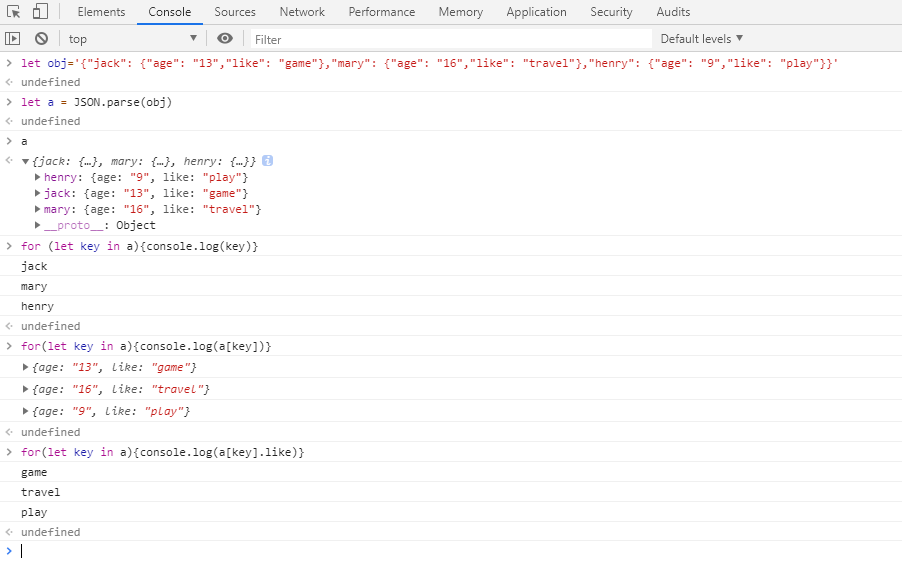
let obj='{"jack": {"age": "13","like": "game"},"mary": {"age": "16","like": "travel"},"henry": {"age": "9","like": "play"}}';
let a = JSON.parse(obj);
for (let key in a){
    console.log(key)   //获取键
}
for(let key in a){
    console.log(a[key])  //获取键的值
}
for(let key in a){
    console.log(a[key].like)  //获取键的值里的某一值
}
判断字符串是否为JSON格式
function isJSON(str) {
    if (typeof str == 'string') {
        try {
            var obj=JSON.parse(str);
            if(typeof obj == 'object' && obj ){
                return true;
            }else{
                return false;
            }

        } catch(e) {
            console.log('error:'+str+'!!!'+e);
            return false;
        }
    }
    console.log('It is not a string!')
}

如果JSON.parse能够转换成功;并且转换后的类型为object 且不等于 null,那么这个字符串就是JSON格式的字符串。
原文参考:https://www.cnblogs.com/lanleiming/p/7096973.html
在项目中使用iconfont字体图标
1、在src文件夹下新建utils文件夹,在utils文件夹里新建iconfont.js文件
2、iconfont.js文件里暴露我的iconfont项目地址(写在一个文件里的目的是以后如果需要改动链接只要改动这一个地方就可以了)
    module.exports={
        iconUrl:"//at.alicdn.com/t/font_8d5l8fzk5b87iudi.js"   //注意这里是js后缀的链接,不要用css后缀的那个链接
    }
3、在需要使用iconfont的页面使用
    import { Icon } from 'antd';
    import {iconUrl} from '../../utils/iconfont.js'   //引入链接
    const IconFont = Icon.createFromIconfontCN({
      scriptUrl:`${iconUrl}`,
    });

    <IconFont type="icon-icon4" />  //使用
给div设置id并获取当前div的id值
<div id="1"  onClick={this.handleClick}></div>

handleClick=(e)=>{
    console.log(e.currentTarget.id)   //获取id值
}
点击后获取当前div的class属性值
classGet=()=>{
    console.log(document.getElementById("classKey").className.split(/s+/)[0])   //获取id值为classKey的元素的第一个class值,这里输出的是#fff,#eee,#ccc 对的,你没看错,class里可以添加带逗号的字符串
}

<div id="classKey"  className="#fff,#eee,#ccc  pics  names demos" onClick={this.classGet}>点我</div>
点击当前div后动态添加className,如active
state={
    index:"1",
}

<div id="1" onClick={this.handleClick} className={["commodify fs-14",this.state.index==="1"?"active":null].join(' ')} >点我</div>  //注意join(' '),引号中间有空格
<div id="2" onClick={this.handleClick} className={["commodify fs-14",this.state.index==="2"?"active":null].join(' ')} >点我</div>  //这是将动态添加className的方式之一
<div id="3" onClick={this.handleClick} className={["commodify fs-14",this.state.index==="3"?"active":null].join(' ')} >点我</div> // index===3与 index==="3"

handleClick=(e)=>{
    this.setState({
        index:e.currentTarget.id
    })
}
react动态添加样式:style和className (转自https://blog.csdn.net/suwyer/article/details/81481507)
react向元素内,动态添加style
添加单个样式
<div style={{display: (index===this.state.currentIndex) ? "block" : "none"}}>此标签是否隐藏</div>

一次性添加多个样式
<div style={{display: (index===this.state.currentIndex) ? "block" : "none", color:"red"}}>此标签是否隐藏</div>
react向元素内,动态添加className
DIV标签中,没有其他class,只需要动态添加一个.active的className,来显示内容是否被选中状态
<div className={index===this.state.currentIndex?"active":null}>此标签是否选中</div>

DIV标签本身有其他class,又要动态添加一个.active的className,来显示内容是否被选中状态
<div className={["container tab", index===this.state.currentIndex?"active":null].join(' ')}>此标签是否选中</div>

使用ES6写法(推荐使用ES6写法)
<div className={`container tab ${index===this.state.currentIndex?"active":null}`}>此标签是否选中</div>
将时间戳转换为日期
function formatDateTime(inputTime) {
    var date = new Date(inputTime);
    var Y = date.getFullYear();   //年
    var M = date.getMonth() + 1;   //月,要+1
    M = M < 10 ? ('0' + M) : M;
    var D = date.getDate();    //日
    D = D < 10 ? ('0' + D) : D;
    var h = date.getHours();    //时
    h = h < 10 ? ('0' + h) : h;
    var m = date.getMinutes();   //分
    var s = date.getSeconds();   //秒
    m = m < 10 ? ('0' + m) : m;
    s = s < 10 ? ('0' + s) : s;
    return Y + '-' + M + '-' + D+' '+h+':'+m+':'+s;
};


react-antd表格用法
{title:"创建时间",dataIndex:"createTime",render:(a,orderRecords,index)=>{
                let createTime=new Date(orderRecords.createTime)
                let Y=createTime.getFullYear()
                let M=createTime.getMonth()+1<10?"0"+(createTime.getMonth()+1):createTime.getMonth()+1
                let D=createTime.getDate()<10?"0"+createTime.getDate():createTime.getDate()
                let h=createTime.getHours()<10?"0"+createTime.getHours():createTime.getHours()
                let m=createTime.getMinutes()<10?"0"+createTime.getMinutes():createTime.getMinutes()
                let s=createTime.getSeconds()<10?"0"+createTime.getSeconds():createTime.getSeconds()
                return <span>{`${Y}-${M}-${D} ${h}:${m}:${s}`}</span>
            }},
日期转换为·时间戳
let time="2019-07-04 19:24:52"
let t=new Date(time)

console.log(t.getTime())   //转换为时间戳,getTime()
上传文件,上传图片(vue和react用法差不多)
handleChange = info => {
if (info.file.status === 'uploading') {
this.setState({ loading: true });
return;
}
if (info.file.status === 'done') {
getBase64(info.file.originFileObj, imageUrl =>
this.setState({
imageUrl,
loading: false,
}),
);
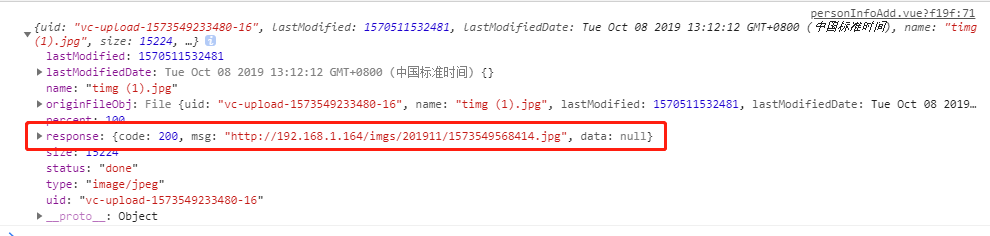
console.log(info.file)
if(info.file.response.code===200){ //组件帮我们请求接口后,我们可以在这里(info.file.response)拿到接口返回的数据
this.setState({
newShopInfo:Object.assign(this.state.newShopInfo,{
logo:info.file.response.data //将接口返回的url,即这里的(response.data)传递给logo参数使用
})
})
}else{
message.error("上传失败!")
return;
}
}
};
<Upload
name="logo" //这里的name就是请求后端所需的key值,要跟后端接口里的一致。这个需要问后端或者在接口文档里查看
listType="picture-card"
className="avatar-uploader"
showUploadList={false}
action={`${config.base}/upload/image`} //使action等于后台处理图片的接口,让组件帮我请求接口。然后这里请求成功后返回给我的数据,可以在以上函数handleChange的info.file里拿到(详情见下图)
beforeUpload={beforeUpload}
onChange={this.handleChange}
>
{imageUrl||this.state.shopInfo.logo ? <div className="picshow">
<img src={this.state.shopInfo.logo||imageUrl} alt="avatar" style={{86,height:86}}/>
</div> : uploadButton}
</Upload>
流程:1、将组件引入,尽量引全一些 2、将图片处理接口给组件的action,让组件帮我们请求接口 3、组件帮我们处理上传的图片并可以本地预览 4、图片请求接口后返回的数据会放在info.file.response里,我们从这里拿数据,然后提交到服务器。
有这么一个需求,修改昵称是一个input标签,里面的value值是初始时通过接口获取的用户昵称,
但是如果你直接将获取到的初始昵称数据赋值给value,那么这个value就定死了。就无法改动,所以这里我们这样做

state={
    userInfo:[],

    changeUserInfo:{
        changeUserName:"",
        changeUserPhone:"",
        changeUserEmail:"",
    },

}

componentWillMount=async()=>{
    this.userInfoGet()
}

async userInfoGet(){   //获取用户信息接口
    let res=await api.userInfoGetApi()
        if(res.code===200){
            this.state.userInfo=res.data;
        }else{
            console.log(res.message)
        }
        this.setState(this.state)   //重新渲染页面,注意:一般get请求之后都需要this.setState(),或者直接在if(res.code===200){this.setState({userInfo:res.data;})}里这样setState也可以。
        this.setState({
            changeUserInfo:Object.assign(this.state.changeUserInfo,{
                changeUserName:this.state.userInfo.userName,     //将接口获取到的初始userName,赋值给已经双向绑定过的input框里的changeUserName,再使input的value={this.state.changeUserInfo.changeUserName}。这样input的初始value就是当前用户名,且后续可以直接改动并传到接口。
            })
        })
}

handleUserName=(e)=>{    //与input框双向绑定
    this.setState({
        changeUserInfo:Object.assign(this.state.changeUserInfo,{
            changeUserName:e.target.value
        })
    })
}


<Input value={this.changeUserInfo.changeUserName}  onChange={this.handleUserName}  />

总结:就是 ①与输入框绑定 ②与接口获取的数据绑定 同时具备
antd表格渲染两组数据并且可使用样式
constructor(props){
        super(props);
        this.columns=[
            {title:"分组名称",
                dataIndex:"usernfo",
                render:(groupInfo)=>{
                    return <div>
                        <a href="# ">{userInfo.userName}</a>
                        <div className="text-999">{userInfo.userIntro}</div>
                    </div>
                }  ,
            },
        ]

        this.data=[
            {key:"1",sort:"1",userInfo:{userName:"李二狗",userIntro:"这个人很有钱"},commodityNumber:"6",createTime:"2019-06-24 13:45:21"},
        ]
}
判断参数个数
方法一
render(...a){
    return <span>demo</span>
}

console.log(...a)  打印出每个参数

方法二
debugger;
断点方式查看


自定义滚动条样式
.test::-webkit-scrollbar {/*滚动条整体样式*/
         10px;     /*高宽分别对应横竖滚动条的尺寸*/
        height: 1px;
    }
.test::-webkit-scrollbar-thumb {/*滚动条里面小方块*/
        border-radius: 10px;
         -webkit-box-shadow: inset 0 0 5px rgba(0,0,0,0.2);
        background: #535353;
    }
.test::-webkit-scrollbar-track {/*滚动条里面轨道*/
        -webkit-box-shadow: inset 0 0 5px rgba(0,0,0,0.2);
        border-radius: 10px;
        background: #EDEDED;
    }
antd骨架屏/loading的使用(用于页面的加载状态)
import {Skeleton} from 'antd';

export default class Demo extends React.Component{
    state={
        isloading:false,  //设置isloading,页面加载状态为false

        userInfo:[],
    }

    componentWillMount=async()=>{
        this.userInfoGet()
    }
    //获取用户信息
    userInfoGet=async()=>{
        this.setState({     //未请求前设置isloading为true,页面正在加载
            isloading:true.
        })
        let res=await api.userInfoGetApi()
        this.setState({   //请求成功后设置isloading为false,页面加载完成
            isloading:false,
        })
        if(res.code===200){
            this.state.userInfo=res.dataMap
            this.userInfoPage()
        }else{
            console.log(res.message)
        }
        this.setState(this.state)
    }

    render(){
        return(
            <div>
                {this.state.isloading?<Skeleton active />:<div>this.state.userInfo<div>}
            <div>
        );
    }
}
关于indexOf的小细节
我们知道indexOf用来返回某个指定的字符串值在字符串中首次出现的位置。若未找到,则返回-1。

假设 var obj=[1,123,34,4,3,44,564,657,578]
今天我从后台接口取到一个数据:商品序号sort,我要判断sort是否和数组obj里的数重合
但是我用obj.indexOf(sort)来判断,总是返回给我-1,也就是未找到,就算sort等于obj里的数,依旧返回给我-1。
我打印了sort,发现sort也的确是一个数。
最终我发现了问题所在,sort可能在某个时候被转换成字符串类型了,但是obj里的全部是number类型。
解决方法①将obj里的数据改成字符串类型。②将sort改成number类型。
这里我用方法②,改成obj.indexOf(Number(sort)) 达到了预期效果
关于分页问题
state={
     //上传的分页参数
     filter:{
        loading:false,   //判断页面是否是加载状态
        pageNo:1,
        pageSize:15,
     },

    //获取到的分页信息
     pageFilter:{},

    //用户信息
    userInfo:[],
}

    componentWillMount=async()=>{
        this.userInfoGet()
    }
    //获取用户信息
    userInfoGet=async()=>{
        this.setState({
            filter:Object.assign(this.state.filter,{
                loading:true,
            })
        })
        let res=await api.userInfoGetApi()
        this.setState({
            filter:Object.assign(this.state.filter,{
                loading:false,
            })
        })
        if(res.code===200){
            this.state.userInfo=res.dataMap
            this.listPage()   //成功获取到用户数据后,调用分页接口进行分页
        }else{
            console.log(res.message)
        }
        this.setState(this.state)
    }

//分页接口(从服务器获取分页信息的接口函数)
    listPage=async()=>{
        let {pageNo,pageSize}=this.state.filter;
        let data=await api.listPageApi({pageNo,pageSize})
        if(data.code===200){
            this.setState({
                pageFilter:data.dataMap
            })
            console.log(this.state.pageFilter)
        }else{
            console.log(data.message)
        }
    }

    //页面改变(前端的普通函数),作用是用来记录用户当前选取的是第几页,再调用分页接口函数传给服务器让服务器返回相应的数据。
    onChangePage=(pageNo=1,pageSize=15)=>{
        this.setState({
            filter:Object.assign(this.state.filter,{
                pageNo,pageSize   //更新当前所选取的页数,如第n页
            })
        })
        this.listPage();  //重新调用分页接口函数获取第n页数据
    }


<div>
    {this.state.filter.loading?<Skeleton active />:
       <Table
       dataSource={this.state.goodsGroupInfo}
       rowKey={record=>record.id}
       columns={this.columns}
       pagination={{onChange:this.onChangePage,current:this.state.pageFilter.pageNo,pageSize:this.state.pageFilter.pageSize,total:this.state.pageFilter.totalRecords}}   //分页设置,注意这里的onChange调用的是页面改变的那个函数而不是那个分页接口函数
       />
</div>
antd日期组件-预设常用的日期范围如“最近一周”,“这个月”,“今天”,“昨天”
<RangePicker
       ranges={{
          '昨天':[moment().startOf('day').subtract(1,'days'),moment().endOf('day').subtract(1,'days')],
           '今天': [moment().startOf('day'), moment()],
           '最近一周':[moment().startOf('day').subtract(1,'weeks'),moment()],
           '这个月': [moment().startOf('month'), moment().endOf('month')],
       }}
/>
转换为数字并保留两位小数
let a=8.3452245

let b=parseFloat(a).toFixed(2)