Vue 简介
- Vue 是一套用于构建用户界面的渐进式框架。
- 与其它大型框架不同的是,Vue 被设计为可以自底向上逐层应用。
- Vue 的核心库只关注视图层,不仅易于上手,还便于与第三方库或既有项目整合。另一方面,当与现代化的工具链以及各种支持类库结合使用时,Vue 也完全能够为复杂的单页应用提供驱动。
# react 是 facebook开发的
# vue 是我们国人开发
vue起步
- 1. 引包
- 2. 启动 new Vue(options);
插值表达式 一定要 双括号 -> {{ msg }}
Vue指令
v-text和v-html
- {{ }} 和 v-text 的作用一样 都是插入值,直接渲染,innerText
- v-html 既能插入值,又能插入标签 innerhtml
v-bind绑定
v-bind: 相当于 ' : ' 简写
v-on事件处理 监听dom
v-on 简写 ' @ '
v-on
事件修饰符
.once
<!-- 点击事件将只会触发一次 -->
<a v-on:click.once="doThis"></a>
为什么在 HTML 中监听事件?
你可能注意到这种事件监听的方式违背了关注点分离 (separation of concern) 这个长期以来的优良传统。
但不必担心,因为所有的 Vue.js 事件处理方法和表达式都严格绑定在当前视图的 ViewModel 上,它不会导致任何维护上的困难。
实际上,使用 v-on 有几个好处:
- 1. 扫一眼 HTML 模板便能轻松定位在 JavaScript 代码里对应的方法。
- 2. 因为你无须在 JavaScript 里手动绑定事件,你的 ViewModel 代码可以是非常纯粹的逻辑,和 DOM 完全解耦,更易于测试。
- 3. 当一个 ViewModel 被销毁时,所有的事件处理器都会自动被删除。你无须担心如何清理它们。
v-for列表渲染
当 Vue 正在更新使用 v-for 渲染的元素列表时,它默认使用“就地更新”的策略。
如果数据项的顺序被改变,Vue 将不会移动 DOM 元素来匹配数据项的顺序,而是就地更新每个元素,并且确保它们在每个索引位置正确渲染。
这个类似 Vue 1.x 的 track-by="$index"。
这个默认的模式是高效的,但是只适用于不依赖子组件状态或临时 DOM 状态 (例如:表单输入值) 的列表渲染输出。
为了给 Vue 一个提示,以便它能跟踪每个节点的身份,从而重用和重新排序现有元素,你需要为每项提供一个唯一 key attribute:
<div v-for="item in items" v-bind:key="item.id">
    <!-- 内容 -->
</div>
建议尽可能在使用 v-for 时提供 key attribute,除非遍历输出的 DOM 内容非常简单,或者是刻意依赖默认行为以获取性能上的提升。
因为它是 Vue 识别节点的一个通用机制,key 并不仅与 v-for 特别关联。后面我们将在指南中看到,它还具有其它用途。
不要使用对象或数组之类的非基本类型值作为 v-for 的 key。请用字符串或数值类型的值。
v-model双向数据绑定
    <p>{{obj.a}} {{obj.b}}</p>

    <input type="text" v-model="obj.a" >

    data:
      obj:{
           num : 0,
           a:1,
           b:"nima"
                  }
Vue中表单输入绑定应用
修饰符
.lazy
在默认情况下,v-model 在每次 input 事件触发后将输入框的值与数据进行同步 (除了上述输入法组合文字时)。你可以添加 lazy 修饰符,从而转为在 change 事件_之后_进行同步:
<!-- 在“change”时而非“input”时更新 -->
<input v-model.lazy="msg">
.number
如果想自动将用户的输入值转为数值类型,可以给 v-model 添加 number 修饰符:
<input v-model.number="age" type="number">
这通常很有用,因为即使在 type="number" 时,HTML 输入元素的值也总会返回字符串。如果这个值无法被 parseFloat() 解析,则会返回原始的值。
.trim
如果要自动过滤用户输入的首尾空白字符,可以给 v-model 添加 trim 修饰符:
<input v-model.trim="msg">
侦听器watch的用法
<div id="app">
    <h3>{{abc[0].name}}</h3>
    <button @click="abc[0].name='addpapa'">changer</button>

</div>

<script src="./vue.js"></script>
<script >
  var v = new Vue({
      el : '#app',
      data:{
          abc:[
              {id:1, name:"123"},
              {id:2, name:"bb"},
              {id:3, name:"cc"},
          ],
         }


        //  基本的数据类型可以使用watch直接监听,复杂数据类型object array 要深度监视
        watch:{
            // key是属于data 对象的属性名,value:监听后的行为,n_v:新值,o_v:旧值
            'mmm':function (n_v,o_v) {
                console.log(n_v, o_v)
            },
            // 深度监视  object | array    对象。数组
            'abc':{
                deep:'true', //这是字符串
                handler:function (new_v) {
                    console.log(new_v[0].name);
                }
            }
        }
计算属性之computed getter
计算属性之computed的setter方法
<div id="app">
    {{content}}
</div>

<script src="./vue.js"></script>
<script>
    //  全局的 过滤器
    Vue.filter("m_reverse",(val) => {
       console.log(this)
       return  val.split("").reverse().join("")
    })
    new Vue({
        el:'#app',
        data:{
            msg:"",
        },
        methods:{
            input_mgs:function (event) {
                const {value} = event.target;
                this.content = value;
            },
            click_mgs:function () {
                console.log(this.content)
            }
        },
    })
</script>
过滤器 filters
为数据添加新东西
<div id="app">
    {{f | my_f("$")}}
    <br>
    {{ff | m_reverse}}
    <br>
    {{content}}
    <input type="text" v-model="content" @input="input_mgs">
    <button @click="click_mgs"  >changer</button>
</div>

<script src="./vue.js"></script>
<script>
    //  全局的 过滤器
    Vue.filter("m_reverse",(val) => {
       console.log(this)
       return  val.split("").reverse().join("")
    })
    new Vue({
        el:'#app',
        data:{
            msg:"",
            f:123,
            ff:"aadddd",
        },
        methods:{
            input_mgs:function (event) {
                const {value} = event.target;
                this.content = value;
            },
            click_mgs:function () {
                console.log(this.content)
            }
        },
        //   局部的 过滤器
        filters:{
            my_f:function (f,a) {
                return a+f
            }
        },
        computed:{
            content:{
                set:function (new_v) {
                    this.msg = new_v
                    console.log(new_v)
                },
                get:function () {
                    return this.msg
                }
            },

        },
    })
</script>
音乐播放器
练手项目:音乐播放器
<head>
    <meta charset="UTF-8">
    <title>音乐播放器</title>
    <style>
        *{
            padding: 0;
            margin: 0;
        }
        ul {
            list-style: none;
        }
        ul li{
            margin: 30px 30px;
            padding: 20px 10px;
            border-radius: 20px;
        }
        ul li.active{
            background-color: lavender;
        }
    </style>
</head>
<body>
<div id="app">
    <audio :src="get_src" controls autoplay @ended="handleend()" ></audio>
    <ul>
        <li :class="{active:index === dataindex}" v-for='(item, index) in musicData' :key="item.id" @click="handleClick(index)">
            <h3>{{item.id}} 歌名: {{item.name}} </h3>
            <p>作者: {{item.author}}</p>
        </li>
    </ul>
    <button @click="handlenext()">下一首</button>
</div>

<script src="./vue.js" ></script>
<script >
    const musicData = [
        {
            id:0,
            name :'信仰',
            author:'hc',
            src:'./static/信仰.mp3'
    },
        {
            id:1,
            name :'春娇与志明',
            author:'hc',
            src:'./static/春娇与志明.m4a'
    },
        {
            id:2,
            name :'暗示分离',
            author:'辉哥',
            src:'./static/暗示分离.mp3'
    },
        {
            id:3,
            name :'突然的自我',
            author:'hc',
            src:'./static/突然的自我.mp3'
    },
        {
            id:4,
            name :'风吹麦浪',
            author:'hc',
            src:'./static/风吹麦浪.m4a'
    }
    ]

    new Vue({
        // 绑定 标签
        el: "#app",
        data:{
            musicData,
            // src:"./static/信仰.mp3",
            dataindex: 0,
        },
        // vue 的计算属性
        computed:{
            get_src(){
                return this.musicData[this.dataindex].src
            },
        },
        methods:{
            handleClick(index){
                // this.src = src
                this.dataindex = index
            },
            handleend(){
                this.handlenext();
            },
            handlenext(){
                this.dataindex++
                if (this.dataindex ===this.musicData.length){
                    this.dataindex = 0
                }
                // this.src = this.musicData[this.dataindex].src
            }
        }
    })
</script>
组件
局部组件的创建和使用
- App 组件 html+css+js
- 1. 创建组件
- 2. 挂载子组件
- 建,挂,用
- 注意: 在组件中这个data 必须是一个函数,返回一个对象
<div id="App">
<!--    //  3. 使用子组件-->
    <App></App>
</div>

<script src="../vue.js" ></script>
<script>
    //  以首字母开头大写 , 第一个参数是组件名,第二个是 模板
    Vue.component("Vheader",{
        template: `
            <div>我是导航栏 </div>
        `
    })
    Vue.component('Vaside',{
        template:`
            <div> 我是侧边栏 </div>
        `
    })
    // 需要用到的局部变量,代码需要写在 创建好的子组件前面
    const Vbutton={
        template:`
            <button>局部按钮</button>
        `
    }
    // 局部组价
    const Vcontent={
        data(){
            return{}
        },
        template:`
            <div>
                <div>我是内容栏</div>
                <Vbutton/>
                <Vbutton/>
            </div>
        `,
        components:{
            Vbutton,
        },
    }
    // App 组件  html+css+js
    // 1. 创建组件
    // 2. 挂载子组件
    // 建,挂,用
    // 注意: 在组件中这个data 必须是一个函数,返回一个对象
    const App ={
        data(){
            return {
                msg: "我是App组件"
            }
        },
        <!-- 一定要有一个闭合的标签 -->
        template:`
            <div>
                <div>
                    <Vheader> </Vheader>
                    <div>
                       <Vaside />
                       <Vcontent/>
                    </div>
                </div>
                <h3>{{msg}}</h3>
                <button @click='handleClick'> 按钮</button>
            </div>
        `,
        methods:{
            handleClick(){
                this.msg='学习局部组件';
            }
        },
        components: {
            Vcontent,
        }
    }
    var a = new Vue({
        el:'#App',
        data:{},
        components: {
            //  挂载子组件
            App,
        },
    })
</script>
全局组件的创建和使用
vue 提供的监听触发事件 把输出的值,通过事件抛出给父组件
this.$emit('inputHandler',val)
 $on 绑定事件
 $emit 触发事件
provide 和 inject
<div id="App">
    <!--    //  3. 使用子组件-->
    <App> </App>
</div>
<script src="../vue.js" ></script>
<script>
    // provide
    // inject
    // 父组件 provide 来提供变量, 然后再子组件中通过inject 来注入变量,无论组件嵌套多深
    //  做了个中间传递者的功能  中央事件总线
    var c = new Vue
    //  这里的this  是这个A子组件本身的this
    Vue.component('AA',{
        template:`
            <div>AA 使用provide 和 inject -> : {{msg}}</div>
        `,
        inject:["msg"]

    })
    Vue.component('A',{
        // data(){
        //     return{
        //         msg:"provide + inject ->  A -> AA -> A "
        //     }
        // },
        template: `
            <div>
                <AA></AA>
                <button @click="countNumber">购物车+1</button>
            </div>
        `,
        methods:{
            countNumber(){
                //  $emit   触发事件
                c.$emit('add',1)
            }
        }
    })
    //  这里的this  是这个B子组件本身的this
    Vue.component('B',{
        data(){
            return {
                number:0
            }
        },
        template:`
            <div>  {{number}} </div>
        `,
        // 组件创建
        created(){
            //  $on     绑定事件
            //  $emit   触发事件
            c.$on('add',(n)=>{
                this.number+=n;
            })
        }
    })

    const App ={
        data(){
            return {}
        },
        // 需要绑定一个属性    ( : 属性, @ 事件 )
        template:`
                <div>
                    <A></A>
                    <B></B>
                </div>
        `,
    }
    new Vue({
        el:'#App',
        data:{ },
        provide(){
            return {
                msg:"provide + inject -> App-> A -> AA "
            }
        },
        components: {
            //  挂载子组件
            App,
        },
    })
</script>
匿名插槽
<slot></slot>
具名插槽
<slot name="aa"></slot>
作用域插槽
有时让插槽内容能够访问子组件中才有的数据是很有用的
生命周期
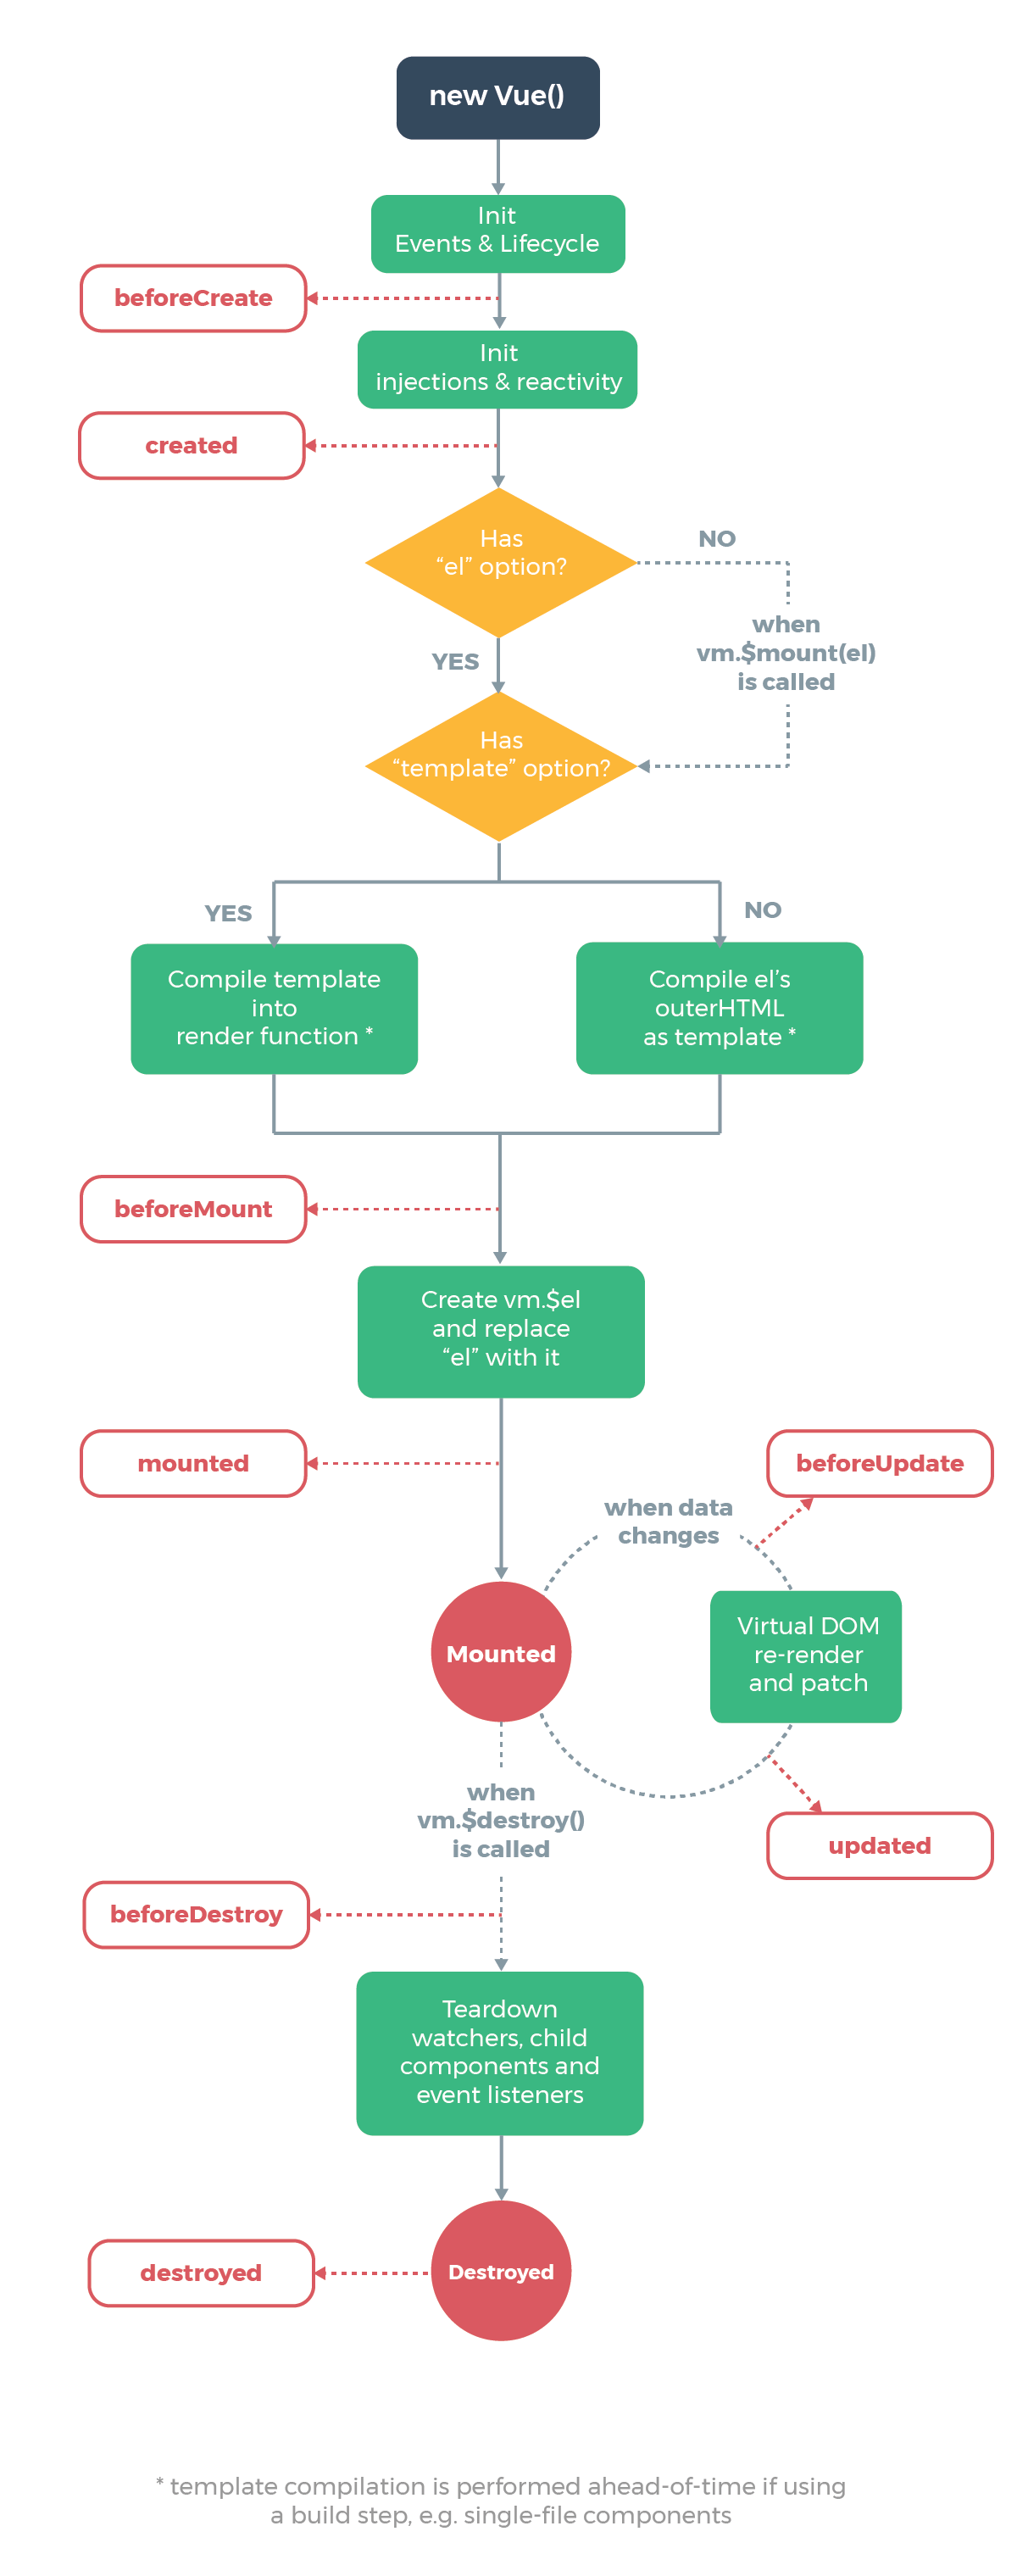
- beforeCreate
- created
- beforeMount
- mounted
- beforeUpdate
- updated
- activated 激活
- deactivated 停用
- 需要配合 keep-alive 保存在内存中
- beforeDestroy
- destroyed
<div id="App">
    <!--    //  3. 使用子组件-->
    <App></App>
</div>
<script src="../vue.js" ></script>
<script>
    // beforeCreate
    // created
    // beforeMount
    // mounted
    // beforeUpdate
    // updated
    // activated    激活
    // deactivated  停用
    // 需要配合 keep-alive  保存在内存中
    // beforeDestroy
    // destroyed
    Vue.component('test',{
        data() {
            return {
                msg:"你辉哥哥哥",
                isRed:false
            };
        },
        methods:{
            handleClick(){
                this.msg = "Appyourpapa";
                this.isRed = !this.isRed ;
            }
        },
        template: `
            <div>
                <button @click="handleClick">改变</button>
                <h3 :class='{active:isRed}'>{{msg}}</h3>
            </div>
        `,
        beforeCreate(){
            console.log("组件创建之前 -> beforeCreate",this.$data )
        },
        created(){
            // 非常重要的事情,在此时发送ajxa 请求后端数据
            console.log("组件创建完成 -> create", this.$data)
        },
        beforeMount(){
            console.log("组件挂载之前 -> beforeMount", document.getElementById("app"))
        },
        mounted(){
            console.log("组件挂载完成 -> Mount", document.getElementById("app"))
        },
        beforeUpdate(){
            console.log("组件更新之前的DOM -> beforeUpdate", )
        },
        updated(){
            console.log("组件更新完成的DOM -> updated", )
        },
        beforeDestroy(){
            console.log("组件销毁之前的DOM -> beforeDestroy")
        },
        destroyed(){
            console.log("组件销毁完成的DOM -> destroyed")
        },
        activated(){
            console.log("组件被激活了 -> activated")
        },
        deactivated(){
            console.log("组件被停用了 -> deactivated")
        },
    })
    const App ={
        data(){
            return {
                isShow:true
            }
        },
        methods: {
            clickHandler(){
                this.isShow = !this.isShow;
            },
        },
        // 一定要有一个闭合的标签
        // 需要绑定一个属性    ( : 属性, @ 事件 )
        template:`
            <div>
                <keep-alive>
                    <test v-if="isShow"></test>
                </keep-alive>
                <button @click="clickHandler">销毁和创建</button>
            </div>
        `
    }
    new Vue({
        el:'#App',
        data:{ },
        provide(){
            return {
                msg:"provide + inject "
            }
        },
        components: {
            //  挂载子组件
            App,
        },
    })
</script>
异步组件加载
<script src="../vue.js" ></script>
<script type='module'>

    const App ={
        data(){
            return {
                isShow:false
            }
        },
        methods: {
            clickHandler(){
                this.isShow = !this.isShow;
            },
        },
        components:{
            test:()=>import('./test.js')
        },
        template:`
            <div>
                <test v-if="isShow"></test>
                <button @click="clickHandler">异步加载</button>
            </div>
        `,
    }
    new Vue({
        el:'#App',
        data:{ },
        provide(){
            return {
                msg:"provide + inject "
            }
        },
        components: {
            App,
        },
    })
</script>
refs的使用
访问子组件实例或子元素
有的时候你仍可能需要在 JavaScript 里直接访问一个子组件。为了达到这个目的,你可以通过 ref 这个 attribute 为子组件赋予一个 ID 引用。例如:
<base-input ref="usernameInput"></base-input>
现在在你已经定义了这个 ref 的组件里,你可以使用:
this.$refs.usernameInput
来访问这个` <base-input> `实例,以便不时之需。比如程序化地从一个父级组件聚焦这个输入框。在刚才那个例子中,该 <base-input> 组件也可以使用一个类似的 ref 提供对内部这个指定元素的访问,例如:
<input ref="input">
甚至可以通过其父级组件定义方法:
methods: {
  // 用来从父级组件聚焦输入框
  focus: function () {
    this.$refs.input.focus()
  }
}
允许父级组件通过下面的代码聚焦 `<base-input> `里的输入框:
this.$refs.usernameInput.focus()
当 ref 和 v-for 一起使用的时候,你得到的 ref 将会是一个包含了对应数据源的这些子组件的数组。
nextTick的使用 和 应用
    <div id="App">
        <!--    //  3. 使用子组件-->
        <App></App>
    </div>
<script src="../vue.js" ></script>
<script >

    // 在页面上拉取一个接口,这个接口返回一些数据,这些数据是这个页面的一个浮层组件要依赖的,
    // 然后我在接口一返回数据就展示了这个浮层组件,展示的同时
    // 上报一些数据给后台(这些数据是父组件从接口拿的)
    // 这个时候,神奇的事情发生了,虽然拿到了数据,但是浮层展现的时候,
    // 这些数据还未更新到组件去,上报失败

    const Pop = {
        data(){
            return{
                isShow:false,
            }
        },
        props:{
            name : {
                type: String,
                default:'',
            },
        },
        template:`
            <div v-if="isShow">
                {{name}}
            </div>
        `,
        methods:{
            show(){
                // 弹窗组件展示
                this.isShow = true;
                console.log(this.name);
            }
        }
    }
    const App=({
        data(){
            return{
                name :""
            }
        },
        created(){
            // 模拟异步请求
            setTimeout(()=>{
                    // 更新数据
                    this.name = "huige"
                    this.$nextTick(()=>{
                        this.$refs.pop.show();
                    })
                    // this.$refs.pop.show();
                },1000);
        },
        components:{
            Pop
        },
        template: `
            <pop ref="pop" :name="name"></pop>
        `
    })

    var vm = new Vue({
        el:'#App',
        components: {
            App
        }
    })
</script>
对象变更检测注意事项
<div id="App">
    <h3>
        {{user.name}}, {{user.age}}, {{user.phone}}
        <button @click="handlerAdd">添加响应式属性</button>
    </h3>
</div>
<script src="../vue.js" ></script>
<script >
    //  Vue 不能检测对象属性的添加和删除
    new Vue({
        el:'#App',
        data:{
          user:{}
        },
        methods:{
            handlerAdd(){
                this.user.age = 20
                // 添加响应式属性, 只有 添加或者删除 有效
                //  vue 的方法需要都要加 $
                //1.  Vue.$set(object, key, value)
                // this.$set(this.user,"age",20)
                // 2. Object.assign 方法
                this.user = Object.assign({}, this.user,{
                    age:200,
                    phone:110,
                })
            }
        },
        created(){
          setTimeout(()=>{
              this.user={name:"我是你爸爸"}
          },2000)
        },
    })
</script>
mixin混入技术
    // 一个公共的组件
    const mymixin={
        data(){
            return{
                msg:"asd"
            }
        },created(){
            this.hello();
        },
        methods:{
            hello(){
                console.log("hello mixin")
            }
        }
    }
    new Vue({
        el:'#app',
        data(){
        return {
            msg1:"huige"
        }
    },
    created(){
        console.log("aaa")
    },
    //  mixin 来分发Vue 组件中 的可复用 功能!
    mixins:[mymixin],
    })
mixin混入技术应用
<div id="app"> </div>
<script src="../vue.js" ></script>
<script>

    // 模态框 和 提示框  逻辑程序的复用
    // 全局的mixin 每个创建的组件都会被调用。
    // 用法    Vue.mixin({})

    const allData={
        data() {
            return {
                isShow:false
            }
        },
        methods:{
            allData(){
                this.isShow= !this.isShow
            }
        }
    }
    const MoDuleData= {
        template:`
            <div v-if='isShow'>
                <h1> 模态框 </h1>
            </div>
        `,
        mixins:[allData]
    }
    const ToolData = {
        template:`
            <div v-if='isShow'>
                <h4> 提示框 </h4>
            </div>
        `,
        mixins:[allData]
    }
    new Vue({
        el:'#app',
        data:{},
        components:{
            MoDuleData,
            ToolData,
        },
        template:`
            <div>
                <button @click="handlemoduel">模态框</button>
                <button @click="handletool">提示框</button>
                <MoDuleData ref='modulea'></MoDuleData>
                <ToolData ref='toola'></ToolData>
            </div>
        `,
        methods: {
            handlemoduel(){
                this.$refs.modulea.allData();
            },
            handletool(){
                this.$refs.toola.allData();
            },
        }
    })
</script>