springMVC基础知识(一)---入门
SpringMVC:
Spring Web MVC是一种基于Java的实现了Web MVC设计模式的请求驱动类型的轻量级Web框架,即使用了MVC架构模式的思想,将web层进行职责解耦,基于请求驱动指的就是使用请求-响应模型,框架的目的就是帮助我们简化开发,Spring Web MVC也是要简化我们日常Web开发的。
具体介绍可以访问 http://jinnianshilongnian.iteye.com/blog/1594806
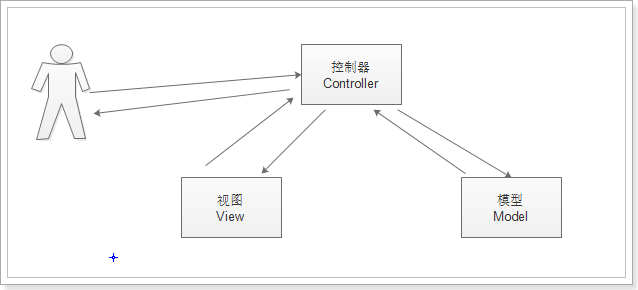
什么是MVC设计模式
当用户发出请求的时候,控制器根据请求来选择要处理的业务逻辑和要选择的数据,再返回去把结果输出到视图层,这里可能是进行重定向或转发等.

SpringMVC的架构

1、 用户发出请求到SpringMVC的前端控制器
2、 通过HandlerMapping查找Handler
3、 返回执行链
a) Handler对象
b) 拦截器数组(list)
4、 通过适配器对Handler对象进行包装,调用Handler
5、 处理用户的请求
6、 返回ModelAndView对象
a) Model数据
b) 视图名称,不是真正的视图对象
7、 将ModelAndView对象返回到前端控制器
8、 通过视图名称在视图解析器中查找视图对象
9、 返回真正的视图对象
10、 前端控制器拥有了模型数据和视图对象,进行视图渲染
11、 返回渲染后的视图
12、 给用户产生响应
废话不多说让我们先搭建环境实现第一个小案例吧
搭建环境
1.导入相应的jar包

jar包可以去官网下载,为了方便应用直接给吧 http://pan.baidu.com/s/1kUTPxyf
2.在WebRoot/WEB-INF/lib的web.xml文件中增加一个servlet
<?xml version="1.0" encoding="UTF-8"?>
<web-app version="2.5"
    xmlns="http://java.sun.com/xml/ns/javaee"
    xmlns:xsi="http://www.w3.org/2001/XMLSchema-instance"
    xsi:schemaLocation="http://java.sun.com/xml/ns/javaee
    http://java.sun.com/xml/ns/javaee/web-app_2_5.xsd">

        <!--   增加一段内容    -->
     <servlet>
        <servlet-name>springmvc</servlet-name>
        <servlet-class>org.springframework.web.servlet.DispatcherServlet</servlet-class>
        <init-param>
              <param-name>contextConfigLocation</param-name>
              <param-value>classpath:springmvc.xml</param-value>
          </init-param>
          <!-- <load-on-startup>1</load-on-startup> -->
    </servlet>

    <servlet-mapping>
        <servlet-name>springmvc</servlet-name>
        <url-pattern>/</url-pattern>
    </servlet-mapping>


  <welcome-file-list>
    <welcome-file>index.jsp</welcome-file>
  </welcome-file-list>
</web-app>
3.导入springmvc.xml
<?xml version="1.0" encoding="UTF-8"?>
<beans xmlns="http://www.springframework.org/schema/beans"
    xmlns:xsi="http://www.w3.org/2001/XMLSchema-instance"
    xmlns:context="http://www.springframework.org/schema/context"
    xmlns:mvc="http://www.springframework.org/schema/mvc"
    xsi:schemaLocation="http://www.springframework.org/schema/beans http://www.springframework.org/schema/beans/spring-beans.xsd
        http://www.springframework.org/schema/context http://www.springframework.org/schema/context/spring-context-4.1.xsd
        http://www.springframework.org/schema/mvc http://www.springframework.org/schema/mvc/spring-mvc-4.1.xsd">

  <!-- if you use annotation you must configure following setting -->
    <mvc:annotation-driven />
    <!-- scan the package and the sub package -->
    <context:component-scan base-package="com.hzp.controller"/>

   <!-- configure the InternalResourceViewResolver -->
  <bean class="org.springframework.web.servlet.view.InternalResourceViewResolver"
            id="internalResourceViewResolver">
        <property name="prefix" value="/WEB-INF/jsp/" />
        <property name="suffix" value=".jsp" />
    </bean>

</beans>
4.编写controller层

package com.hzp.controller;

import org.springframework.stereotype.Controller;
import org.springframework.web.bind.annotation.RequestMapping;

@Controller
@RequestMapping("/mvc")
public class HelloCtrl {

        @RequestMapping("/test")
        public String test(){
            System.out.println("执行了test请求");
             return "hello";
             // /jsp/ + hello + .jsp
        }
}
5新建一个jsp连接

在index.jsp中加个连接
<a href="mvc/test">访问 test页面</a>
在WebRoot/WEB-INF/jsp建个hello.jsp
<body>
      欢迎 。。。。。 进来 。。。
  </body>
测试

点击

以上只是个人学习记录,不足之处还望指出。