最近项目中有一个通讯录的模块,为了使体验效果更佳,和系统通讯录一样可以分组索引,于是自己用framlayout,嵌套listview和分组索引的布局方式实现的
我的代码中,写了两个界面实现,其中一个是添加对象list,另一个是string数组用到了排序,具体逻辑也不一样,我推荐使用前者;
先贴张效果图;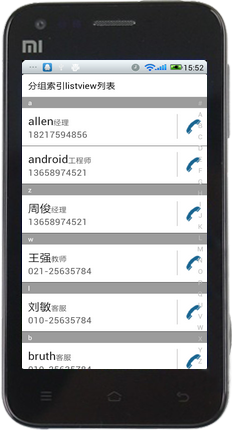
下面就说下我的实现思路和具体代码:
布局文件如下:

 1 <LinearLayout xmlns:android="http://schemas.android.com/apk/res/android"
 2     android:layout_width="fill_parent"
 3     android:layout_height="match_parent"
 4     android:background="#ffffff"
 5     android:orientation="vertical" >
 6
 7     <TextView
 8         android:layout_width="fill_parent"
 9         android:layout_height="wrap_content"
10         android:padding="10dp"
11         android:textColor="#000"
12         android:textSize="16sp"
13         android:text="分组索引listview列表" />
14
15     <FrameLayout
16         android:layout_width="match_parent"
17         android:layout_height="match_parent"
18         android:background="#ffffff" >
19
20         <ListView
21             android:id="@+id/listView1"
22             android:layout_width="match_parent"
23             android:layout_height="wrap_content" >
24         </ListView>
25
26         <TextView
27             android:id="@+id/tv"
28             android:layout_width="60dp"
29             android:layout_height="60dp"
30             android:layout_gravity="center"
31             android:background="#f0606060"
32             android:gravity="center"
33             android:text="A"
34             android:textColor="#ffffff"
35             android:textSize="30sp" />
36
37         <LinearLayout
38             android:id="@+id/layout"
39             android:layout_width="wrap_content"
40             android:layout_height="fill_parent"
41             android:layout_gravity="right"
42             android:background="#d7d7d7"
43             android:gravity="center"
44             android:orientation="vertical" >
45         </LinearLayout>
46     </FrameLayout>
47
48 </LinearLayout>
图上看到的字母索引列表,是用过动态生成的,首先需要一个存放英文字母的数组
其中,给最外面的linearlayout添加onTouch事件,滑动时获取当前滑动的是哪一个字母索引,然后在listview查找item中存在的字段显示在最前面
 1     /** 绘制索引列表 */
 2     public void getIndexView() {
 3         LinearLayout.LayoutParams params = new LayoutParams(
 4                 LayoutParams.WRAP_CONTENT, height);
 5         // params.setMargins(10, 5, 10, 0);
 6         for (int i = 0; i < str.length; i++) {
 7             final TextView tv = new TextView(this);
 8             tv.setLayoutParams(params);
 9             tv.setText(str[i]);
10             // tv.setTextColor(Color.parseColor("#606060"));
11             // tv.setTextSize(16);
12             tv.setPadding(10, 0, 10, 0);
13             layoutIndex.addView(tv);
14             layoutIndex.setOnTouchListener(new OnTouchListener() {
15
16                 @Override
17                 public boolean onTouch(View v, MotionEvent event)
18
19                 {
20                     float y = event.getY();
21                     int index = (int) (y / height);
22                     if (index > -1 && index < str.length) {// 防止越界
23                         String key = str[index];
24                         if (adapter.getSelector().containsKey(key)) {
25                             int pos = adapter.getSelector().get(key);
26                             if (listView.getHeaderViewsCount() > 0) {// 防止ListView有标题栏,本例中没有。
27                                 listView.setSelectionFromTop(
28                                         pos + listView.getHeaderViewsCount(), 0);
29                             } else {
30                                 listView.setSelectionFromTop(pos, 0);// 滑动到第一项
31                             }
32                             tv_show.setVisibility(View.VISIBLE);
33                             tv_show.setText(str[index]);
34                         }
35                     }
36                     switch (event.getAction()) {
37                     case MotionEvent.ACTION_DOWN:
38                         layoutIndex.setBackgroundColor(Color
39                                 .parseColor("#606060"));
40                         break;
41
42                     case MotionEvent.ACTION_MOVE:
43
44                         break;
45                     case MotionEvent.ACTION_UP:
46                         layoutIndex.setBackgroundColor(Color
47                                 .parseColor("#00ffffff"));
48                         tv_show.setVisibility(View.INVISIBLE);
49                         break;
50                     }
51                     return true;
52                 }
53             });
54         }
55     }
然后关键的地方是在adapter中
1)中间显示对应的分组字母,通过隐藏和显示的方式控制
2)遍历字母数组和当前数据源,将对应字母在adapter中的position保存起来

package com.allen.indexablelist;

import java.util.HashMap;
import java.util.List;
import java.util.Map;

import android.content.Context;
import android.view.LayoutInflater;
import android.view.View;
import android.view.ViewGroup;
import android.widget.BaseAdapter;
import android.widget.ImageView;
import android.widget.TextView;

/** 实现Filterable接口,编写过滤规则 */
public class NoteBookadapter extends BaseAdapter {
    private Context ctx;
    private ViewHolder holder;
    List<NoteBookItem> list;
    Map<String, Integer> selector;//键值是索引表的字母,值为对应在listview中的位置
    /** 字母表 */
    String index[];

    public NoteBookadapter(Context context, List<NoteBookItem> list,
            String[] index) {
        this.ctx = context;
        this.list = list;
        this.index = index;
        selector = new HashMap<String, Integer>();
        for (int j = 0; j < index.length; j++) {// 循环字母表,找出list中对应字母的位置
            for (int i = 0; i < list.size(); i++) {
                if (list.get(i).index.equals(index[j].toLowerCase()))
                    selector.put(index[j], i);
            }

        }
    }

    @Override
    public int getCount() {
        // TODO Auto-generated method stub
        return list.size();
    }

    @Override
    public Object getItem(int arg0) {
        // TODO Auto-generated method stub
        return list.get(arg0);
    }

    @Override
    public long getItemId(int position) {
        // TODO Auto-generated method stub
        return 0;
    }

    @Override
    public View getView(int position, View convertView, ViewGroup parent) {
        try {
            if (convertView == null) {
                holder = new ViewHolder();
                convertView = LayoutInflater.from(ctx).inflate(
                        R.layout.note_item, null);
                holder.tv1 = (TextView) convertView.findViewById(R.id.tv1);
                holder.tv2 = (TextView) convertView.findViewById(R.id.tv2);
                holder.iv = (ImageView) convertView.findViewById(R.id.iv_phone);
                holder.tv3 = (TextView) convertView.findViewById(R.id.tv3);
                holder.layout = convertView.findViewById(R.id.layout);
                holder.index = (TextView) convertView
                        .findViewById(R.id.tv_index);
                convertView.setTag(holder);
            } else {
                holder = (ViewHolder) convertView.getTag();
            }
            // 绑定数据
            NoteBookItem item = list.get(position);
            holder.tv1.setText(item.name);
            if (item.number.equals("null"))
                holder.tv2.setText(item.mobile);
            else
                holder.tv2.setText(item.number);
            holder.tv3.setText(item.call);

            // 显示index
            String currentStr = item.index;
            // 上一项的index
            String previewStr = (position - 1) >= 0 ? list.get(position - 1).index
                    : " ";
            /**
             * 判断是否上一次的存在
             */
            if (!previewStr.equals(currentStr)) {
                holder.index.setVisibility(View.VISIBLE);
                holder.index.setText(currentStr);//中奖提示的文本显示当前滑动的字母
            } else {
                holder.index.setVisibility(View.GONE);
            }
        } catch (OutOfMemoryError e) {
            Runtime.getRuntime().gc();
        } catch (Exception ex) {
            // handler.sendEmptyMessage(CommonMessage.PARSE_ERROR);
            ex.printStackTrace();
        }
        return convertView;
    }

    class ViewHolder {
        ImageView iv;
        TextView tv1;
        TextView tv2;
        TextView tv3;
        View layout;
        /** 索引字母 */
        TextView index;
    }

    public Map<String, Integer> getSelector() {
        return selector;
    }

    public void setSelector(Map<String, Integer> selector) {
        this.selector = selector;
    }

    public String[] getIndex() {
        return index;
    }

    public void setIndex(String[] index) {
        this.index = index;
    }
}
最后我把代码贴上点击下载:我这种方式实现虽然跟大牛写的不一样,但是基本功能实现了就行